
Enjoy Your Thanksgiving Day!
Leave a reply

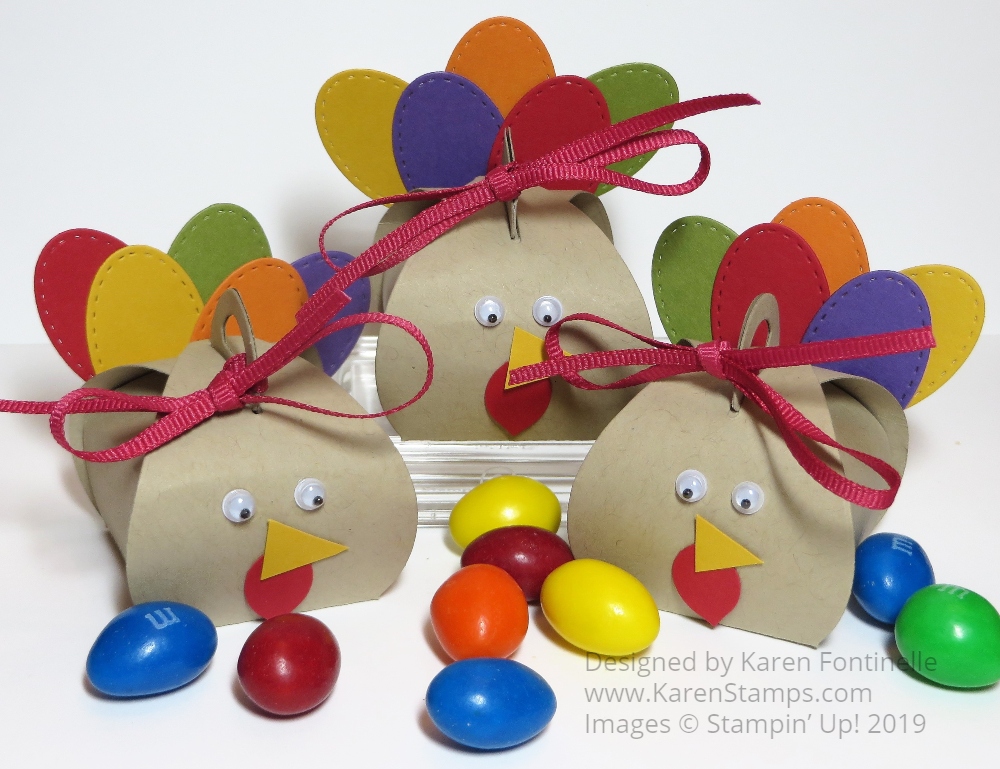
At least these three turkeys are done for Thanksgiving (but not the real one!). These Mini Curvy Keepsake Turkey Box Treats For Thanksgiving are quick and easy to make and you could make any number of variations. There are so many cute little things you can make for lots of occasions with the Mini Curvy Keepsake Box Dies!
I always think these take two pieces to make but they do not…..just one die cut! You just need a piece of cardstock 6″ wide and turn the die so the points of the die-cut “point” to the corners of the cardstock, not straight up and down, and the die will fit. I used Crumb Cake Cardstock but Soft Suede would be another good choice for the turkey.
To make the tail feathers, I just used the oval tag die-cut in the package of the Mini Curvy Keepsake Box Dies. It does have a little hole in the tag, but I just put that at the base of the feather and it’s not seen. I started to glue the feathers right onto the body but then I thought to punch a 1 1/2″ Circle of Crumb Cake Cardstock and adhere the two rows of feathers on to that and then that onto the turkey body. You could also use colored leaves die cuts or even just strips of cardstock in various colors.
For the turkey face, I just used some stick-on googley eyes and cut a little turkey beak out of Crushed Curry. For the wattle, I punched out a sprig from the Leaf Punch and then cut off the leaves and used those for the turkey wattle. Just use and do whatever you think up or have on hand!
Don’t forget to put a little treat inside! I also tied on a piece of Lovely Lipstick 1/8″ Grosgrain Ribbon partly to hold the box closed for sure and mostly just for another little something to jazz up the turkey box!
You could make one for each of your guests at Thanksgiving and place them at their seat at the table. Or even put a little strip with the guest’s name on it at the bottom of the front of the turkey for a place card. I used to always love to make place cards for the table when I was a little girl!
If you are hosting Thanksgiving dinner, make a fun little treat or favor like these Mini Curvy Keepsake Turkey Box Treats For Thanksgiving or take a few for your hostess!
Have a Happy Thanksgiving!

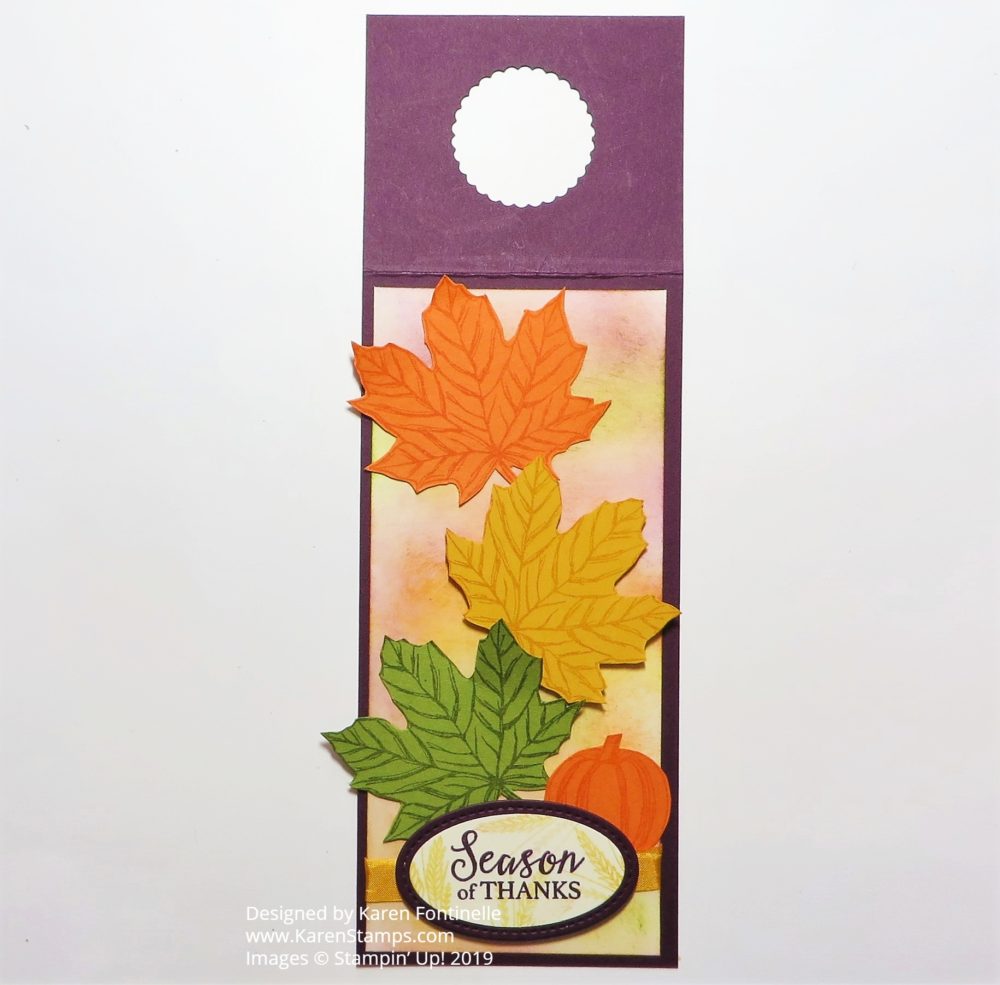
Thanksgiving will be here soon, although this idea can be used at any time of the year, and perhaps if you are going to someone else’s home, you might like to take a hostess gift such as a bottle of wine or other beverage. Rather than just take an ordinary bottle of wine, decorate it with your personal touch by making a Gather Together Fall Wine Bottle Tag such as this one. You can make it as easy and simple or as fancy as you like!
The basic idea is a piece of cardstock to hang down the partial length of the bottle with a score line at the top with a punched hole to make the hanger. Without the score line, the tag would just hang and stick out. You may need to alter these measurements to fit your bottle, but the project is easy enough to understand and you can make adjustments for your individual project.
For this exact project, I began with a piece of Blackberry Bliss Cardstock 9″ x 3″. It is scored at 2 1/2″ down from the top. You can either eyeball the center or measure accurately to find the center of this top portion in order to punch a hole to go over the wine bottle. I used a 1 3/8″ Scallop Circle Punch to make the hole. You could also use a circle die.
Next, I cut a piece of Very Vanilla Cardstock to layer on the Blackberry Bliss Cardstock at 6 1/4″ x 2 3/4″. I stamped three leaves with the Gather Together Stamp Set in the same color ink as the cardstock in Pumpkin Pie, Crushed Curry, and Old Olive. If you have the Gathered Leaves Dies, you can die cut the leaves, or if not, just use Paper Snips to cut out by hand (as I did!). The pumpkin is also stamped and cut out.
The greeting is stamped from the Gather Together Stamp Set in Blackberry Bliss Ink and lightly stamped in Crushed Curry with the little wheat stamp for a little interest. It is die-cut with the Layering Ovals Dies and layered on a Stitched Shapes oval die. I put a piece of underneath the popped up greeting.
As I laid out the design of the tag, I decided to add some color to the Very Vanilla layer on the Blackberry Bliss. I simply took a sponge and sponged on some Pumpkin Pie Ink, Crushed Curry Ink, Old Olive Ink, and Blackberry Bliss Ink very lightly. It just adds a little more of a fall look.
I sponged on these colors, then adhered the Crushed Curry 3/8″ Crinkled Seam Binding Ribbon under the popped up greeting at the bottom of the tag. Next, I placed the leaves with the top and bottom leaves being adhered straight on to the tag and the middle one popped up on Stampin’ Dimensionals. I also tucked in the little stamped pumpkin by the greeting and leaf.
Here are another bottle tag I made in the past and another to give you other ideas and see how easy they are to make! And like I said, they could be designed for a birthday celebration or other occasion.
Here is a photo of the entire tag not hanging on the wine bottle to see how the top is made.
If you wanted to take an extra little hostess gift, you could also make an assortment of cards that matched the colored leaves and design on the tag. Give this little project a try and then keep it in mind when you are going somewhere and want to take a gift!
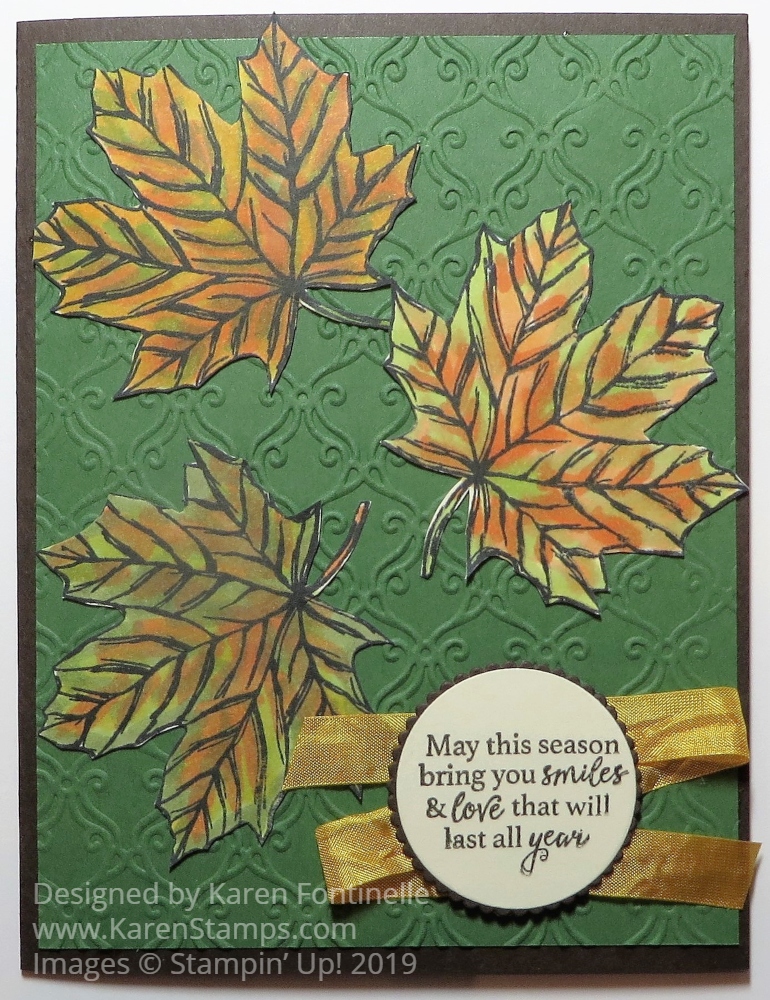
This Gather Together Fall Leaves Card is a fairly easy one to make to show off the beautiful colors of autumn. I’m pretty sure I got this idea from another Demonstrator but I think I changed it up a little bit. I don’t remember where I saw the idea, but of course, the internet is full of ideas if you don’t have your own!
Fall is such a great season with all the beautiful colors and symbols such as colored leaves, pumpkins, scarecrows, fall flowers, etc. For this card, I made colored leaves by stamping with Stazon Ink in Black and then coloring in with various colors of Stampin’ Write Markers. I believe I used a little bit of yellow, a couple of greens, and some orange. If you start with the lightest color then you can color over with increasingly darker colors without picking up dark ink on a light marker.
The leaves are stamped with the Gather Together Stamp Set. I don’t own the Gathered Leaves Dies so I just cut out the leaves by hand. The greeting is also in the stamp set. It is stamped in Early Espresso Ink and layered on a scalloped circle of Early Espresso. The Crushed Curry Crinkled Seam Binding ribbon is placed in a fun way. Just go back and forth behind the greeting and hold it down either with Snail Adhesive or put Stampin’ Dimensionals on the back.
The card base is Early Espresso and the cardstock layer is (I think, cuz I already mailed it!) Garden Green. You could use any green that you like. It is embossed with the very pretty Stylish Scroll Embossing Folder. This folder can provide a beautiful background for many cards.
On the inside of the card, you may need to put a Whisper White or Very Vanilla layer so you can stamp a greeting or especially write a personal note with the dark cardstock. Stamp a leaf or something from the stamp set inside or add a matching strip of cardstock to decorate the inside a little bit.
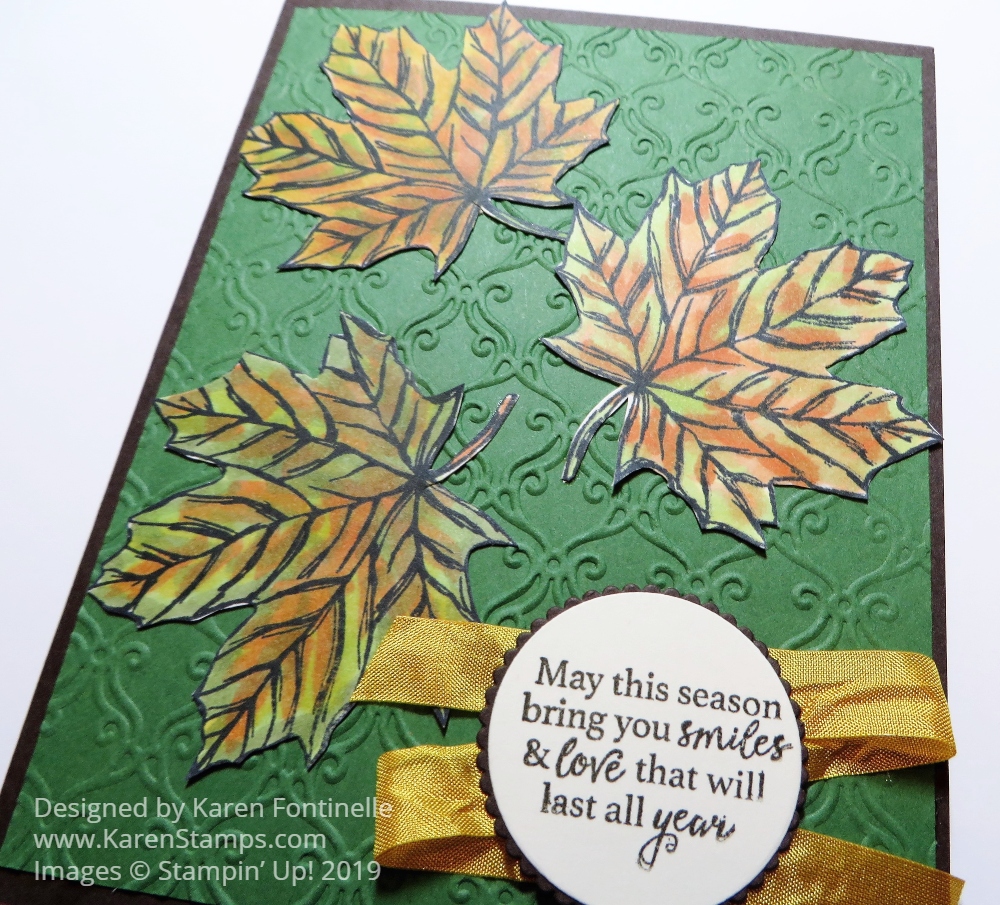
Here is a closeup of the card so you can see the nice embossing design.
Have fun coloring some fall leaves and decorating your cards or projects with them. If you want to use Stampin’ Blends for coloring, stamp with Memento Ink. We are in the thick of autumn right now so you can make cards like this Gather Together Fall Leaves Card for birthdays or even the upcoming Thanksgiving holiday. Just change the greeting for whatever occasion you need.
Sometimes you feel a little bit pleased with yourself when you make a card that turns out better than you expected and this card is one of those! I wasn’t really exactly sure what I was going to do with this stamp and probably expected to make a less colorful card. When I saw this paper I decided it would be a card for fall with the autumn colors.
This stamp is from the Nature’s Beauty Stamp Set, found on the inside of the last page of the Holiday Catalog. You might not have even noticed it way back there, but there is something important about this stamp set! Stampin’ Up! is donating $3 of every sale to mental health organizations. So while you can have fun stamping and using this set, you will know you are making a difference in the lives of others.
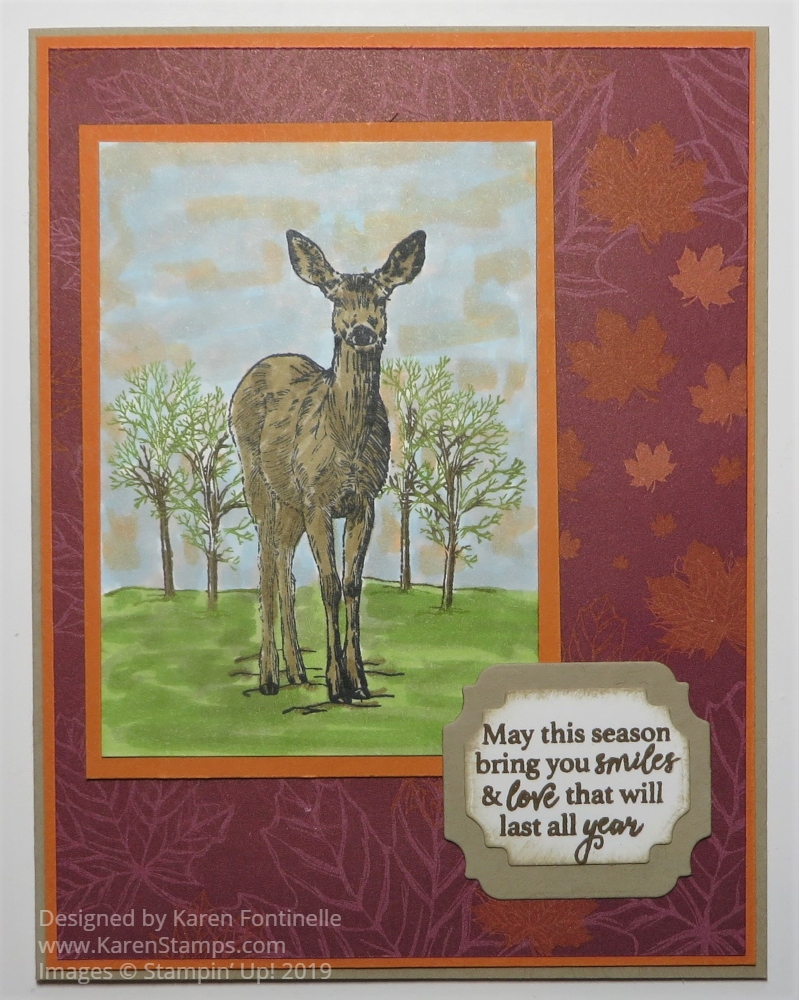
I stamped the deer in Memento Black Ink because I knew I would color him in with my Stampin’ Blends markers. That led to coloring in the sky a little bit with about three different colors. When you do this, when you start out it looks like you are making a scribbly mess! But just keep going and as the colors blend together it will likely turn out fine. I started with just kind of scribbling in with Balmy Blue Light, then some Pumpkin Pie Light, and some Gray Granite Light. As I said, it looks like the sky is going to not turn out, but then it does. I really like the way it looks now! You can experiment with whatever colors you have or you like.
The deer is colored with the Crumb Cake markers and maybe I added a bit of Soft Suede. After I stamped the deer on the Whisper White piece of cardstock, I stamped again on a piece of scrap paper, then cut it out just inside the stamped lines. This gave me a “mask” to place directly over the deer to I could stamp the trees on each side of him without stamping over the deer. To stamp the trees, I used my Stampin’ Write Markers, two colors of green on the leaves and then a dark brown for the trunk and a few branches. I colored directly on the stamp so I could have the greens on the leaves and the brown on the tree trunk. The grass I colored the same way as the sky with just a couple of green shades.
The designer paper is from the Come To Gather Designer Series Paper. When I saw this orangish paper with the colored and outlined leaves I knew it would be perfect with the deer. The greeting is stamped in Early Espresso Ink on Whisper White that is sponged a little bit around the edges with Crumb Cake Ink and layered on a piece of Crumb Cake Cardstock. Both the die-cut shapes are from the Ornate Frames Dies. The greeting is in the Gather Together Stamp Set.
The card base is Crumb Cake with layers of Pumpkin Pie Cardstock. Even though Pumpkin Pie is not one of the coordinating colors with this designer paper, I thought it looked good on the card and brought out some of the lighter orange colors.
You could send this card to someone any time from now on through Thanksgiving. It would make a great masculine birthday card or just a card with a note inside, also.
Consider putting this stamp set, Nature’s Beauty, on your order and know that you and your stamping may be a part of helping someone.
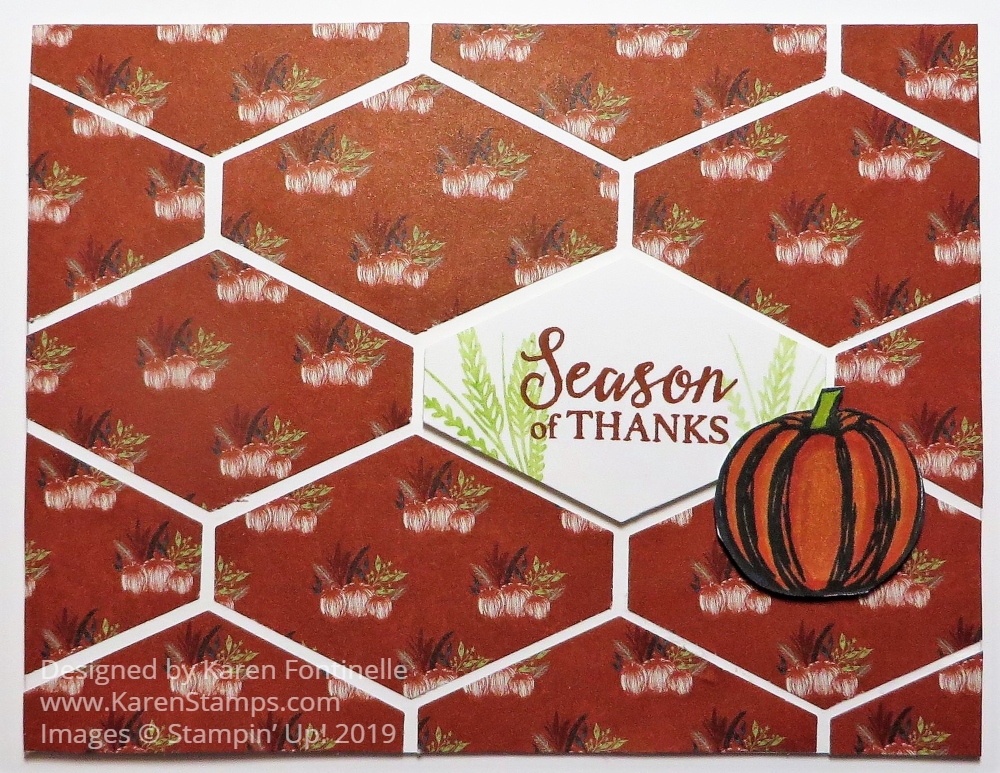
I’ve made and seen cards like this Geometric Card For Fall With the Tailored Tag Punch and saw one recently online. I changed the kind of paper to make it look like fall, added the greeting, a little stamping and of course, a pumpkin! What says fall more than a pumpkin?! You could make and send this card now just for fall, a card for someone who doesn’t celebrate Halloween, or save it for closer to Thanksgiving. You can also make this same card with different paper and a different greeting for a birthday or lots of other occasions.
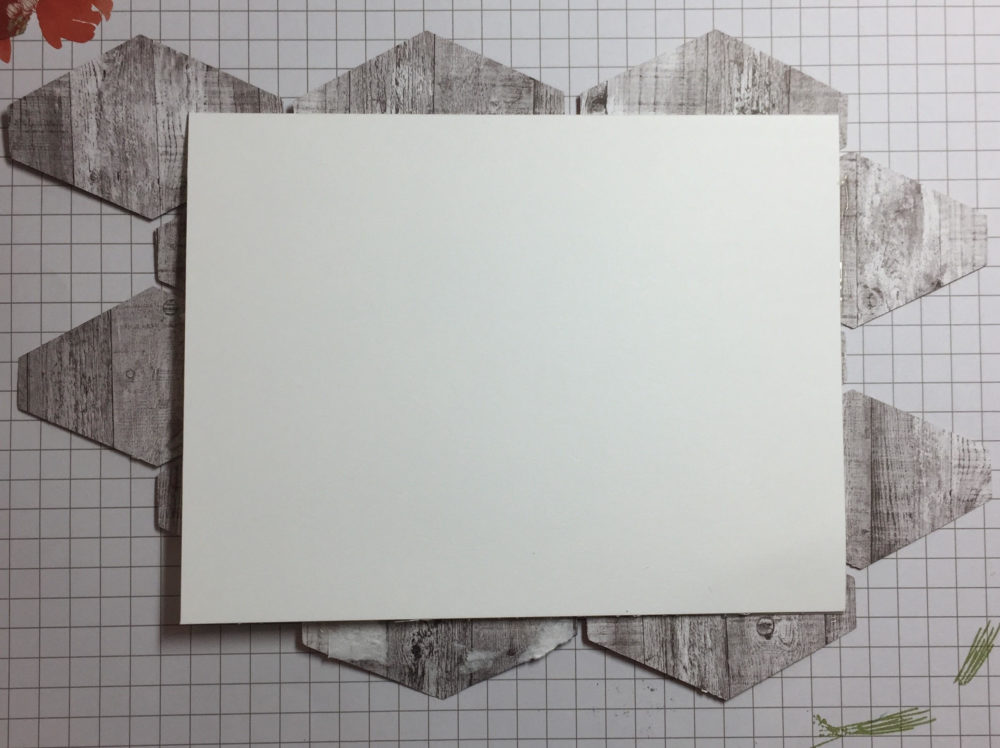
The card base is Whisper White Thick Cardstock to give it a little heft. The paper is the Come To Gather Designer Series Paper, the pattern with little groupings of pumpkins. You might think this card would be difficult to make, fitting in all those pieces like a puzzle! But no, you just start somewhere and space out the punched pieces, allowing them to hang out over the edge of the cardstock underneath. After you have them placed how you like, glue them down. Turn the paper over and trim off the excess hanging off the edges. Check out the photos below to see how I did this layout and then trimmed off the pieces hanging over on the other side.
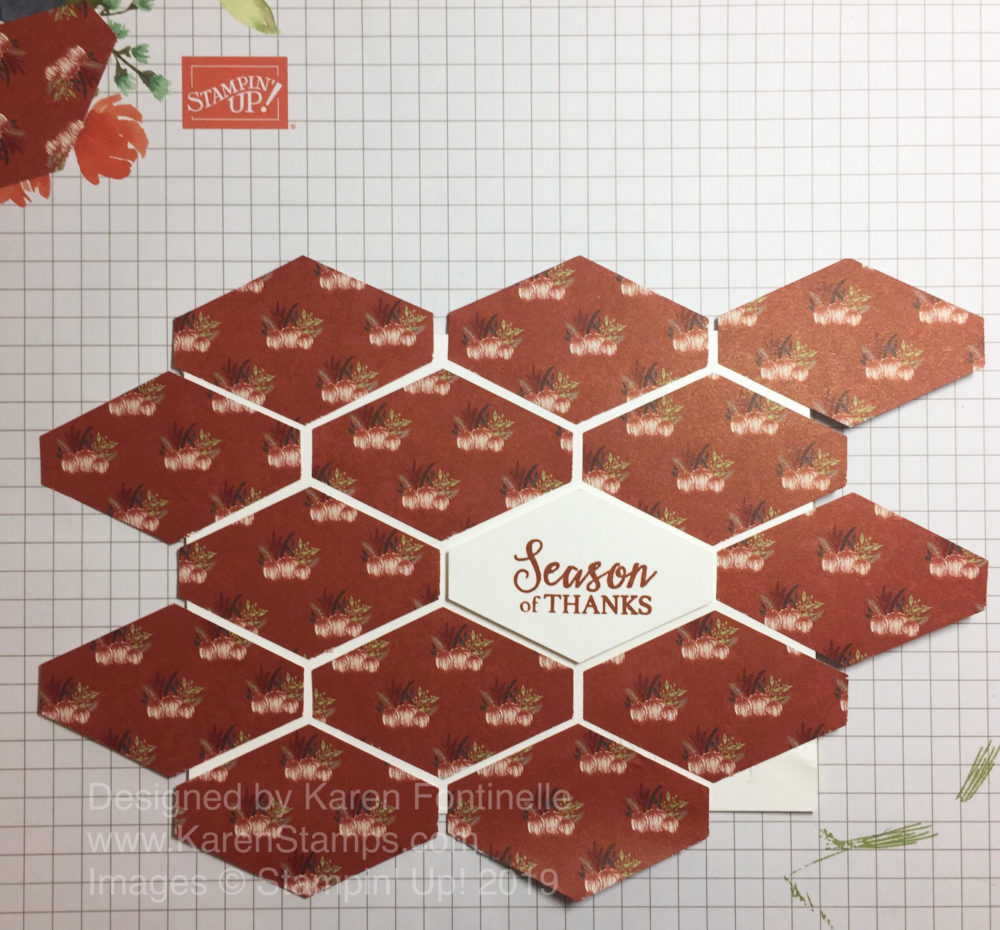
The greeting is stamped with the Gather Together Stamp Set in Cajun Craze Ink and then punched out with the Tailored Tag Punch. I thought it looked a little too stark so I stamped the wheat stamp in Granny Apple Green Ink, stamped off once or twice. I just wanted it fairly light.
I also stamped and colored in a pumpkin from the Gather Together Stamp Set. It is colored with Stampin’ Blends Markers in various colors. You can choose whatever look you want for your pumpkin. I started with a bit of Daffodil Delight with Pumpkin Pie and then added some Cajun Craze to match the paper better with the darker shade.
The designer paper pieces are all adhered directly to the card front, but the greeting is popped up on Stampin’ Dimensionals®, as is the pumpkin. Here is a similar card made with the Wood Textures Designer Paper last year so you can see a different idea and occasion.
There are infinite possibilities for making a card like this using different papers and greetings! Try it and see what you think!

We can do so many things with all our Stampin’ Up! products and supplies and papercrafting skills, like making a piece of home decor such as this Gather Together Fall Votive Holder. I think the colors and items of fall just inspire us so much, like pumpkins, leaves, gourds, mums, scarecrows, and more. That’s what makes it so fun, especially getting relief from the heat of summer!
You can easily make something like this, probably with something you already have in your house, or you can make it for a gift for someone. All you have to do is add a candle inside or one of the flameless ones to be extra safe. If you are using a real candle, make sure the paper is nowhere near the top of the votive holder.
It’s funny how I can start a project with one idea in mind and then come up with something totally unplanned. I almost don’t need to tell you how to make this exactly because I’m sure you have something very similar in your stash and can use what you have.
I started with a checked strip of the Come To Gather Designer Series Paper. When you are using glass, it would be nice if you can to use something that also looks good on the inside since it will be able to be seen. Although unplanned, this strip happens to have the same pumpkins on the opposite side which you can see through the inside of the glass that I used on the decoration.
I started out thinking I was just going to do something with colored leaves but it’s hard to resist the siren call of the beautiful Come To Gather Designer Series Paper. I cut out some of the pumpkins from the paper and I also found some stamped pumpkins from the Gather Together Stamp Set in my stash that I had already colored with Stampin’ Blends. I thought they still fit in with the other pumpkins even though they are more colorful. Next, I stuck in some stamped and die-cut or punched leaves I had just done or already had in my stash. The larger leaves are from the Rooted In Nature Stamp Set.
Once I decided my pumpkins and leaves needed a little background, I die cut a piece from the Ornate Frames Dies. You should really check out these dies because they are pictured in the Halloween section but they CERTAINLY can be used for other things. There is nothing “Halloween” about them. I think they will be very useful well past Halloween. I die cut a large one out of Pretty Peacock Cardstock, even though it is barely visible.
Play around with your elements before adhering and see what layout you like the best. Some of the pumpkins are popped up with Stampin’ Dimensionals® and some are flat. Then I stuck in the leaves and sprigs of greenery wherever I thought they would look good.
Votive holders like this one are fun to decorate for any holiday or occasion so stock up a few at the dollar store or wherever you find them! Here is a Christmas one I made a few years ago. You could also decorate all the way around the holder. So many possibilities!
Shop Stampin’ Up! Online For the Best in Papercrafting Products!
Sometimes I just get out some paper and stamps and have no idea where the stamping will lead and what will turn out, but today this Gather Together Pumpkin Card is what came out of some stamping, coloring, and paper cutting!
Who doesn’t love pumpkins, especially as fall is approaching?! Nothing says fall, and eventually Halloween, like pumpkins! These pumpkin stamps are in the Gather Together Stamp Set in the Holiday Catalog. I decided to stamp the pumpkins with Sahara Sand Ink so there wouldn’t be the bold, black lines of Memento Ink that I would normally use. I did go ahead and used Stampin’ Blends to color in the pumpkins and it seemed to work okay. I started with the Pumpkin Pie Light and Dark colors but added a bit of Light Cajun Craze for some contrast. The stems I first colored with a bit of Soft Suede Blends, but I also tried to add just a bit of Old Olive green and a bit of the Light on the pumpkins. Some pumpkins are popped up with Stampin’ Dimensionals.®
There is a set of dies that go with this stamp set, Gathered Leaves Dies. I haven’t purchased these yet, but they would be great for making the embossed leaves. I wish I would have ordered them! Since I don’t have the dies, I just hand cut the pumpkins with my Paper Snips. You can, however, save 10% if you purchase the Gather Together Stamp Set and the Gathered Leaves Dies in a Bundle, the Gather Together Bundle.
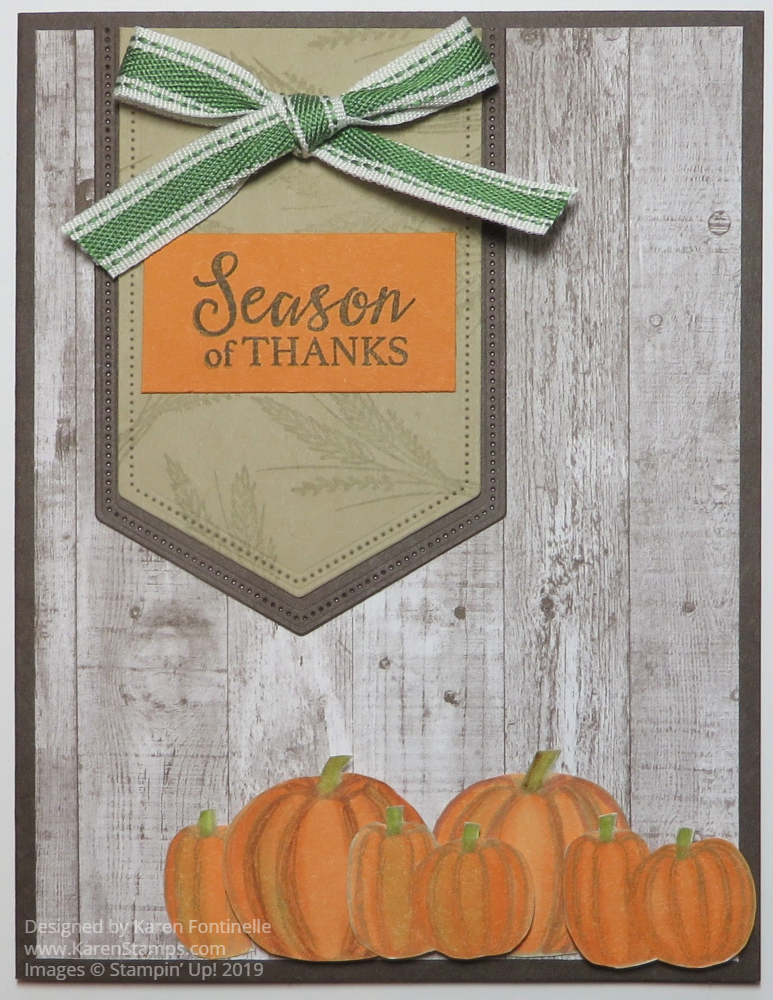
The card base is Early Espresso Card Stock with a layer of the wood grain pattern in the Come To Gather Designer Series Paper. For the banner with the greeting, I die cut a piece of Sahara Sand Cardstock with the Stitched Nested Labels Dies and just cut off the top to line up with the top of the card. The Sahara Sand is layered on a die-cut of Early Espresso. The greeting is just cut to fit on the banner. By the way, the banner was first stamped with the wheat-looking stamp for a little something in the background.
Once I got the banner made with the greeting and then added the Garden Green 3/8″ Double-Stitched Ribbon tied in a bow, that’s when I was satisfied with what I was creating! Sometimes it just takes playing around and then having that “moment” when you know you have something you like. You will find this pretty ribbon in the Toile Tidings Suite, but there is no reason why you can’t use it for fall and Halloween.
There is so much to like about the Come To Gather Suite. You can make cards for fall, Thanksgiving, and even maybe Halloween! Such pretty colors in the designer paper and even some wooden elements, the Tags & Feathers Elements, that you can use for stamping or embellishing. Think of many creative projects you can use with these products as well, some pretty home decor and other things. Fall is such a great time of year! I will be glad when it feels like fall in Houston, Texas!
SHOP STAMPIN’ UP! ONLINE FOR THE COME TO GATHER SUITE!
***Check out the “refreshed” Clearance Rack today!***
I thought if I made this Gather Together Pumpkin Card For Fall it would cool me off from the very hot summer temperatures in Houston, Texas. It did bring a rainstorm which knocked a few degrees off the temperature! I love these new colors for fall, something modern and different!
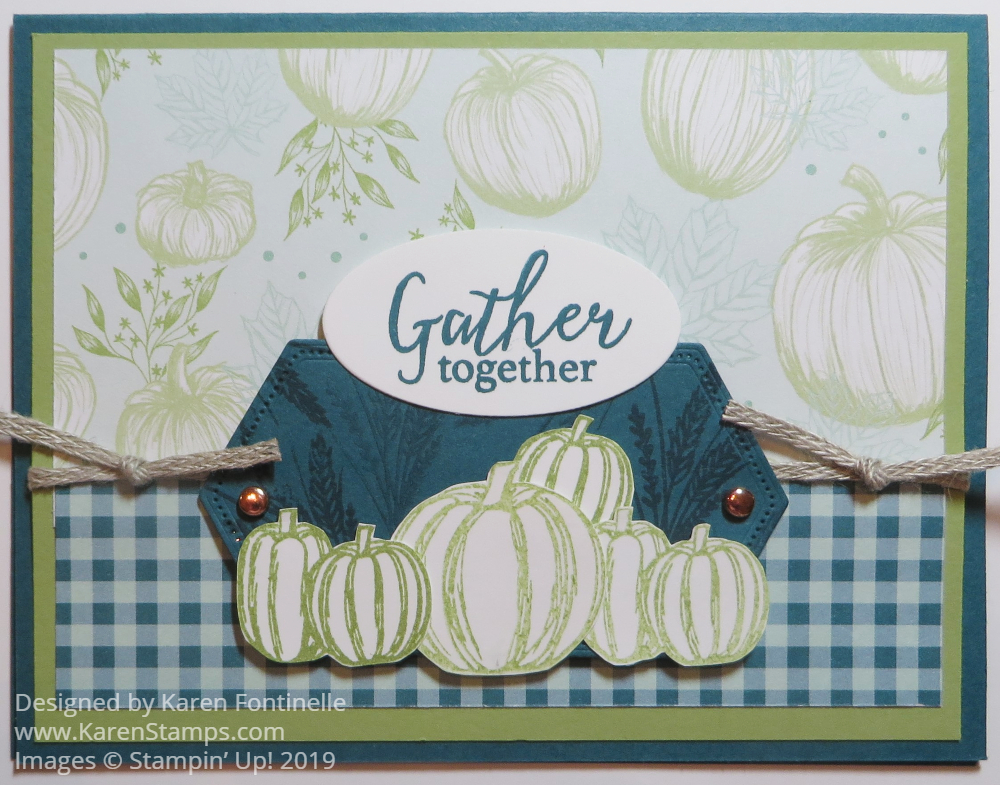
This card uses the very pretty Come To Gather Designer Series Paper. I can’t wait to use all of the other designs in the package, especially the bright, modern plaid. For this card, I began with a card base of Pretty Peacock Cardstock and a layer of Pear Pizzazz. Then I chose the designer paper with the whitish pumpkins. On the opposite side was the Pretty Peacock gingham check design which I also liked so I cut a strip, turned it over and used it at the bottom of the card. To cover up the seam from the two papers, I just placed some 3/16″ Braided Linen Trim around the card.
I didn’t purchase the Gathered Leaves Dies in the Suite (because even Demonstrators can’t buy everything!) so I just stamped the pumpkins on Whisper White Cardstock with Pear Pizzazz Ink. Some I stamped with full ink and some I stamped off first and then stamped for a lighter shade with less ink. After stamping the pumpkins, I just cut them out with my Paper Snips, which as easy enough.
To make the pumpkins stand out on the card, I wanted some kind of background. I decided to try this piece die cut from the Stitched Nested Labels Dies in Pretty Peacock. To add a little interest I stamped in Pretty Peacock ink the wheat image from the Gather Together Stamp Set. Then I added two small copper brads from the Metallic Brads. It seems like years ago brads were a really big deal for embellishments, but I don’t think they are used or talked about as much these days. But I thought they seemed like the perfect little bling to add on this card! I poked a hole first with the sharp pointy end of the Take Your Pick Tool with the paper on the Stampin’ Pierce Mat, then inserted the brad into each hole. You can flatten the brads well by pushing down on the top of the brad with something heavier, like an acrylic block or the wide part of your scissors or whatever is handy.
This label piece is placed a little lower on the card because I didn’t want to cover up all the pumpkins printed on the designer paper! Then the cut out pumpkins are placed a little lower on the label so as not to cover up the stamping on the label! This whole piece is then popped up on Stampin’ Dimensionals.
The next dilemma was how to add a greeting without covering up too much of the card! I used the greeting from the Gather Together Stamp Set, stamped in Pretty Peacock and die cut with a Layering Oval Die. I ended up, as you can see, adding it right to the top of the die-cut label, overlapping a bit. It is a little different, but I think it turned out okay. In order to make it even with the Pretty Peacock label, I put dimensionals just under the top part of the greeting so it would be the same height as the label.
It was fun making a fall card even though I didn’t get to put on a sweater! It is still plenty hot, but at least this card gives the promise of fall! I just love the thought of fall colors and pumpkins and everything that goes with that theme! When you receive your Stampin’ Up! Holiday Catalog and begin to place your order(s)….and believe me, there will be orderS, plural!…..you will want to choose some of the fall-themed stamp sets and papers for a change of seasons or Thanksgiving or use some of the generic colors just for a switch in colors for your cards and projects.
Pumpkins, these days, seem to come in all colors and textures so you can be very creative! Here is a post from last year with traditional orange pumpkins but with a bright green polka dot background, but you could use the same design to make a card with these new 2019 colors! I saw some beautiful fabric pumpkins on Instagram the other day, some even embroidered, all different kinds of fabrics, not just orange. Yet they all look appropriate for fall and into Thanksgiving. So don’t be afraid to try some non-traditional colors in your pumpkins and fall cards like this Gather Together Pumpkin Card For Fall.
Use Your Bonus Coupons During August in the Stampin’ Up! Online Store!

I believe “sour cream treat holders” have been a staple since I started stamping so here is my Turkey Sour Cream Treat Holder! The basic concept is that this simple little treat holder is shaped like sour cream packets come in/used to come in?? The top side is closed one direction and the bottom side is closed another direction. They are very simple to make and very popular in the papercrafting world! You can make them for lots of occasions and decorate them to look like lots of different characters like this turkey. On Pinterest (of course!) I also saw a Pilgrim and an Indian that were very cute for Thanksgiving.

Here is the turkey sour cream treat holder from the side. Just be sure to put your treat inside before you seal up each end! If you have a paper crimper like we used to sell but you can probably still buy in a craft store, it is handy to use that along with adhesive to close up those ends, and it looks very decorative. I didn’t use mine on this turkey.
Here is a diagram from a past sour cream container in this post if you need more directions:

Make a roll out of the paper and adhere along the side.

After adhering one end, pinch closed the opposite end going the other direction (after putting in your treat!).

To decorate the turkey, die cut or punch some paper feathers. I used the leaf die in the Nature’s Roots dies. You can use any left shape or punch out ovals in different colors. The beak is just a hand-cut triangle over a fold. The waddle is just a die-cut heart or you can use a punch or just cut one out! For the eyes, just punch out two circles, like with the 1/2″ Circle Punch and then two smaller circles from the Cookie Cutter Builder Punch.
So simple and yet you end up with a cute treat for Thanksgiving!

If you are looking for a cute little favor for Thanksgiving, look no further than this Thanksgiving Pumpkin Favor. It is just a little box in between two of the largest scalloped circle die-cuts and then decorated.
I started with making the little box. This is the size that worked to fit behind the scalloped circles die cut with the Layering Circle Framelits Dies. When the Big Shot first came out, we had a BIG scalloped circle steel die, so if you used that your box would need to be larger but I think you could easily do the calculations from this template. You could also use any circle if you didn’t have these dies. Here is the template for the little box. The paper is 4 1/2″ x 4 1/4″.

With the 4 1/4″ side up at the top of your Stampin’ Trimmer or Simply Scored Tool, score at 1″ from each side. Turn the paper so the 4 1/2″ side is up at the top. Score at 1 3/4″ and 2 3/4″. Then cut those flaps just up to the score line as you see in the photo. I like to cut mine on a slight angle to that bulky scored area doesn’t interfere with how the flaps fit together.
For the pumpkin pieces, as you see in the photo, I first die cut with the largest scallop circle, then ran it through the Swirls & Curls Embossing Folder. I think you could use almost any embossing folder, just to give the paper a little texture and interest. To get the flat bottom, although perhaps you could leave the circle whole, I marked one scallop and then I counted over 14 scallops and cut from one mark to another. That made the two circles even and matching.
After assembling the box, just glue the pumpkin pieces on each side. The handle was about 7″ long. I just glued inside but it might be nicer to adhere it to the box before adhering the pumpkin sides. Or use ribbon!
To embellish, I die cut various leaves in a couple of green colors, yellow, and orange, even Gold Shimmer Paper. I used the Seasonal Layers Dies and the Rooted in Nature Dies. Use whatever you have. I cut a variety so I could play and see which leaves I wanted to put on the pumpkin. If I made another favor I can use my extra leaves. I tied a bow with the new 3/16″ Braided Linen Trim and adhered it with a Mini Glue Dot.
For a Thanksgiving greeting, I turned to the Itty Bitty Greetings Stamp Set, invaluable, in my opinion! I stamped the “gratitude” saying and cut out with the Classic Label Punch. I also made a flagged end with that punch. Then I just put some glue on the back of the one end and stuck it underneath the leaf.
I’m really happy how my Thanksgiving Pumpkin Favor turned out and I have filled it with candy and am taking it to someone this afternoon!

As I was getting out my Thanksgiving decorations the other day, I came across a little gift bag I’d made last year out of designer paper. It was a little crushed so I decided to make a new one so here is my Granny Apple Green Gift Bag For Thanksgiving.
Part of my purpose was to use up this polka dot paper in the Halloween paper, Toil & Trouble Designer Series Paper. But if I made the bag with this paper, then the inside would have the Halloween designs. Maybe it doesn’t matter too much, but I decided to make this bag out of cardstock and then decorate with the designer paper because the design is not at all Halloween!
This is just a small little bag (and could be an open box) so it is perfect for just a little treat or maybe as a table favor at Thanksgiving or a hostess gift. It’s really just a basic template we have all probably used before. You can squeeze the sides in like I did in order to close the top. I punched two holes in the top for some ribbon to tie it closed. You could use a little clip like the Gold Library Clips or any of the other kinds of clips in the Stampin’ Up! Store.
The paper is 12″ x 6″. I used Granny Apple Green in the Brights 12″ x 12″ Cardstock Assortment package. It’s a little harder to get your hands on 12″ x 12″ paper today but you can buy the assortments and of course a big package of Whisper White 12″ x 12“. I scored the long side at 1″, 3 3/4″, 6 1/2″ and 9 1/4″. Then I turned the paper and scored at 2″ which makes the bottom flap. If you are using a patterned paper, pay attention to which direction the pattern is going! For the front and back sides, I adhered pieces of the Toil & Trouble DSP cut at 2 3/4″ x 4″. You could stamp on the cardstock without adding designer paper. Just do it before you assemble the box!

You’ll notice on the flaps I cut them on a diagonal a little bit. Sometimes it doesn’t matter, but sometimes it makes it easier to fold things in if the tabs are just a little narrower. Sometimes that scored area gets things off kilter a little. After stamping or decorating the paper how you like, use something strong like Tear & Tape Adhesive on that side tab. Then fold the rest of the paper over to meet it so you can adhere it flat and not hold it up in the air to try to line everything up! Also adhere the bottom tabs.
Then just squeeze in the sides, put in your treat, and tie on some ribbon to close. This is what it should look like from the top.

Image © Stampin’ Up! 2018
For the front, I stamped a label outline from the Labels To Love Stamp Set on Granny Apple Green Cardstock and punched out with the Everyday Label Punch. I also stamped the greeting in the same set and punched with the 1 1/2″ Circle Punch. To add a little embellishment, added two Metallic Pearls to the sides of the label. I adhered the label with Stampin’ Dimensionals.
If you don’t want to make it a bag, don’t pinch in the sides and leave the sides all straight. You could add a handle or just put some “shred” inside and your treat or gift or insert a cello bag of candy or whatever! Lots of possibilities and all of them fun and easy when you make something like this Granny Apple Green Gift Bag For Thanksgiving.

