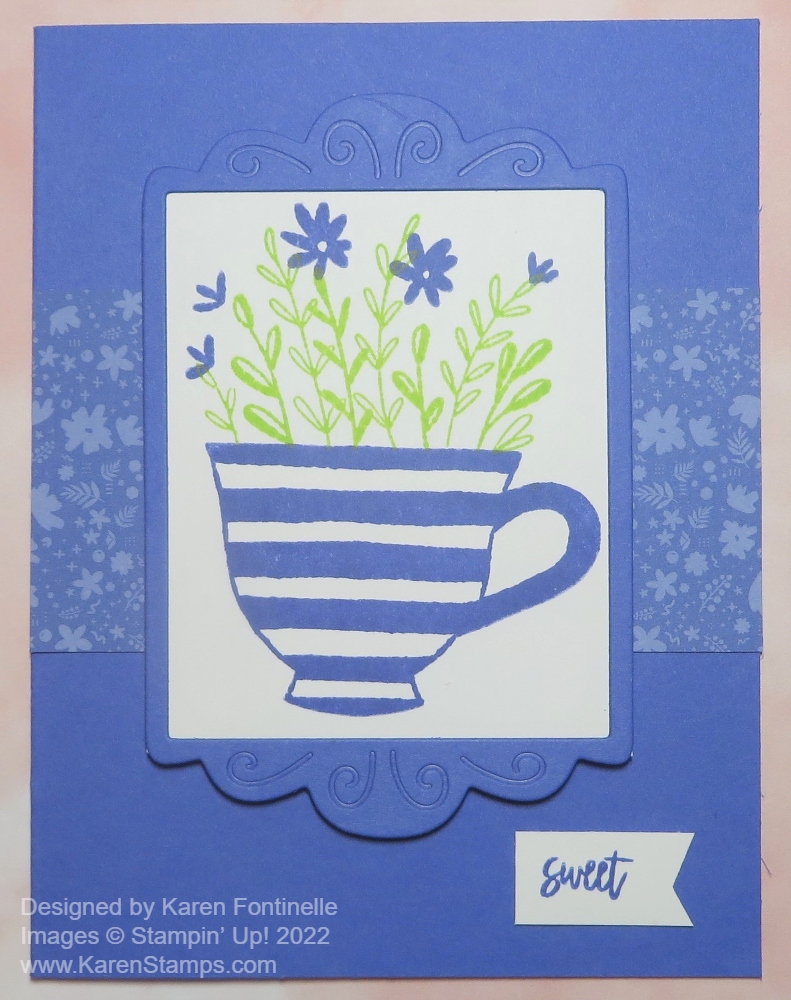
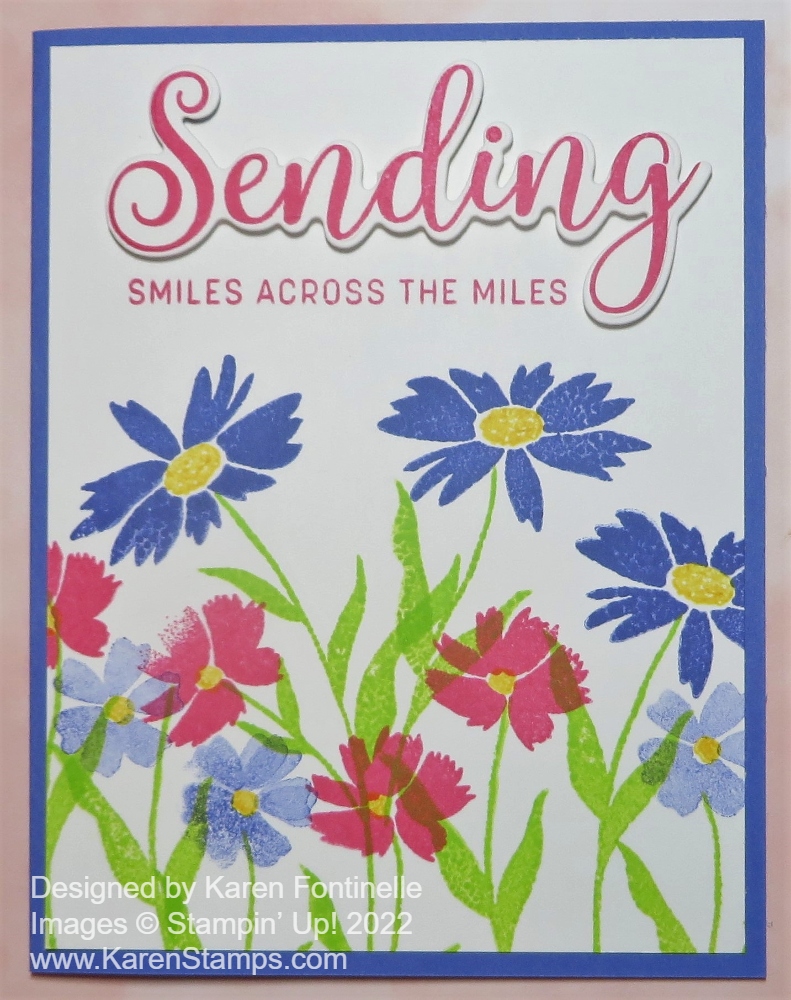
Category Archives: Cards

Sunshine & Rainbows Note Cards & Gift Box

Sunshine & Rainbows Note Cards Gift Box

Recently I needed a birthday gift for someone, and after finding a little notebook at the bookstore that nearly matched our Sale-A-Bration Sunshine & Rainbows 6″ x 6″ Designer Series Paper, I got an idea! I bought the notebook and then made four note cards to match! Next, I needed some kind of box or bag to put the note cards and envelopes in so the photo above is the top of the gift box I made.

To make these cards I just used the Note Cards & Envelopes which made it so easy! You should really keep a package or two of these on hand! I have used them many times. The designer paper on the note cards are two different patterns in the Sunshine & Rainbows Designer Paper that was available during Sale-A-Bration which just ended. Perhaps you already have some from Sale-A-Bration. I die cut the rainbow pieces with the Brilliant Rainbow Dies. You can use whatever colors of cardstock or designer paper that you like. I used Poppy Parade, Crushed Curry, Bermuda Bay, and Gorgeous Grape. I was trying to copy the colors in the rainbows on the notebook as best I could. I also die cut the little clouds with the dies. I adhered the rainbows to a scalloped rectangle die cut, one of the Scalloped Contours Dies. I also added some Iridescent Rhinestone Basic Jewels to each note card.

After I had the note cards made, I wanted a cute bag or box to put the note cards and envelopes in. There are lots of box ideas out there online and once you know the basic principles you can vary the size box and lid that you need to make. I found one from the Paper Pixie that was specifically made for note cards so I used those measurements and then, of course, decorated the box lid to match my cards.

Here is the diagram, basically the same idea for the box bottom and the lid. Each has different measurements but you score and cut the same way on each. I tried making a more professional sketch on the computer but it was a mess and this was easier to just draw it!!

The box bottom starts with a piece of cardstock that is 7 3/4″ x 9 1/4″. Score at 1″ and 2″ on all four sides.

The box lid measures 6 3/8″ x 7 7/8″ but just a “smidge” less on each measurement, just a sliver! Score at 5/8″ and 1 1/4″ on all sides.

Crease and fold all score lines on the box and the lid. Use a Bone Folder if you have one to get a good crease. Then open the folded cardstock back up and following the diagram above, cut from the bottom up to the scoreline on each red line with the arrow. Turn the paper and do the same to the other end. Then cut off the squares where the X’s are. After that, you can see how the sides and tabs will fold in and form the box and the lid.

It’s probably best to use Tear & Tape to adhere the box and lid, but Multipurpose Liquid Glue works, too. Or use Stampin’ Seal+ to hold everything together. Apply the Tear & Tape to the outside edge of all the sides. You can use a bit of Multipurpose Liquid Glue on each tab to hold those in place first.

Before you assemble the box lid, you might want to decorate it first, but you could assemble it first, too. For my lid, I used a layer of Crushed Curry Cardstock under a layer of the Rainbow & Sunshine DSP. Then I die cut the rainbow with Basic White and fit it over one of the big rainbow patterns in the package. Just cut out a full rainbow carefully, they are placed closely together! Just cut a rectangle shape of the rainbow, don’t cut out the actual rainbow. Place the die-cut white piece over the DSP rainbow and adhere carefully. I also layered this on a piece of the DSP that matched one of the cards. To embellish I die cut a couple of white clouds and added some Iridescent Rhinestones.

Making a box is easier than writing about it so just give it a try! It’s handy to know how to make a box out of cardstock in case you need one for a gift or storage.

Flowering Fields Z-Fold Easter Card

Flowering Fields Z-Fold Easter Card

The Flowering Fields Designer Series Paper has so many pretty sheets in it! It’s pretty difficult to choose which one to work with! This day, this page with the yellowish tulips is the one that spoke to me! This is just a simple Flowering Fields Z-Fold Easter Card with the designer paper and a little stamping making a bright card for spring.

The card base is Mango Melody, one of the coordinating colors in the designer paper. To make the Z-Fold, just score the front of the card in half, at 2 1/8″ and fold back on itself. It’s really easy and the recipient will think you made an extra-special card! The tulip designer paper on the front panel is cut at 5 3/8″ x 2″. The opposite side of the tulip paper is the one I adhered inside the card. It is cut at 4 1/8″ x 5 3/8″. You could also use the normal layer sizes of 1/4″ margins instead of 1/8″.

Here is a similar card from a year ago that can give you another idea.

On Basic White cardstock I stamped a couple of tulips with the Flowering Tulips Stamp Set. This was two-step stamping using So Saffron and Mango Melody inks for the flowers and Pear Pizzazz for the stems and leaves. After stamping on the Basic White, it was die cut with one of the Scalloped Contours Dies to make this scalloped rectangle. I situated the die so that the flowers would be down lower on the die cut to leave room for a greeting. I found the “”Happy Easter” greeting in the Celebrating You Stamp Set in the Spring Mini Catalog. It is stamped in Mango Melody ink. This piece was then adhered to the front of the card, right on the fold. Be sure to only put adhesive on half of the piece and the other side shouldn’t have any adhesive on it so it doesn’t stick to the inside of the card.

Flowering Fields Z-Fold Easter Card Inside

For the inside of the card, I die cut another Basic White piece the exact size of the scalloped rectangle on the front of the card. I made sure that it was perfectly placed behind the front piece so that it wouldn’t show underneath from the front. To do this I put adhesive on the back of the scalloped rectangle and then held it perfectly behind and against the front rectangle. Then I folded the back of the card over so that the rectangle would then adhere to the inside of the card. It worked! You’ll understand when you actually do it. Now a message can be stamped on the inside of the card or a note written and it won’t be sticking out from the front of the card!

I always say these Z-Fold cards look like something really special but they are easy to make! No one has to know! I hope you will feel inspired with this Flowering Fields Z-Fold Easter Card and make your own, even with different paper and theme! Try it!

Shop the Stampin’ Up! January-June 2022 Spring Mini Catalog!

New Robot Buddies Kit!

Robot Buddies Kit Contents

There’s a new Kit in the Stampin’ Up! Kits Collection! It’s called the Robot Buddies Kit and looks like a fun one to me! With the Robot Buddies Kit, configure cards featuring cute robots and robot-themed images that kids will love. Combine your bandwidth to craft this kit together for some offline fun with these awesome, friendship-themed robots! But I think anyone of any age can enjoy these cute robots so go ahead and get it for yourself!

Robot Buddies Kit Stamp Set

DETAILS


  • Kit includes 9 card bases—3 each in 3 designs—and 9 envelopes
  • Includes sticker sheets and printed die-cuts to decorate with
  • Includes two Classic Stampin’ Ink Spots in Bermuda Bay and Pumpkin Pie
  • Finished card size: 5-1/2″ x 4-1/4″ (14 x 10.8 cm)
  • Coordinating colors: Balmy Blue, Bermuda Bay, Granny Apple Green, Night of Navy, Pumpkin Pie
Robot Buddies Kit Pieces

Watch this video with Sara Douglass showing you how the kit goes together! Of course, you can play and change it up however you like! So many creative possibilities with these little robots!

If you enjoyed or even thought about the Nuts & Bolts Stamp Set in the Spring Mini Catalog the Robot Buddies Kit will be another fun addition to your stamp collection! I found that stamp set to be really fun to use on cards, mostly on valentines at the time but could be used for birthdays or other fun cards for kids or adults! Click on the photos below to see my card ideas using those robots and you might see the possibilities for this Robot Buddies Kit!

Nuts & Bolts Heart Robot Valentine

I didn’t think I was “into” robots, but I had a lot of fun making these and other valentines in February so I am convinced the Robot Buddies Kit will be a fun one for you!

Check out the Robot Buddies Kit (and MORE!) in the Kits Collection in the Stampin’ Up! Online Store!

Blessings of Home Watercolored Flowers Card

Blessings of Home Watercolored Flowers Card

This Blessings of Home Watercolored Flowers Card card was intended to be a Fresh Freesia monochromatic card but took the step of coloring in the large flower with Fresh Freesia and then it was down the rabbit hole! I could have started over because it wasn’t turning out how I intended but I just kept going. I don’t know if that was a mistake or not!

Once I colored in the one flower even though it was purple it just didn’t seem right. So I thought I would color in the other flowers and leaves lightly. But that didn’t look good. Luckily, the paper held up well to my coloring/watercoloring so that was good.

I stamped the flower bouquet in the Blessings of Home Stamp Set with Fresh Freesia ink and then die cut it with one of the Scalloped Contours Dies. To color in the bouquet, I used the Water Painter and picked up ink from the ink refills in the lid of the ink pads I used. Some of the colors I used were Polished Pink, Pool Party, Flirty Flamingo, Mango Melody, Soft Succulent, Daffodil Delight, Soft Suede, and Granny Apple Green.

I realized the reason these flowers and leaves don’t look quite right is that the image is stamped in Fresh Freesia and not in Memento Black ink. With black ink, you see the outlines and the little texture lines in the images even though you color over them. Stamping in a light color of ink makes it look entirely different.

The card base is Fresh Freesia with a layer of the Heart & Home Designer Series Paper in a Fresh Freesia color. I just adhered the floral die cut flat on the card but you could pop it up. The greeting is in the Blessings of Home Stamp Set. However, I didn’t want to use the entire stamped greeting so I covered up the bottom line with a sticky note and inked up just the “Thank You”. Then I removed the sticky note and stamped it on a strip of Basic White. I layered that on a piece of Fresh Freesia and popped up the greeting with Dimensionals.

For embellishing, I tied a bow with the Fresh Freesia 3/8″ Open Weave Ribbon but I thought of putting it on an angle on the corner of the bouquet. Then….you guessed it…I added several Iridescent Rhinestone Basic Jewels on the ends of the greeting and here and there on the flowers!

Here is another card I stamped with the same Blessings of Home Stamp Set and colored with Stampin’ Blends Markers and had stamped in Memento Black ink so it has a whole different look.

All in all, the card has a little different look and it wasn’t what I envisioned when I began! But there are no mistakes in stamping, so I think it turned out okay and I like it fine!

Flowing Flowers Just a Little Hi Card

Flowing Flowers Just a Little Hi Card

One of the stamp sets I ordered a while back from the Spring Mini Catalog was the Flowing Flowers Stamp Set. Here is the first card I finally got around to making with it, the Flowing Flowers Just a Little Hi Card! I thought the flowers were pretty and I liked the sentiments. This is one of the Stampin’ Up! Distinktive stamp sets that have a lot of texture right in the stamp. One of these stamps really does a lot of work for you! There is a single larger flower but I kind of liked this smaller flower with leaves.

One of my favorite papers, besides Real Red, is the Shimmery White cardstock. I thought its slight glimmer might be just right with this softer flower. This paper is great for stamping, of course, and also watercoloring since it can handle the moisture a bit better than Basic White.

To stamp this flower, I used my Stampin’ Write Markers (sometimes they feel neglected because I use the Stampin’ Blends markers so often!). I colored on the flower with Mango Melody, then Melon Mambo over most but not the top edges. The little dots are Gorgeous Grape and the leaves Granny Apple Green. Don’t forget to “huff” on your stamp – that means breathe on it – to remoisten the ink since it takes a bit of time to color on all parts of the stamp with different colors. I like the way the two colors on the flower blended and still show both.

This stamped flower is die-cut with the third-largest scalloped rectangle die in the Scalloped Contours Dies. I love this die with the scalloped edges and stitched look. Before adhering to the card, I stamped the greeting right in the corner of that die-cut piece. I used one of the many greetings in the Special Moments Stamp Set which is a Sale-A-Bration stamp set that you can earn FREE with a $100 purchase TODAY ONLY! TODAY is the last day of Sale-A-Bration. This is a great stamp set with all kinds of sentiments. I almost overlooked it, actually, in the Sale-A-Bration Brochure. I’m glad I was able to get it. The greeting is stamped in Melon Mambo ink.

The card base is Polished Pink, one of the 2021-23 In Colors. It needed a layer so I chose a piece of Fresh Freesia cardstock and cut it a little smaller to show off more of the Polished Pink. I embossed it with the Pretty Flowers Embossing Folder. Since I wanted to add some Fresh Freesia 3/8″ Open Weave Ribbon, I moved the stamped piece over to the left side a little bit so there was room for a bow on the right side. For a finishing touch, I placed three Champagne Rhinestone Basic Jewels around the flower for a little sparkle!

Today is your last chance to earn FREE products during Sale-A-Bration! Be sure you check your Wish List and see what else you want or need. Speaking of need, you can stock up on adhesives, cardstock, ink refills …. all those basics that we need to keep in stock. Get them while you can earn more free products!

Also, remember that during Sale-A-Bration you can JOIN Stampin’ Up! as a Demonstrator, and besides getting a good deal on the Starter Kit (choose $125 worth of products and pay only $99!), you also get to choose two FREE stamp sets!

This is the last day of February and the last day of Sale-A-Bration! Don’t miss it!

SHOP STAMPIN’ UP!

Daffodil Afternoon Just For You Card

Daffodil Afternoon Just For You Card

This is the last weekend for Stampin’ Up! Sale-A-Bration and I ended up using the Daffodil Afternoon Designer Series Paper once again! I had seen another card on Instagram I liked and after I copied that one, a piece of the designer paper peeking out of the papers on the table just called to me to make another card!

This Daffodil Afternoon Designer Series Paper is only available during Sale-A-Bration until February 28. With a $50 purchase, you can choose this paper from the Sale-A-Bration Brochure. This paper is designed with smaller flowers like you see on the pattern I used, plus larger images of daffodils like the one I added to the card.

The card base is Crushed Curry Cardstock. Daffodil Delight is another coordinating color so you have your choice of yellows. For the card layer, I chose this pattern of smaller flowers and then used the opposite side of that paper for the bottom portion for a little contrast. That strip is 5 1/4″ x 1 1/4″. I wrapped around a piece of the 1/4″ Black & White Gingham Ribbon. Even though the papers are busy, this thin ribbon still stands out even not being a solid color. I tied a bow separately and glued it to the card with Mini Glue Dots.

Being influenced by the card I made before this one, I decided to die cut a scalloped circle and another die cut circle showcasing one of the larger daffodils from one of the other papers. I ended up making a layer under the daffodil of a Crushed Curry scalloped circle. Since I had an extra larger Basic Black scalloped circle I added that underneath the Crushed Curry which helped it all stand out a little more against the floral background and popped it up with Stampin’ Dimensionals.

The greeting is stamped from the Celebrating You Stamp Set, a stamp set with all sorts of greetings and sentiments. It’s in the Spring Mini Catalog on page 65 so don’t overlook it! We always need more words for our cards!

This is a simple, basic card design but always looks good when you make it! In this case, the pretty paper on my Daffodil Afternoon Just For You Card is doing all the work! Remember, Sale-A-Bration ends on Monday, February 28th so get your free stuff with every $50 purchase while you can!

SHOP STAMPIN’ UP! ONLINE HERE!

Join My Stamping With Karen Mailing List!

Red Mailbox for Mailing List Sign Up

I’d like to invite you to join my Stamping With Karen Mailing List to keep up with news from Stampin’ Up! and to be inspired with new stamping projects, tips, techniques, and more from me! There is always something new with Stampin’ Up! from products to catalogs and early releases of new products and I know you’ll want to know all about it.

I send out a newsletter every Tuesday with at least one free project idea plus the latest Stampin’ Up! news and updates. Stampin’ Up! usually posts updates to Demonstrators every Tuesday morning so a newsletter on Tuesday from me has the news “hot off the press”!

Stampin’ Up! puts out an Annual Catalog once a year (coming SOON in May!), plus two “Mini” catalogs a year {that aren’t so “mini”) plus the big promotion called Sale-A-Bration. Right now that is coming to an end but there are a couple of early releases of new products available to tide us over until new catalog time in May! These catalogs give you lots of products you will be excited about, want to learn about, and want to see all the ideas for cards and projects possible! Get on my Mailing LIst to keep up with these exciting events and know what to expect.

Keep up with news about the new Paper Pumpkin Kit every month and subscribe if you want to join in the fun of having a project already planned and prepped for you in the cute Paper Pumpkin box! Always sign up or skip a month if you want by the 10th of any month.

As a special gift to my Mailing List subscribers, every year before the holidays I send out my “12 Weeks of Christmas” newsletters, with one new holiday project each week leading up to Christmas. These are ONLY for my subscribers and you won’t find them on my blog or anywhere else

If you are on my blog, you will see a red sign-up box in the top right corner where you can simply put your name (or first name) and best email. If you are on your phone, you probably need to scroll way down to get to the sidebar things. OR you can go to my sign-up page HERE.

When you do sign up, you will receive an email with a link to a free gift from me!

I hope you will enjoy the card and project ideas I send out in my weekly newsletter. Even if you never make the project, maybe just seeing ideas will do your crafty heart good! I know it does mine! I’m all about the ideas!!

Let’s stay connected and in touch with each other over our favorite thing to talk about…..stamping with Stampin’ Up!

Calming Camellia Whitewashed Card

Calming Camellia Whitewashed Card

This Calming Camellia Stamp Set is one I wish Stampin’ Up! would carry over after Sale-A-Bration because not everyone certainly was able to earn it during Sale-A-Bration and it is a spectacular stamp set as you can see on this Calming Camellia Whitewashed Card.

This is a Distinktive** Stamp Set (**patent pending) which is made to stamp with rich texture and dimension. The stamp does all the fabulous work, is what that means! I have to say my ink pad was a little dry and my stamp could have used more ink to have a little more of a dramatic background, but it still looks fine.

I had never done this “whitewashing” technique before but it’s easy! It’s just coloring with white! Some people use the White Watercolor Pencil or the White Craft Ink. I used the White Craft Ink with a Blender Pen. The flower is stamped with Crumb Cake ink on Crumb Cake cardstock and then the flower petals are colored with White Craft ink using the Blender Pen. You can pick up extra ink in the lid of the ink pad or make a little puddle of the White Craft Ink Refill or touch the corner of the ink pad itself. That usually isn’t recommended because of the moisture in the Blender Pen getting into your ink pad. I rubbed a small acrylic block into the ink to use as my palette to pick up the ink with my Blender Pen. As you color with the ink (and the white craft ink is a little thick anyway) it looks a little heavy but will dry lighter so don’t panic!

Calming Camellia Whitewashing Technique

To color the leaves and flower centers, I did the same thing. I just colored in with Granny Apple Green ink and Old Olive Ink on the leaves and some Daffodil Delight ink for the flower centers. I little later I went over the flower centers with a little bit of Soft Suede Ink. I should have left well enough alone because I thought I was messing it up! Sometimes you have to know when to stop! (An art lesson I learned a long time ago with my crafty painting!) But I think it still turned out fine, so no problem. It almost makes the whole flower look watercolored even though it is just stamped and colored.

The greeting is from the Calming Camellia Stamp Set and is stamped in Soft Suede Ink. Then I noticed the little swirls so I stamped a few of those.

The card base is Old Olive with a layer of Soft Suede Cardstock and then the Camellia image layer. I wanted to bring in a little white so I added a bow on the flower with the White 1/4″ Crinkled Seam Binding Ribbon. The bow is adhered with a Mini Glue Dot.

Calming Camellia Whitewashing Technique Closeup

This Calming Camellia Stamp Set is only available as a Host Set during Sale-A-Bration, which ends February 28. Traditionally a Host Set would be for a Hostess having a stamping party and gathering orders and if the workshop total reached $300, the Hostess would earn the Host Stamp Set. But it can also be earned by anyone putting in their own order of $300 or maybe including a few friends’ orders. However, even if you do not own this stamp set, I’m sure there are others that you can use this whitewash technique with. There is always something new coming that we turn out to love! Now you know how to do this technique so you can use it with other stamp sets and projects you do in the future!

Sale-A-Bration ends February 28! SHOP NOW!

Coming in March! Save on Mini Stampin’ Cut & Emboss Machine & Bundles

Next week, Tuesday March 1, you will be able to purchase the Mini Stampin’ Cut & Emboss Machine at 20% off! What is it about something being small that makes it so cute?! That’s what you will think about this Mini Machine! Plus, you will have the opportunity to purchase select Bundles of stamp sets and dies to use with your machine! If you are new to die-cutting, this gives you a chance to purchase some Bundles to use in your machine at a discount. If you are experienced, you can stock up on some Bundles you may have missed before!

This mini—but mighty—machine is durable, portable, and easy to use. It’s the perfect pick for budding beginners who want to branch out, papercrafting pros who want to craft on the go, or those who are short on storage space! With this trusty tool, any crafter can make precise cuts and embossed designs for their projects with one pass.

During the month of March, you can snag the Mini Stampin’ Cut & Emboss Machine at a 20% discount! This miniature machine is compatible with a large selection of Stampin’ Up! embossing folders and dies. Build your craft collection and combine the Mini Stampin’ Cut & Emboss Machine with any (or all!) of the select stamp-and-die bundles that are also available for 20% off during the month of March!

Take your crafting to the next level!

Click HERE to read the Flyer!

Watch the video below for everything you have ever wanted to know about the Mini Stampin’ Cut & Emboss!

SPECIAL OFFER COMING TUESDAY, MARCH 1ST!

Just One More Week to Sale-A-Brate!

A week from today on February 28, Stampin’ Up!’s big promotion called Sale-A-Bration comes to an end! With every $50 you spend on any Stampin’ Up! products you earn a FREE product in the special Sale-A-Bration Brochure! No limit! I’m sure a lot of you have done your shopping and gotten your free products! Is there anything more fun than free stamping products?!! But time has flown by so fast since Sale-A-Bration began in January some of you might not realize we have nearly reached the end! But it’s not over yet, you have another week to go!

You may have already seen these videos, but if you need some information about these products or would enjoy a review now that you own some of them, enjoy!

Remember, you can shop from the Stampin’ Up! Annual Catalog, the January-June 2022 Spring Mini Catalog, and the Stampin’ Up! Clearance Rack! Whatever you can find in the Stampin’ Up! Online Store!

Have fun shopping this week at Stampin’ Up!

Catching Butterflies Greeting Card

Catching Butterflies Greeting Card

While I didn’t think this Sale-A-Bration stamp set was very exciting, I am very happy with this Catching Butterflies Greeting Card I came up with! The stamp set may look simple, but there are many different ways you can work with it! And best of all, it is FREE with a $50 Stampin’ Up! order during Sale-A-Bration! However, Sale-A-Bration is coming to an end soon, on February 28. That’s not far off anymore!

This Catching Butterflies Stamp Set is in the Sale-A-Bration Brochure on page 6. I really like the sentiments in the set. The little girl is cute and you could even cut the butterfly net stick out of her hand and not use it! Or have her be holding something else, like a group of balloons. The little butterflies are cute almost any time to stamp.

This card has a card base of Balmy Blue. For the background layer on the card, I used a piece of the Simply Marbleous 6″ x 6″ Designer Series Paper, another item you can earn free during Sale-A-Bration, found on page 10 of the SAB Brochure. I didn’t use the “swirly” side, I used the “other” side of one of the blue papers. I thought it looked like sky and also found a green patterned paper in the Sunshine & Rainbows 6″ x 6″ Designer Series Paper to look like the grass the little girl is running in.

For the grass piece, I cut a curvy edge on the top of it to look more natural. Then I used my Light Mint Macaron Stampin’ Blend Marker to draw in bits of grass, just little short lines, quick and fast!

The little girl is stamped with Memento Ink and colored in with Stampin’ Blends. I used Light Melon Mambo for her dress and some of the new Natural Tones Stampin’ Blends markers (read this post for more information) to color her skin and put a little blush on her cheeks! If you fill in that chart of marker combinations to get different shades, you can choose what you would like to use. And remember, these Natural Tones Markers aren’t just for skin tones! I used one for her hair color with some added Light Daffodil Delight. You aren’t limited to one color or Light and Dark Combo of Stampin’ Blends markers, you can use different colors together to get different shades or different blending.

Natural Tones Stampin’ Blends Color Chart

Print it out on Basic White Cardstock so you get true colors rather than computer paper. Then add each marker number across the top and down the side. Color the two marker shades that coordinate in each box to see what the two colors together look like. Here’s how I started mine. Your colors may differ because of computer screens, etc.

Natural Tones Stampin' Blends Color Chart

For the butterfly net, I just lightly colored over the strings with the Light Gray Granite Stampin’ Blend Marker. After the girl was all colored in, I just cut her out with Paper Snips. Notice I did not go all the way into every white area, and when you looked at my card, you probably didn’t even notice! Neither will your recipient so don’t worry about precise cutting!

I used the Sunshine & Rainbows Designer Paper again to punch out the clouds with the Cloud Punch. If you don’t have the paper, just punch out some white or light blue clouds. If you don’t have the punch, just cut out some cloud shapes from the paper or plain cardstock.

The butterflies are all in a group on one stamp so I stamped those in Memento Ink and didn’t color them in, although I could have. There is also a single stamp of a small butterfly so I did stamp two of those on Basic White Cardstock and colored and cut them out. They are stuck on with Mini Glue Dots.

The sentiment is stamped from the Catching Butterflies Stamp Set, as I’ve said, and cut out with one of the Ornate Frames Dies. I needed something small enough to fit in the space as compactly as possible since the card is already rather “busy”.

This is one of those cards that you can make very simply or have all kinds of pieces to “play” with to make the card! Do however much or little you like! If you earn this stamp set during Sale-A-Bration, have fun playing with it! You will make some happy, cheerful cards with it for many occasions!

SHOP STAMPIN’ UP! ONLINE HERE!

Calming Camellia Birthday Card in Fresh Freesia

Calming Camellia Birthday Card in Fresh Freesia

I so loved making the card the other day with the Calming Camellia stamp that I had to try another one. This Calming Camellia Birthday Card in Fresh Freesia though was really super simple! The stamp does all the work of making a beautiful card!

The card base, as you might have guessed, is Fresh Freesia Cardstock, one of the 2021-23 In Colors. I really like this group of In Colors. I cut the Basic White layer for the card front a little smaller than usual just to let more of the Fresh Freesia color show. It is 5″ x 3 3/4″. I stamped the camellia up a little high in the center of the Basic White with Fresh Freesia ink. The entire image you see on that card is all from the Distinktive stamp, a new type of stamp developed by Stampin’ Up! You don’t have to add anything else to get that full look of all the texture and detail.

The birthday greeting is also in the Calming Camellia Stamp Set so I stamped that near the bottom of the card. I decided not to do a die-cut or punch, but just to stamp right on the card front (unless I messed up!). Then I just tied the Fresh Freesia Open Weave Ribbon around with a bow so it looked like the bow was on the flower stem. That’s all there is to it! I didn’t even add any jewels this time, I just wanted the card to be simple and basic.

Now this stamp set, Calming Camellia, is special because you can’t just purchase it. It’s a Host set to earn with a $300 order during Sale-A-Bration which is quickly coming to an end in less than ten days! It can be all your own order or go in with some friends to reach that amount.

You can earn Sale-A-Bration products by ordering from either of the catalogs plus from the Clearance Rack! Just spend $50 and choose a product in the Sale-A-Bration Brochure. Spend $100 and you have additional choices! No limit to the products you can earn, so shop in $50 increments!

SHOP STAMPIN’ UP! ONLINE HERE!

Calming Camellia Card With Stamped Background

Calming Camellia Stamped Background

What do you think of this beautiful background paper on this Calming Camellia Card With Stamped Background? Could you imagine that it is just a stamped background using the Calming Camellia Stamp Set? This Calming Camellia Stamp Set is available FREE during Sale-A-Bration as a Host Reward with a $300 order, either yours alone or with a group of friends. You can make a card like this one in about five seconds! Well, maybe a tiny bit longer! But this was some of the most satisfying stamping I have ever done!

This Calming Camellia Stamp Set is one of the Stampin’ Up!’s Distinktive** stamps. As Stampin’ Up! describes it, “This is a Distinktive** stamp set; it has a special texture that gives added depth and dimension in a single step, creating photo-realistic images. **Patent pending.” All you have to do is ink up the stamp and you get this beautiful stamping with almost no effort! It’s amazing!

I’ve seen some interesting techniques you can do with this stamp. I saw another Demonstrator on Instagram stamp with certain colors of ink on certain colors of cardstock. I doubt there was anything magical about her choices, she was probably experimenting with ink colors used with certain cardstock colors, which you can do as well! But I thought it was beautiful.

My card today is Flirty Flamingo ink on Blushing Bride cardstock. The card base is Blushing Bride, with a layer of Basic White just to show off the stamped layer a little better. I just made 1/8″ margins instead of the usual 1/4″. The top layer is Blushing Bride cardstock and then stamped with the Calming Camellia largest stamp. The greeting is one that is in the stamp set and I used the Everyday Label Punch. It is stamped in Flirty Flamingo ink. I tried layering it on different shapes and die cuts but in the end, I used my Blending Brush to ink around the edges of the label. I think this helps the white not be so stark against the stamped background yet helps it to stand out a bit almost like a layer underneath.

For some embellishment, I used a piece of the Very Vanilla 3/8″ Scalloped Lace Trim just going across the card underneath the greeting. The Iridescent Rhinestone Basic Jewels are perfect on each side of the greeting.

Let’s talk about the actual stamping! It’s so easy! Just ink up the large camellia stamp and stamp randomly around on the cardstock! You can fill it up completely or leave an empty space. Whatever you like! The stamp really does ALL the work! It is amazing! Of course, you can also just stamp a single image on Basic White or some other color and use that as the focal point on your card or project. I just thought stamping all over the piece of cardstock with this particular stamp was so much fun. I would even say the name of the stamp, “CALMING Camellia” is true! It was so satisfying and calming to stamp with this type of stamp!

Sale-A-Bration ends February 28 so if you need to stock up on ink, cardstock, adhesives, maybe pick up some new products like the Blending Brushes or Water Painters, ribbon, new embellishments, Stampin’ Blends markers you don’t have…..now is the time! Maybe you can earn the Calming Camellia Stamp Set or at least earn some other free products! Another good idea is to purchase a Prepaid Paper Pumpkin Subscription which goes on your Stampin’ Up! order like any other product if you need something good to put yourself up to the level you want!

SHOP STAMPIN’ UP!

Driving By With Beauty of the Earth Paper Card

Driving By With Beauty of the Earth Paper

This Driving By With Beauty of the Earth Paper Card is one that surprised me when I got finished. As I worked on it, with what I first thought was a good idea, I didn’t really think it was going to turn out well and I thought I would have to work on it and rework it to make it into a good card. But when the card was finished, I really liked it! And it’s probably the first time I ever colored in cars! This stamp set, Driving By, is one that you can earn FREE during Sale-A-Bration with a $50 purchase IF you hurry and order before the end of the month. February 28th is the last day! Can you believe we are at the end of Sale-A-Bration already (almosts!)?!

I just got this Driving By Stamp Set recently with my last order but even then I didn’t get to play with it right away. I suppose all the days of making Valentines leading up to Valentine’s Day took away time from some other stamps and cardmaking. Finally I got a chance and made this card.

I thought maybe the Beauty of the Earth Designer Series Paper would have a paper with trees that I could use as a background for my cars. Most of them had very heavy-duty trees and colors and I thought it might overwhelm the little cars. But then I came across this sheet which has a light-colored design that seemed perfect for a little road scene! It reminds me of when you are driving along a highway and see all the trees off the side of the road or maybe even a bit of a haze off in the distance in the trees. When I got the card finished, thought the background paper was perfect for my little scene!

The van and the car (Volkswagon??) are stamped in Memento ink and then colored with Stampin’ Blends. You can choose whatever colors you like. My van is colored with Old Olive (light and dark) Stampin’ Blends and the car with Night of Navy (light and dark). I used one of the light grays for the bumpers and then a darker gray or maybe even the Light Basic Black for the tired. For the windows I colored in lightly with the Light Balmy Blue Marker. I just cut the cars out by hand.

For the roadway, I used a strip of a light gray (I get my grays mixed up!) and just made a hand-drawn divider line with a black marker and a ruler. The van is popped up on Stampin’ Dimensionals®. The car is adhered flat to the card. The card base is Thick Basic White just because I thought I wasn’t going to have layers on my card at first. Then a layer of a dark gray and then the Designer Paper.

The greeting is in the stamp set and is die cut with one of the Tailor Made Tags. I used a piece of the Misty Moonlight ribbon in the 1/8″ Cotton Ribbon Combo Pack because I thought the blue ribbon goes well with the blue car and the duller colors of the trees.

Don’t forget about Sale-A-Bration ending on February 28 and it’s alreaday February 16th! Time flies during a Pandemic! It’s also a good time to stock up on adhesives or cardstock and earn some free products while you’re at it!

SHOP STAMPIN’ UP! HERE!

Daffodil Afternoon Hello Sunshine Card

Daffodil Afternoon Hello Sunshine Card

Our weather here has turned into spring, at least by afternoon, so I thought this Daffodil Afternoon Hello Sunshine Card was appropriate for this week! When you think of spring you often think of daffodils, tulips, and other spring weather flowers. On this card, I only used the Daffodil Afternoon Designer Series Paper, even cutting out the flowers from the paper. This paper will only be available during Sale-A-Bration, which, unfortunately, is going to end on February 28.

The card base is a color I have barely used – Evening Evergreen cardstock. I added a layer of Basic White so the designer paper would show up a little better. I already had these strips cut as scraps and I wanted to use this background of strips of designer paper for the background card design. All I had to do was trim them to 3 3/4″ inches long. They were already 1 1/2″ wide. To get more patterns than three on this card I would have to make the strips narrower. I didn’t really do any math, just placed the strips on the Basic White so they were spaced evenly. I think the middle strip breaks up the strong flower designs of the other papers.

The center piece is one of the die cuts from the Scalloped Contours Dies in Evening Evergreen. Separately, I cut just a Basic White rectangle with the Paper Trimmer to fit inside the die-cut. Then I cut out by hand some of the daffodils in the designer paper and some stems and leaves to arrange on that Basic White center. First I stamped the greeting in the Special Moments Stamp Set. This is a stamp set you can earn with a $100 Sale-A-Bration purchase. It is great as it has so many good sentiments in it. This tiny sentiment fit perfectly in the small space I had for it.

The daffodils are just placed in a pleasing way with a few stems and leaves. Two of the flowers are popped up on Stampin’ Dimensionals. The other one and the stems and leaves are glued down with Multipurpose Liquid Glue. Before I adhered the center piece, I thought it would also make a pretty tag on its own!

This Daffodil Afternoon paper is very pretty and easy to work with to make lots of cards, scrapbook pages, or other projects! Be sure you get some if you like it before it is gone in less than two weeks! Wow!

Shop Stampin’ Up! Online HERE.