Author Archives: Karen Fontinelle

New Major Stampin’ Up! Products Coming!

Breaking News

Big News From Stampin’ Up!

Yesterday we were surprised to hear some big news from Stampin’ Up! about new products that will be coming in the future. If you are on my Mailing List, you got this information yesterday afternoon in my newsletter.

Stampin’ Trimmer Being Replaced

Stampin’ Up! is retiring the Stampin’ Trimmer and all its accessories on June 3rd while they search for a suitable replacement, due to supplier issues. This will leave a gap in time until a new paper cutter is released, which will not particularly affect those of us who already own the trimmer or another paper trimmer. If you are new to stamping or have always wanted this trimmer, NOW is the time to purchase this one. However, if you want to see what new product comes out, then wait and see.

How this affects my customers is that replacement Cutting Blades could be an issue. Stampin’ Up! has increased their inventory and will continue ordering until September. When the retirement list comes out April 15, the Cutting Blades limit will be increased from 3 to 6. Even with increased inventory, these could go on backorder. So….if you need Cutting Blades to last until we get a new trimmer (if you decide to purchase a new one at that time), or RIGHT NOW, then I would order Cutting Blades ASAP and maybe as available throughout the retirement period. In other words, get what you need while you can! (At this moment it looks like the Cutting Mats and Scoring Blades are not available.)

Big Shot Being Replaced

Big Shot Machine

The Big Shot Die-Cutting Machine will be retired as Stampin’ Up! wants to work directly with a manufacturer to better meet our needs and designs after extensive research and evaluation including Demonstrator feedback. This should lead to a better product in the future, but in the meantime, we can still use the Big Shots that we own and even the new dies coming in the new catalog will still work in the Big Shot and any die-cutting machine you may own or purchase. It’s possible, due to machine differences, that maybe something like a shim may be needed with dies. Also, the “fancy” language of Framelits, Thinlits, Textured Impressions Embossing Folders, etc. will be simplified to just “dies” and “embossing folders”.

How this affects my customers is that you can continue to use your Big Shot as long as you like, until a new die-cutting machine comes out and you have the opportunity to choose to purchase or not. There will be new dies in the new catalog, made in a slightly better design. Perhaps we will need to add a shim or finagle something but we will figure it out together! The new die design seems like it will cut closer which will be great! New dies will be the new design. Old dies will continue to be sold until the inventory is depleted, then the new design will take over. There could be backorder situations during this transition.

If there are dies that you want now or in the near future, just like with the Trimmer and Blades, I would order what you want as soon as you can to avoid disappointment. No way to tell what could be sold out. (But of course, there are always new things coming that sometimes make us forget the old things!)

If you have always wanted a Big Shot, buy one now so you have it and you can reassess machines when a new one comes out. I love mine and would hate to do without it, but if you already have one, in a way, nothing changes!

There are no time frames given for these new products so there likely will be a long gap in between the retirement and new products announced. Just my guess.

The Retiring List comes out April 15. Anything you REALLY, REALLY want from the outgoing catalog or Occasions Catalog, I would not wait until April 15 when the rush starts. I’m sure we will hear more information as time goes on. Just keep in mind, Stampin’ Up! is always trying to make our stamping and papercrafting experiences and products as positive and high quality as possible so sometimes we have to go through these bumps in the road! But once the new pavement is down, we are usually very happy with the new products they have released! Keep your fingers crossed and enjoy what we do have!

Let me know if you have any questions/comments about these announcements of new Stampin’ Up! products either in an email or leaving a comment on this post!

SHOP STAMPIN’ UP! ONLINE HERE!

Sign Up For Paper Pumpkin With New Distinktive® Stamps

Paper Pumpkin Distinktive Banner April 2019 Kit

Last Two Days! Sign up now!

The April Paper Pumpkin Kit is going to have something different….brand new Stampin’ Up! Distinktive® stamp images.

This is it! The deadline is tomorrow, April 10th, to get signed up for Paper Pumpkin, the papercrafting kit that Stampin’ Up! sends right to your mailbox each month with a fun project inside, all materials, stamps, and ink included! What could be more fun to look forward to!

What are Distinktive stamp images? Stampin’ Up! says…….

  1. Distinktive stamps give you photo-realistic images with just one stamp. They have a special texture that gives added depth and dimension in a single step.
  2. These stamps are available only from Stampin’ Up! and are made using a patent-pending process.
  3. Distinktive stamps are available in red rubber and photopolymer; Paper Pumpkin’s April kit includes photopolymer stamps.
  4. Shop Distinktive stamps in the online store by searching “Distinktive,” or look for the Distinktive icon in Stampin’ Up! catalogs.

Join Paper Pumpkin today and your April Paper Pumpkin Kit will be in the mail in just another week. Get the first set of Distinktive stamps to appear in Paper Pumpkin. You must subscribe (or reactivate) your subscription by April 10th to receive this kit. Do it now so you don’t miss out!

JOIN PAPER PUMPKIN TODAY!

The link above is my personalized link for my Paper Pumpkin page to make it easy for you to sign up. If you have a Demonstrator you want to use, then go to Paperpumpkin.com and search for their name.

Delightfully Detailed Paper Birthday Card

Delightfully Detailed Paper Birthday Card

Maybe you already had some of this Delightfully Detailed Laser-Cut Specialty Paper or maybe you got some free during Sale-A-Bration, but it’s time to use it on a card something like my Delightfully Detailed Paper Birthday Card.

This paper is beautiful but has to be handled with a little bit of care. Be sure to keep the tissue paper in between the sheets in the package and it’s not a good idea to cut it with the Stampin’ Trimmer. Using a scissors and cutting out a larger piece than you need, then trimming that down, is a lot easier.

Delightfully Detailed Laser-Cut Paper Placement

It seems I rarely use Very Vanilla in my cards, so I flipped the Delightfully Detailed Specialty Paper over to use the Very Vanilla side. One side is white and one side is vanilla so take your pick!

I wanted a monochromatic kind of look, so I used a Very Vanilla card base and layered the laser paper on top. As I said, I cut out a larger piece than I needed with scissors, then sponged very lightly some Multipurpose Liquid Glue on the back side of the paper so it would adhere to the card base. I managed to do this without a gluey mess! Then I just trimmed off the excess with my scissors around the border of the card. Of course, you could also make a smaller layer with the laser paper like we normally do on a card.

For a greeting, I die cut this label piece from the Stitched Labels Framelits Dies and stamped a greeting from the Detailed With Love Stamp Set to make it a birthday card. You could use any greeting. This would make a lovely engagement, wedding, or anniversary card as well. The ink is Calypso Coral and the ribbon tied on the ends is the Calypso Coral 1/4″ Ombre Ribbon.

This is a pretty easy card to make except for the little bit of fussing with the laser-cut paper, handling it carefully so it doesn’t get tangled with itself or tear. You will also find the Beautifully Detailed Laser-Cut Specialty Paper in the Occasions Catalog which is white on one side and Petal Pink on the other.

Here are some other cards I made with the laser-cut paper and a colored card base. This paper comes with 8 sheets, 4 each of 2 designs. The other sheet has sections that you can cut apart to use on cards or other projects rather than the one big floral sheet. You can color the designs as well with markers or sponging color on or using the Sponge Brayer.

This Delightfully Detailed Laser-Cut Specialty Paper provides a different kind of paper that gives a different look to our cardmaking and other projects. It’s always fun to change things up a bit! If you already own this paper, try this Delightfully Detailed Paper Birthday Card or make up your own design!

Easter Wood Crate Candy Holder With Chick

Easter Wood Crate Candy Holder With Chick

This Easter Wood Crate Candy Holder With Chick would be fun to make as a treat holder just using some dies and glue! Something a little bit different than a bunny! Make the paper crate, add some Easter grass or paper shred and put in some Easter candy! You have a little treat for someone or put it at each place setting on your Easter table for dinner.

To make the crate I used the Wood Crate Framelits Dies and the Wood Textures Designer Series Paper Stack. Just cut two pieces with the wood crate die. The die scores the paper as it cuts so all you have to do is crease and fold and assemble with some Multipurpose Glue. If you don’t own the Wood Crate Dies just make some other little basket or box by scoring and folding.

The chick is copied from one I made many years ago on THIS little Easter basket. Back then we had a Scalloped Circle Punch, but you can use the scalloped Circle Dies. For the wings, I just cut a scalloped circle into portions. I sponged all the pieces. For the little feathers on top of his head and for his feet, I just found some shapes on some dies that would work or maybe you could use the Blossom Builder Punch. Whatever you have with something resembling the shapes you need! The little beak is just cut by hand. The eyes are punched with the Cookie Cutter Builder Punch and just colored with a black marker. The chick is adhered to the wood crate with a couple of Stampin’ Dimensionals.

You can use whatever color card stock you like or other designer paper. Make the chick with whatever shapes you can punch or die cut. You can also add an Easter greeting on the front. It’s just a cute little treat idea for holding some Easter candy treats or for a little home decoration. Have fun making your own Easter treats to give to some family members, friends or neighbors!

Fable Friends Bunny Garden Impressions Easter Card

Fable Friends Bunny Garden Impressions Easter Card

Once you start using the Fable Friends Stamp Set you can hardly stop using this cute bunny for Easter cards! You can make this Fable Friends Bunny Garden Impressions Easter Card or you can change the greeting and have it be a baby card, birthday card, or other occasions. And what a relaxing way to spend some time coloring in this cute bunny!

I decided to show a little love to my package of the Garden Impressions 6″ x 6″ Designer Series Paper. I placed a strip of 2″ x 5 1/4″ blue floral pattern on the layer of So Saffron Cardstock. This is all layered on a Whisper White card base. The bunny is colored in to match the flowers on the Garden Impressions paper and I just LOVE how the bunny looks – a little like Peter Rabbit I think! While I first thought the blue color was Night of Navy, some of it is, but some is Pacific Point. I chose to use Pacific Point as the scalloped oval color and the color of the bunny’s jacket. The Night of Navy was too dark but the Pacific Point was perfect!

After coloring in the Fable Friends bunny with Stampin’ Blends markers, I die cut the bunny with the Stitched Shapes Framelits Dies. He is then layered on a scalloped oval in the Layering Ovals Framelits Dies. You can glue the bunny down flat on the card or pop him up on Stampin’ Dimensionals.® I chose the Easter greeting in the Fable Friends Stamp Set but you could make the same card with another greeting. You could add some ribbon as well, but I was keeping it simple.

Go check out the Fable Friends Stamp Set for making Easter cards and treats! You will find it in the Stampin’ Up! Online Store from the Occasions Catalog!

Make an Easy Paper Easter Basket

Three Easy Paper Easter Baskets

Here is an easy paper Easter Basket anyone can make, so easy in fact that you can make THREE little Easter baskets for treats! At least here are three different ideas for you to show you what you can make!

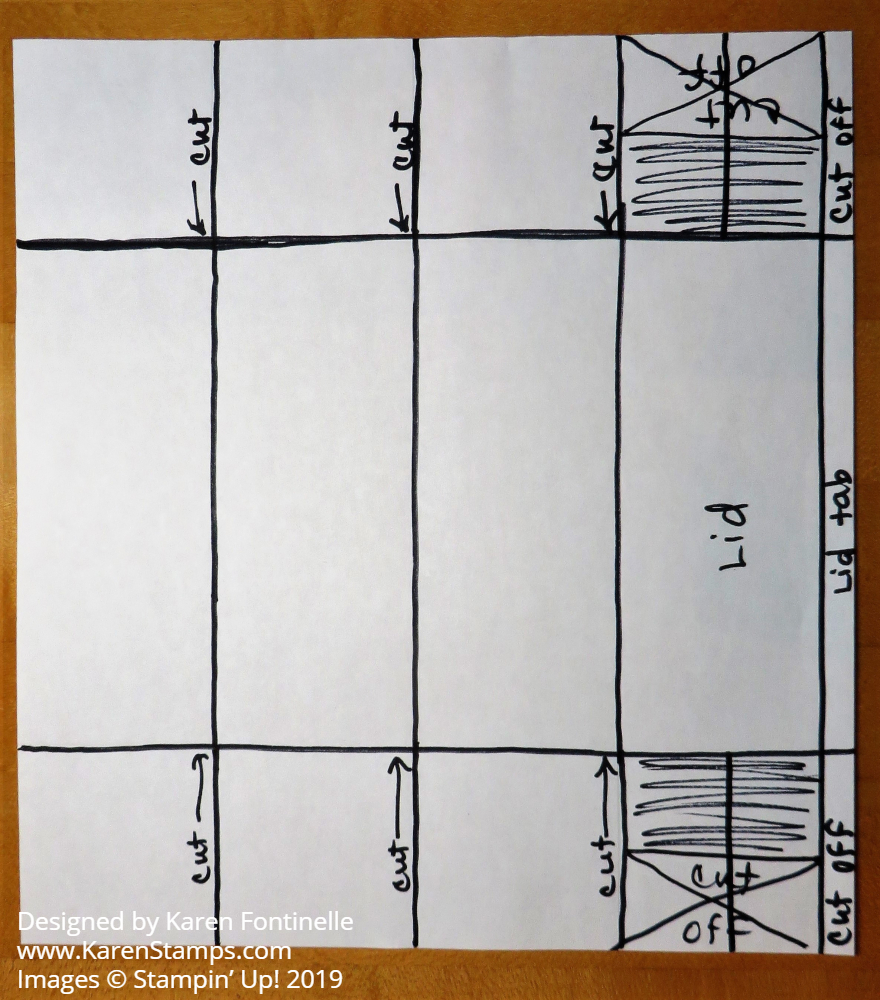
Just start with a 6″ x 6″ square piece of paper (I used a sheet of Gingham Gala 6″ x 6″ Designer Series Paper) and score like a tic tac toe. Score at 2″ and 4″, then turn and score at 2″ and 4″. Cut up on the two vertical score lines up to the horizontal score line. Do the same on the opposite side. See the diagram below. Cut a handle of about 8 1/2″ x 1/2″.

Easy Paper Easter Basket Scored Diagram

Crease and fold all score lines. If you like, use the Detailed Trio Punch to round all four corners. Or you can leave them as is. Form the paper into a basket and use brads or glue to hold the sides and handle together. The handle goes in between the two side flaps and the center flap. That hides it a little bit on the inside.

Easy Paper Easter Basket Assembled

Decorate however you like. I made a bunny face with a Circle Die and two Oval Dies (or you could use punches) and then used the tip end of Stampin’ Blends markers to draw on the pieces to make a face. Just adhere to the side of the basket with Stampin’ Dimensionals.

Easy Paper Easter Basket With Bunny

If you would like to use cardstock for the basket and decorate with some designer paper, this is how you would do it! I used Melon Mambo Cardstock and Garden Impressions 6″ x 6″ Designer Series Paper. Everything else is the same as the gingham bunny basket.

Easy Paper Easter Basket with DSP
Easy Paper Easter Basket with Daisy

For this basket, I used the Daisy Punch to punch two layers and adhered the flower to the side of the basket. I added a Gold Faceted Gem to the center.

Easy Paper Easter Basket Stamped

For my last basket, I simply stamped on the cardstock to decorate it! It uses Pool Party Cardstock and the flower is from the Painted Glass Stamp Set. To finish it off, I tied a bow with the Petal Pink/Whisper White Variegated Ribbon.

Now just fill the basket(s) with some Easter grass or paper shred and fill with some delicious Easter candy! These would make cute treats for someone or a cute table favor for Easter dinner.

Have fun making your Easy Paper Easter Baskets!

Storage by Stampin’ Up! Design Your Space Your Way!

Stampin' Up! Storage Ad Square

It’s not an April Fool’s joke! You can buy storage solutions for your crafting space from Stampin’ Up! beginning TODAY! Use the pieces to design your own space according to your own needs. Buy it all or buy it piece by piece according to your budget and what you need!

Click the photo below! Or see it all in the Online Store!

Stampin' Up! Storage Configuration Chart
CLICK THE PHOTO TO READ THE FLYER!

Today is the day! These are white plastic modular units for storing ink pads, markers, Stampin’ Blends, and open storage cubes. The open storage cubes can be used for various storage needs, whatever you want to put inside them! We don’t have the storage yet so in the next few days, you will see ways to use all these pieces. Note that the old ink pads DO NOT fit in the ink pad holders. They are designed for the new style of ink pads. Perhaps the old ones and others, like Stazon and Memento, will fit in the empty cubes. We will have to see!

Shop for Stampin’ Up! Storage HERE in the Online Store!

Also available beginning today, April 1st…..this very pretty Floral Grid Paper with the new Stampin’ Up! artwork in the corners! It’s lovely and I use Grid Paper all the time. I will say this paper does not have measurements printed on it although you can pencil the inches in. It’s very “happy” paper to stamp on! Just having the grid lines to keep everything straight or center or use it as scrap paper to easily do some trial stamping or make sure your stamp is inked up or check a color of ink or marker is very handy. I couldn’t stamp without grid paper! Available while supplies last!

Floral Grid Paper
Stampin’ Up! Floral Grid Paper #150819

So refreshing to start a new month with new Stampin’ Up! products! Now run and check out these Storage by Stampin’ Up! products and start planning your craft space!

A Favorite Stampin’ Up! Sale-A-Bration Stamp Set

So Hoppy Together Frog Tag Card

Sale-A-Bration is coming to an end tonight, as hard as it is to believe, so I thought I would make one last card with a favorite Sale-A-Bration stamp set, So Hoppy Together! Funny thing is, I didn’t want this set in the beginning, but as I saw some cute samples other people made, I had to have it. I have to say I have enjoyed using this stamp set for many whimsical cards with these cute frogs!

The frogs are easy to stamp in Memento Ink and then color in with Stampin’ Blends markers. You could also use Stazon Ink and color with watercoloring techniques with ink refills or the Stampin’ Write Markers. I just have fun when I am coloring these frogs. Each one has a different look! And the sayings are good too! I used a paper from the Botanical Butterfly DSP for the layer on the card. The opposite sides of the paper have other designs!

So today we wrap up Sale-A-Bration, Stampin’ Up!’s biggest promotion of the year! Who doesn’t like getting free stuff?! I hope you placed an order and got your free item(s) and maybe more! It’s always fun to get something extra!

If you haven’t ordered yet, Sunday, March 31 at 11:50 pm MT is the absolute deadline. You can order any of the catalog items or items in the Occasions Catalog. It’s all in the Stampin’ Up! Online Store! And when you have your order entered, it will prompt you to add your Sale-A-Bration items at the bottom, one for every $50 you spend….or two for every $100..or one higher value item for $100….lots of combinations!

Be sure to place your order TODAY! Sunday, March 31! If the frogs in So Hoppy Together aren’t your favorite, pick something else like the Botanical Butterfly Designer Series Paper or the Hello Cupcake Stamp Set or the Pizza Boxes or the beautiful Petal Promenade DSP or the TWO rolls of the Rich Razzleberry Velvet Ribbon!

Enjoy your last day of Sale-A-Bration!

I told you to remind me it was the last day of Sale-A-Bration!

Last Two Days of Sale-A-Bration! Get Your Freebies!

More Free Sale-A-Bration Items

Hard to believe, but this is the last weekend for Stampin’ Up! Sale-A-Bration! Seems like the holidays just ended, the new Occasions Catalog came out and Sale-A-Bration started! Whether you have already placed your order or not, the deadline is tomorrow night for sure! We all like free stuff and what is better than Stampin’ Up! free stuff during Sale-A-Bration!

Here are some of my favorite projects I made with SAB products!

Tiny Treat Box With So Hoppy Together Frog

Tiny Treat Box So Hoppy Together Frog

Love What You Do Frog Card

Love What You Do Frog Card

Butterfly Gala Card

Free Butterfly Paper During Sale-A-Bration

Butterfly Gala Note Cards

Botanical Butterfly Note Cards

Hello Cupcake Birthday Card

Hello Cupcake Birthday Card

Butterfly Gala Gift Bag

Easy Botanical Butterfly Mini Gift Bag

Azaleas and Petal Promenade Designer Paper

Quick and Easy Petal Promenade Floral Card

Country Floral Embossing Folder

Country Floral Embossed Card For You

Colored Country Floral Embossed Card

Country Floral Embossed and Colored Floral Birthday Card

Those are just a few projects I’ve made during these Sale-A-Bration months! I thought this year had really good products to choose from. Obviously, they were great because several sold out! But we knew it was “while supplies last”. And this year, the supplies did not last!

Be sure to check your Wish List and basic supplies. Maybe you just want to stock up on ink refills, adhesives, new ink pads, cardstock, ribbons, whatever! You can get to $50 easily….and more, for sure! Or splurge on something like the Stamparatus!

You can also order a 3-month Prepaid Paper Pumpkin subscription to get SAB credit, even if you already are on a month-to-month subscription. It will work out!

Go ahead and shop and then choose your free Sale-A-Bration items with every $50 you spend!

SHOP STAMPIN’ UP! ONLINE!

Watercolored Easter Egg Notecard

Watercolored Easter Egg Notecard

The other day I saw on Facebook a Stampin’ Up! post of a stamping technique that a French Demonstrator, on the Artisan Design Team, had used on a card using the acrylic blocks. I had already been reminded of an Easter card I made of an oval shape and decorated like an Easter egg, so I used her technique to make a Watercolored Easter Egg Notecard.

You can use the largest oval framelit in the Layering Ovals Framelits Dies to make this card although it is a little small. If you want a larger card you will need some kind of template. I just used a notecard in the Note Card & Envelopes since the egg will be small anyway. Fold the note card and position the largest oval die over the note card (closed) but having it off the card a bit over the fold. In other words, you do not want to cut a portion of the fold. If you do, you will have two ovals cut out of the Note Card but they won’t be connected by the fold. Just slide the oval off to the left a little bit so you will still have a fold.

You can see how I made an Easter egg-shaped card HERE a few years ago. The die will cut through the two layers of the card and still have a fold as long as you move the die to the left of the fold.

This is how I colored my egg card. I used a larger acrylic block that the egg could fit on. Then I chose several colors of ink pads and picked up ink from each color with my Aqua Painter one at a time and colored it onto the acrylic block. Instead of picking up the block and stamping it on the card, I placed the front of the egg card down onto the acrylic block loaded with stripes of colors of watery ink. Just press and then lift up carefully.

Depending on how much ink and how much water from your Aqua Painter (or brush) that you use and how you lay down the colors, you will get a different look on your card each time you make one. It’s really fun to do a technique where each time the final look will be a surprise! You could also color directly on the card, but Whisper White cardstock doesn’t hold up really well to very much water. I would recommend using Shimmery White Cardstock.

To decorate my Easter card, I used the Easter greeting from the Fable Friends Stamp Set. It is stamped in Highland Heather ink and layered on Highland Heather Cardstock, both die cut from the Layering Ovals Framelits Dies. For a little bling, I added some self-adhesive Basic Sequins.

As I was getting an envelope for the note card, I decided to color the envelope flap to match. It doesn’t match exactly because I didn’t use an acrylic block, I just colored directly onto the envelope flap. This does make the flap a little “warpy” and the glue on the flap inside gets a little damp so make sure the flap is open. And finally I stamped the bunny from the Fable Friends Stamp Set in Highland Heather on the front of the envelope.

This is a pretty small little Easter egg card but very cute and fun! You can try this technique or you can make one like the one I linked to from three years ago. Of course you can use this ink-on-the-acrylic-block technique to make lots of different kinds of cards, even just stamping the block onto cardstock and leaving a rectangular stamped shape as the Artisan team member did. Get out some ink and an acrylic block and experiment for yourself in making whatever cards you like or one for Easter like my Watercolored Easter Egg Notecard.

SALE-A-BRATION ENDS SUNDAY, MARCH 31! DON’T MISS IT!

The New Stampin’ Up! Solution For Storage and Organization!

Stampin' Up! Storage Banner w Info
Image (c) Stampin’ Up! 2019

If you have been wishing Stampin’ Up! would come out with some stamping storage and organization solutions, your wish is about to come true! Stampin’ Up! just announced these new storage products will be available April 1st! Get ready to get your supplies all organized!

This new product line, Storage by Stampin’ Up!, provides you with modular storage solutions that let you organize—and customize—your space your way! This is different from many solutions out in the market. You can move pieces around, stack different ways, make it work for you and your space. Watch the video below to get an idea of how this new storage line will work!

Stampin' Up! Storage Configuration Chart
Click photo to read flyer!

This will give you some idea about the new storage solutions PLUS the Floral Grid Paper will be available! Very pretty grid paper to work on!

Stampin’ Up! says the old ink pads will not fit in this ink pad storage. So if you want, stock up on some new ink pads, introduced in the current catalog last June, you might want to do that during Sale-A-Bration, which ends Sunday, March 31, so you can take advantage of that!

ALL THESE NEW PRODUCTS WILL BE AVAILABLE APRIL 1st!

Small Easter Basket With Scalloped Tag Punch

Small Easter Basket With Scalloped Tag Punch

If you are looking for a fun and easy little basket, try this Small Easter Basket with the Scalloped Tag Punch. It is really easy to make and you can decorate it however you like. The Scalloped Tag Topper Punch makes cute sides with an opening for the handle, but if you didn’t have this punch, you could just leave the side as is, unpunched. I just love this cute little Easter candy I found! It looks so cute in a little basket! Some chocolate eggs would be nice, too!

It’s very easy to make this little basket! I used Calypso Coral Cardstock with a layer of Happiness Blooms Designer Series Paper on the front and back sides. You could use whatever paper you like, or stamp the cardstock, heat emboss, or emboss with the Big Shot and a folder. Anything goes! To make the basket, cut two strips of cardstock 2″ x 7 1/2″ and punch one end on each strip with the Scalloped Tag Topper Punch. Score at 3″ from the scalloped top and fold. Those will be the ends of the basket and you can adhere the bottom pieces together, one on top of the other.

Also cut two pieces of cardstock 2″ x 5 1/2″.  Score 1/2″ at each end. These pieces will be the front and back sides of the basket. If you are going to adhere designer paper or stamp or decorate these two pieces, it’s a good idea to do it before you assemble the basket. The designer paper pieces are cut at 1 3/4″ x 5 1/4″. Once you have everything ready, glue all the pieces together to form the basket.

For the handle, cut a strip 1/2″ x 8 1/2″. Insert each end through the scalloped tag punch opening and glue to inside of basket. See photo of inside.

Small Easter Basket With Scalloped Tag Punch Handle

Just to decorate the basket a little, I tied around a piece of Calypso Coral 3/8″ Satin Ribbon. You could make a little paper flower or add an Easter greeting or whatever you like!

Go get your “craft supplies” (chocolate candy!) at the store and then make some Easter baskets like this Small Easter Basket With Scalloped Tag Punch.

Don’t Miss Stampin’ Up! Sale-A-Bration!

Time Is Short! Sale-A-Bration Ends Soon!

SAB Banner 2019

March 31, 2019 is almost here, so time is short! Sale-A-Bration comes to an end that night and the “free stuff” will be all over! Don’t miss out! Stock up on some basics for your stamping or choose those things you’ve been lusting after in the Stampin’ Up! catalogs. With every $50 you get to choose a FREE Sale-A-Bration item. Upon reaching $100, you can choose two free items OR one $100 category choice…..and so on! No limit! And with a $150 you also get Stampin’ Rewards….and with a $250 order you earn an EXTRA $25 in merchandise (plus Stampin’ Rewards).

If you would like to JOIN Stampin’ Up!, this is the week! Check out the extra benefits PLUS you can choose to get the special Craft Tote Bag along with your Starter Kit.

Here are the Sale-A-Bration choices (as I write this!):

And here are items you may choose with a $100 purchase!

And here is the Craft Tote you can choose if you want to join Stampin’ Up!
Join Stampin' Up! Sale-A-Bration 2019

Butterfly Gala Thank You Card With Floral Garden Impressions

Butterfly Gala Thank You Card With Floral Garden Impressions

When my daughter was here for a visit last week and pulling out lots of paper and stamps, some retired, when we went to put away the Garden Impressions Designer Paper I honestly couldn’t remember if it was current or retired! I hadn’t used it in a long time! So I thought it was time to USE IT, along with the Butterfly Gala Stamp Set and the Butterfly Duet Punch to make this Butterfly Gala Thank You Card With Floral Garden Impressions.

The Garden Impressions paper is a pack of 6″ x 6″ sheets so it is a little easier to work with. So many pretty floral patterns and on the other side a more generic, plain design. This pattern with the Night of Navy background and So Saffron flowers jumped out at me so I chose to use that. The card base is Night of Navy with a Whisper White layer. The strip of designer paper is 5 1/4″ x 2″. The ribbon is the beautiful Gold 3/8″ Metallic-Edge Ribbon, so useful to have on hand.

The butterflies are stamped with the Butterfly Gala Stamp Set, colored with Stampin’ Blends markers and punched out with the Butterfly Punch. Unfortunately, at the moment, the punch is back ordered and unable to be ordered until they get more in stock.

The greeting on the card is from the same Butterfly Gala Stamp set, along with some other very nice greetings. Luckily I didn’t mess it up when I stamped it just above the ribbon. Well, somehow I did get a slight black ink smudge in the upper left corner, but I was able to cover it with the butterfly wings! The large butterfly is popped up with Stampin’ Dimensionals and the other two are just adhered flat with Glue Dots.

Remember, Sale-A-Bration is going on just one more week!! Wow, does time fly!! You can still get the Botanical Butterfly Designer Series Paper FREE with a $50 purchase, at least as I write this! I’m surprised this paper didn’t sell out early on because it is so fun with the butterflies on one side and some black and white designs on the other. If you like butterflies, you do want this paper!

If you didn’t want to take time to color in butterflies, you could simply make this same card without them! The Garden Impressions 6″ x 6″ DSP is pretty enough! Stamp a greeting, maybe add a ribbon and you’ve got a lovely card. Check out these products in the Stampin’ Up! Online Store and get your Sale-A-Bration order in before you miss out!