
Believe it or not, as I’m putting away my Christmas decorations, Valentine’s Day is not so far off, only a month away so here is my first Valentine sample card, Sweet Talk Valentine’s Day Card With Tags. I started this card by simply looking through the very cute Sweet Talk 12″ x 12″ Designer Series Paper and picking out one paper I especially liked. I liked a lot of them, probably all of them!
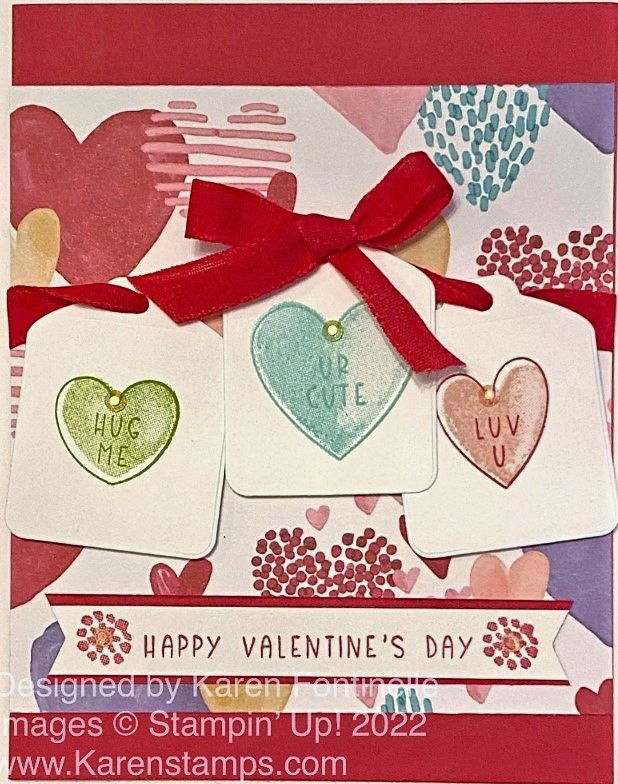
I decided to place the designer paper on the Real Red card base in a slightly different way. I cut it as wide as the card (4 1/4″) but only 4 1/2″ long. If you place it in the center of the card front, this leaves a 1/2″ margin at the top and bottom of the card. Just something a little different! Before you adhere any designer paper, think about if you want the ribbon to wrap around to the back or whatever else.
While trying to decide what else to do with the card, I looked at the Sweet Hearts Dies and got the idea to use the tag die in there. I decided to die cut and stamp three tags and then sort of string them across the card with some ribbon. I used the Sweet Conversations Stamp Set. You can get the stamp set and dies in the Sweet Conversations Bundle. I stamped a different heart, color, and saying on each one. I used Granny Apple Green, Pool Party, and Real Red outline with a Blushing Bride pink heart. The hearts are two-step stamping. Stamp the outline and words, the stamp the solid heart to fill in if you like.
I used the Real Red Faux Linen Ribbon to string the hearts together and adhered the ribbon around on the back of the designer paper before adhering the paper to the card base. I used Stampin’ Dimensionals® under each tag to hold it in place but you could let them dangle if you wanted to! I also tied a separate bow and adhered it to the top of the middle tag with Mini Glue Dots.
The greeting at the bottom is also in that stamp set. I just stamped it in Real Red ink on a scrap strip of Basic White and also stamped the little flower design on each end. The strip is layered on Real Red just 1/4″ wider and then made the banner ends with the Tailored Tag Punch.
For the grand finale, I had to add some of the new Iridescent Rhinestones Basic Jewels, one on each flower at the end of the greeting and one on each heart on the tags! They look prettier in person than they do on the photo!
When you are trying to think of a card design, just pull out some designer paper and see what speaks to you and see what you come up with! Some ideas will come to you for sure, even if they are simple!
Start thinking about Valentine’s Day because it is only a month away!!