Happy Thanksgiving to You & Yours!

Happy Thanksgiving to You & Yours!
You may want to send a few cards to your loved ones or friends for Thanksgiving like this Amber Autumn Thanksgiving Card. It’s time! I can’t believe how fast Thanksgiving has snuck up on us! Anything “fallish” will do, but I have loved this Amber Autumn Stamp Set since it came out!
For something different, I decided to make this a “book fold” card. I also chose some “fallish” colors of cardstock scraps to decorate the background of the card. To make the book fold card base, cut the cardstock at 11″ x 4 1/4″. With the paper placed horizontally, score at 4 1/4″ and 5 1/2″. Of course, normally you would score that card in half at 5 1/2″, but for the book fold you add in that extra inch and a quarter and adhere that to the inside of the card. If you think you want to add ribbon or twine around this “binding” part, do it before you adhere that section or just place the ribbon around the cardstock or designer series paper you adhere to that section on the front. If you forget, there are ways around it!
I chose different color scraps of cardstock in fall colors to make the background of this card. On the left book binding section, I adhered a piece of Timid Tiger cardstock. The other colors are Cherry Cobbler, Lost Lagoon, Crushed Curry and Old Olive.
Once these pieces were adhered, I stamped the acorns and leaves image from the Amber Autumn Stamp Set with Versamark ink. I tried to stamp them randomly on that area. Since they were already adhered to the card, I didn’t want to get the stamping on the Crumb Cake card base, so I placed other scrap pieces of cardstock along whatever edge I would be stamping on as a mark to protect the card base from the ink. I probably could have done it a better way, but this worked. Same with the Timid Tiger piece being stamped with just the leaf images.
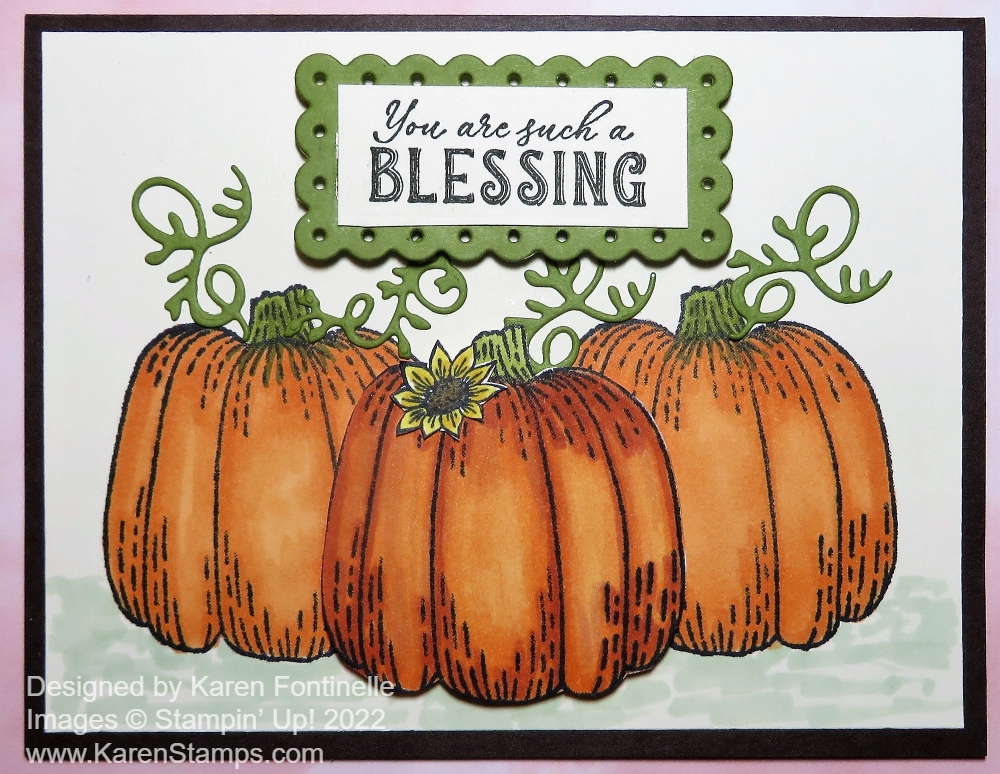
For the focal point, I stamped the pumpkins, squash and corn image from the Amber Autumn Set in Memento ink in black on Very Vanilla. I colored in the images with Stampin’ Blends. Some of the colors I used were Pumpkin Pie, Timid Tiger, Daffodil Delight, Granny Apple Green, and Old Olive. Then I scribbled in some Pool Party around the background just to add some color to the background. This image was diecut with a Stylish Shapes circle die and layered on a larger circle of Garden Green.
The greeting is stamped in Garden Green ink from the Amber Autumn Stamp Set on Very Vanilla and made little banner ends. It is glued down flat across the pumpkins.
The pumpkins image is popped up on a lot of Stampin’ Dimensionals since I held down the Gold Striped Ribbon with the Dimensionals. I just wound it back and forth on the back of the circle die. Since I didn’t think to add ribbon around the binding section before adhering it, instead I added three of the large Timid Tiger 2025-27 In Color Flat Pearls to the side for something different!
I think these Book Fold cards are fun to make, hence the name “fun fold” cards for anything folded differently than the norm. Many can get very complicated and take some extra work, but this book fold card only had one extra score line and a little glue in a different place!
Thanksgiving, surprisingly, is only one week from Thursday on November 27th! Remember, Stampin’ Up! is celebrating Black Friday this year for the first time a couple of days early, November 25 – December 1 for discounted prices on select products. That’s all I know! Maybe we’ll all be surprised on the 25th! And that is one month until Christmas!! Oh my goodness!

It’s November already so here is an Amber Autumn Card For November. You could easily use this card for Thanksgiving although a Happy Thanksgiving greeting is hard to come by! Now that Halloween is over we can turn our attention to Thanksgiving and Christmas coming up.
The card base is Early Espresso with a layer of one of the plaids in the Timeless Plaid 6″ x 6″ Designer Series Paper. This paper is so versatile with it’s different plaid patterns and pretty colors. The pumpkins are stamped from the Amber Autumn Stamp Set. I used Memento ink and colored in with various colors of Stampin’ Blends markers. I used Very Vanilla cardstock and then diecut with one of the Branching Out Dies. I think these dies are on their way to being favorites! I love how they can be layered with lots of different sizes. I chose Pecan Pie cardstock for the layer.
Although that was all I planned to do with this piece, it seemed to be missing something. I got the idea to use the Metallic Textures Rub Ons for a little extra something. You can cut out the exact area you want to use so I cut out three different small groupings of gold dots and applied them around the top of the pumpkins. The card needed a little gold!
At first I tried a greeting in one of the ephemera packs, even sponging it with some Pecan Pie ink but finally decided the white background clashed with the Very Vanilla cardstock on the card. I was hoping there was a Happy Thanksgiving in the ephemera pack but I didn’t find one. So I stamped my own greeting from the Amber Autumn Stamp Set on a strip of Very Vanilla in Pecan Pie ink and popped it up on MIni Dimensionals.
These months are really flying by, but even in Houston TX the temperatures have dropped a little so that it feels like fall. I’m going to put away my Halloween decorations now and get out my Thanksgiving decorations! And maybe make a few Thanksgiving cards to send!
I always say having a Paper Pumpkin monthly subscription from Stampin’ Up! is a gift you give yourself! When I get my kit, it already looks like a gift when I open up the box and see the supplies wrapped up in colored tissue paper! Then I open up the supply package like it’s Christmas and see what all is included! In the photo above , you can see what I discovered when I opened everything for the September 2025 Kit, Fall For Toile! You get the card bases, envelopes with decorated flaps, diecuts, stamp set, ink spot, ribbon, and adhesives! I don’t think I even needed a scissors!
This was a set of nine cards for fall, 3 each of 3 designs. All the kits are easy enough for anyone to make. You get pictorial directions plus you can watch a video, which I usually like to do regardless. The directions show you where to put the adhesive on each piece and what kind of adhesive, which, again, is included in the kit. I would say this kit was really easy to make. Just some easy stamping on the diecut pieces for two of the greetings and some acorns for another decorative piece, a little ribbon to add to three of the cards, and the rest was just adhering the diecuts to each card. These are beautiful cards to send to friends and loved ones for fall or even Thanksgiving.
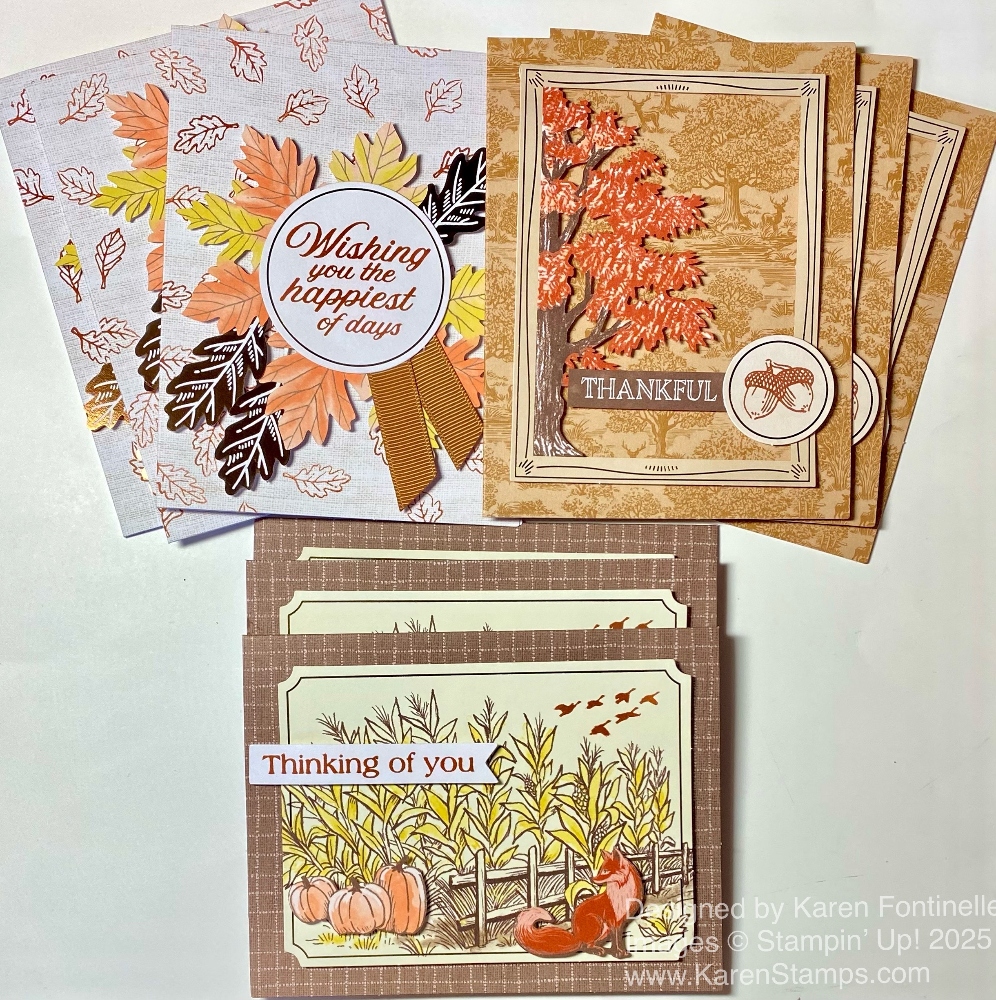
The top left card was the most “difficult”. It was fun stamping leaves around the edges of the card. I always like doing that random stamping! Then I had to placed the two diecut leaf groupings together, plus the foil-accented dark leaves on the card, all popped up on Dimensionals. Then the stamped greeting and ribbon adhered to the back was adhered over the intersection of the leaves.
The top right card is the first one I made. The card base already has that pretty toile background on it (also on the backside of the card!). The greeting was already printed, I only stamped the cute pair of acorns. The tree and frame are a diecut popped up on dimensionals.
The bottom card was the very easiest. I stamped the little birds in the corner of the cornfield and adhered it to the card base with Dimensionals. The pumpkins and fox are all diecuts and popped up also. The greeting is stamped and popped up. Nothing could be easier to make!
You, too, could get in on the fun of Paper Pumpkin Kits by subscribing before October 10th. For October you will receive a Kit to make Christmas cards that have flocked pieces to decorate the cards. For November, your Kit will make small goodie boxes perfect for the holidays to present a gift card or small gift or treat. Personally, I like the holiday kits the best, but then I love holidays of all kinds!
When you become a subscriber, besides getting the kit in the mail every month, you also have the option to purchase any past kits that are available, refills (which do not include the stamp set or ink spot, but otherwise have all the same supplies), and some add-ons like small dies that you can use to enhance your cards and projects or use any time. If you like a past kit but only see a refill, you can probably make use of that even without the stamp set and ink spot that would come in the full kit. For example, this fall kit I am showing has already been mailed out to subscribers, but once you subscribe, perhaps the “refill” kit will still be available, as it is as I write this, and you can just use some of your own stamps and ink to make the cards. Then your first kit will come in the mail, Cozy Christmas, right after October 10th.
And you can always use your supplies any way you like! Lots of alternatives are always posted online as soon as people get their kits and start creating. For example, with this month’s kit, with the card bases printed on both the front and the back, you could cut the two sides apart and make twice as many cards by adhering the printed part of the kit card to your own cardstock base. You can change it up however you like. Sometimes I make some of the cards as designed and then make my own alternatives. It just depends on what you like to do. If you are a beginner, at first you will probably just want to follow the directions for the fun of crafting. As you get more experienced, you might like to make the projects a little bit different – maybe add your own greeting instead or add your own embellishments if you have some.
To join Paper Pumpkin, just click the link below. No risk, no obligation to continue for any length of time. Stampin’ Up! guarantees every kit, so if you have a problem, just let them know. You can even skip a month if necessary or if the hint of the upcoming project doesn’t appeal to you. It used to be a total surprise what would come in the kit, but now we get somewhat of a hint, which I am happy about. Subscriber or reactivate a previous account you had, by October 10th! The 10th of the month is the date to always remember if you want to make any changes to your account as that is the date the current subscription ends and on the 11th the new kit comes out. It’s easy to go into your account and skip a month, or heaven forbid, cancel! I hope you will try out Paper Pumpkin and enjoy some pre-planned crafting with all the supplies right there in your box! And wrapped up in tissue paper like a gift!!
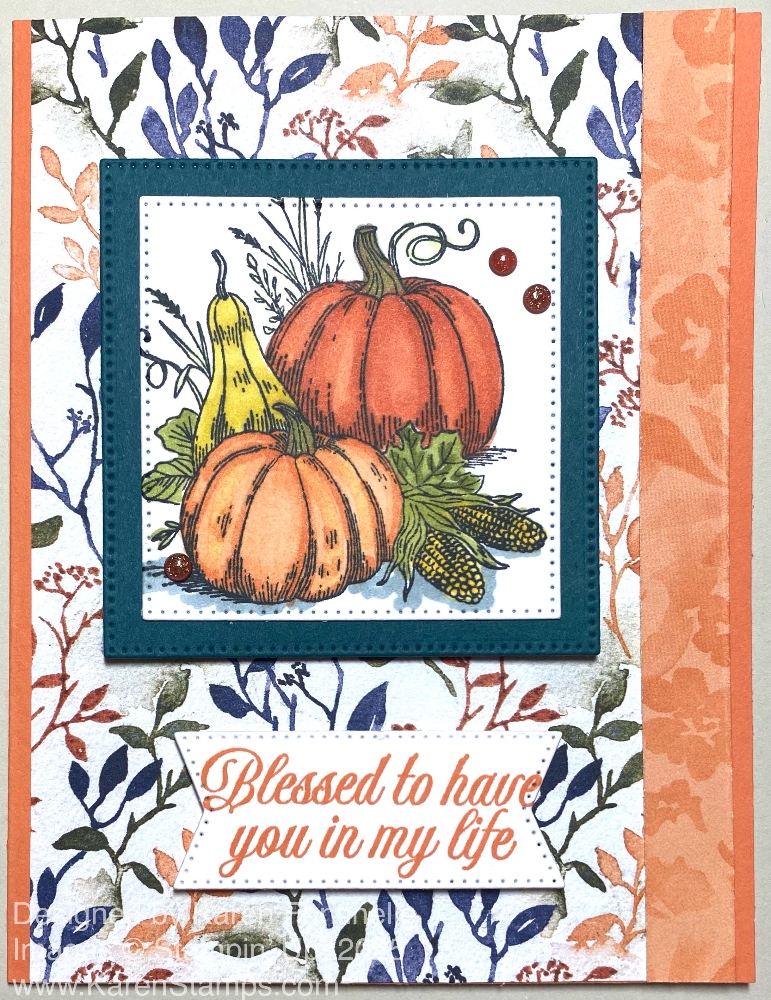
This Floral Charm Blessed Fall Card shows that you can mix and match different papers and stamps and still make a pretty card! What I ended up with isn’t what I started out to make, but I like how it turned out! I thought I was going to make just a pretty floral card with the Floral Charm Designer Series Paper and maybe a diecut flower or two, but when I pulled out this paper, everything changed!
This pretty paper just looked like fall to me! It has various greens, browns, and oranges in it so it is perfect! The card base is Timid Tiger, one of the 2025-2027 In Colors. The designer paper was cut at 5 1/2″ to fit the full length of the card front and 4 1/2″ wide. To show off the other side of paper, I folded back 1/2″ on the right side to reveal the orange floral “other side”. Because some measurement was a little bit off, I centered the paper with the folded right side on the card front with a little margin of Timid Tiger visible on each side.
I thought the pumpkin image in the Amber Autumn Stamp Set would go perfectly with this designer paper. I stamped the pumpkins with Memento ink on Basic White cardstock. The image is colored in with various Stampin’ Blends markers. I used Timid Tiger, Pumpkin Pie, Daffodil Delight, Darling Duckling, Old Olive, Pecan Pie and a little Cloud Cover for the shadow. I diecut this with the second largest square in the Stylish Shapes Dies, then cut a larger square out of Pretty Peacock cardstock to match some of the foliage colors in the paper. These two pieces are popped up on Stampin’ Dimensionals.
The greeting is also in the Amber Autumn Stamp Set and is stamped in Timid Tiger ink on Basic White cardstock. I used a banner die in the Stylish Shapes Dies. The greeting just barely fit inside the die, but I didn’t want anything too large so this worked out fine. The greeting is also popped up. You could adhere the stamped image and greeting flat on the card as well if you preferred. I really wanted to use the new Cajun Craze & Gold Dots which you can find in the Gathering Together Suite Collection. I managed to fit three of the smallest ones around the pumpkins. These dots are a great color for fall with a little gold dust, it looks like, inside them!
Remember to check out ALL the new products Stampin’ Up! released on Sept. 3rd! New Mini Catalog, new Online Exclusives, and two new Kits in the Kits Collection! Not to mention, only a few more days to sign up for the Paper Pumpkin subscription and get a kit to make some fall cards with all the supplies included in the box that shows up in your mailbox like a gift to you!

Happy Thanksgiving To You!
I hope you and your family or friends are having a wonderful Thanksgiving together! I am thankful that you are one of my customers, blog readers, or that you just happened upon my website! I hope you enjoy the ideas you find here! There’s more to come through the holidays!
Enjoy that turkey dinner and especially the pie and dessert!

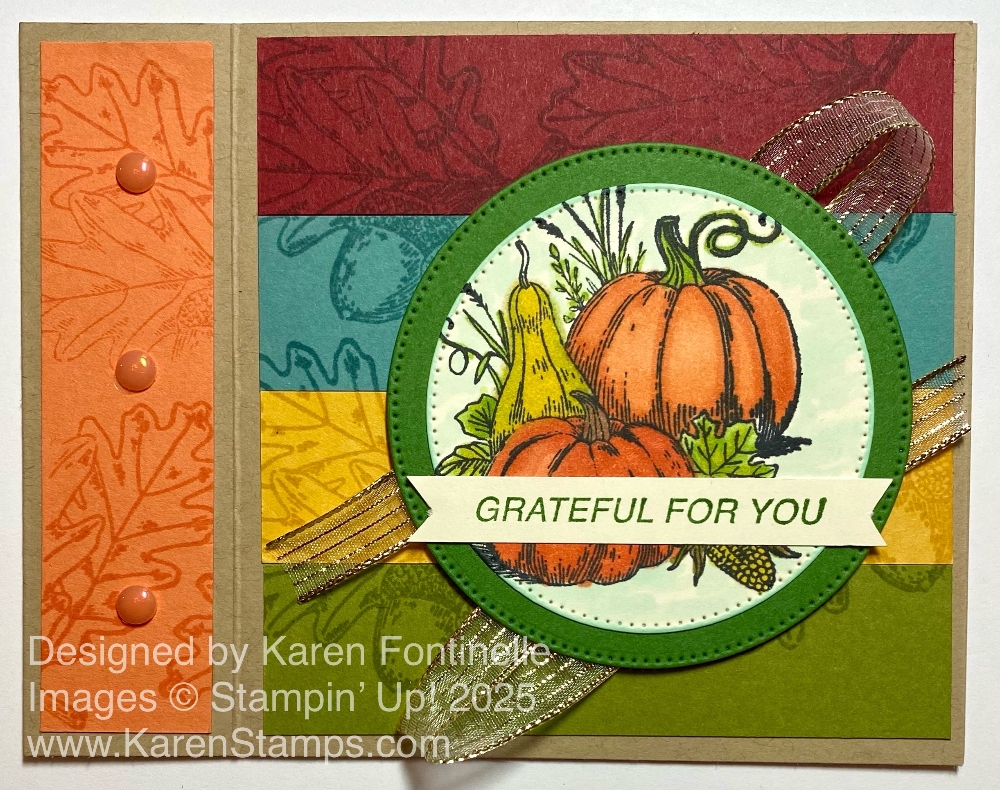
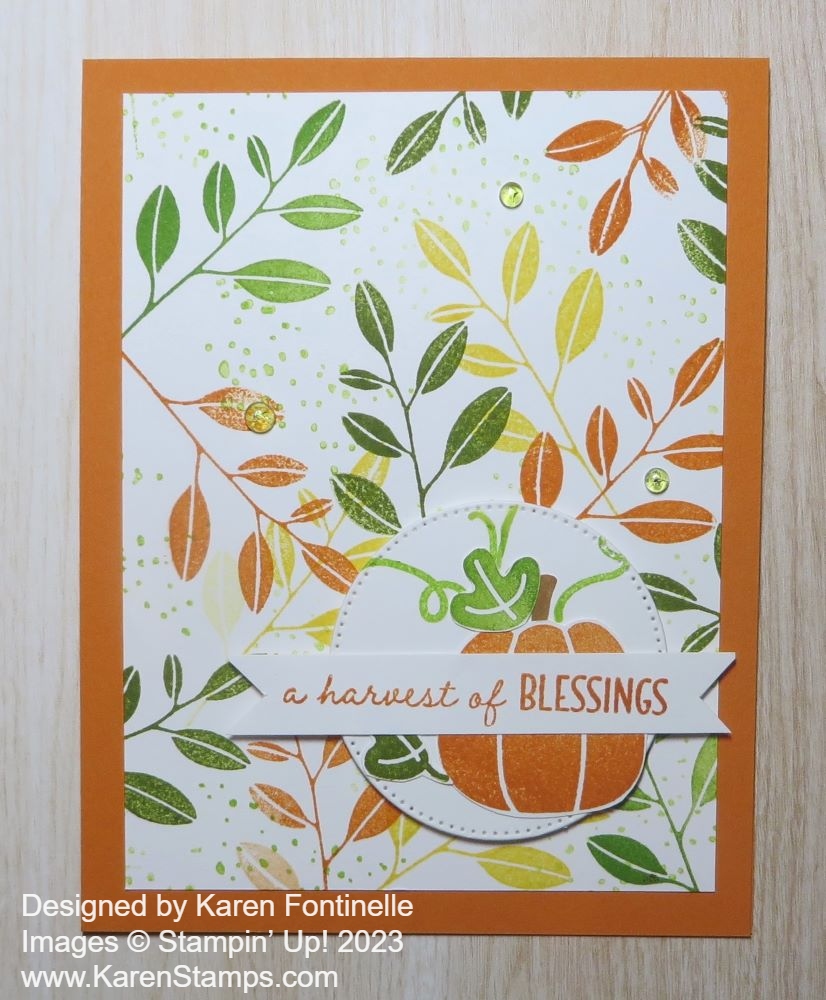
I think this Frames & Flowers Grateful For You Card is one of those cards that you could use for a Thanksgiving card, or any time, really. The card has fallish colors, somewhat colored leaves, and an appropriate greeting for the season of gratitude and thanksgiving.
The card base is Garden Green with a layer of Pumpkin Pie cardstock to bring out the orange colors in the leaves and to make the whole card look like it is made for fall. The layer on top of the Pumpkin Pie is a frame in the Frames & Flowers Specialty Designer Series Paper. The center just punched out of the frame. I chose to put a small piece of Basic White cardstock behind the frame. Then I chose a flower in the ephemera pieces that would look good in the cneter of that open frame. It is popped up on Stampin’ Dimensionals.
The greeting is in the Layers of Beauty Stamp Set. I think it can go for a regular card or this Thanksgiving card. It is stamped in Memento Black ink on Basic White cardstock. I cut it out with one of the Nested Essentials Dies. I then cut out another piece the same size in Garden Green and cut it in half horizontally and adhered the two pieces to the top and bottom of the stamped greeting. I adhered it flat to the card in case I wanted to put a gem that would stick up very much on the ends of the greeting.
For the embellishment, I chose some sequins in the Adhesive-Backed Shiny Sequins. These sequins come in Lemon Lime Twist, Lemon Lolly, Melon Mambo, and Pumpkin Pie colors. I used two Pumpkin Pie Sequins on the ends of the greeting and three Lemon Lime Twist sequins up by the flower.
When you want to make a card and have fun, use this Frames & Flowers Specialty Designer Series Paper or any of the ephemera packs that Stampin’ Up! now sells! The Frames & Flowers should be back in stock next week.

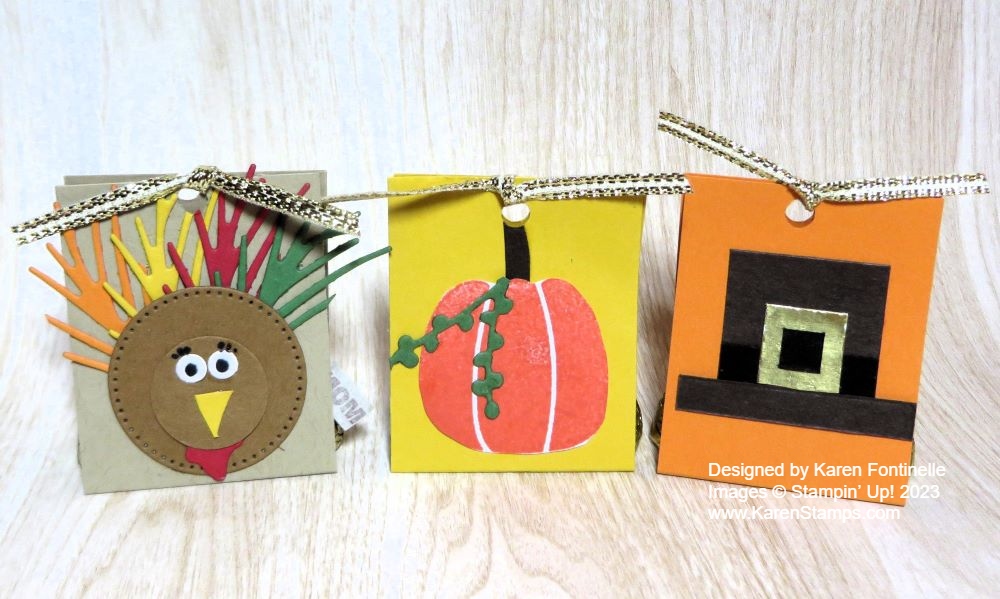
If you are serving Thanksgiving dinner at your house, you might want to make place cards so people know where to sit or just for a table decoration. When I was a little girl, I always liked to make place cards! Sometimes I made them at my grandma’s house when it was just my family and grandparents. I just folded some paper in half and stuck on a sticker or drew a little picture. Little did I know that years later I would have all kinds of paper, ink, and stamps and a multitude of tools and accessories to make place cards!
Here are three ideas for making place cards.

This little pumpkin is made with punched hearts. I used the heart in the retired Heart Punch Pack that had this regular heart punch and one with a scalloped heart punch. You may have other heart punches or heart dies you can use. If you have the retired Apple Builder Punch that would work also. Just cut or punch out several hearts and score them down the middle to make folding them in half easier. You can cut out a little stem by hand if you like.

Fold and crease each heart in half. Apply glue to the top of the first folded heart and adhere another folded heart to it, making sure it lines up pretty well on all sides until you have all the hearts stacked up and glued together. Use as many or few hearts as you like. Before making it into a pumpkin, use a sturdy scissors and cut off the bottom point of the stack of heart to make a straight line for the base of the pumpkin. You only need to take off a little bit. Die cut or cut out by hand a leaf and write a name of a guest for the place card. Then open up the stacked hearts. before you glue them together, adhere the stem if you cut one and the leaf to hold them. Glue the hearts together so you have a standing pumpkin! If you want to get fancy, maybe you have a stamp set with a pumpkin and can stamp that first and fussy cut or diecut, whatever you have, or shade the edges of the hearts.

Here’s the standard kind of place card, the kind I used to make for our family dinners. You can make it any size you want. Mine is a 4 1/2″ x 4″ piece of Basic White cardstock, scored in half at 2 1/4″. I stamped the small pumpkins from the Playful Ghosts Stamp Set, colored them with Stampin’ Blends markers, then cut out by hand. I also diecut some foliage from the Textured Floral Dies in both Lemon Lime Twist and Garden Green cardstock. If you have the Bough Punch you can use that. I cut the diecut foliage apart because I only needed little pieces to glue to the place card behind the pumpkin. I put just a tiny bit of glue behind the pumpkin to hold it in place while I glued down the foliage where I wanted it and then added a bit more glue under the sides of the pumpkins. An easier way, if you have the stamps that fit, would be to stamp a pumpkin, hold a mask over it, then stamp foliage on each side. Remove the mask that protected the pumpkin and yours should look like mine except stamped! Or simply stamp and color a pumpkin in the corner of the card.

This kind of place card is actually a little party favor, too! I simply covered a small chocolate bar with a piece of designer paper and added a name on top. I used a piece of the green plaid paper in the Season of Green & Gold Specialty Designer Series Paper. You could just use cardstock as well. I used a piece that was about 2 1/2″ x 3 1/2″. It all depends on your candy bar, of course. For this card, I diecut a piece from the Everyday Details Dies on which to glue on the pumpkins and write the name. On the other candy bar in the top photo, I used a diecut from the Unbounded Love Dies in Very Vanilla and used a Pumpkin Pie Stampin’ Blend just to outline the edges of the diecut, plus added two Gold Textured Dots. There are no bounds to what you can do with these!
These are just some ideas to get you started! Once you begin, you will likely come up with more and better ideas! Just have fun!

***REMINDER: TODAY, Nov. 15, is the LAST DAY for the Stampin’ Up! Seasonal Sale!
This Textured Floral Book Fold Thanksgiving Card is a Thanksgiving card you can make without turkeys, pumpkins, or Pilgrims. Just use some fall colors of flowers and paper and add an appropriate greeting.
This card is made in the Book Fold design. That means there is an extra score line on the front of the card which makes it look like a book when you open the card. Cut the paper at 4 1/4″ x 11″. Score at 4 1/4″ and at 5 1/2″. Crease and fold the score lines. Decide how you want to do the book fold. You can apply adhesive in that small area in between the fold and the score line on the front of the card. Or, if you don’t want to use adhesive, you could punch two holes in that side by the fold and tie ribbon through there to have a bow on the side of the card.
This card has a card base of Mossy Meadow cardstock. For designer paper, I used the Season of Green & Gold Specialty Designer Series Paper for layers on the card front. For the right side of the card, cut the designer series paper at 4″ x 4″. For the little side piece, cut the designer paper at 1″ x 4″.
For the main image of the card, I used a piece of Very Vanilla cardstock cut at 3″ x 3″ layered on a piece of Pumpkin Pie cardstock cut at 3 1/4″ x 3 1/4″. The flowers are stamped from the Textured Floral Stamp Set. One large flower is stamped in Pumpkin Pie ink, the other in Crushed Curry ink with a little Pumpkin Pie ink sponged on with Sponge Daubers. The little flower is stamped with Crushed Curry ink. The leaves are stamped in Old Olive ink and Garden Green ink. The flowers and leaves are diecut with the Textured Floral Dies.
The greeting is in the Layers of Beauty Stamp Set and stamped in Garden Green ink. It is diecut with a die in the Countryside Corners Dies. I made it smaller to fit on the card better by running it through the machine a second time after moving the die where I wanted it to end.
Two of the flowers and the greeting are popped up on Stampin’ Dimensionals. I added some Gold Textured Dots for some sparkle. On the inside of the card I added a piece of Very Vanilla cardstock, something lighter to stamp or write a message. Since I had an extra flower and leaf that I didn’t use, I adhered that inside the card for a little decoration.
You can send this card for Thanksgiving or for any other occasion with this beautiful floral stamp set. Try the Book Fold for something a little different.
Shop Stampin’ Up! Online HERE!
Last Day For the Seasonal Sale!

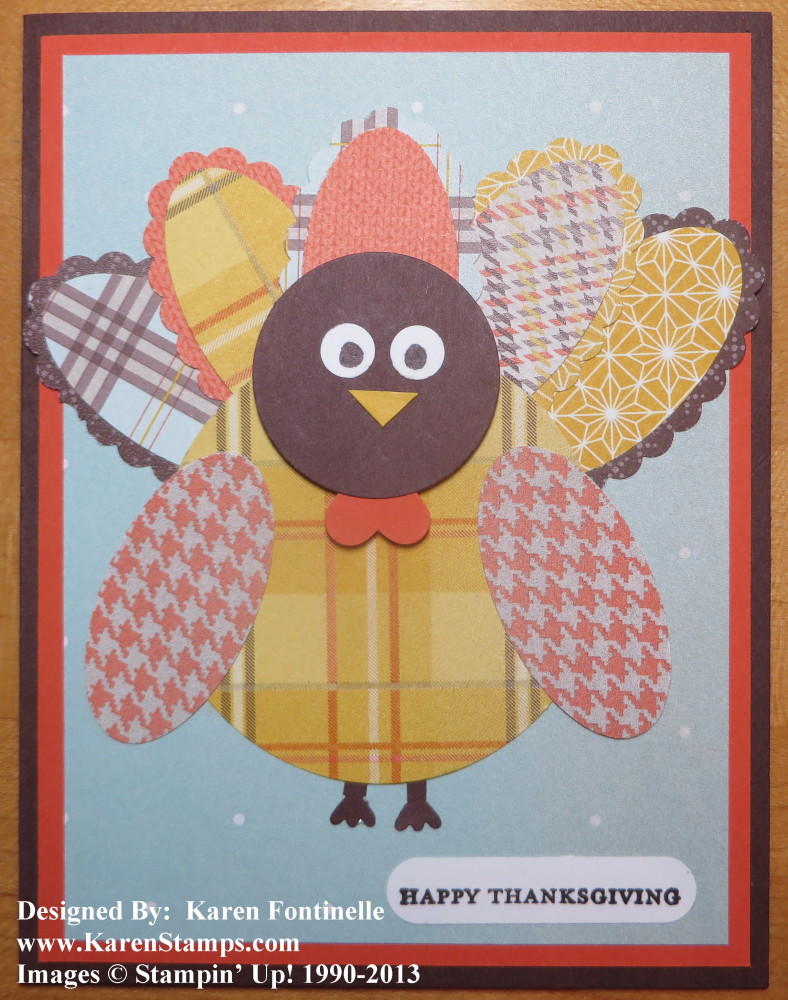
Here is a whimsical Thanksgiving turkey I came up with while thinking about a new Thanksgiving card. I’ve seen cards with turkeys made in different ways, so I thought maybe I’d use some kind of designer series paper. The first one that popped into my head was the Full of Life 6″x 6″ Designer Series Paper, with its watercolor designs and many different colors, including fall colors.
As I looked through all the papers, I came across this one pattern with the triangle designs and I thought this paper could be used for turkey feathers. I cut the design apart so I would have lots of colors to use for turkey tail feathers.

For the turkey body, I looked through the Meandering Meadows 6″ x 6″ Designer Series Paper and found this brownish design on “the other side” of one of the meadow patterned papers. I used two stitched circle dies in the Stylish Shapes Dies to make the turkey body and head.
To adhere the tail feathers, I applied a lot of Stampin’ Seal adhesive to the back of the largest circle, arranged the triangle pieces how I liked them, and stuck them to the adhesive. To adhere the body and feathers to the card I used Multipurpose Liquid Glue so that I could apply some to the tips of all the feathers and all the rest of the turkey. It is adhered onto another pattern in the Full of Life Designer Paper that has colors of green and orange for a background. The card base is Pecan Pie cardstock.
I adhered the turkey head onto the body and a little heart shape for his waddle, cut from a die in the Friends For Life Dies. The beak is cut from a piece of Daffodil Delight cardstock. The eyes are made with a punch I had and I colored in the black pupils with a marker. The hat is made with a 3/4″ x 3/4″ square of Basic Black and a little strip for the brim, plus a Daffodil Delight hat band. The turkey legs are two ends of a Real Red banner diecut just because I had it nearby.
The greeting is in the Choose Happy Stamp Set! I was surprised to find the word Thanksgiving in there but I searched “Happy Thanksgiving” in the Stampin’ Up! online store and the Choose Happy Stamp Set came up! I wasn’t sure if I would have a banner going across the turkey, but I decided to cut the stamped words to be separate and I liked that look. For a final touch, I added some Gold Textured Dots.
This is just one idea of how to make a Thanksgiving turkey for a card! You can play around with what supplies you have and make your own version!
Have a Wonderful Thanksgiving Day
With Your Family & Loved Ones!
We’re almost out of time because tomorrow is Thanksgiving! If you are still looking for some inspiration for a treat to take to someone, table decorations or favors, a card, or something else, here are some of my past ideas from the archives! You can update with the paper or stamps you have now or dig around in your stash and find something you have that will work! Just click the title below each photo to go to the blog post!
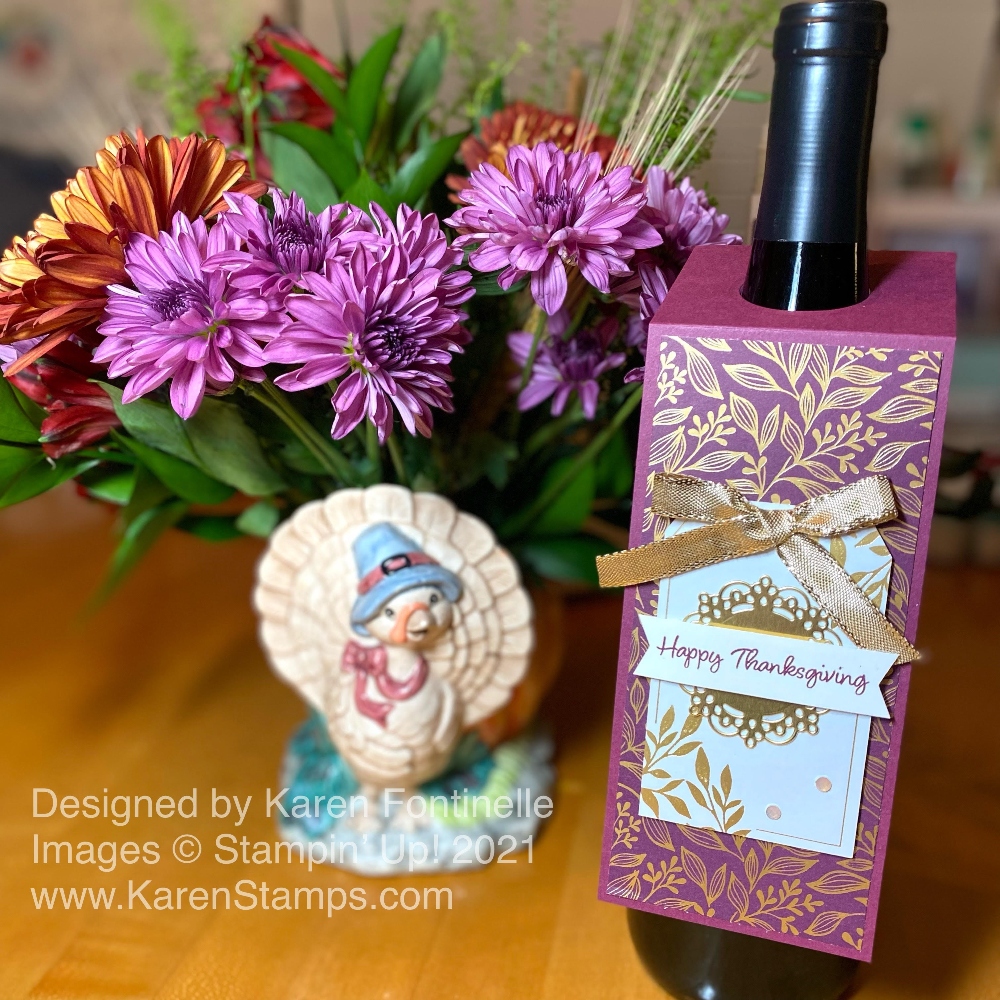
Thanksgiving Wine Bottle Label
Maybe you are taking a bottle of wine or some other drink to a Thanksgiving dinner or just want to decorate your own bottled beverage. Make a simple decoration to hang over the neck of the bottle. It’s almost like a giant tag with a hole in the top! Check out my blog post for the measurements and details to get your started making your own!
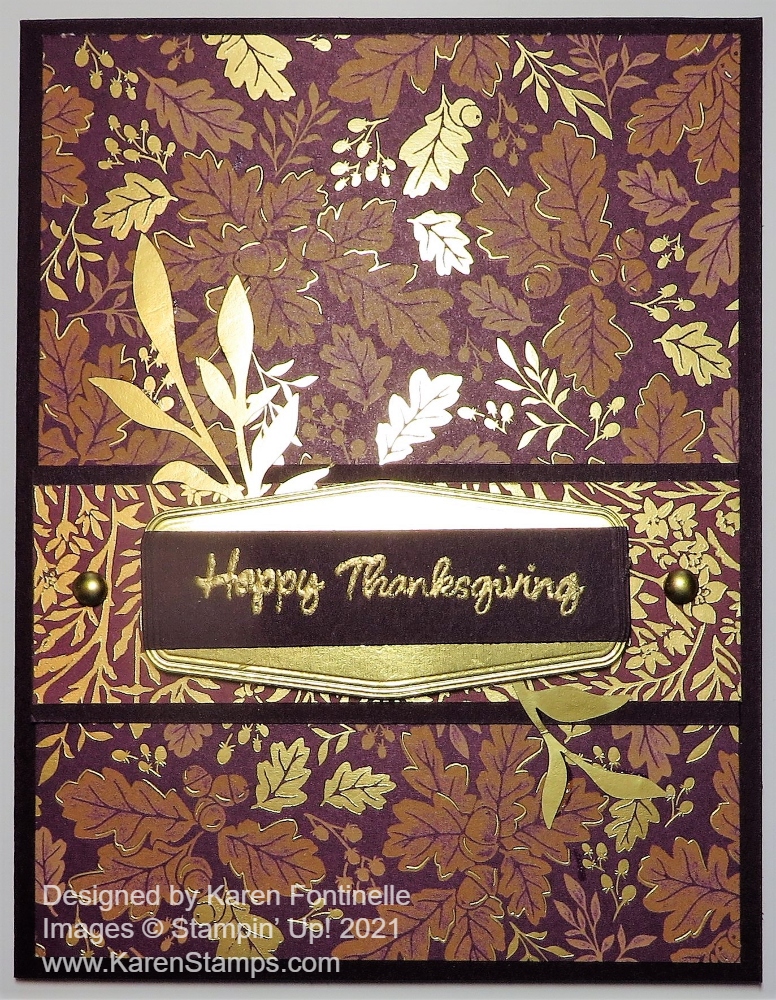
Blackberry Beauty Thanksgiving Card
This card really caught my eye as I was looking back for past projects! It certainly is the gold foil accents that makes the card so beautiful! You don’t need to use this exact same paper, just use some other paper you love with a Thanksgiving greeting (or something generic) across the front with a little glimmery embellishment.
Oh, how I loved this Hello Harvest Stamp Set from last year! You can make a similar card with the Pick of the Patch Stamp Set we have currently, or go look for the Hello Harvest Stamp Set from last year’s Holiday Mini Catalog! I loved coloring in the pumpkins with Stampin’ Blends.
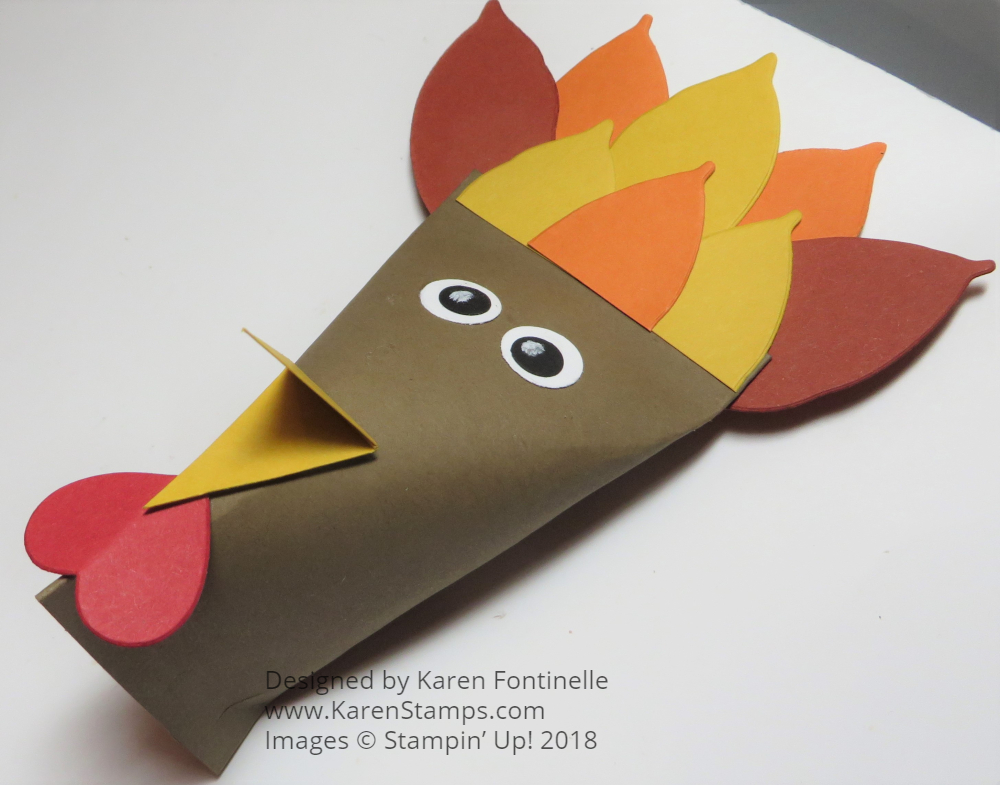
Turkey Sour Cream Treat Holder For Thanksgiving
This is one of those “sour cream holders” that we have probably all learned to make from the time we learned about stamping! Put some candies inside and put one by everyone’s place at the table! Read the blog post for the directions if you aren’t sure! Then decorate your turkey with whatever punches or dies you have for feathers!
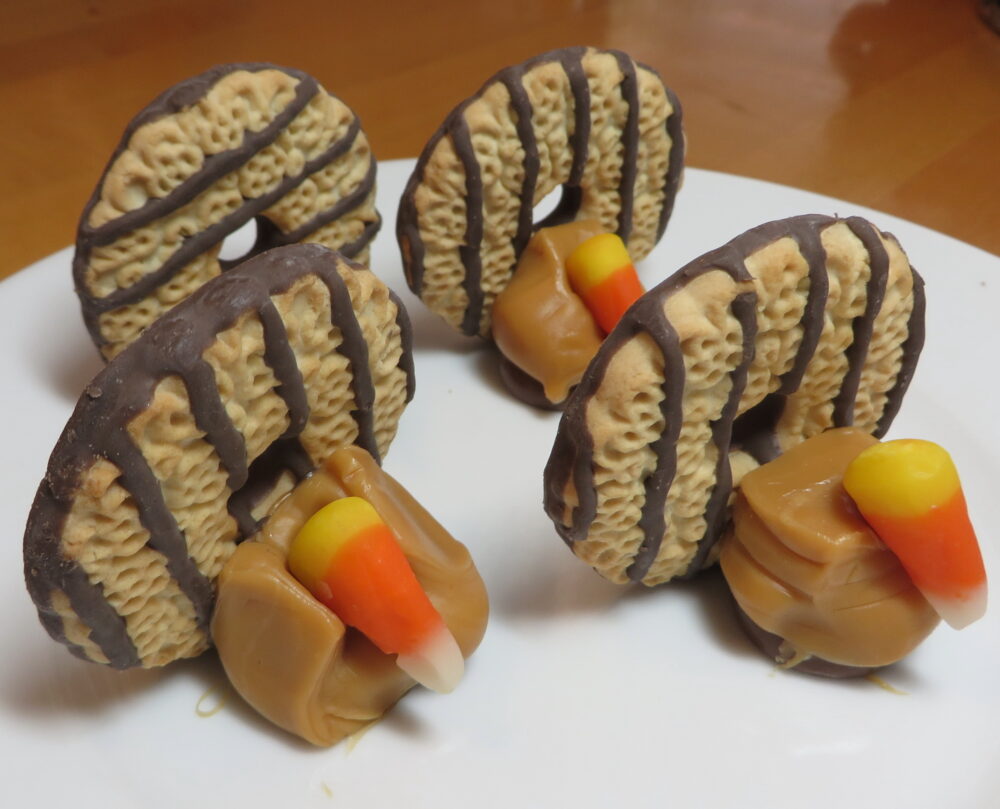
I can’t resist! You may not have the ingredients on hand but maybe you’ll remember for next year! I learned how to make these from a friend back when my kids were little and in preschool! I made them lots of years to take to school for treats or to simply have as place setting decorations at our Thanksgiving table at dinner. I don’t know why, but I love them! Just soften a few caramels at a time in the microwave, stick the cookie on the back end, then smoosh in a candy corn on its side!
Enjoy Your Thanksgiving!
It’s down to the wire for Thanksgiving, as hard as that is to believe, but there’s still time if you want to make some little Thanksgiving Candy Holder Favors. These are really easy and will hold two chocolate kisses or a chocolate nugget. Think how cute these would be by everyone’s plate at Thanksgiving dinner for a little favor!
To make these little candy holders, cut a strip of cardstock approximately 5″ long by 1 3/4″ wide. You can change up the measurements depending on what kind of candy you want to put inside. Score these strips at 2″ and 3″. Crease and fold on the score lines. You can use different colors and images on the front or make them all match.
After you have your candy inside, you can punch a hole in the top and tie a ribbon through the hole or use a couple of Mini Glue Dots to hold them closed. If you have any kinds of clips you could use those to hold them closed. You can also attach a greeting or a guest’s name to use each favor as a place card. I used to love to make place cards when I was young for family dinners!
I started with the pumpkin and the Pilgrim hat but I got a little carried away with the turkey! The pumpkin is stamped from the Pick of the Patch Stamp set and just a little diecut greenery that was already in a pile of scraps on my table.
The Pilgrim hat is made with Early Espresso for the hat and the brim. The hat is a 1″ x 1″ square and the brim is 1/4″ x 1 1/2″. The Basic Black band on the hat is 1/4″ x 1″. The buckle is made with a 1/2″ x 1/2″ square of Gold Foil with a center of Basic Black 1/4″ x 1/4″ to look like the band going through the buckle.
The turkey is made with two circles of Pecan Pie cardstock. The feathers are die cut greenery in the Joy of Noel Dies! Just use whatever you have or come across! The red turkey waddle is a diecut holly leaf from that set! The eyes are punched with my old Crop-a-Dile and colored in with black.
These are just fun little candy favors, so unless you want to, you don’t need to go to a lot of trouble making these!
Happy Thanksgiving!
Happy October!! Now that it is officially October, it feels much more like the fall season, even if it still doesn’t feel like fall here in Houston! This Layering Leaves October Fall Card commemorates the beginning of October which really makes us think of fall, colored leaves, and all the upcoming holidays and seasons! Once the fall and Halloween decorations go up in my house and my regular home decor is put away, it won’t get pulled out again until January! Halloween decorations are starting to go up in the neighborhood. While I absolutely love all my Halloween decorations, I’m not quite ready for full-blown Halloween decorating quite yet. Maybe in another week or two for sure!
This card base is Pumpkin Pie and is cut at 11″ x 4 1/4″, scored at 5 1/2″ and the fold is at the top. I could have put the fold on the left and the card would be in a landscape position rather than our usual cards at 5 1/2″ x 8 1/2″.
I made my own designer paper, so to speak, by stamping the leaves from the Layering Leaves Stamp Set. I used these inks: Pumpkin Pie, Daffodil Delight, Granny Apple Green, and a little bit of Old Olive. I love to do this random stamping all over the paper! To fill in the empty spaces I used a stamp in the set with just little dots. Those kinds of stamps just add a little something lots of times! Those dots are stamped with Lemon Lime Twist.
Next, I used the Pick of the Patch Stamp Set to stamp and cut out a pumpkin, some leaves, and a stem. I also stamped some vines on the die-cut circle on which I adhered the pumpkin and leaves. It is from the Stylish Shapes Dies. This circle is popped up on Stampin’ Dimensionals.
The greeting is also from the Pick of the Patch Stamp Set and is stamped in Pumpkin Pie. I always have a bunch of narrow strips of Basic White so it makes it easy when you want to stamp a narrow greeting. I just stamped the greeting on the scrap strip and then flagged the ends to make it look like a banner.
For a finishing touch, I added a few Lemon Lime Twist gems from the Tinsel Gems Four-Pack. Sometimes it is hard to stop at adding only three gems! I would have liked more by the pumpkin and/or the greeting…..but sometimes you have to know when to stop!
Get out your fall colors and do some fall stamping!
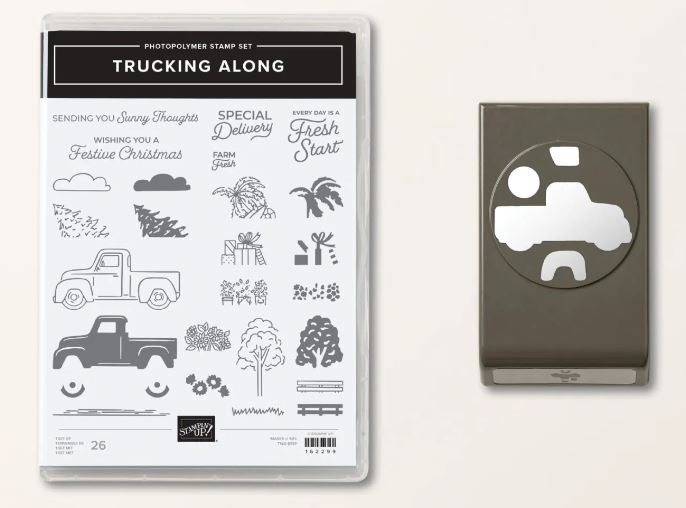
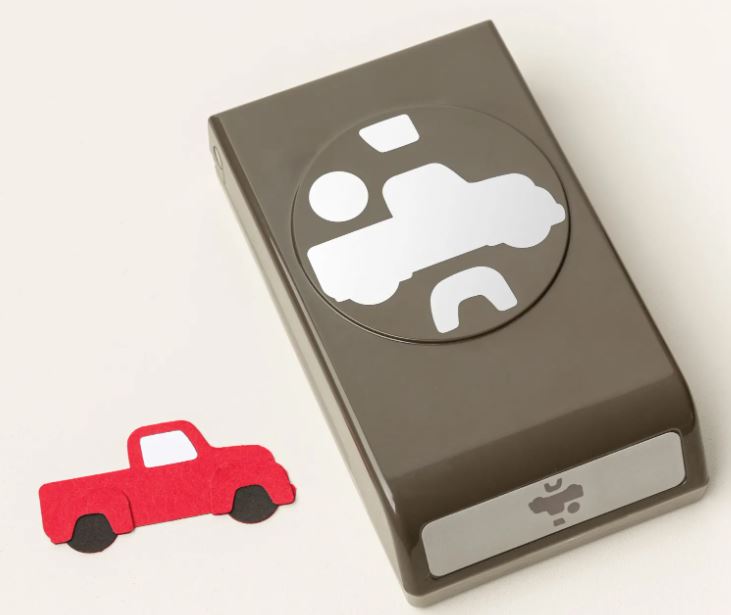
This Trucking Along Bundle has proven so popular that it has sold out quickly from the beginning and every time Stampin’ Up! got more in stock. There has been a long wait but finally, it is back, even earlier than expected!
As I write this, you can purchase the Bundle with the stamp set and Trucking Along Builder Punch and save 10%.
You can use this Trucking Along Bundle for all seasons! Just load up the truck bed with different colors and different objects! Put fall leaves, Christmas trees, or spring flowers in the truck! Whatever you like. You will have fun with some of your other stamp sets finding little things you can add in the truck I’m sure!
Or you can purchase just the Trucking Along Stamp Set alone.
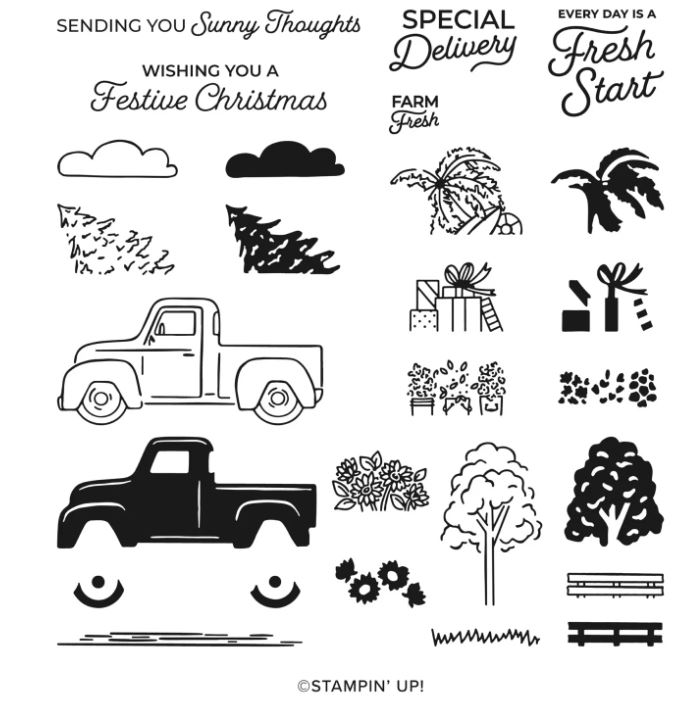
Or maybe the most popular of all, the Trucking Along Builder Punch.