Tag Archives: Cheerful Daisies Stamp Set

Cheerful Daisies Birthday Card

Cheerful Daisy Birthday Card

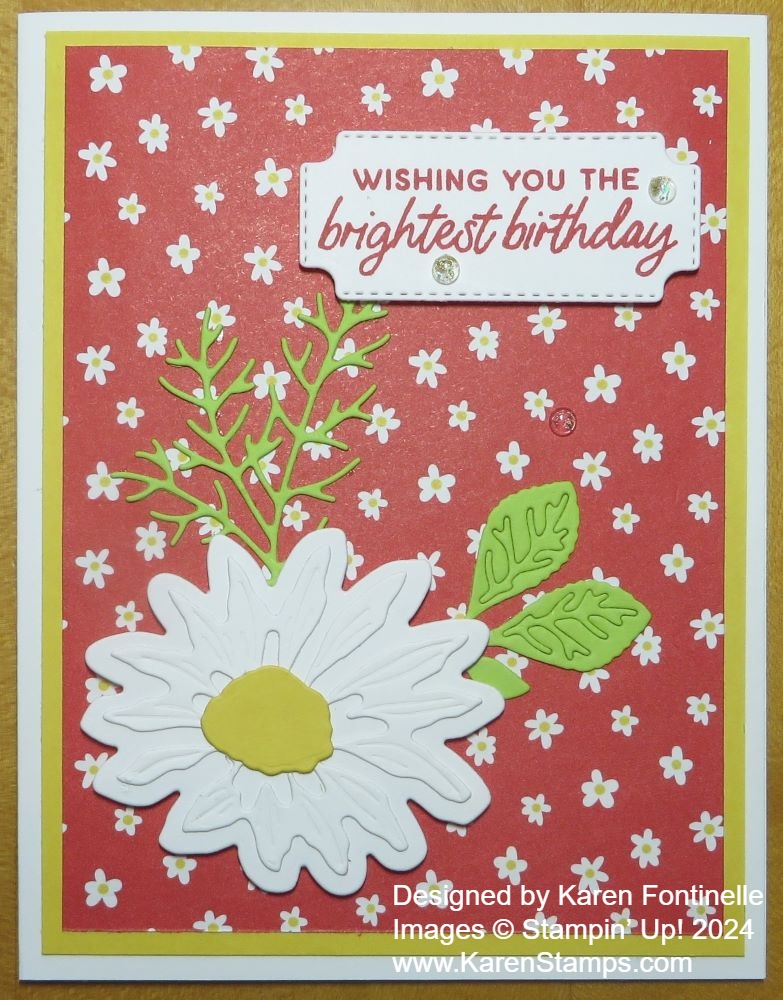
It’s been quite a while since I have used this daisy set, but I got the idea to make this Cheerful Daisies Birthday Card since it looked so springlike! I love the background paper in any case and putting a daisy on the front seemed like the right thing to do!

The card base is Basic White Cardstock with a layer of Daffodil Delight and then the layer of the Bee Mine Designer Series Paper in the Spring Mini Catalog. This paper will be retiring April 30. This pattern, with the Sweet Sorbet background with tiny little white daisies, is nice because there are no hearts or bees so it is easy to use. And I love the color, Sweet Sorbet, which is also retiring. Sad to see that one go! You wouldn’t have to add the Daffodil Delight layer under the designer paper. I just thought it brightened everything up even more by bringing in the yellow in the daisy centers on the paper.

I used the Cheerful Daisies Dies to cut out two pieces to layer to make up the one large daisy with a Daffodil Delight center. The leaves are Granny Apple Green Cardstock and are attached to a collection of different daisies. I just used a portion of that die on the Granny Apple Green Cardstock to cut out the leaves and stems. I decided to leave in the cutout veins of the leaves since I didn’t want the background paper to show through.

There was another die, too, that cut out that very fine foliage piece. It would be good to think ahead and use Adhesive Sheets before die-cutting very delicate pieces like that foliage. Then you wouldn’t have to try to put the tiniest drops of glue on the back of the stems.

After gluing the two layers of daisies together, I popped that daisy up with Stampin’ Dimensionals in the bottom corner of the card and adhered the leaves and foliage underneath.

The greeting is in the Cheerful Daisies Stamp Set. I stamped it in Sweet Sorbet ink and used the label die in the Cheerful Daisies Dies to cut it out. I think it fits perfectly in the space on my card. Sometimes you design a card and then don’t quite know where to put the greeting! I also added three of the Iridescent Foil Gems, two to the greeting and one farther down on the card. I love adding those little embellishments and had to stop myself from adding a couple more!

I’m happy to see that this Cheerful Daisies Bundle of stamp set and dies is in the new Annual Catalog, but not as a Bundle any more. Stampin’ Up! retires Bundles although the pieces of the Bundle may still appear separately. What this means is, in the new Stampin’ Up! Annual Catalog you will still be able to buy the stamp set and you will be able to buy the dies, but you will not save 10% buying the Bundle unless you purchase the Bundle by April 30 when the current Annual Catalog retires!

Also, even though the cute Bee Mine Designer Series Paper that I used is retiring, the Bee Mine Stamp Set and Bee Builder Punch are carrying over into the new Annual Catalog, but again, not as a Bundle. I’m happy we can continue to use that fun punch!

Remember, the 2022-2024 In Colors and all their papers and accessories are retiring so if you need any of those colors, be sure to stock up. I wish they weren’t retiring as I like those better than the ones we got last year! But we will be excited for the next new In Colors!

Check my blog post HERE for the retiring lists of products in the Spring Mini and the outgoing Annual Catalog!

SHOP STAMPIN’ UP!

Melon Mambo Daisies Birthday Card

Melon Mambo Daisies Birthday Card

Sometimes it’s fun to stamp your own images on a card instead of using die cuts or designer paper! It’s like getting back to basics and it feels so good to have that stamp in your hand and stamp over and over!

This card is very simple. I chose a Melon Mambo cardstock card base with a Basic White layer. Of course, stamp the white layer before adhering!

I used the Cheerful Daisies Stamp Set to stamp three of the largest daisies and then filled in the rest of the space with the smaller outline daisy stamp. For the flower centers, I used Daffodil Delight ink. There is a smaller flower center stamp and a larger one. Of course, flowers need leaves, so I inked up the leaf stamp with Granny Apple Green ink and filled in wherever I could.

The ribbon tied around the card is the Lemon Lime in the Ribbon Duo Combo Pack. To make the bow a little more substantial, I used two strands of ribbon and tied a bow.

The greeting is in the Cheerful Daisies Stamp Set and is stamped in Melon Mambo ink. It is diecut with the small banner die in the Countryside Corners Dies. For a final touch, I added several pink Pastel Adhesive-Backed Sequins.

This is just a fun, simple card to make and good to have on hand for birthdays or other occasions!

SHOP STAMPIN’ UP! ONLINE HERE!

Quick and Easy Fresh As a Daisy Card

Quick and Easy Fresh As a Daisy Card

Sometimes you just want to make a quick and easy card like this Quick and Easy Fresh As a Daisy Card and with this new designer paper, you can surely do that!

I wanted to use this bold daisy pattern in the Fresh As a Daisy Designer Series Paper in the new Stampin’ Up! Annual Catalog. I liked these large, bright white daisies with their golden centers on this paper.

You can choose from many coordinating colors with this paper. I played around with several and decided on Daffodil Delight, which isn’t a coordinating color but I liked the bright yellow for a Monday morning! I could have chosen Crushed Curry or Lemon Lolly to go with the flower centers, or Cajun Craze to match the background of the paper, or any of the greenish blues to match the leaves. Or you could Basic White for a card base! Or you could choose Basic White and then another cardstock color for a layer and then make the designer paper a little smaller to layer on the color cardstock. Or a colored cardstock for the base and white to set off the designer paper! Whatever you are in the mood for when you are creating is fine!

I originally intended to make this a two-tone card using the daisy paper on top and a piece of one of the colors on “the other side” of the daisy paper. But once I had this 5 1/4″ x 4″ paper cut I liked it so much I didn’t want to cover up or lose any of the white daisies.

Before adhering the designer paper to the card, I adhered a piece of the Burlap Ribbon in the Real Red and Burlap Ribbon Combo Pack. I put it on the side, where I haven’t put a ribbon in a long time, so as not to cover up too many daisies. Then I just tied on a short ribbon in a knot.

The greeting is stamped from the Cheerful Daisies Stamp Set in Tuxedo Black Memento Ink on Basic White. I tried it on the Daffodil Delight also and decided to use the White but layer it on Daffodil Delight. The label die in the Cheerful Daisies Dies is one of those perfect dies to use over and over again! It’s simple yet has that little stitched look and curved corners. But there is not a layering size die to match so what do you do? I cut out another label in Daffodil Delight, then cut it in half across the middle. Then I could layer those two half pieces under the top half and bottom half of the greeting. If you do it just a tiny bit, it really lines up with the curved corners even though it doesn’t extend out to the sides. No one will notice! It looks fine!

If you want the stamp set and dies, buy the Cheerful Daisies Bundle and save 10%! But be sure to get the Fresh As a Daisy Designer Series Paper, too!

That’s all there is to this card! You could add some jewels or sequins if you wanted to. Or you can leave it as the Quick and Easy Fresh As a Daisy Card!

Daisy Notecard

Daisy Notecard

I needed multiples of a card, so I decided on this Daisy Notecard, to show off the new Fresh As a Daisy Suite! It’s coming on May 2nd, in the new Stampin’ Up! Catalog! Yes, next week is May and yes, next week is finally time for the new catalog, a day we stampers live for!

You can purchase official Note Cards & Envelopes which are great to have on hand, but this time I didn’t need envelopes so I just made my own note cards with Basic White cardstock. I just cut a piece of cardstock at 5″ x 7″, then scored at 3 1/2″ so that when folded the note card would be 3 1/2″ x 5″.

I wanted to use the new Fresh As a Daisy Suite so I played around with all the pieces until I came up with a design I liked and could somewhat easily make. It’s like when you design Christmas cards and want to make multiples of the same card. If you make it too fancy, it will take forever to make multiples. This one had stamping and die-cutting so it took a little time but I just relaxed and enjoyed myself!

The Fresh As a Daisy Designer Series Paper has many color combinations in the patterns to choose from. All the new In Colors are represented! It’s a long list of coordinating colors for this designer paper. I chose this pattern with greens in the background to be the layer on my note card. I cut it at 3″ x 4 1/2″. The cute label is in the Cheerful Daisies Dies. I like the shape and the stitched edge. I stamped the greeting in the Cheerful Daisies Stamp Set in Shady Spruce ink.

The daisy is stamped in Memento Ink and the center is stamped in Crushed Curry. There is a stamp to use for the flower center, but I discovered that if I stamped it twice, partially overlapping, it covered up the empty center space a little better and I liked the darker color. The daisy was die-cut. Some of the dies fit the daisies printed on the designer paper. You can even layer die-cut daisies for a little more texture. When you get the Cheerful Daisies Bundle (save 10%!) just play with it for a while and see how all the pieces work! The daisy is popped up with Stampin’ Dimensionals. The Suite also has the Adhesive-Backed Solid Gems in Copper Clay, Boho Blue, and Lemon Lolly.

I think the Fresh As a Daisy Suite will be a popular one because who doesn’t like daisies?

SHOP STAMPIN’ UP! ONLINE HERE!