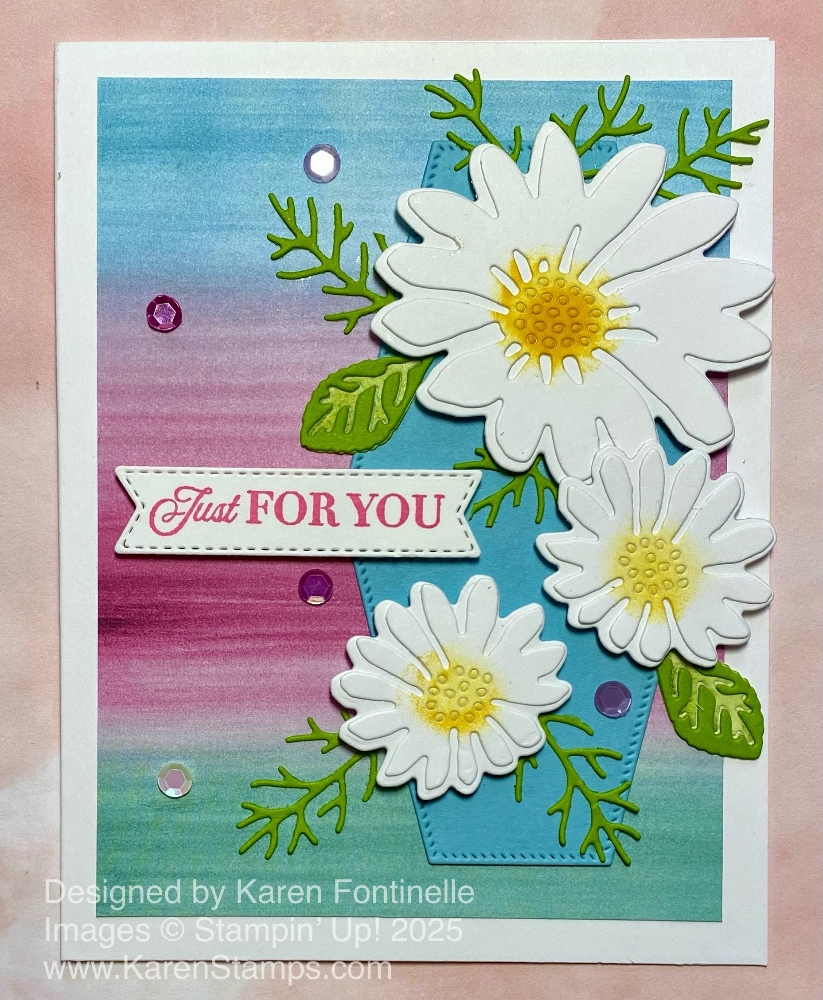
Tag Archives: Cheerful Daisies Dies

Cheerful Daisies Birthday Card

Cheerful Daisy Birthday Card

It’s been quite a while since I have used this daisy set, but I got the idea to make this Cheerful Daisies Birthday Card since it looked so springlike! I love the background paper in any case and putting a daisy on the front seemed like the right thing to do!

The card base is Basic White Cardstock with a layer of Daffodil Delight and then the layer of the Bee Mine Designer Series Paper in the Spring Mini Catalog. This paper will be retiring April 30. This pattern, with the Sweet Sorbet background with tiny little white daisies, is nice because there are no hearts or bees so it is easy to use. And I love the color, Sweet Sorbet, which is also retiring. Sad to see that one go! You wouldn’t have to add the Daffodil Delight layer under the designer paper. I just thought it brightened everything up even more by bringing in the yellow in the daisy centers on the paper.

I used the Cheerful Daisies Dies to cut out two pieces to layer to make up the one large daisy with a Daffodil Delight center. The leaves are Granny Apple Green Cardstock and are attached to a collection of different daisies. I just used a portion of that die on the Granny Apple Green Cardstock to cut out the leaves and stems. I decided to leave in the cutout veins of the leaves since I didn’t want the background paper to show through.

There was another die, too, that cut out that very fine foliage piece. It would be good to think ahead and use Adhesive Sheets before die-cutting very delicate pieces like that foliage. Then you wouldn’t have to try to put the tiniest drops of glue on the back of the stems.

After gluing the two layers of daisies together, I popped that daisy up with Stampin’ Dimensionals in the bottom corner of the card and adhered the leaves and foliage underneath.

The greeting is in the Cheerful Daisies Stamp Set. I stamped it in Sweet Sorbet ink and used the label die in the Cheerful Daisies Dies to cut it out. I think it fits perfectly in the space on my card. Sometimes you design a card and then don’t quite know where to put the greeting! I also added three of the Iridescent Foil Gems, two to the greeting and one farther down on the card. I love adding those little embellishments and had to stop myself from adding a couple more!

I’m happy to see that this Cheerful Daisies Bundle of stamp set and dies is in the new Annual Catalog, but not as a Bundle any more. Stampin’ Up! retires Bundles although the pieces of the Bundle may still appear separately. What this means is, in the new Stampin’ Up! Annual Catalog you will still be able to buy the stamp set and you will be able to buy the dies, but you will not save 10% buying the Bundle unless you purchase the Bundle by April 30 when the current Annual Catalog retires!

Also, even though the cute Bee Mine Designer Series Paper that I used is retiring, the Bee Mine Stamp Set and Bee Builder Punch are carrying over into the new Annual Catalog, but again, not as a Bundle. I’m happy we can continue to use that fun punch!

Remember, the 2022-2024 In Colors and all their papers and accessories are retiring so if you need any of those colors, be sure to stock up. I wish they weren’t retiring as I like those better than the ones we got last year! But we will be excited for the next new In Colors!

Check my blog post HERE for the retiring lists of products in the Spring Mini and the outgoing Annual Catalog!

SHOP STAMPIN’ UP!

Daisy Notecard

Daisy Notecard

I needed multiples of a card, so I decided on this Daisy Notecard, to show off the new Fresh As a Daisy Suite! It’s coming on May 2nd, in the new Stampin’ Up! Catalog! Yes, next week is May and yes, next week is finally time for the new catalog, a day we stampers live for!

You can purchase official Note Cards & Envelopes which are great to have on hand, but this time I didn’t need envelopes so I just made my own note cards with Basic White cardstock. I just cut a piece of cardstock at 5″ x 7″, then scored at 3 1/2″ so that when folded the note card would be 3 1/2″ x 5″.

I wanted to use the new Fresh As a Daisy Suite so I played around with all the pieces until I came up with a design I liked and could somewhat easily make. It’s like when you design Christmas cards and want to make multiples of the same card. If you make it too fancy, it will take forever to make multiples. This one had stamping and die-cutting so it took a little time but I just relaxed and enjoyed myself!

The Fresh As a Daisy Designer Series Paper has many color combinations in the patterns to choose from. All the new In Colors are represented! It’s a long list of coordinating colors for this designer paper. I chose this pattern with greens in the background to be the layer on my note card. I cut it at 3″ x 4 1/2″. The cute label is in the Cheerful Daisies Dies. I like the shape and the stitched edge. I stamped the greeting in the Cheerful Daisies Stamp Set in Shady Spruce ink.

The daisy is stamped in Memento Ink and the center is stamped in Crushed Curry. There is a stamp to use for the flower center, but I discovered that if I stamped it twice, partially overlapping, it covered up the empty center space a little better and I liked the darker color. The daisy was die-cut. Some of the dies fit the daisies printed on the designer paper. You can even layer die-cut daisies for a little more texture. When you get the Cheerful Daisies Bundle (save 10%!) just play with it for a while and see how all the pieces work! The daisy is popped up with Stampin’ Dimensionals. The Suite also has the Adhesive-Backed Solid Gems in Copper Clay, Boho Blue, and Lemon Lolly.

I think the Fresh As a Daisy Suite will be a popular one because who doesn’t like daisies?

SHOP STAMPIN’ UP! ONLINE HERE!