Category Archives: Big Shot

A Father’s Day Card Idea

Chalk Talk Father's Day Card

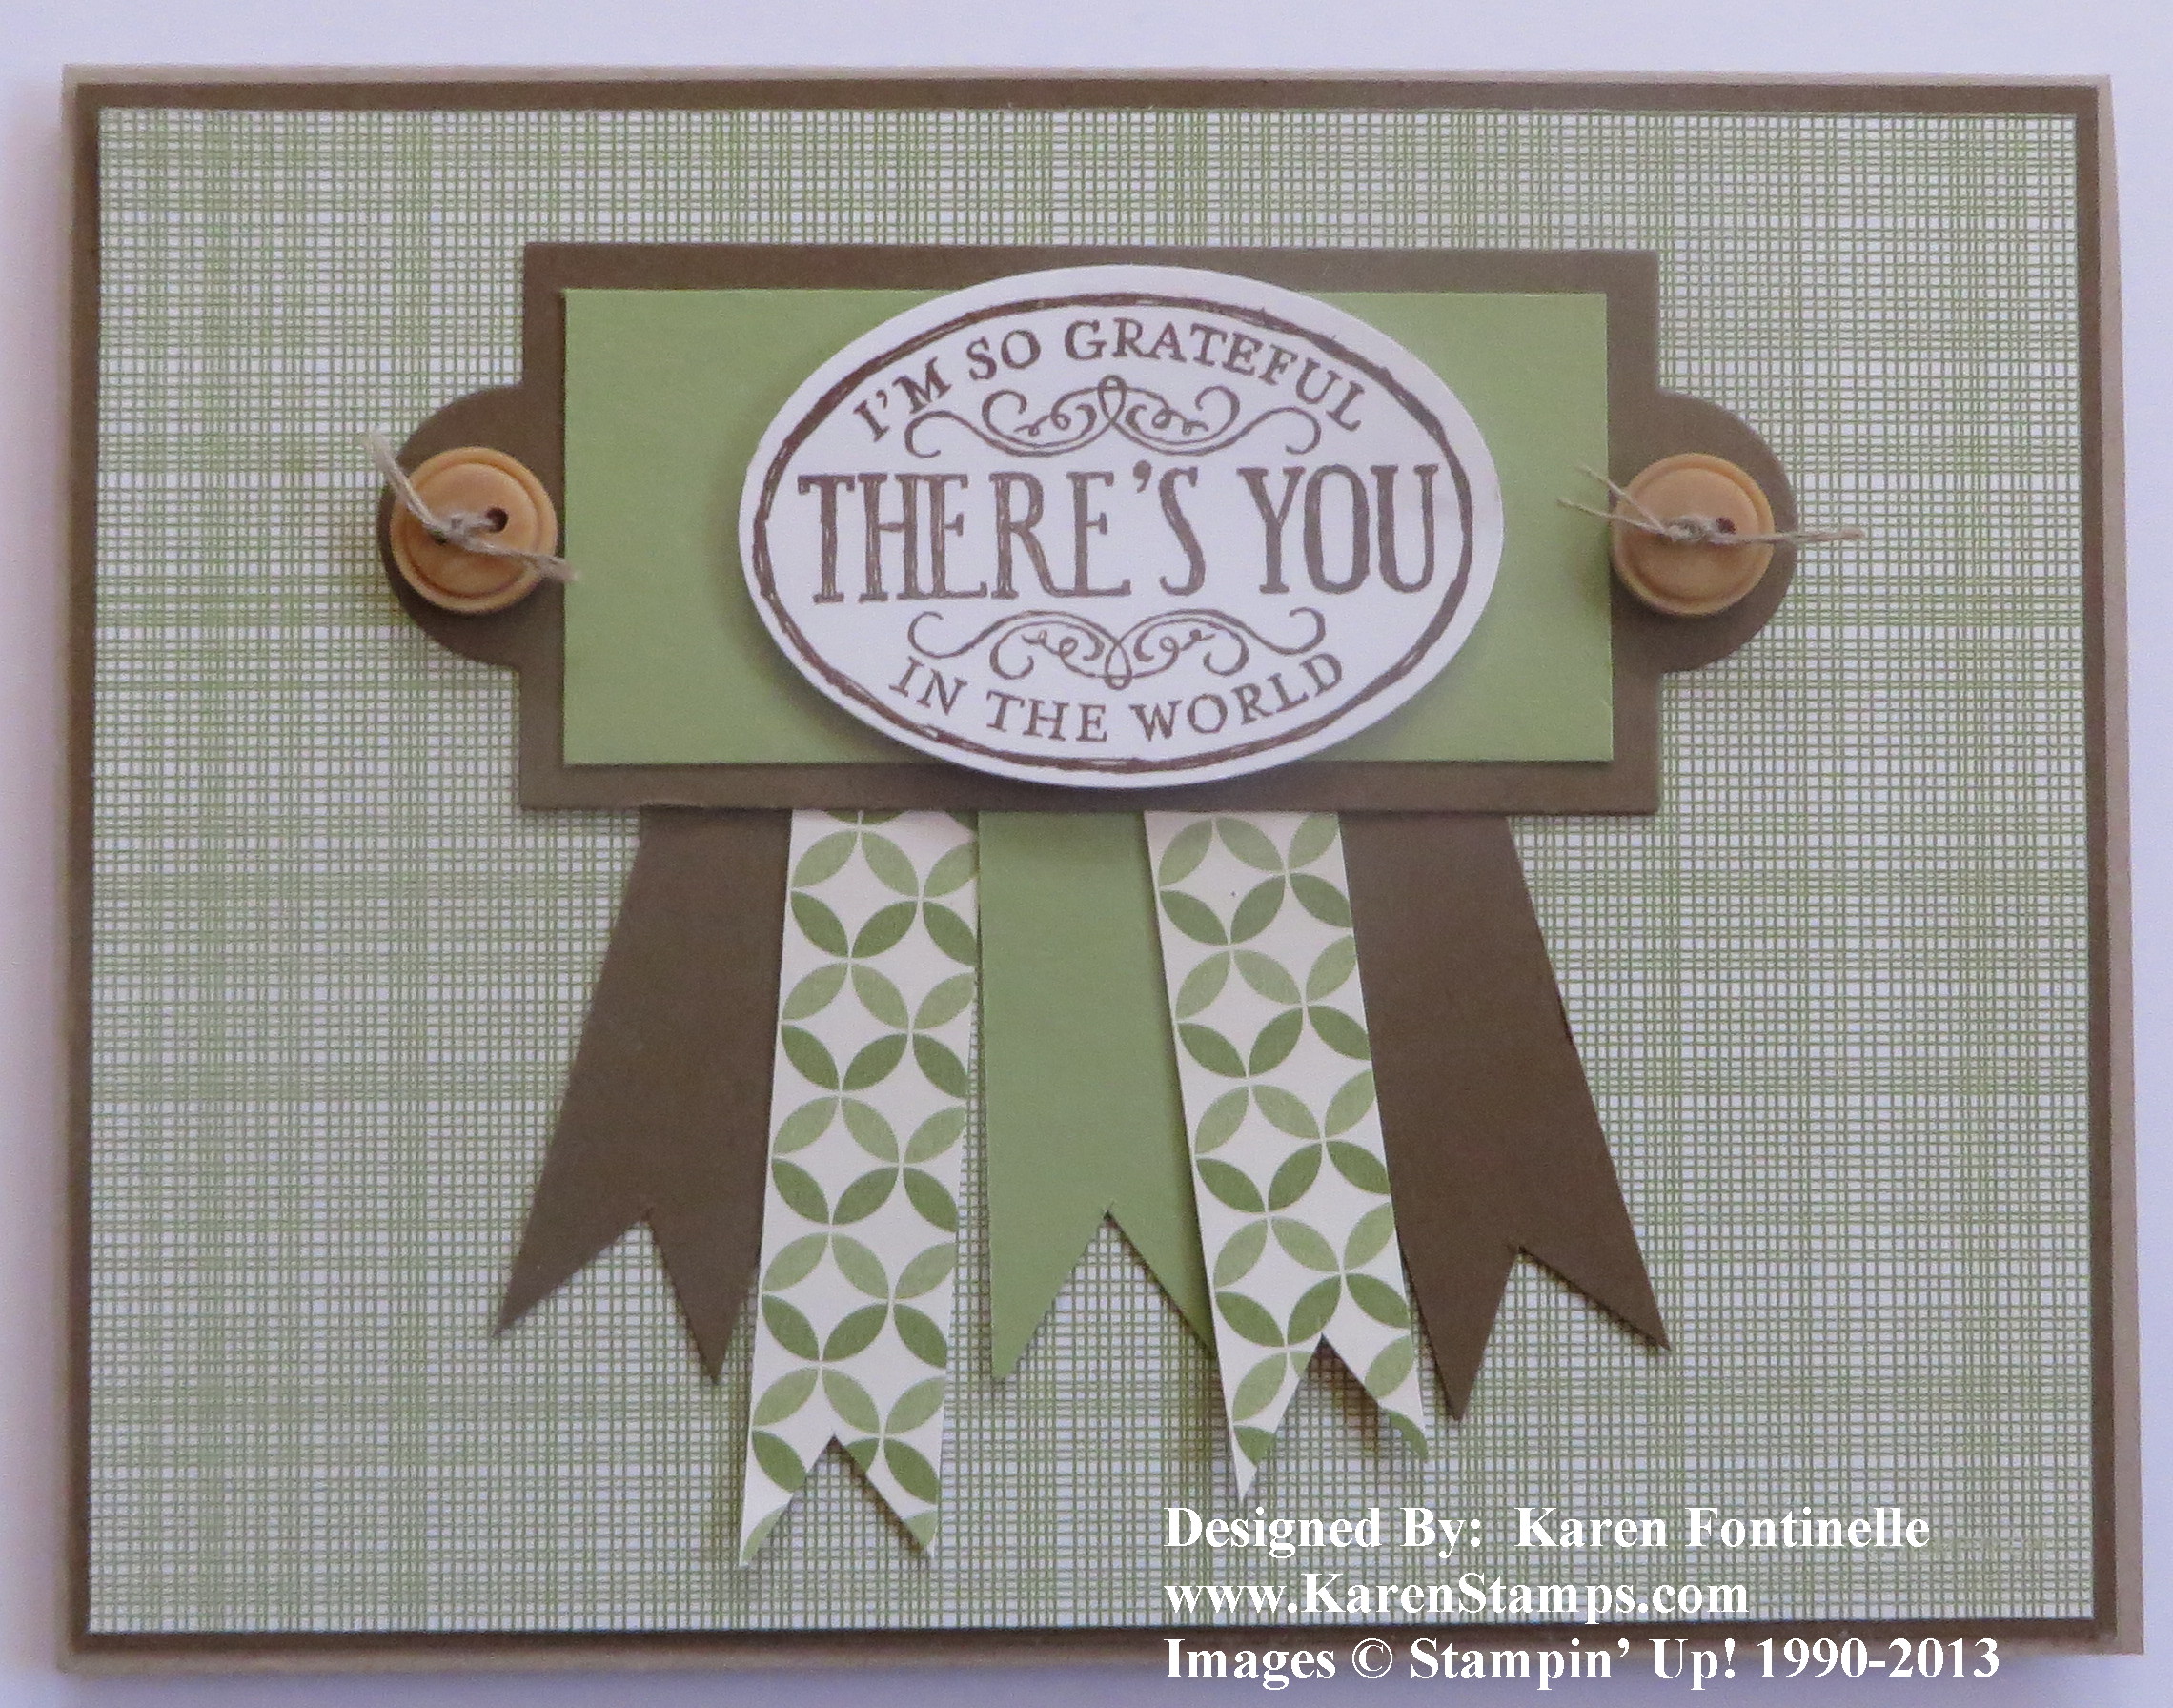
Father’s Day is Sunday, June 16th so we should all be thinking about making a Father’s Day card. Here is a Father’s Day card idea I came up with using a greeting from the new Chalk Talk Stamp Set.  And you won’t believe the designer paper I used for the background! It’s a pattern from Gingham Garden Designer Series Paper!!  Who would think you would find a suitable male pattern in a pack of Gingham Garden paper?! But the backs of the flowery papers have patterns like this one to use for a variety of projects!

The card base is Crumb Cake.  The darker brown is Soft Suede. The banner is cut out with the Apothecary Accents Framelits Die.  If you don’t own that die, you could use a rectangle and two small circles adhered to the sides. The cute little buttons, which I think just “make” this card are from the Naturals Designer Buttons and tied with a little bit of Linen Thread.

The greeting is from the new stamp set Chalk Talk. It’s a generic greeting that can be used in so many ways so I think it can be used for a Father’s Day card from a child, a step-child, a wife to her husband, maybe even a niece or nephew to a favorite uncle; anyone special in your life.

If you are interested in the Chalk Talk stamp set, be sure to notice you can purchase the stamp set (wood or clear) and the matching Chalk Talk Framelits DIes as a Bundle and save 15%!! You use the Framelits with the Big Shot Die-Cutting Machine to cut out those shapes.

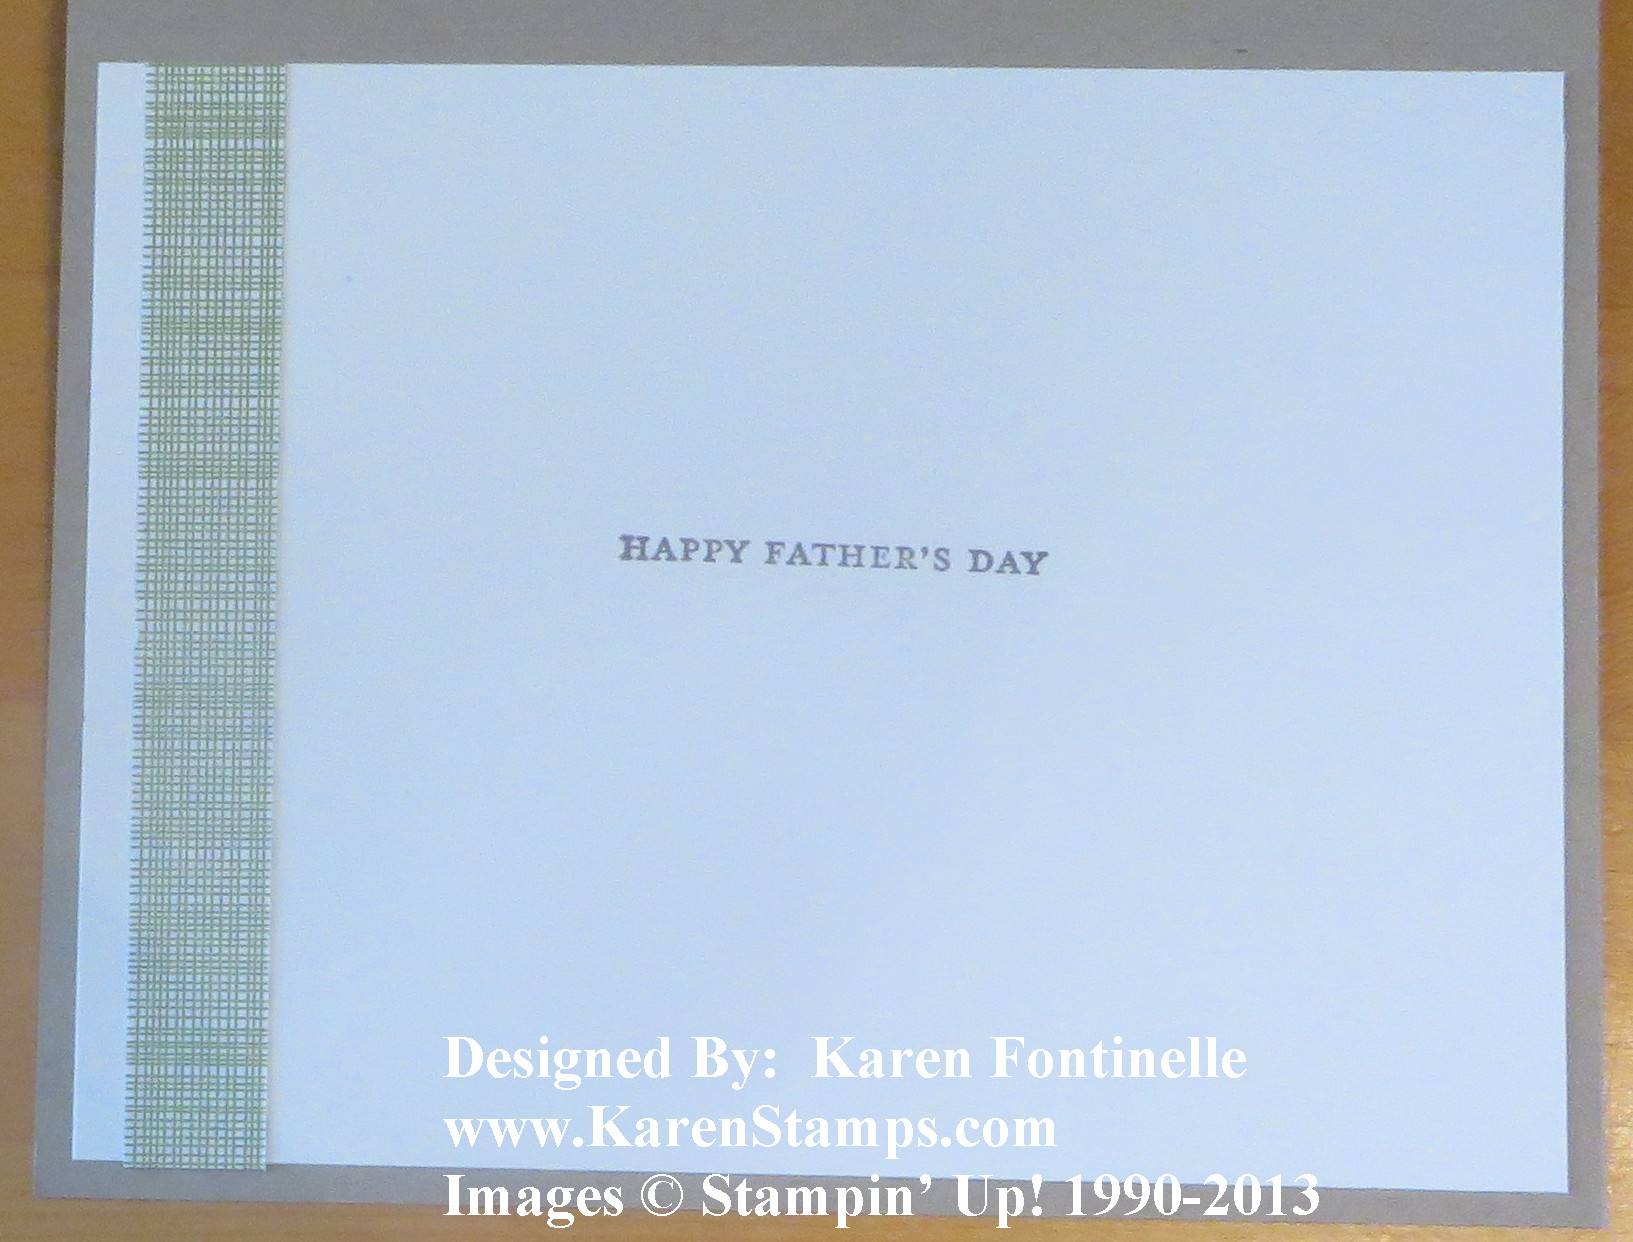
And for the inside of the card, I added a Whisper White layer and a little designer paper. The Father’s Day greeting is from Teeny Tiny Wishes (a must-have set, if you ask me!) By the way, a stamp set like this, with small stamps, I prefer to own in the wood-mount. Just a little easier to handle and clean.

Chalk Talk Father's Day Card Idea

For all of your stamping needs, please visit my Stampin’ Up! Online Store here.


Dress Up Birthday Card

Dress Up Birthday Card

Now that my daughter has received her birthday card, I can post it here.  The paper is retired now, but most things are current for you to make your own card like this. The Dress Up Framelits are so fun to use! Just cut out a dress in whatever paper you like, maybe cut two and then have a different top and bottom to your dress, or even a jacket! Almost like playing with paper dolls!

Use the Oval Collection Framelits to die cut a background.  I used the birthday stamp from Petite Pairs for the greeting.  This stamp set is on sale now in the Grab Your Greetings offer for 25% off.  Be sure to check it out because it is a good sentiment stamp set to own.  The other two choices are good ones, also.

The Real Red border at the top and bottom of the retired designer paper is punched with the Dotted Scallop Ribbon Border Punch.  What I love about this punch is you can show just the tiny scallops on the edge or you can show the dotted part, so versatile!

If you would like to own the Dress Up Framelits and make oh so many cute projects with them, please visit my Stampin’ Up! Online Store here to place your order.

New Stampin’ Up! Catalog Day is Here!

The NEW STAMPIN’ UP! ANNUAL CATALOG BEGINS TODAY AT NOON MT!!

Stampin' Up! Annual Catalog 2013-14

View the Catalog online (Flash)

View the Catalog PDF

View the Stampin’ Supplies

This is the day we’ve all been looking forward to!  Stampin’ Up! will be transitioning the website over to the new catalog until noon MT today You can also order any retiring items, as well as from the Spring Catalog, while supplies last!  People are calling it the “trifecta of ordering” because you can order from all three catalogs at once…the old, the new, and the Spring Catalog!  Have patience because there will be a LOT of people ordering and sometimes there are glitches when everything is new!

Stampin’ Up! New Catalog goes live at:

  • 11:00 am Pacific Time
  • Noon Mountain Time (Stampin’ Up! Home Office Time)
  • 1:00 pm Central Time
  • 2:00 pm Eastern TIme

I always like the see the time written in my own time zone so I don’t have to keep figuring it out!

And that’s not all!!!!

Grab-Your-Greetings sale

Three greeting stamp sets are on sale for 25% off starting today and going through June 30!  We always need another greeting set!  This is an easy add-on to your order!

Grab Your Greetings Chart

____________________________________________________________________

The Bracket Stamp personalized name stamp with 5 lines (item 131138) will not be available in time for the May 31 catalog launch, but we anticipate that it will be available soon. However, the other versions of Bracket Stamp, with 1-4 lines, will be available to order once the catalog is live.

________________________________

Remember……Ordering begins today at Noon MT (Stampin’ Up! Time!)

Current Catalog          NEW CATALOG           Spring Catalog

The Spring Catalog will END tonight at 11:50 pm MT!!!!!!!!!!!

Just go to my Online Store after Noon MT today and you can start placing your order!  If you have any questions, please contact me at Karen@KarenStamps.com or call at 713-981-7662.

If you plan to shop for your Stampin’ Up! supplies with me and want a brand new catalog to hold in your hands (even though it is online!) please email me or call with your contact information and phone number.

Going to Miss the Two Tags Die

One of the many Stampin’ Up! products that I will miss when it retires next week is the Two Tags Die. You can make cards, tags, even little bags and boxes for treats and little gifts. Today I have used my Two Tags Die for two projects as well as two retiring stamp sets, retiring designer paper, and retiring colors, Regal Rose and Baja Breeze.

Two Tags Die BirthdayThere are actually two tag shapes on the Two Tags Die.  This one pictured above had a score line so can be folded in half and tucked under the little slit, which the die also makes.  I cut out the Twitterpated Designer Paper at the same time as the card stock so it fit perfectly. I stamped the cupcake image from the retiring Easy Events stamp set (a great set for all-occasions, especially for the beginning stamper!) and colored it in with Stampin’ Write Markers. For a little pizzazz I had to add some Dazzling Diamonds Glitter to the frosting with my 2-Way Glue Pen. And for a little trim above and below the stamped image, I used the versatile Dotted Scallop Ribbon Border Punch with only the scallop edge showing. The little flower on the edge is made with the Boho Blossoms Punch.

Two Tags Die Word Play Card
This card I made using the discontinued Regal Rose card stock (admittedly not one of my favorite colors in all these years, but it’s okay) and embossed with the Perfect Polka Dots Folder. The Two Tags Die is stamped with a greeting from the Word Play stamp set (another stamp set I hate to see retire) and decorated with a couple of Subtles Collection Designer Buttons tied with
White Baker’s Twine.  I made a similar card back in this post.

The Two Tags Die is a fun and handy die to own if you also own the Big Shot.  If it is still available, I would add it to your list of must-haves before the retirement period is over.

Remember, the new Stampin’ Up! catalog goes live at Noon Mountain Time on Friday, May 31.  Ordering will be down that morning and the night before so they can make the change to the new catalog.  You will still be able to order from the old catalog until June 3.  The Spring Catalog ends May 31.

Place your order today before time runs out at my Online Store or email me with your order at Karen@KarenStamps.com if you prefer.

.

Make a Gift Bag for Mother’s Day!

Mother's Day Twitterpated Paper Gift Bag

Do you need a pretty gift bag for your Mother's Day gift…or really any occasion? You can use this design and just change out the paper for whatever person or occasion you want a gift bag for. If it's for a man, maybe leave off the paper flower but add a stamped image or greeting instead. You'll think of something!

I just found one of those small brown handled bags that you get now and then at the store.  If you save them, you'll always have a stash to go to when you need a nice gift bag.  Just choose 3 patterns from a pack of Stampin' Up! designer paper and cut one larger piece for the bottom section, one smaller piece for the top and  a piece to go across and cover up that line where the two papers meet and make a cute border. You could leave it as is or you could cut or punch a scalloped edge or whatever to jazz it up.

For my bag, I used three patterns out of the Twitterpated Designer Series Paper. For a pretty accent I added three buttons from the  Designer Buttons Subtles CollectionEach is tied with a small piece of White Baker's Twine. For something at the bottom corner of the bag, I chose to make a flower with the Flower Folds Die and the Big Shot using a pattern from the Twitterpated DSP.

Some of these items are on the Stampin' Up! Retired List so better do your shopping soon!  Anything on the list can sell out at any time so you don't want to be disappointed. Just click that link to go to my store with the retiring products and shop to your heart's content!

All Dressed Up Belated Birthday Card

All Dressed Up Belated Birthday Card

Do you have trouble getting birthday cards sent out on time? I can know a birthday is coming up for weeks and then still not get the card mailed on time or in enoughtime! That's why I like the greeting in the stamp set All Dressed Up. That's not exactly what it says, but I used parts of it to make the greeting I wanted. The stamp set All Dressed Up is really fun to play with, especially to use the Dress Up Framelits Dies with it and save yourself all that cutting time.  There are lots of ways to play with these dresses,whether you are using the stamped dress or making your own with the Dress Up Framelits DIes.

To make the necklace, I just used a piece of Baker's Twine and a Rhinestone Jewel.

For any stamping supplies you may need, please visit my Stampin' Up! Online Store!

Make an Easter Chick with the Stampin’ Up! Petal Cone Die

 Petal Cone Die Easter Chick

If you want to make an Easter Chick, or an Easter Duck I suppose, it’s easy to make one with the Stampin’ Up! Petal Cone Die. It makes a great treat holder.  Just die cut two shapes of the Petal Cone Die with the Big Shot and adhere them together.  Cut off all but one of the flaps. Use the same die to cut the orange scalloped tuft for the top of his/her head.  The other scalloped pieces of yellow that were cut out with the original cone can be folded in half and made into wings on the side of the body.  Make a face and beak using some punches and scraps of card stock and you’ve got a cute little chick!

Punch holes in the sides if you want to add a ribbon hanger.  Add some Easter grass and some candy treats! You can use the Petal Cone Die to make all sorts of treat holders for any occasion!

Make a Punch Art Easter Bunny and Basket

Punch Art Easter Bunny Basket

It’s fun to make a punch art Easter Bunny with your Stampin’ Up! punches, and even more fun to put him on a cute basket made with the Fancy Favor Die and the Big Shot! To get the basket look, I also embossed the cut out basket with the Lattice Embossing Folder. The basket is made with Soft Suede card stock and I also sponged some White Craft Ink on to the embossing to make it show up a little more. The Easter eggs were really fun….just punched some Tea for Two Designer Series Paper with the Small Oval Punch.

To make a bunny out of punches, just experiment according to what size you want. This one has a 1 3/4″ circle punch body, 1 1/4″ circle punch head and ears made with the Blossom Petals Punch. I drew in the eyes and mouth and whiskers, punched the heart nose and colored in some cheeks with Watercolor Crayons and an Aqua Painter.

  Punch Art Easter Bunny Fancy Favor Basket

The basket is all ready for some Easter treats!  Cut some narrow strips of card stock and crumple or run through your (retired) crimper to make “Easter grass”!

Try your hand at making a punch art bunny!

For any punches, card stock, or any other papercrafting supplies, just check out my Stampin’ Up! Online Store here.

Patio Party All-Occasion Card

Patio Party All-Occasion Card

An all-occasion card is one that we can all make and would be handy to have in our stash.  Sometimes I don’t put a greeting on the front of the card so that I can add whatever I want later for whatever occasion I need.

If you remember in this post the other day, it was like I rediscovered the Patio Party Designer Series Paper and loved it!  I knew I loved it when I first saw it at Stampin’ Up! Convention or Leadership awhile back, but then I never used it much.  Right now it really appeals to me. One of the sheets in the pack has the multi-pattern design as you see on the bottom of the card….so no work!  Just cut off a piece and adhere it to your card and it will look like you spent time adding various patterns in strips!

I loved making a flower with the Flower Folds Die and the Big Shot out of several different patterns of the paper.  Maybe a real flower wouldn’t have the lines of a banner going across it, but I liked the colorful look.

Play with what you have and I bet you will be inspired too!

Don’t forget, Sale-A-Bration is going on but not for too much longer!  With every $50 purchase you get a free Sale-a-Bration product!  Shop Online HERE!

Four Leaf Clover Smooch Spritzed with Gold

Four Leaf Clover Smooch Spritzed with Gold

Soon it will be St. Patrick's Day, March 17th! Did you know you can make a four-leaf clover with hearts?  And why not a touch of Gold Smooch Spritz to your four-leaf clover for good luck?!  The hearts are die cut with the Hearts Framelits Dies, the white hearts being stamped with the Hearts a Flutter stamp set in Gumball Green. As I looked at my desk, I spied a Paper Doily and thought maybe that would work as a background for the clover.  It fit perfectly on my 4 1/4" square card. The greeting is stamped with the Teeny Tiny Wishes stamp set and punched out with the Modern Label Punch. I don't know if four-leaf clovers come with a rhinestone in the middle, but mine does!  Love those Rhinestone Jewels!

If you need to make a shamrock or four-leaf clover for a St. Patrick's Day card or treat, don't despair if you don't have an appropriate stamp…..just use hearts!

Shop Stampin' Up! Online here for all your stamping supplies!

Stampin' Up! Smooch Spritz

Secret Garden Flower Card

Secret Garden Flower Card

Today is such a beautiful spring day here in Houston. When I saw this green leafy page in the package of Summer Smooches Designer Series Paper, I decided that it might be a nice backdrop for the flowers in the Secret Garden stamp set.

I stamped the flowers with Versamark ink on the color of card stock I wanted them to be and used the new Stampin' Up! Heat Tool to emboss with Clear Embossing Powder. Since we have Secret Garden Framelits Dies I didn't even have to tediously cut out the flowers! I just rolled them through the Big Shot and they were cut out perfectly!  The stems I did cut by hand.

The most difficult part of the card was gluing things down in the correct order. And in the end, I glued the designer paper to the Whisper White card stock BEFORE I tied a ribbon around it.  But since there are no mistakes in stamping (!), I just made a bow out of the ribbon and stuck it on with a Glue Dot.  Who would know that wasn't my intention from the start?!

If you don't have any spring flowers blooming yet where you live, maybe you want to stamp some to enjoy!  Get out your bright colored card stock and inks and have fun!

You can also purchase the Secret Garden Stamps and Framelits Dies in a bundle in wood- or clear-mount and save 15%!

Go to my Stampin' Up! Online Store now and take a look around!

Remember, with Sale-A-Bration you get a free product from the Sale-A-Bration brochure with every $50 in product you buy!  Only through March 22!

Secret Garden Flower Card Embossing

A Birthday Card with the Chalkboard Technique

Birthday Card Chalkboard Technique

Some of us can’t seem to get enough of the chalkboard technique! Here is a birthday card using a banner and the chalkboard technique!

In case you are new to this chalkboard craze, the black card stock is stamped with Versamark ink and embossed with white embossing powder. You could also stamp with white craft ink. Then for me, the fun part is taking a small cloth or sponge or even your finger and smearing a little of that white craft ink onto the card to make it look like an old dusty chalkboard!  The look is not restricted to black card stock…lots of chalk boards were a dark green. Do whatever you want!  It’s your piece of art!

On this card, I used the More Amore Specialty Designer Series Paper in the Stampin’ Up! Spring Catalog, stamped with the Hearts A Flutter stamp set and cut out the banner pieces with the Hearts a Flutter Framelits Dies. Be sure to check out the Bundle if you are interested before you purchase!

Try out this technique!  It’s really fun and I love the look!  Once you are aware of it, you will see it in lots of advertising and lots of places!  Be trendy!  Try the chalkboard technique!

Last Minute Valentine’s Day Candy Treat Ideas

In case you are scrambling for a few last minute Valentine candy treat ideas, here are a few for you!

 Happy Valentine's Day!

Valentine Top Note Candy Treat Bag

This is super easy! Just fill a cello bag with Valentine candy and make a topper for it! I used the Top Note Die (so versatile), folded it in half, and decorated it with punched hearts. You could add a Valentine greeting, too, if you wanted. You can staple the bag inside or use SNAIL adhesive.

Valentine Scallop Envelope Candy Treat

The Scallop Envelope Die makes it easy to make a little treat holder. A Ghirardelli chocolate fits just right inside! Wrap a ribbon around the bottom to hold it closed and add a Valentine greeting! This greeting is from Got Treats. If you don't have the Scallop Envelope die you could fold up your own little envelope with paper.

Valentine Candy Treat  Matchbook

One of the first cute things I ever learned to make when I first heard of Stampin' Up! was a matchbook! We put post-it notes inside then, but candy works well, too! Mine measures 2 1/2" x 7" and is scored at 3", 3 1/4", and 6 1/4" to fold around a Ghirardelli chocolate.  It you have some other candy, you might want to make it larger. The stamp on the Whisper White is from Easy Events, a very versatile stamp set for lots of occasions.

Valentine Candy Treat Matchbook Inside

I stapled the edge of the candy to the bottom flap or you could use a mini glue dot. The ribbon will hold the front flap closed.  Or the flap can go on the outside. However you want!

Valentine Candy Treat Matchbook Side

Matchbook from the side.  You can see how the scoring makes a little space to hold the candy.

Have a fun Valentine's Day doing something YOU love!

You Are Loved Valentine for Valentine’s Day

You Are Loved Valentine for Valentine's Day

Valentine's Day is only one day away!  Did you make a Valentine for someone special? This one came to mind when I saw something similar online with non-Stampin' Up! materials. I decided to add texture to the Cherry Cobbler base of the card with the very popular Honeycomb Textured Impression Embossing Folder #1293778. (I never remember it is called "Honeycomb"….I think most of us think of it as the 'hexagon' embossing folder!) I used the Labels Collections Framelits Dies #125598 to die-cut the First Edition Specialty Paper #121878. I stamped on it with Cherry Cobbler ink and sponged the edges a bit with Soft Suede to give it  a little aged look. Couldn't you also see this as a wedding card?

Originally I stamped the "Love" image directly on the First Edition paper as I did the flower from the stamp set You Are Loved, but the design just didn't do enough for me. So I relented and stamped it on Very Vanilla and cut out with the Decorative Label Punch #120907. I stamped it again and punched out the word "Love" with the Large Oval Punch #119855.

Since I already had the Champagne Glimmer Paper #127885 out on the table, I couldn't resist using it! Once you see that glimmer paper in person, you just can't resist it! The Champagne paper is still available to order even though it is not in the Spring Catalog. I originally tried it as a large Label die-cut behind the First Edition paper but changed my mind.  But once I was using the Decorative Label Punch, it was easy to layer it behind that! There is a trick to doing that….just punch out two and cut each in half, one vertically and one horizontally, then layer behind the punch on all four sides.  You'll see how they fit. And for a final touch, I wrapped some Cherry Cobbler Baker's Twine around the front of the valentine.

We often don't get a peek at the inside of the card, but since this You Are Loved stamp set had a nice saying in the set, I used that as well as stamped the flower on the inside layer.

You Are Loved Valentine inside

Now that's another Valentine card ready to go on February 14th! If you make a Stampin' Up! valentine, send me a picture and I'll put it on my blog!

Valentines for Boys (or Robot-Loving Girls!)

Robot Valentines for Boys

Valentines are sometimes all "mushy" but here is a cute idea for valentines for boys! Not that they can't be for girls, too, of course…but in the craft world, it's often more difficult to find "boy" things. Anybody who loves robots will like these valentines…and not just for Valentine's Day either!  They would be just as cute for birthday cards or some kind of birthday party favors. The only bad thing is that the chocolate candy making up the body is pretty tempting and then the robot is kind of destroyed! But that's okay…we have to remember, it is only paper!

Of course I copied the idea from a couple I saw online a long time ago and then made them up my own way. On two, I embossed aluminum foil (the heavy duty kitchen kind) in an embossing folder in the Big Shot.

Embossed Foil

Here are close-ups of the robot valentines. The glare of the foil makes it a little difficult to take photos!

Robot Valentine
Here you can see the two chocolate nuggets forming the body (stuck together with one mini glue dot near the bottom of the candy and some Sticky Strip on the back.

Holding nuggets

Robot Valentine 2

Robot Valentine 3

Use your imagination and make some fun valentines like these! Once you get started, it is hard to stop!

Shop Stampin' Up! Online here at my Online Store!