Author Archives: Karen Fontinelle

Sign Up For the January 2025 Paper Pumpkin Kit

Paper Pumpkin Jan 2025 Hearts For You Banner

It’s a New Year and a new year for Paper Pumpkin, the fun monthly subscription from Stampin’ Up! Each month a new Paper Pumpkin Kit will be delivered right to your mailbox. This January 2025 Kit, Hearts For You, will be the fun Paper Pumpkin Kit perfect for Valentine’s Day! Or of course any time you want to send hearts to someone throughout the year!

Paper Pumpkin is a monthly, all-inclusive crafting kit that you subscribe to. Each kit includes a photopolymer stamp set, Classic Stampin’ Spot, and step-by-step instructions to complete exclusive paper craft projects, including cards, tags, and gift packaging. There is no obligation to subscribe for any length of time and you can go into your account and skip a month any time you need to. Stampin’ Up! guarantees each Paper Pumpkin Kit so if you ever have a problem or question about your subscription, you can contact them and they can assist you. Here at the beginning of the year is a great time to try out Paper Pumpkin or come back if you were a past subscriber given there is no risk, obligation, or pressure to continue.

SIGN UP FOR PAPER PUMPKIN BY JANUARY 10, 2025!

KIT DETAILS

JANUARY: Hearts for You
Subscribe December 11–January 10
Create heartfelt cards for Valentine’s Day, Galentine’s Day, and beyond!
• Makes 9 cards: 3 each of 3 designs with 9 envelopes
• Heart-shaped precut pieces and stickers
• Twine and heart gem embellishments
• Coordinating colors: Flirty Flamingo, Petal Pink, Real Red (Classic Stampin’ Spot)

Since this will be useful for Valentine’s Day, keep in mind you can order more than one kit in your account if you’d like to make more than 9 cards! Order a couple of kits to make with your children, grandchildren, or friends for fun!

JOIN PAPER PUMPKIN HERE!

No risk, no obligation! Skip a month or cancel if you need to.
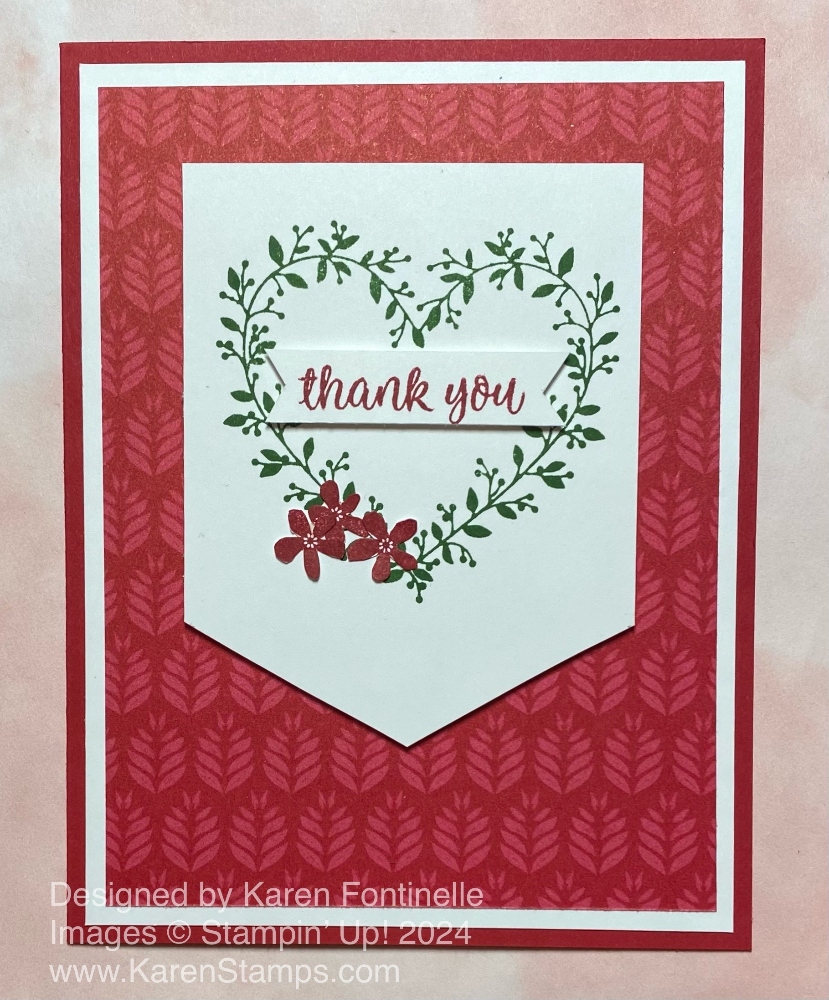
Heart Shaped Thank You Card

Heart Shaped Thank You Card

Here’s a new card for 2025 and one using a new product! This Heart Shaped Thank You Card is an easy one to make with just stamping and a little scissor-work! My diecutting products are still put out of the way for Christmas so I didn’t want to pull those things back out just to make a card at the time. So it was back to “just stamping” which often feels good to do, like back in the day when we didn’t have a die-cutting machine and dies and embossing folders. Keep it simple.

The card base is Real Red with a layer of Basic White just to set off the designer paper a little. The patterned paper is the Marbled Elegance Specialty Designer Series Paper which is in the Marbled Elegance Suite. This was a new Online Exclusive back in early November when most of us weren’t interested yet in something that would work for Valentine’s Day, not that it can only be used for Valentine’s Day as you can see, but we were into the Christmas holidays.

The stamp set I used is the Heart Shaped Stamp Set, a freebie in the Sale-A-Bration Brochure. It is actually part of a Bundle that you can get FREE during Sale-A-Bration with a $120 purchase beginning January 7th. That is only days away now!! While mostly you get a single product with every $60 purchase during Sale-A-Bration, Stampin’ Up! always includes a couple of bundles or combination of products that you can earn free with a larger purchase. I really liked the stamp set since it CAN be used for Valentines but also lots of other occasions, even just to say “Hello”. The Sale-A-Bration Bundle also comes with a set of dies, but as I said, since my Stampin’ Cut & Emboss Machine is put away right now, I only used the stamps.

I did copy a sample in the Sale-A-Bration brochure for this bundle but I used different designer paper in the background and I only stamped the heart, I didn’t use a diecut shape. That’s how you can use the samples in catalogs to get ideas but still put your own spin on it if you like. The heart is stamped with Garden Green ink on Basic White. The little flowers are stamped in Real Red and I just cut those out with my Paper Snips. A little tedious when I could have used a die but that’s what I wanted to do in the moment. The greeting is in the stamp set and is stamped in Real Red ink on a narrow scrap of paper that I still trimmed down to be very narrow and short with my Paper Trimmer. I flagged the ends of the greeting and popped it up on Stampin’ Dimensionals.

The white banner piece is cut first at 2 3/4″ x 3 1/2″. Your measurements can vary. I just tried to get a size that didn’t take up too much space on the card, so it is basically the width of the wreath with a little margin on each side. At the bottom I put a tiny pencil mark at the center, which was about 1 3/8″ and maybe about 3/4″ down from each side. Then I just used a scissors to cut a diagonal from each side. Or after you cut one diagonal piece on one side you can flip it over and put it in the corner of the other side and use that as your cutting guide to get the same size. The whole banner is popped up on Stampin’ Dimensionals also.

While you could “fancy up” this card a little bit with some ribbon or gems, I opted to leave it simple. You wouldn’t even have to cut the banner shape at the bottom. Just cut a square or rectangular shape or use a diecut.

When January 7th arrives and Sale-A-Bration and the new January-April 2025 Spring MIni Catalog go live, if you spend at least $120 be sure to check out the Bundles you can choose on pages 12 and 14 of the Sale-a-Bration brochure. But you can also choose the individual products with each $60 purchase so for $120 you can choose two products rather than one bundle. Yes, the qualifying order did rise to $60 this year instead of $50 as in the past, but the past has been “forever” so maybe it was time to raise the dollar amount a little bit.

I hope you enjoyed this first card of the New Year. There will be lots more to come in 2025!

With You In Mind Birthday Card

With You In Mind Birthday Card

Now that the Christmas holidays are over, we are getting real close to the new year. That brings thoughts of getting organized and getting birthday cards ready like this With You In Mind Birthday Card. Especially if you have birthdays coming up in January after the busy-ness of the holidays, you need to get on the ball and get cards ready to send right away in the New Year!

This With You In Mind Stamp Set is one that is coming January 7th in the new Spring Mini Catalog (officially known as the January – April 2025 Mini Catalog). This stamp set appealed to me because it has four all-occasion greetings with one of the words in a rather large font. You get “Thinking of You”, “Happy Birthday”, “Best Wishes”, and “Thank You” plus a small flower, star, heart, cupcake, and leafy sprig.

To try to get back into create mode after being very busy with Christmas and children home, I started off making up a card beginning with copying a sample from the new mini catalog. I thought the “Happy Birthday” tag with cupcakes was pretty cute and could be made into a card. To choose colors for the card, I tried out the Color Coach. I’m not a real expert using the Color wheel but I decided to choose three colors next to each other on the wheel. I chose Pool Party, Balmy Blue, and Azure Afternoon. I really wasn’t sure how that combination was going to work, but I think it did!

The card base is Basic White and on top of that I used two of the cardstock colors I mentioned above. I used two panels of Pool Party with a panel of Balmy Blue in the middle. These are cut at 1 3/4″ x 4″. I adhered them right next to each other with no space in between. After I adhered them to the Basic White card base, I stamped stars around the background using the star in the stamp set with Versamark ink to give it that light, watermarked image.

As I said, the tag in the middle of the card is like the sample in the mini catalog. It is a piece of Basic White cardstock cut at 2 1/4″ x 4 1/2″. The greeting is stamped in Azure Afternoon ink ( one of the three colors next to each other on the Color Wheel). The three cupcakes are stamped with Daffodil Delight ink for the frosting and Pool Party ink for the cupcake holder. I inked up just the frosting top portion with the ink pad and stamped that three times for the three cupcakes. Then I went back and inked up just the bottom portion of the cupcake and stamped it underneath the frosting. This worked better than using Stampin’ Write Markers because these stamps were brand-new and not cooperating with trying to color on with a marker. The ink pads worked much better.

The end of the greeting was cut in a flagged end and a small 2 1/4″ x 1″ piece of Azure Afternoon card stock was adhered to the left side of the tag. I had also stamped it with a few Versamark stars. I tied around some Balmy Blue twine in the Baker’s Twine Three Color Pack and made the strands spread out just for a fun look. Then I took three pieces of the same twine and tied a knot in the center. The whole greeting was then popped up with Stampin’ Dimensionals.

This is an easy card to make! The only thing that took time for me was deciding the best way to do the cupcakes and what colors to make them. I love the new stamped greeting and love seeing something big but not huge. The greetings in this With You In Mind Stamp Set will get a lot of use!

Remember, Sale-A-Bration also begins on January 7, 2025 and runs through February 28 during which time when you make a qualifying purchase, you get to choose a product from the special Sale-A-Bration brochure for FREE! This year the qualifying amount is $60 in product (before tax and shipping).The products include stamp sets, designer series paper, embellishments, an embossing folder, and more. And if you choose to join Stampin’ Up! and become a Demonstrator, with your purchase of the Starter Kit (stamping products you choose yourself plus business supplies to get your business started), you can either choose from certain free items or an additional amount to add to your Starter Kit. It’s all in the last pages in the Sale-A-Bration brochure!

It all begins a week from tomorrow!!

A Poem For a Christmas Stamper

‘Twas the week before Christmas, and the house was a hush
Save the stamping of rubber in a last minute rush.
The cardstock was cut with precision and care
In hopes that a greeting would soon be stamped there.

The children were tucked in their beds around eight,
But now it’s ten-thirty… How’d it get so late?
And I in my PJs with bleary red eyes
Had finally arranged all the stamping supplies.

It started out simple. (It does every year.)
Just make a few cards for friends who are dear.
I pressed ink to paper. (It looked crisp and clean.)
A sprinkle of powder, heat to a sheen.

When what on my green Christmas card should appear?
Why, a tiny gold Santa with sleigh and reindeer.
On pigment! On powder! On heat from a gun!
Now ribbon and glitter! Can I make eighty-one?

“I can do it!” I said with all of my might
And looked at the clock – ’twas well past midnight.
I went straight to stamping out card after card.
“This might take all night, but at least it’s not hard.”

But after I finished, they looked a bit lame.
I didn’t want fancy, but these were too plain.
And then in a twinkling, a thought came to mind.
“I’ll just dress them up, and then they’ll be fine.”

So I went to my craft room and looked all around,
Then back to the table with all that I’d found.
My Fiskars I brandished (I wasn’t a quitter),
And soon I was covered in EP and glitter.

The cap of a marker I held in my teeth.
I’d lay in some color or maybe gold leaf.
My broad little face was all beaded with sweat,
But I wouldn’t give up – well, not at least yet.

There was glue on the table and ink on the floor.
I laughed at the sight though my fingers were sore.
I did not complain, just kept up my work.
When more things went wrong, I did not go berserk.

When finally finished, one card about six,
It looked pretty good after all of my tricks.
I’m keeping this one. My work on it shows.”
So clutching my card, up the stairs I arose.

I crawled into bed at the crack of dawn,
Creativity all spent, motivation all gone.
But make no mistake, I promise one thing:
You’ll all get your cards, but not ’til next spring!

–Author Unknown

I read this somewhere online years ago, but I thought it was quite appropriate! Enjoy!

Quick Christmas Gold Dipped Cards & Envelopes

Gold Dipped Blue Cards

If you need “just a few more cards” for Christmas at the last minute, if you have this package of cards and envelopes, these Quick Christmas Gold Dipped Cards & Envelopes might save you! Maybe you ordered them and forgot you had them, but they are nice to have on hand and very pretty and colorful! It’s great if you have any of the Ephemera Packs in the Holiday Mini or the A Little Bit Festive Specialty Designer Series Paper with die cuts or any of the Sticker Sheets that came with some of the designer paper in the “Scrapbook Workshop” packages. Now is the time to scrounge around and use what you have!

These cards use the Gold Dipped Specialty Cards & Envelopes at Stampin’ Up! You will find them and lots of samples on pages 14-19 in the Holiday Mini. Here are some that I either copied from the sample or used my own ideas.

Gold Dipped Ephemera Christmas Cards

You can turn the cards vertically like the top two cards or horizontally like the two just above. I didn’t do any stamping except on the inside of the card where I stamped “Merry Christmas” or some other sentiment on a stamp. These larger cards are great for writing that Christmas note! Wish I’d thought of that earlier for certain people instead of cramming it in on the inside of the card or a notepaper!

Gold Dipped Christmas Cards

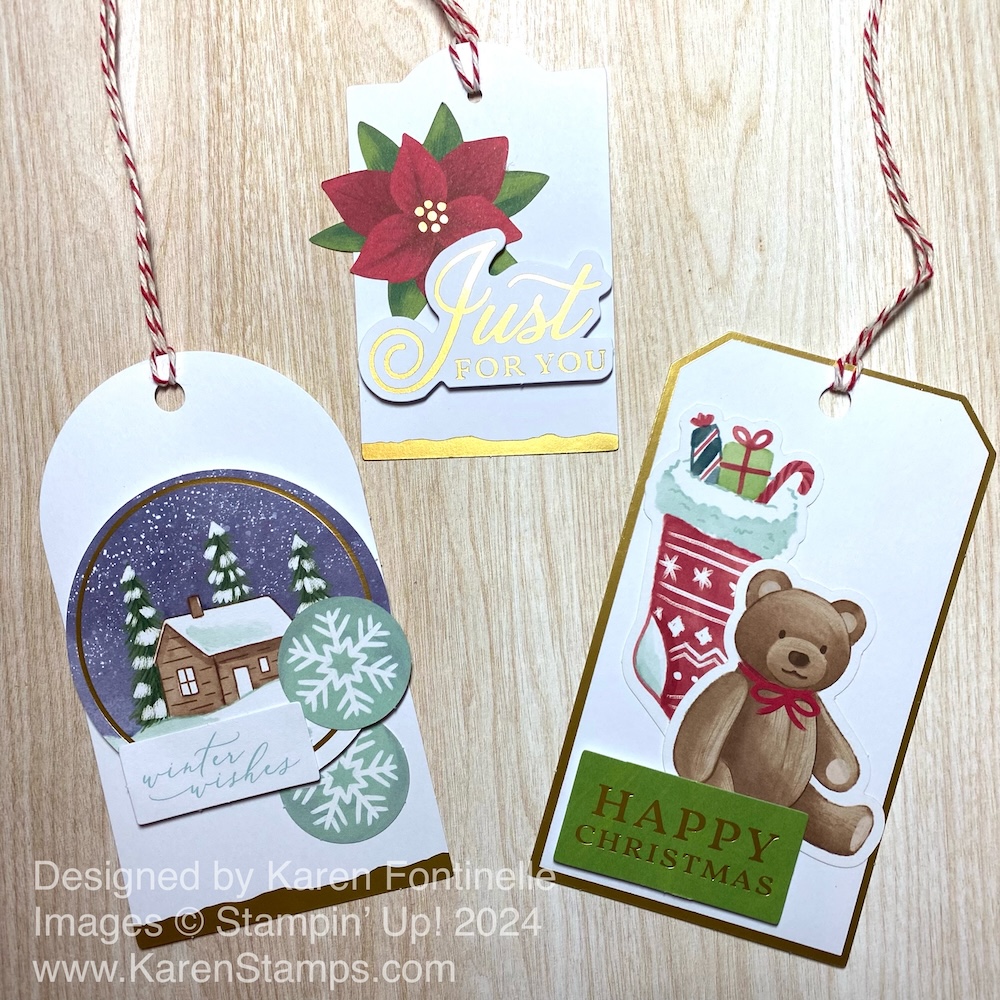
Here are a few gift tags I also made with the Tags For the Season Ephemera Pack and other pieces of ephemera.

Ephemera Gift Tags

You can pop up some of the pieces with Stampin’ Dimensionals or just adhere them flat on the card or tag. You can also make tags and then attach to the front of the card and maybe add a little bit more of designer paper or stamping or whatever you need. If you only attach it with minimal glue, maybe the recipient can remove the tag and use it for a gift! But maybe they won’t want to take apart your pretty card!

I hope these cards give you some ideas here at the end of our holiday preparations! And add a few gems, jewels, or sequins, whatever you have, for a little sparkle and bling! Even three add a lot of pizzazz to the cards!

Make This Easy Gift Card Holder

Reindeer Days Gift Card Holder (1)

It’s that time of year, that time of the holiday season, where we need some gift card holders for gifts. This Easy Gift Card Holder will fit the bill for you! There’s almost no time left for shopping before Christmas and gift cards are a great solution for those you don’t have any gift ideas for. You could fold up some cash and put in this pocket as well!

Start with a 4″ x 12″ strip of cardstock. You could make it taller if you wanted to. Score this strip of paper at 4″ and 8″, basically in thirds, since the paper is 12″ long. Then on the end section, cut from the score line down to the corner on a diagonal. This can be on either end of the card.

Gift Card Holder Diagram

Put a strip of Tear & Tape Adhesive or other strong adhesive on the bottom of that section with the diagonal cut. Then fold that diagonal piece over to the inside panel next to it.

My sample is a base of Real Red, and I used the Reindeer Days Designer Series Paper and Sticker Sheet to decorate the holder. On the front I cut a piece of designer paper with the packages at 3 3/4″ x 3 3/4″. The tree and strip of holly leaves behind it are stickers from the Reindeer Days Sticker Sheet.

You can decorate the inside however you like or leave it plain. I put another paper behind the diagonal piece and a diagonally cut piece of designer paper on that diagonal corner. Just cut a square of 3 3/4″ x 3 3/4″ and cut diagonally from one corner to the other. Just make sure you have the pattern going the right way and that you cut to and from the correct corners. You can write a message on the inside left of the holder or add a piece of Basic White on which to write or stamp something.

Reindeer Days Gift Card Holder Inside

Put your gift card or cash in the pocket. Decorate the front a little more with some bling, like these Iridescent Faceted Gems on the tree. If you prefer, make a belly band to go around the gift card holder to keep it closed. These are so quick and easy I bet you can’t make just one!

How to Decorate a Gift Box

Decorated Gift Box

The other day while searching for some tins I ordered many years ago for candy, I found these Stampin’ Up! White Gift Boxes (142000) in my retired stash. I had to change my design idea from candy in a tin to candy in a box for a few gifts. Whether or not you have these official White Gift Boxes in your stash, you can use this idea of any plain box. It would even cover up company printing on the box and the size of the box doesn’t matter. You can use this same principle.

Each side of this box is 3″ x 3″. I cut out five pieces of cardstock at 2 3/4″ x 2 3/4″, then five pieces of designer series paper at 2 5/8″ x 2 5/8″ (or you could do 2 1/2″ x 2 1/2″). Just adhere the designer paper to the cardstock and then on to the box. I like to use Multipurpose Liquid Glue because it gives you “wiggle room” to get the paper on straight on the box. On this box, I used the A Little Bit Festive Specialty Designer Series Paper and Misty Moonlight Cardstock.

The snowman on the top of the box is punched out of the Snowy Scenes Designer Series Paper with a Circle Punch and then layered on a punched circle of Daffodil Delight to match his scarf. You could use whatever you like.

For a final touch (before adding candy inside!), I wrapped around some ribbon that I had handy, which happened to be some retired Pretty Peacock ribbon, but I thought it matched okay. Use Mini Glue Dots to hold the ribbon in place at least in the back and maybe the sides, then tie a bow on the front.

Even if you had a small Amazon or other shipping box, you could use this same idea to cut out pieces of cardstock and/or designer paper to cover the sides of the box and personalize it! Just have fun with it! Time to wrap those gifts!!

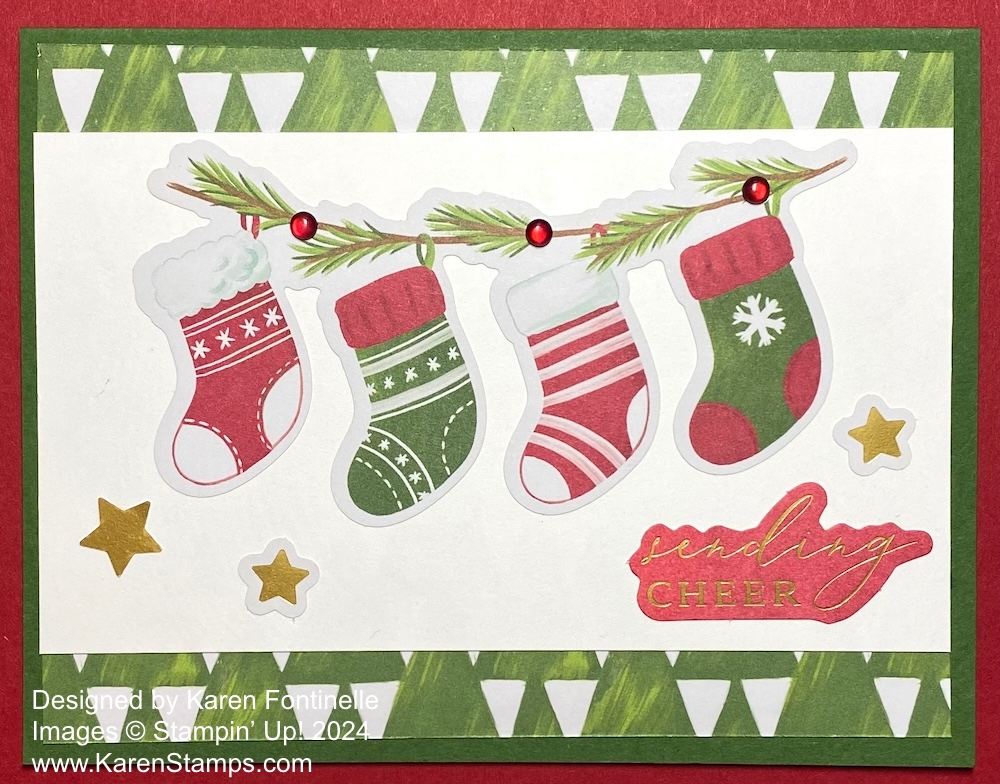
A Little Bit Festive Christmas Stockings Card

A Little Bit Festive Christmas Stockings Card

This A Little Bit Festive Christmas Stockings Card is another fun and easy Christmas card to make! All you need is the A Little Bit Festive Specialty Designer Series Paper plus one greeting. As I’ve said in other blog posts, the A Little Bit Festive paper is special because it consists of 3 double-sided sheets of designer series paper and 3 sheets of Christmas die cuts! What more can you ask for?! Everything is matched and ready for you to use right there in one package!

This card base is Garden Green although you could choose Real Red instead. It would also be pretty. The layer on the front is Basic White cardstock that measures 5 1/4″ x 3″. Underneath the top and bottom of the Basic White layer are strips of the designer paper with the green triangle trees. You could make a whole layer of it which ouls mostly get covered up by the white piece, so I just used two strips adhered underneath the white layer. You can cut them at 5 1/4″ x 1″ and that should give you enough for the margin to show top and bottom. It just adds an interesting border.

I chose the row of Christmas stockings die cut which includes the branch of greenery that they are hanging from. I added some little star diecuts to fill up some space. The greeting is in the Joyful Sayings Ephemera. I adhered everything flat to the card front but you could pop up some or all of it with Stampin’ Dimensionals. I also added some red dots for berries on the bough of greenery in the Cherry Cobbler & Pearl Adhesive-Backed Berries. I think those little red dots add a lot to the card above the stockings.

That’s all there is for that card! Using the ephemera packs in the Holiday Mini Catalog and the diecut in the A Little Bit Festive Specialty Designer Series Paper have been so fun to use and so quick and easy! Make sure you have used yours! And if you don’t need more cards, make tags for packages!

SHOP STAMPIN’ UP! ONLINE HERE!

x

Christmas Ornaments Kit Stampin’ Up! Kits Collection

Christmas Ornaments Kit Stampin' Up! Kits Collection

Finally, I got my Christmas Ornaments Kit in the Stampin’ Up! Kits Collection made! I’ve kept the box out ever since it arrived weeks and weeks ago, and yet it didn’t get made until the pressure was on here at the last Christmas minute! The kit makes nine ornaments, three each of three designs, which I posted in the photo above. Unfortunately, the kit is “currently not available” in the Online Store, but maybe you already have the kit and haven’t made it. This is your reminder to get out that kit and sit down and enjoy making the ornaments! Or if you are too busy, get it out right after Christmas when you have more free time and make the kit. Then you’ll have them ready for next year!

The kit is called Christmas Ornaments, but you could use these for fancy gift tags on packages! If you were hand-delivering a card or mailing a card inside a package, maybe you could use this ornament as a card front! Then the recipient can take it off the card and use it themselves as an ornament or decoration.

Someone suggested jazzing up these ornaments a little bit! I plan to do that this afternoon in my “spare time”! Just as with the Paper Pumpkin Kits, people always think of other creative ways to use the kit and make “alternate” projects with the contents. So even though you are given directions and a video, you can still make your project differently, however you want to make it! Some of the suggestions I saw were adding a bit of gold or maybe some Wink of Stella glimmer. Paint on a bit of white for a snowy look on the pinecones. Add a greeting or another Christmas image on the ornaments. Six red bows are included in the kit but you can add your own bows to the other three ornaments if you wish. Just play around with the kit and do what pops into your head to make it your own!

The only difficult part of this kit is tying on the gold thread onto the gold hoop. The hoops are very nice, by the way. Strong and good quality. Use the included glue dots to put glue dots where the gold thread is going to go. You will see a little bump on each hoop, some barely noticeable, so you might want to wrap the thread around those areas if you can. Be sure to watch Sara’s video assembling the kit to see how she does it. You can watch it again and again or pause it to follow along with each step. Or just go wild and crazy and do it however you like, as I’ve said!

Watch the video below about the kit. As I said, if you have the kit but haven’t made it yet, now is the time!

Here is the kit in the Online Store that you can check out and keep an eye on in case they get more in stock.

While you are there, check out the other Kits in the Kits Collection! You can purchase a kit for yourself or get an extra one to make with a friend or loved one (I hear lots of grandmas do this for their grandchildren!). Maybe you just want to purchase a kit as a gift for a friend! Lots of variety to choose from! Enjoy!!

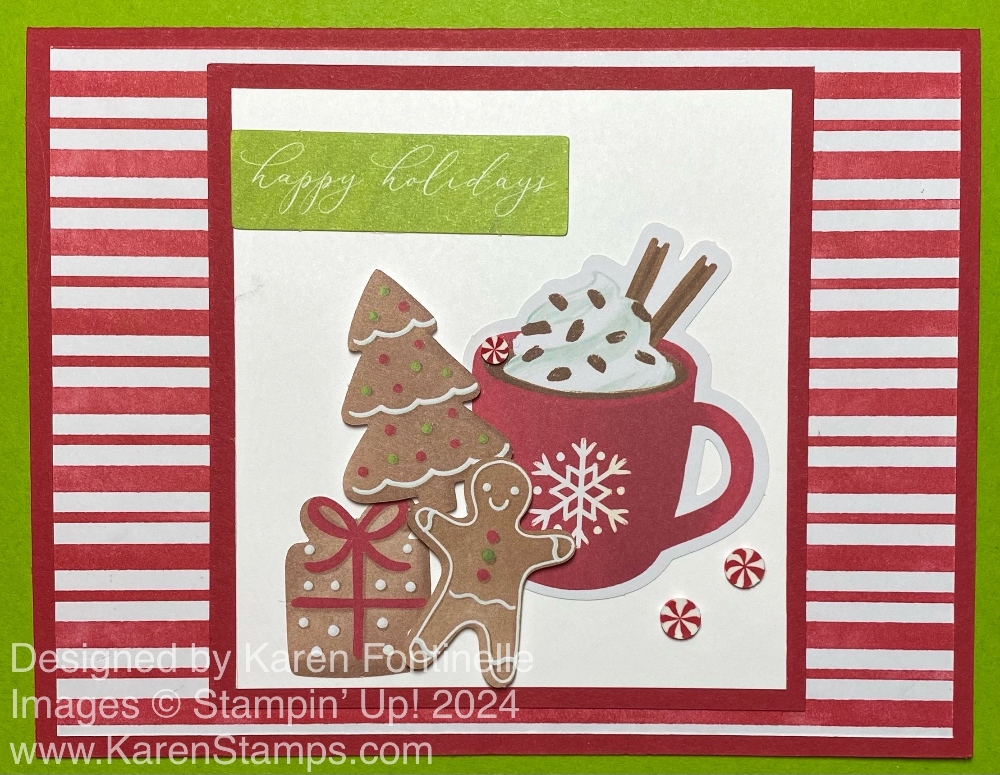
A Little Bit Festive Cocoa & Gingerbread Card

A Little Bit Festive Cocoa & Gingerbread Card

When you don’t have your own original idea, you can copy a card from the Stampin’ Up! catalog as I did with this A Little Bit Festive Cocoa & Gingerbread Card. You will find the sample that I copied on page 18 in the Holiday Mini Catalog. I changed mine just a tiny bit, but it was fun to make!

This Christmas card uses the A Little Bit Festive Specialty Designer Series Paper. This paper comes with three regular double-sided sheets of designer paper and three sheets of Christmas die cuts that you can use for cards or holiday projects. It’s really fun to work with, just playing with all the pieces!

This card has a card base of Real Red and a layer of the red and white striped designer paper in this package. After playing with the die cut pieces to get the design set, I cut a piece of Basic White cardstock at 3 1/4″ x 3 1/2″ layered on a piece of Real Red cardstock at 3 1/2″ x 3 3/4″. I arranged the die cut pieces like on the sample in the catalog. The cup of hot chocolate is adhered flat to the card, the gingerbread tree and gingerbread man are popped up on Stampin’ Dimensionals, and the gingerbread present is glued flat on the card. I chose “Happy Holidays” for the greeting in the Joyful Sayings Ephemera Pack.

For a little embellishment, this was the perfect card on which to use the Real Red & White Adhesive-Backed Peppermints. Unfortunately, these cute embellishments have been very difficult to keep in stock and are backordered even now. Hopefully, you already snagged some earlier. These do look cute with two next to the cocoa cup and one looking like it is floating in the whipped cream topping!

My card looks almost exactly like the sample card in the catalog, but if you look closely, you will see mine is the full size card and the sample looks to be square. My red and white stripes are running horizontally rather than vertically. And as I said, I used a different greeting and the peppermint embellishments. This is what usually happens when you plan to copy a card Almost always you will find your own little twist you want to put on the card and that helps get your creativity flowing!

New Paper Pumpkin Kit For January 2025!

Paper Pumpkin Kit January2025 title

The December Paper Pumpkin is being sent out and now it’s time to sign up for Paper Pumpkin so you get the next kit in January! I couldn’t believe I was writing 2025 in the post title! But this will be the fun Paper Pumpkin Kit you can receive in your mailbox mid-January 2025 which will be perfect for you-know-what…..Valentine’s Day! Or of course any time you want to send hearts to someone throughout the year!

Paper Pumpkin is a monthly, all-inclusive crafting kit that you subscribe to. Each kit includes a photopolymer stamp set, Classic Stampin’ Spot, and step-by-step instructions to complete exclusive paper craft projects, including cards, tags, and gift packaging.

JANUARY: Hearts for You
Subscribe December 11–January 10
Create heartfelt cards for Valentine’s Day, Galentine’s Day, and beyond!
• Makes 9 cards: 3 each of 3 designs with 9 envelopes
• Heart-shaped precut pieces and stickers
• Twine and heart gem embellishments
• Coordinating colors: Flirty Flamingo, Petal Pink, Real Red (Classic Stampin’ Spot)

Since this will be useful for Valentine’s Day, you can order more than one kit in your account if you’d like to make more than 9 cards!

JOIN PAPER PUMPKIN HERE!

No risk, no obligation! Skip a month or cancel if you need to.

It’s Day 2 Of FREE SHIPPING at Stampin’ Up!

Free Shipping Boxes on Cart Info

From December 9–11, you can shop and save on all qualifying orders of $75 or more. What a great way to stock up on all your favorite products from the catalog, Last Chance Products List, Online Exclusives, kits, and more!

Free shipping is for three days only so don’t delay!

Due to the high volume of orders and the Christmas season, the distribution center may fall behind their typical shipping timeframes. They will do all they can to return to the regular service levels as quickly as possible. 

Please know that any orders placed during this promotion are not guaranteed to arrive before or by December 25. 

SHOP TODAY!

(Give yourself a Christmas gift! Order what you want! 🙂 )