You can earn this beautiful butterfly paper FREE during Sale-A-Bration at Stampin’ Up!, the biggest promotion of the year. And butterflies seem to be a theme this year! In fact, I had to remember that this designer paper was in the Sale-A-Bration Brochure and not the Occasions Catalog where you will find the Butterfly Gala Stamp Set in the Gingham Gala Suite of products.
Look at how simple this card is to make! The card base is Daffodil Delight Cardstock with a layer of Basic Black. If you like or want to learn a tip, cut out or punch out the inside of the black cardstock, leaving a wide enough margin for the layer of designer paper but saving a large rectangle of paper from the center of the black. No one will ever know unless they take apart the card! I certainly do not do this all the time but sometimes with a specialty paper like foil or shimmer paper, I will do it. Or if you need a punched or die cut piece the same color as the layer, you can punch that piece and use the rest of the paper as the underneath layer.
My first idea in designing this card was to cut out or punch out some of the printed butterflies on the Botanical Butterfly Designer Series Paper on page 9 of the Sale-A-Bration Brochure. As it turned out, this particular page had butterflies that fit the Butterfly Duet Punch on page 35 of the Occasions Catalog, part of the Butterfly Gala Bundle with the punch and the Butterfly Gala Stamp Set. Of course, you need to cut out around the butterfly on the paper in order to reach it with the punch, but you don’t have to trim around the details of the butterfly, just punch it. I like to adhere a post-it note to a corner of a small piece of paper I am punching so that I can still maneuver it into place inside the punch. If the paper you are punching is small, you have no edge of it to hold onto while you punch, so you need to adhere a scrap of paper or a post-it note to hold on to.
I chose the designer paper with these small butterflies as the background for my punched out butterfly. The sentiment is stamped from the Butterfly Gala Stamp Set. I really love that font! I played around with several options to put underneath the butterfly and finally decided on this Whisper White circle I found in my stash already die cut with the Stitched Shapes Framelits Dies. Then I just popped up the butterfly with the Stampin’ Dimensionals.
In summary, this is a very easy card. It has a card base, an extra layer under the designer paper just for a little extra definition. You could even skip this piece. Then there is the punched out butterfly layered on a die-cut circle (could be punched out) with a stamped sentiment. Just for fun, I brushed Clear Wink of Stella over the butterfly to give it some shimmer.
After I made this card, I had the same feeling I had after I made this Gingham Gala Monochromatic Card. Although I loved the Holiday Catalog and making Christmas cards and projects, now making cards with the new Occasions products just feels like a breath of fresh air! I guess it is always that way with a new catalog!
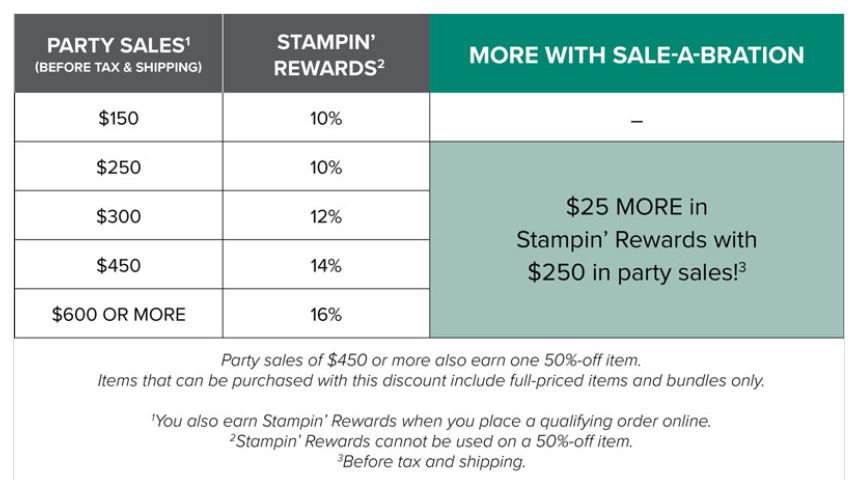
Remember, whether you are buying products from the new Occasions Catalog, the Annual Catalog or even the Clearance Rack, it all counts toward Sale-A-Bration! So for every $50 you spend, you can choose a FREE product from the Sale-A-Bration Brochure. If you spend $100, you can either choose TWO free products from the Sale-A-Bration Brochure or one of the special $100 rewards. If you spend $150, you make your SAB choices PLUS earn Stampin’ Rewards which is 10% of your total in additional free merchandise. Just check page 52 in the Occasions Catalog for the information. With a large order (or combined with friends) of $250, you also get an EXTRA $25 in free merchandise you can choose.
We can make very fancy cards or sometimes just a simple card like this Botanical Butterfly card will be perfect. Right now you can earn this FREE butterfly paper during Sale-A-Bration.