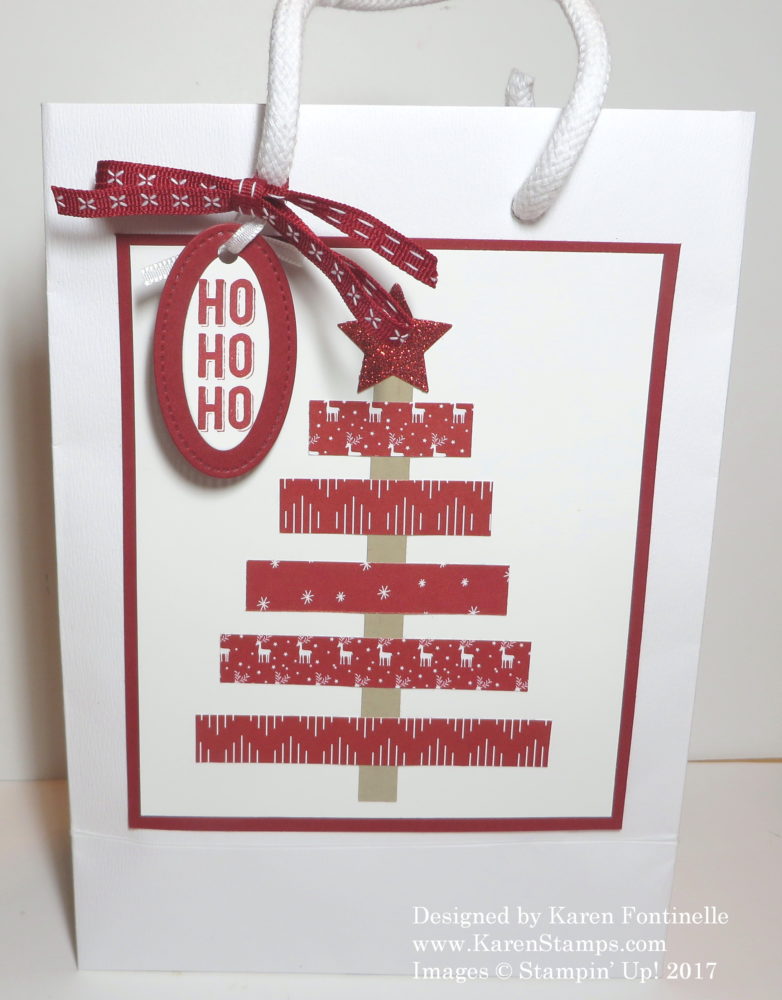
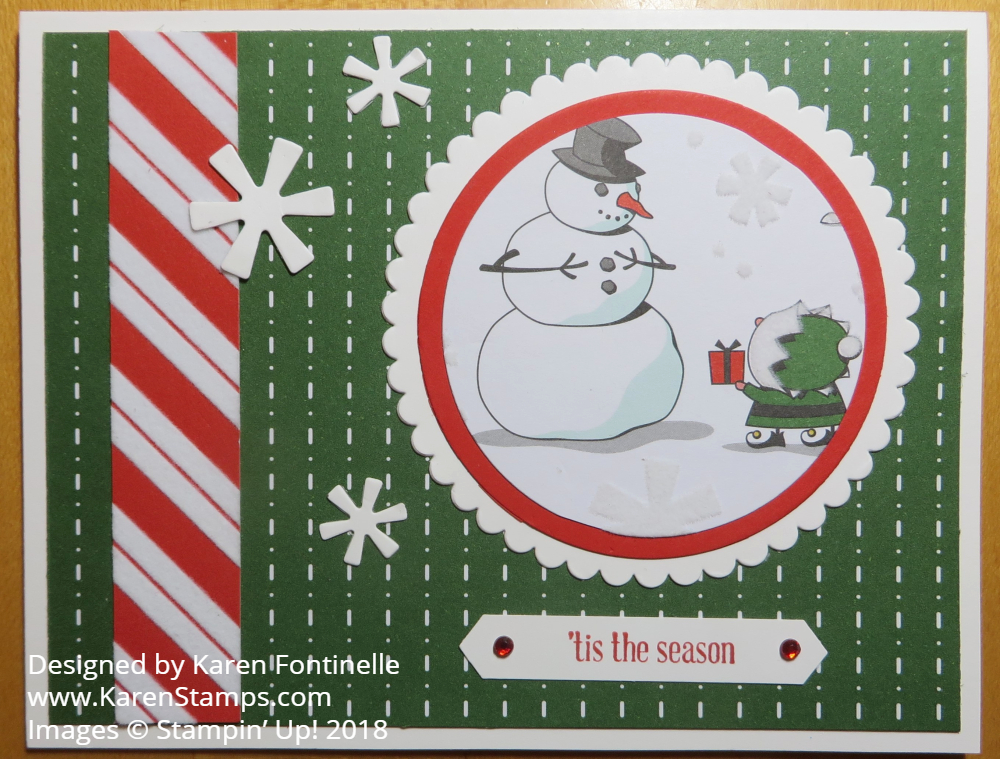
Author Archives: Karen Fontinelle

Easy Candy Bar Reindeer Christmas Favors

Candy Bar Reindeer

If you were wondering what to do with any leftover Halloween candy (especially if it rained and stormed and you barely had any trick-or-treaters), here’s an idea to turn the small candy bars into Easy Candy Bar Reindeer Christmas Favors!  It’s almost Christmas anyway, so the candy won’t get old!

These were little snack size candy bars but of course, you could use regular size candy bars if you like. Basically, you just wrap cardstock around the candy bar and then turn it into a reindeer for Christmas!  You can use these for stocking stuffers, party favors, table decorations, whatever you need.

For those who like measurements, for these chocolate bars my Crumb Cake Cardstock was cut 3 1/2″ wide to go around the bar and 3 3/4″ in length.  You can just wrap the paper around and kind of score it with your fingers, or measure your candy bar if you want more precision.  I scored my cardstock at 1″, 1 1/4″, 2 1/4″ and 2 1/2″.

To make the antlers, I used the Sprig Punch and Early Espresso Cardstock. I just put a dab of glue on the end of the sprig and adhered it inside the candy bar cardstock wrapper.  You could even separate the two sides of the sprig if you wanted to.  I liked mine together as punched.  Use whatever you like for the eyes, big or little.  I decided on the two circles in the Cookie Cutter Builder Punch and added pupils with a black marker.  It would be cute to use any “googlie eyes” you might have in your stash.  For the nose, I used the 3/4″ Circle Punch to make a sparkly red nose with some retired red Glimmer Paper, but of course you could just use Real Red Cardstock for the nose.

For more inspiration, here is another reindeer papercrafting project I did.

That’s all there is to this easy candy bar project. You could even tie a little red ribbon around the bottom portion of the reindeer or fancy it up a little more. Make some cute candy bar reindeer Christmas favors for your holiday table!  Just have fun with it!

***Here are some products that are no longer available to purchase due to the fact that they are backordered and cannot be sent in time for the holidays by the manufacturer.  Very sad this beautiful paper is no longer available.

147816: Joyous Noel Specialty Designer Series Paper
147890: Festive Farmhouse Elements
147811: Santa’s Workshop Enamel Elements

BUT Stampin’ Up! is bringing back the Dashing Along Designer Series Paper, a package of old and new paper patterns for a traditional Christmas!

Dashing Along Designer Series Paper

Winter Woods Vellum Trees Christmas Card

Winter Woods Vellum Trees Christmas Card

I can’t believe I have had this Winter Woods Bundle for awhile and only now am I getting around to making this Winter Woods Vellum Trees Christmas Card. You can make all kinds of beautiful cards and projects with this stamp set and framelits dies.

Since I was trying this out for the first time, I used the Holiday Catalog samples for inspiration. The Stampin’ Up! catalogs are always the best places to go when you are looking for an idea! Of course I changed it up a little bit partly by turning the card sideways instead of vertical.

The card base is Garden Green with a Whisper White layer and a couple of snowdrifts made from Sparkle Glimmer Paper.  There is a curved die in the set of framelits that can be used to cut out snow, but I just used some scissors! I made two layers so I could place the vellum trees in between.  The Whisper White layer is first embossed with the Softly Falling Embossing Folder.

The trees are cut from Vellum Cardstock and placed in the snowdrifts. It would have been handy to use the Multipurpose Adhesive Sheets before die-cutting the trees so the adhesive would already be on them, but I didn’t think of it ahead of time.  The next best thing to use with vellum so the adhesive doesn’t show is to sponge on some Multipurpose Liquid Glue very lightly.

Next I stamped the evergreen tree from the stamp set with both Pear Pizzazz and Garden Green inked on the stamp. Then it was die cut with the tree outline in the In the Woods Framelits Dies Set.  There is also a die to cut out a stamped tree with little bunches of branches that you can pop up.

This very nice greeting comes in the set, although I thought it was a little big for the placement on my card. I used the Pretty Label Punch, but I trimmed off the top and bottom portion on the Whisper White.  Then I punched it again in Garden Green and layered the full punched piece under the greeting.  I also added two little Clear Epoxy Droplets.

Check out the Winter Woods Stamp Set and In the Woods Framelits Dies in a Bundle and save 10%!

Shop Stampin’ Up! Online HERE!

The Snowflake Showcase of New Products Is Here!

Snowflake Showcase Banner

Image © Stampin’ Up! 2018

Today is the first day you can order products in the Snowflake Showcase!  This is a group of exclusive products that you will love that are only available during the month of November! It’s hard to believe we have now passed Halloween and are on the slippery slope to Christmas!!

We did not have a fun Halloween in Houston yesterday!  We knew there was a possibility of rain during the day with a cool front coming through seemingly late at night, looking like there would be plenty of time for trick-or-treating. But it rained lightly all day until late afternoon when the rain got heavy and funnel clouds were sighted and tornado warnings were issued, including one near my area. Then it all let up just long enough for dinner and a bit of trick-or-treating, but I only had 12 kids come by!  So sad! There was a Trunk-or-Treat event, moved indoors, down the street so hopefully, a fair number of kids got to participate in that and have fun.  Now we are all wondering what to do with all the leftover candy!

So now it is November already, but the good thing is you can check out this Snowflake Showcase stamp sets, paper, dies, and velveteen paper. It isn’t even just for the holidays! You can get lots of use out of these products!  I urge you to order as soon as you can just in case any sell out.

Enjoy this Stampin’ Up! video with Shannon West from the Home Office!

SHOP THE SNOWFLAKE SHOWCASE FROM STAMPIN’ UP!

Halloween Cards and Projects Collage 2018

Halloween Cards and Projects Collage 2018

HAPPY HALLOWEEN!

Today is the big day, especially if you have young children! I remember all those class parties and costumes, the carnival down the street with the Sesame Street puppet booth that gave out cookies and candy to the little ones, the duck pond, the cake walk, my husband taking the kids out trick-or-treating while I stayed home and gave out candy, our first Halloween here 36 years ago when my husband carried our tiny baby daughter to the little carnival down the street at the urging of a friend who came by, and even a Halloween thirty years ago when my newborn baby boy and I were in the hospital, alone, because everyone everywhere was out trick-or-treating. The night before when we’d gone to the hospital I told the nurse the last food I ate was cupcake batter and frosting because I was making cupcakes to take down to the carnival!  His birthday parties always had a Halloween theme with an October 30th birthday!

Lots of good memories of Halloween, even when I was a child, except for those Halloweens in St. Louis where it could be cold on Halloween night and we might have to wear a winter coat over or under our costume! Imagine! We were expected to tell a joke at each house where we went trick-or-treating before we got a treat!

I made this collage with a lot of the Halloween projects I made since the Holiday Catalog came out! If you are looking for last minute Halloween ideas for cards or favors or whatever, check the Categories drop-down box and click on Halloween to find even older ideas from years past!

Whether you are going to a Halloween party, trick-or-treating, helping with the school party, or stamping at home with the porch light turned off, have a safe and fun Halloween!

Paper Pumpkin Halloween Treat Bags

***Sign up for my Mailing List so you do not miss any more of my FREE Holiday emails, the 12 Weeks of Christmas, every Wednesday! Sign up in the red box!

Paper Pumpkin Halloween Treat Bags

Here is a photo of my Paper Pumpkin Halloween treat bags all filled with candy and ready for some trick-or-treaters!  know I showed you these bag toppers I made with my September Paper Pumpkin Kit, but since I didn’t have Halloween candy at the time, I had to wait to post a photo of the completed treat bags.

I’ve been posting some of the extra Halloween cards I made with the stamps and leftover pieces I had in this papercrafting kit. But this is the original project that the kit was designed to make.  If you didn’t need any Halloween treats, you could have used all the pieces to make Halloween cards or some other project or scrapbook page. That’s why Paper Pumpkin Kits are so much fun! Make the project as designed, no muss no fuss, or play with the contents yourself and devise your own projects! It’s a win either way! Crafting time in a box!!

The cute little printed cello bags even came with a little piece of cardboard to put in the bottom so they could stand up!  I stamped the greeting onto the foldover banners on each back and adhered the ghost, bat, and pumpkin to the top as well as the self-adhesive words and tied on a little baker’s twine.

If you don’t want to miss out on the Paper Pumpkin fun, be sure to subscribe to Paper Pumpkin today (or by November 10th) in order to receive the cute plaid box with a holiday project inside!

Paper Pumpkin Nov 2018

CLICK:  JOIN PAPER PUMPKIN TODAY! 

DON’T MISS OUT ON A FUN HOLIDAY KIT!

Easy Halloween Trick or Tweet Candy Treats

Easy Halloween Trick or Tweet Candy Treats

If you need a last minute quick and easy treat or favor, try these Easy Halloween Trick or Tweet Candy Treats.  When I got out my Halloween decorations, I found a very old version of this candy treat! Here it is updated with the Trick or Tweet Stamp Set!  I’m going to miss these little guys when Halloween is over!  They were so much fun to stamp and color!

You won’t believe how easy these treats are to make! Just cut a strip of cardstock 1 3/4″ x 5 1/2″.  Score at 2 1/4″ and 3 1/4″.  Fold on the score lines. Stamp and color whatever images you like for the front and punch or cut out in a square or circle shape.  I used the 1 1/2″ Circle Punch for these. If you wanted to be fancier you could put a layer behind the image and even a very small greeting. Punch two holes and thread some ribbon through and tie in a knot.  I used the Daffodil Delight 1/4″ Double-Stitched Ribbon.

For coloring the images, use whatever you like!  I LOVE the Stampin’ Blends alcohol markers, but I also like the Watercolor Pencils.  If you wanted to save time, you could just stamp the image in a color and not color in at all!  It could even be monochromatic if it matched the cardstock color!

If you are making these for cute little party favors, then maybe you want to fancy them up a bit…..or make them larger for larger pieces of candy.  Just to give to Trick-or-Treaters, just keep them simple!  Put some adhesive in that center space and adhere some candy.  I think nuggets would work well or two of these miniature candy bars! Be careful that the adhesive isn’t touching the part of the candy you would eat. It wouldn’t hurt for the candy to hang out on the sides either!

Easy Halloween Candy Treats

If you are working at the last minute on Halloween treats or projects, this one just might save you! These are fun to make and only take a minute or two!

Happy Halloween!


Now Available! Timeless Tidings Project Kit from Stampin’ Up!

Timeless Tidings Project Kit

If you were interested in this kit when you saw it in the Holiday Catalog, you will be happy to know that after being so popular it completely sold out, the Timeless Tidings Project Kit from Stampin’ Up! is available again!  Along with the Timeless Tidings Stamp Set, you can use this kit to make holiday cards quickly and easily!

The Timeless Tidings Project Kit makes 20 cards, 5 each of 4 designs.

Kit includes:
* 20 printed card bases
* 20 printed envelopes with gold foil edges
* Cardstock
* Gold foil
* Printed die-cut accents and backgrounds
* 80 green and champagne rhinestone jewels

Watch the Stampin’ Up! video and find out more about the kit:

Whether you are a new stamper or crafter or an experienced one, you might like to have this kit on hand to easily make 20 cards to have on hand even if you have made some cards of your own designs. We often need “just a few more cards” at the last minute and this would solve that problem.

Timeless Tidings Project Kit Finished Cards

If you love the watercolored look, you will love this Timeless Tidings Project Kit. Be sure to order it now in case it sells out again!  You never know!

SHOP STAMPIN’ UP! TODAY!


Black Cat Halloween Cards

Black Cat Halloween Cards

These black cats may be spooky for Halloween, but on these Black Cat Halloween Cards, they are just fun! One is even wearing a witch’s hat!  To make these cards I used the stamp set in my September Paper Pumpkin Kit (I need to remember to use these stamp sets more often!).

I stamped the background  on the Whisper White Card Layer with various stamps from Paper Pumpkin just randomly around the card.  I think these words have such cute fonts!

I had a few of the self-adhesive words left over from the Halloween treat bag project so I happily used those on these cards.  You will see the Silver Foil “Boo” on the black cat on the left and the word “Eeeek”  underneath the cat, on the other card.  The Cat Punch is always fun to use, especially at Halloween!  The witch hat is just cut by hand out of the Toil & Trouble Designer Paper.  I provided a little background for each cat to help him stand out!

That’s all there is to these two easy cards make with some leftover pieces from the Paper Pumpkin Kit.  Have some fun this weekend making something for Halloween!

Shop Stampi’ Up! Online Today!

Spooky Ghosts Halloween Card

Spooky Ghosts Halloween Card

Sometimes you have to just stop the world and stamp Halloween cards like this Spooky Ghosts Halloween Card!  Especially if you are planning to mail some of the cards and you want them to get there before Halloween!  That’s what I did the other day!  I just used up some of the leftover pieces in my September 2018 Paper Pumpkin Kit, used the stamp set from the kit, and used some of my Toil & Trouble Designer Series Paper.

This card has a card base of Gorgeous Grape Cardstock.  On a layer of Whisper White, I cut a strip of the Toil & Trouble Designer Paper with the cute little ghosts and stamped the word “Spooky” down the other side of the card.  The stamp comes from the exclusive stamp set included in every Paper Pumpkin Kit. I loved the font! I often forget to use the stamp sets that came in my Paper Pumpkin Kits!

For fun, I placed three other ghosts along the side!  As in this post, I told you how I like to make ghosts out of heart shapes cut in half!

In order to stamp the word “Spooky” so evenly, I used my Stamparatus!  It’s perfect for this, especially the unique Stampin’ Up! feature of moving the plate with the stamp down a hinge each time! It’s great! And if any of the images didn’t stamp fully, I could have reinked the stamp still on the Stamparatus, not moved the card, and then stamped again right over the first image.

If you don’t already own a Stamparatus, I strongly urge you to put one on your next order, in time for making Christmas cards! It will be so great when you are stamping multiples!

It’s time to get those Halloween cards and treats made this weekend! Have fun working on such enjoyable projects!

SHOP STAMPIN’ UP!

Paper Pumpkin Frights & Delights Extra Cards

Paper Pumpkin Frights & Delights Extra CardsAfter I made all the treat bags in my Paper Pumpkin Kit, I had just a few pieces left in the kit so I made these Paper Pumpkin Frights & Delights extra cards! It came with these really cute bats, pumpkins, and ghosts for the treat bag toppers and there was one of each left over plus some sticky words!

Here’s the Stampin’ Up! video that shows the Paper Pumpkin September Kit:

I made all the bag toppers when I got my kit but I wasn’t ready to fill them with candy yet, so I didn’t have them ready to be photographed!  The little cello bags are so cute, printed with little Halloween images on them.

I saw the idea for the stamped background on these cards online somewhere (there are always alternative ideas for using your Paper Pumpkin Kit online if you don’t want to make the project exactly as designed).  These stamps were in the exclusive stamp set that came in the Frights & Delights Kit for September.  Sometimes I forget to use these stamp sets that come in Paper Pumpkin except for when I am making the project in the box, but it’s really a great way to pick up some extra stamps! (Since we all need to constantly add to our collection!!)

The Whisper White card layer has the random stamping and then I added a layered banner, just cut by hand.  I stamped the greeting at the bottom of the banner and adhered the pumpkin, bat, and ghost with Stampin’ Dimensionals to pop them up a bit. The two “Spooky” words came in the kit and were self-adhesive which was great!  The “Boo” on the bat card is actually silver foil so it doesn’t photograph well.

WIth some of my own cardstock and a few leftover pieces from the September Paper Pumpkin Kit, I was able to make a few extra Halloween cards that turned out pretty cute!  The stamp set that came in the kit was great to use!

You can see how cute this Halloween kit was so you might want to try out the November Kit in this pretty plaid holiday box!  It will ship out mid-November but you have to subscribe to Paper Pumpkin by November 10th. The cost is $19.95 but that includes the shipping. You can skip a month if you ever want to or even cancel if it’s not the right thing for you.

JOIN PAPER PUMPKIN TODAY!

Toil & Trouble Decorated Halloween Candle and Card

Toil & Trouble Decorated Halloween Candle and CardHere is a matching Toil & Trouble Decorated Halloween Candle and Card just to show how you can use a card idea for a 3D project and vice versa!  If you kind of think of any project as just a small or large card, you can get ideas for almost anything!

I started with the candle.  You could use a real candle or for safety, one of the flameless candles.  I wrapped a piece of the Toil & Trouble Designer Series Paper around the candle. It’s about 3″ wide for this particular candle. I cut out a large circle of Crushed Curry Cardstock for a background (or moon!).  I also hand-cut a witch and some pumpkins from the designer paper to add to the candle.  The greeting is from the cute Trick or Tweet Stamp Set.  I sponged the Whisper White paper a little bit with Pumpkin Pie ink just to take off the brightness of the white.

Next, just to show how you can use the same design on a card, I really just duplicated the same thing onto a card!  I think the Toil & Trouble Designer Paper is so cute this year for Halloween!

Here is a similar Halloween card I made way back in August with the Toil & Trouble Paper and a witch!

I can’t believe how Halloween is sneaking up on us so fast this year, but I guess that is the way it always happens!  Have you made some Halloween cards and treats?  Time is getting short, but you do still have an opportunity to have fun making some Halloween projects!

SHOP STAMPIN’ UP! ONLINE TODAY!

Stampin’ Up! FLASH SALE TODAY ONLY! Select Stamp Sets 15% Off!

Stampin' Up! Stamp Set Flash Sale

Click to view

Stampin' Up! Stamp Set Flash Sale

Click to view

Stampin’ Up! Birthday Sale!! 15% Off These Select Stamp Sets!  One Day ONLY!

Put on your party hats and save!  It’s time for the It’s Our Birthday Stamp Sale!

SHOP THE BIRTHDAY SALE!

For 24 HOURS ONLY, you can save 15% on select stamp sets. This sale will be gone in a flash, so celebrate with Stampin’ Up!!  Don’t miss it!

CLICK HERE to see the list of stamp sets on sale!

  • All selected stamp sets may be applied to Starter Kits.
  • Discount applies to select stamp sets only when purchased individually during the 24-hour promotion period. Bundles featuring stamp sets from the promotion will not be discounted.
  • If you purchased a stamp set prior to the sale, we will not be offering exchanges or credits.
  • In the event that we run out of any stamp sets, we will honor the discounted price as long as the order is closed within the promotion deadlines. You will receive your discounted stamp set as soon we are able to fulfill your order.
  • Sale ends Tuesday, October 23 at 11:50 PM (Mountain Time).

Let me know if you have any questions.  You can add other things to your order along with these sale stamp sets.  Have fun at the stamp birthday party!

SHOP STAMPIN’ UP! STAMP SALE!

Tomorrow! Birthday Flash Sale! Birthday Stamp Sets 15% Off!

Tomorrow, Tuesday October 23!  It’s a Birthday Flash Sale!  Select stamp sets will be 15% off! Check them out and make out your list!

Birthday Stamp Sale 2018 SIgnBirthday Stamp Sale List1Birthday Stamp Sale List2Click HERE or on any of the images above to see the PDF list!

Make sure you are on my Mailing List to keep up with all the Stampin’ Up! news! Sign up in the red box!

Have fun shopping TOMORROW, OCTOBER 23! 

Tomorrow!  ONE DAY ONLY FLASH SALE!

Get On My Stamping With Karen Mailing List!

JOIN MY STAMPING WITH KAREN MAILING LIST!

Stamping With Karen Mailing List

Join my Stamping With Karen Mailing List and get a FREE GIFT!  Well, besides that, I will keep you up with the latest Stampin’ Up! news and offers and send you free projects complete with supply list and instructions every Tuesday!  You know with the holidays coming, there are bound to be some special offers!  Just sign up in the red box on my blog!

Right now, every Wednesday, I am sending out a FREE holiday email, The 12 Weeks of Christmas, with a new holiday project each week leading up to Christmas!  This is a free gift to my subscribers only!  These projects will not be on my blog, Facebook, Instagram, or Twitter.  They are exclusive to my Mailing List! We start with holiday card ideas, then gift ideas, and also gift wrap/gift bags/gift tags!  Everything you need for the holidays!

Sign up right now in the box below or in the sidebar on my blog or in the pop-up box! No matter where, you will be signed up! If you do it before Tuesday, you will receive my Tuesday newsletter and Wednesday you will receive my 12 Weeks of Christmas email!  I hope you will join us!

Paper Pumpkin October 2018 Handmade Cards

Paper Pumpkin October 2018 Handmade Cards

I got started pretty soon on my October 2018 Paper Pumpkin Kit after it arrived and made all the cards. I made some exactly as designed but changed some of them up a bit.  You can do whatever you like with your Paper Pumpkin Kit each month!

I have to admit when I saw the package of the contents I wasn’t too thrilled. But once I started making the cards I really liked the kit! I especially loved the finishing touch of the sequins (although I forgot to put them on the white cards until after the photo)!  I think that even though the pieces are feathers, to me they reminded me more of colored leaves!

Paper Pumpkin October 2018 Kit Contents

In the above photo you can see all the pieces that come in the kit!  I stamped a few of the pieces with the greetings and left some plain until I could see how I wanted to use everything.  Each month there are plenty of alternative ideas online if you want to make something different with your kit and need some inspiration.

Paper Pumpkin October 2018 Kit Extra Pieces

Even after making eight cards, I still had all these pieces left over in the kit!  I already have some ideas of what I want to make with them. What I have in mind could serve as Thanksgiving cards with the right greeting…..or no greeting and just a note!

I’ve discovered that our new Take Your Pick Tool is great for using the tiny glue dots that come in the kit.  They aren’t as easy to use as our usual Mini Glue Dots on the roll. In the past I have used my Paper-Piercing Tool  to pick them up off the sheet, but I think I like the Take Your Pick Tool better!  The Take Your Pick Tool has lots of uses, has two ends, and extra pieces to change out.

Here is the Stampin’ Up! video that shows how to assemble the October Kit! I always like to watch these videos for each kit even though directions are included.

If you would like to start getting Paper Pumpkin Kits in the mail every month all you have to do is sign up!  Once you are a subscriber you can even go back and look at whatever past kits are available in the Online Store under Paper Pumpkin (the category shows up after you subscribe) and purchase those. Sometimes a full kit with the exclusive stamp set and ink spot are available and other times just the “refill” with all the pieces since you probaby already have the stamp set and ink.

Sometimes I just save the ink spots for other things and use my regular ink pad. The ink spots are good for using with the Stamparatus and for travel!  They fit nicely in the empty Stamp Cases.  Did you know you could just buy those for storage for whatever you like?  They come in handy!

Think about joining Paper Pumpkin because the November Kit is coming soon!  It’s going to be in a plaid holiday box, and when they design a special box you know it’s going to be good!  Sign up by November 10th to get the November Kit that will ship out mid-November.

The cost is just $19.95 a month, plus tax, but that price includes shipping!  For that you get an exclusive stamp set you can use over and over again, an ink spot, and all the materials you need for the project inside, even glue dots and dimensionals if needed! And the presentation is perfect!  You deserve a gift for yourself each month! The kit is always easy enough for beginners and you don’t need a closet full of supplies!  You just need the box!  And maybe scissors to open the package! Treat yourself and enjoy some crafting time before the holiday season is upon us!

JOIN PAPER PUMPKIN AND GET THE PRETTY PLAID BOX IN THE MAIL!

(This is my personal link OR go to www.PaperPumpkin.com and find my name as your Demonstrator!)

Paper Pumpkin Nov 2018