Tag Archives: Merriest Trees Bundle

Merriest Trees Stenciled Christmas Card

Merriest Trees Stenciled Christmas Card

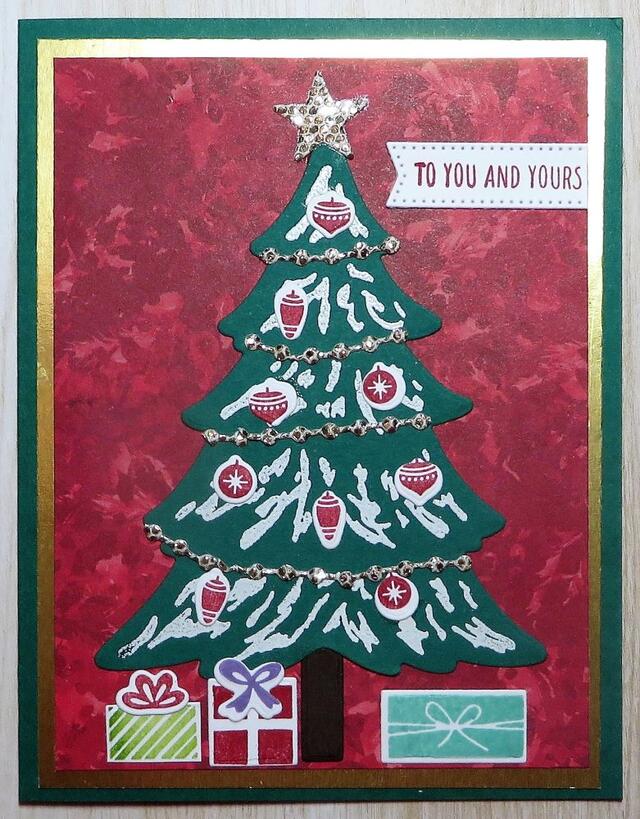
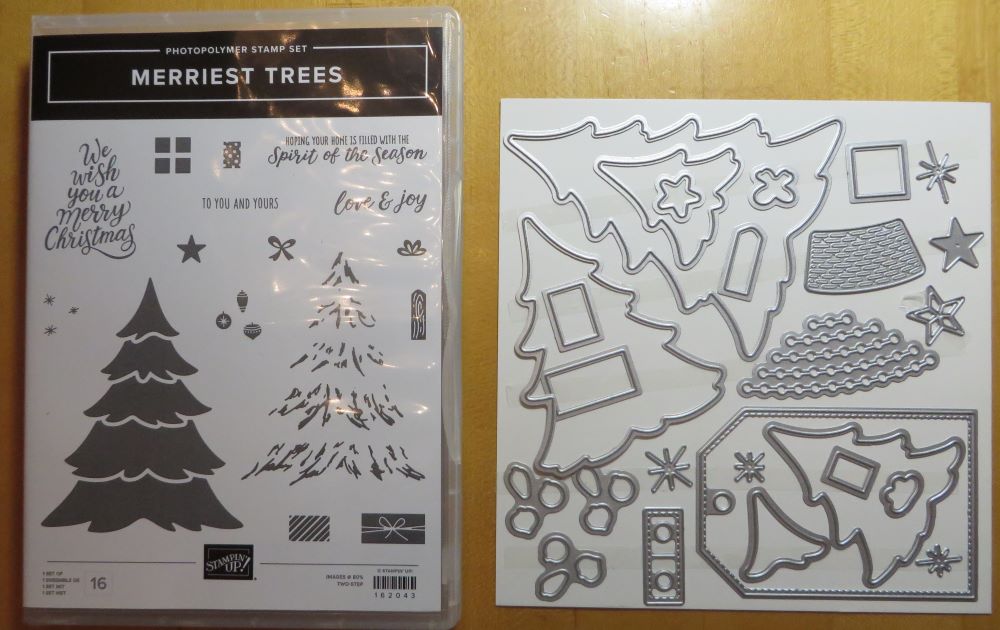
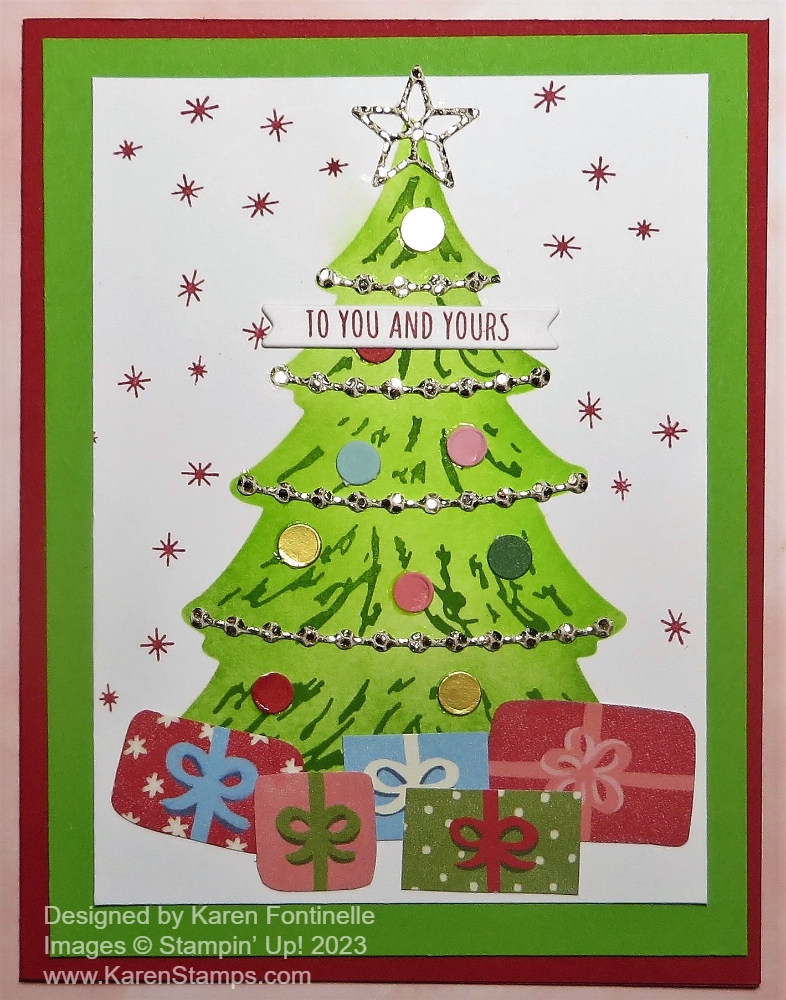
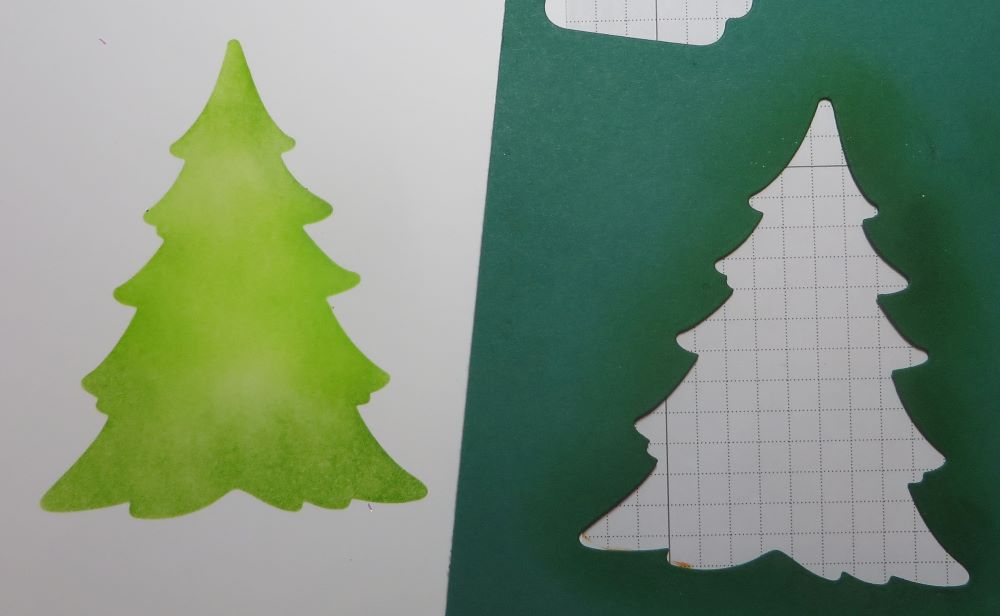
You’ll find many ways to work with the Merriest Trees Bundle in the Stampin’ Up! Holiday Mini Catalog. This Merriest Trees Stenciled Christmas Card was inspired by a scrap piece of cardstock from which I had diecut a tree for another card I made. That scrap laid around here and every time I saw it I thought of using it as a stencil.

Merriest Trees Stencil

My intention was to use several colors to give the tree kind of an ombre effect. I used Parakeet Party, Lemon Lime Twist, and Granny Apple Green. The Granny Apple Green stood out a little more against the other two and I also used it as a little bit of shading on each side. But in the end, it seemed all three colors blended together and the tree looked like one green! But it was still fun doing it. I used one of the Small Blending Brushes to add the color, starting with the lightest color. When I was finished, I just rinsed the Blending Brush under the faucet to rinse out the ink. Let it dry before you use that brush again. After you are finished with the stenciling, you can stamp with the detailed branch stamp in the Merriest Trees Stamp Set to add some interest to the tree. I stamped that using Granny Apple Green Ink.

To decorate the tree, I used the More Dazzle 6″ x 6″ Specialty Paper (or you may have some left of the Champagne color from Sale-A-Bration a little while ago). There is a die in the Merriest Trees Dies in the Bundle that cuts out these cute little chains. There are also several stars you can choose from for the top of the tree. The little red starry images are stamped with Real Red ink with one of the small Merriest Trees stamps. The gifts under the tree are cut from the Beary Christmas Designer Series Paper. I actually trimmed some of them smaller to make them fit under the tree better.

The colored circles on the tree that look like decorations are actually punched out pieces from the Festive Tags Kit in the Kits Collection after I made all the tags. They looked too cute to just trash so I saved them. Gluing a few to the tree seemed like a perfect idea!

For the greeting, I needed to choose something small. In fact, I considered not even adding a greeting to the front of the card since the card is pretty busy already. But the smallest die in the Countryside Corners Dies was the perfect size to make this little banner with the greeting that fit on the tree without being too big or distracting.

Here is the other card I made with the Merriest Tree Bundle.

Today is the last day to purchase on sale any of the kits in the Stampin’ Up! Kits Collection! If there is one you like be sure to get it and save a little bit of money. I especially like the Festive Tags Kit, as I have said before. It will be so useful in a couple of months!

SHOP STAMPIN’ UP! ONLINE HERE!

Merriest Trees Decorated Christmas Card

Merriest Trees Decorated Christmas Card

This Merriest Trees Decorated Christmas Card is the first card I’ve made with this Merriest Trees Bundle (162048) in the upcoming Stampin’ Up! Holiday Mini Catalog! You can make all kinds of cards with this Bundle from simple to fancy. I think I started with fancy on this one! This card is for someone who likes “little bitty” things. I’ll explain as I go along in this blog post!

This Merriest Trees Bundle comes with the Merriest Trees Stamp Set and the Merriest Trees Dies. (Do you like how they are now naming the stamp set and dies the SAME?!) If you buy them both together in the Bundle, you will save 10% on the price. The stamp set has a tree that you can ink up and stamp as is, or you can use the second tree stamp for some added highlights on that tree. There are some nice sentiments to use and several accessories. There is a tree trunk, gifts, bows, ornaments, a star, and some little twinkles I suppose you would call them! The trees are actually pretty large so you will need Clear Block E for sure!

Merriest Trees Bundle

As you can see in the set of dies, there are LOTS of extra pieces! On the one hand, that is extra-fun and on the other hand, there are some LITTLE pieces there to work with! One great thing is that when you stamp the little ornaments, they are on one stamp and there is a die that matches that arrangement so the die will cut out all three ornaments at one time! The other great thing is that there are THREE ornament dies so you can stamp three sets of three ornaments and die-cut them all in one fell swoop with your machine! You can cut out chains or garlands for the tree with the one die that makes all the different lengths of garlands from that one die. It would be good if you used Adhesive Sheets on the back of the paper before you cut those out! I don’t know how you would get glue on the back of those except with the teeniest drop of glue. Even with the Adhesive Sheets on the back to turn them into stickers, they are very fragile although even if you accidentally tear them apart you can match the ends back up again.

If you stamp the solid tree, it may work better to lay the stamp and block face up on the table and then apply the ink rather than try to ink up the tree by patting it on the ink pad. Even better if you have the retired Stamparatus. Be sure to use a cushion underneath your stamp. It’s often a little difficult to get a perfect impression the first time with a large solid image like this tree.

This card has a card base of Shaded Spruce. I added a layer of Gold Foil underneath this interesting red pattern of designer paper in the Joy of Christmas Designer Series Paper (161958). This designer paper has all kinds of different patterns that can be for Christmas or for other occasions.

The Christmas tree is die-cut from Shaded Spruce. I used the other tree piece with Versamark Ink to stamp and embossed with white embossing powder using a Heat Tool. This makes it look like a little bit of snow on the Christmas tree! Then I used Adhesive Sheets on the back of a small piece of gold More Dazzle 6″ x 6″ Specialty Paper. It’s in the Annual Catalog but you may already have some from a previous catalog. Then I used the die to cut out several different lengths of garlands. If you have the Take a Pick Tool or some other piercing tool it makes it easier to pry off the backing sheet. As I said before, these little diecut garlands are very delicate and fragile.

The little ornaments are stamped in Real Red on Basic White and then diecut. They just need a tiny drop of glue on the back to adhere to the tree however you would like to place them. Use different colors of ornaments if you like. There are two different styles of stars to choose from to put at the top of the tree.

No Christmas tree would be complete without packages! You can stamp little gift boxes and bows and die-cut them, or you could die-cut the presents out of solid cardstock or scraps of designer paper.

The greeting is one in the Merriest Trees Stamp Set. It is stamped in Real Red Ink and die cut with a small banner in the Stylish Shapes Dies. I cut off the banner end on the right so it would line up with the edge of the designer paper background. Once again I will point out that this greeting is very small.

If you like lots of detail when you make a card, this card might be for you. If you want to make a few of these cards to send for Christmas, I say go for it! Once you have your design and make everything in an assembly-line fashion it will be easier than it looks. But if you are making 50 Christmas cards to send, maybe you want a simpler design with fewer little pieces! This exact card takes more than a few minutes to make, so plan ahead!

SHOP STAMPIN’ UP! ONLINE HERE!