Double Z-Fold Unbounded Beauty Card

Unbounded Beauty Double Z-Fold Birthday Card

If you are enjoying the new Stampin’ Up! Annual Catalog, here is a Double Z-Fold Unbounded Beauty Card made with some of the new paper, stamps, and gems in the catalog that you can now order! No matter how pretty you think this designer paper looks in the Stampin’ Up! Catalog, I guarantee you it is even more beautiful in person! And this Double Z-Fold card is very easy to make!

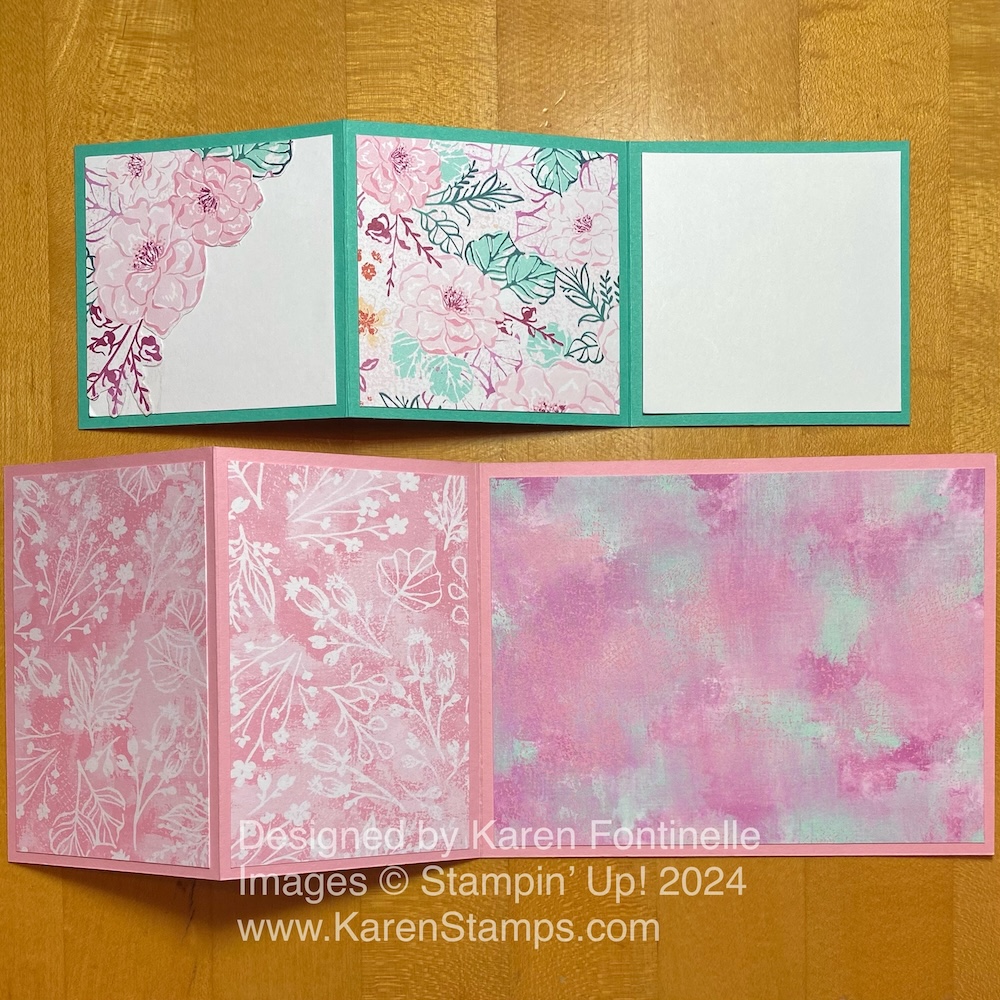
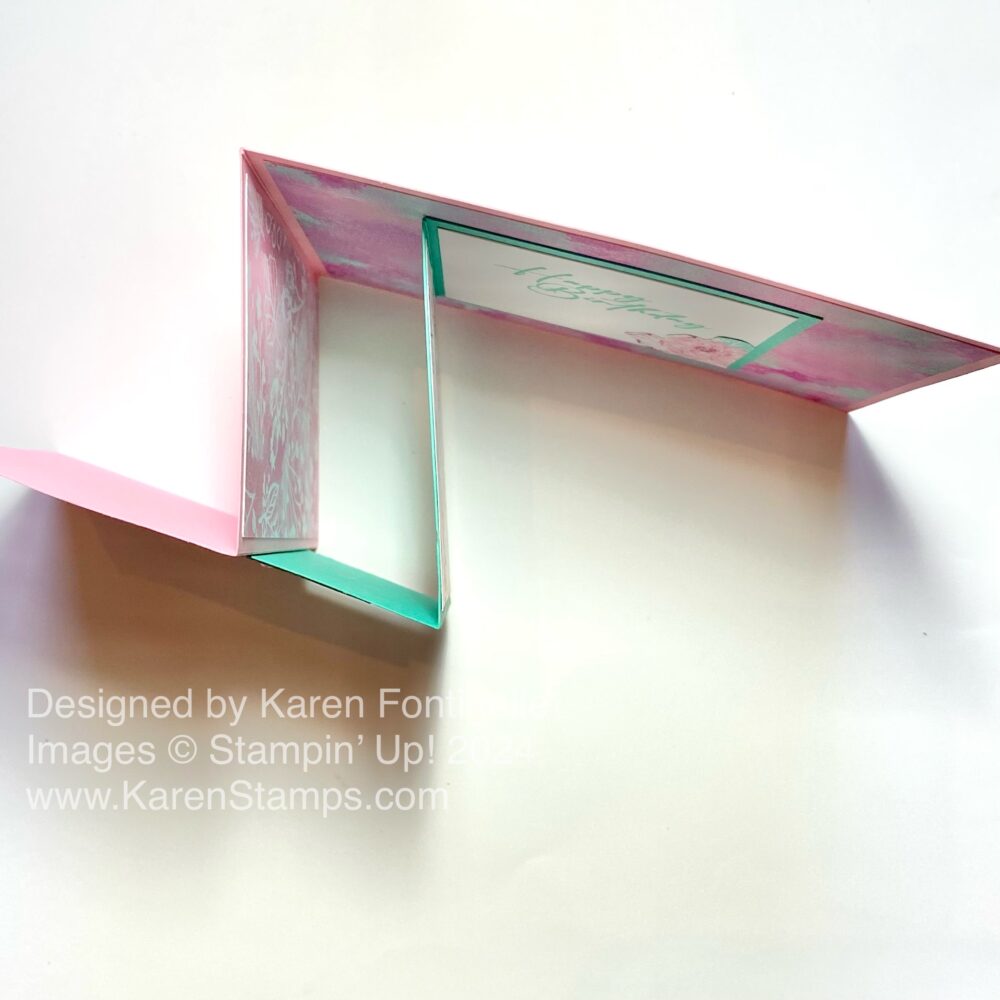
This card base is Pretty in Pink, one of the new In Colors 2024-2026 in the catalog. This card base is cut at 4 1/4″ x 11″, then scored at 2 3/4″ and 5 1/2″. If you have ever made a basic Z-Fold card, it is the same. Crease and fold the score lines so it looks like you have folded the front panel in half back on itself.

The other cardstock color I used is the new Summer Splash, another new In Color. This piece, the top Z-Fold piece, is cut at 3″ x 9″ and scored at 3″ and 6″. Crease and fold the score lines and see how it will fit on the Pretty in Pink base. Don’t adhere anything yet!

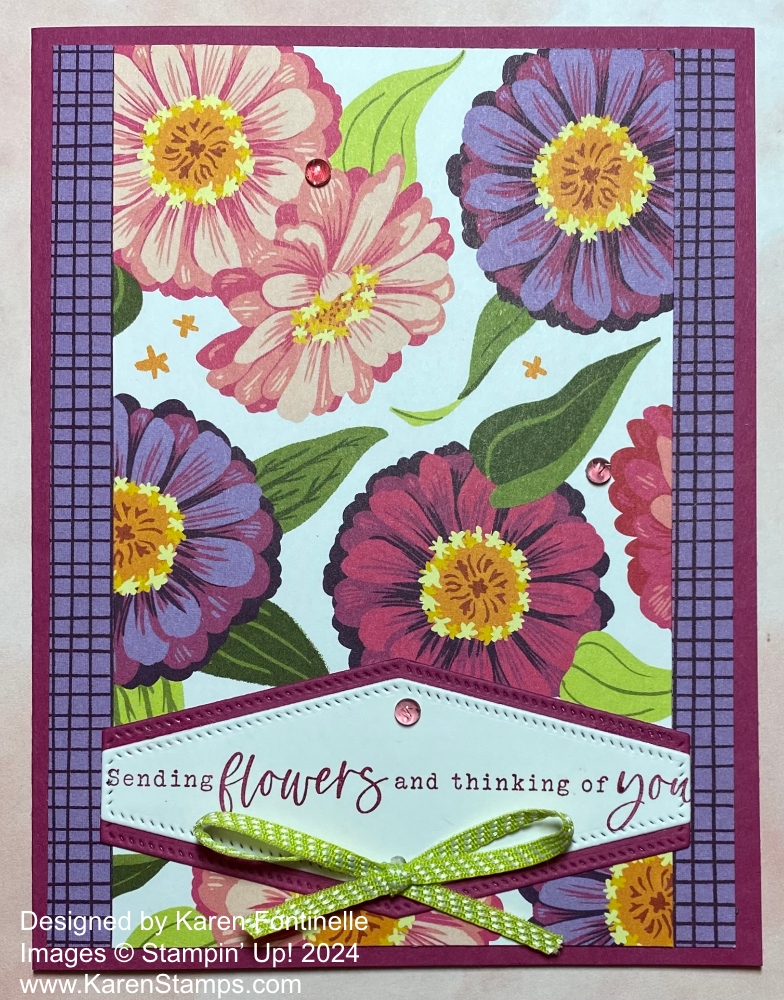
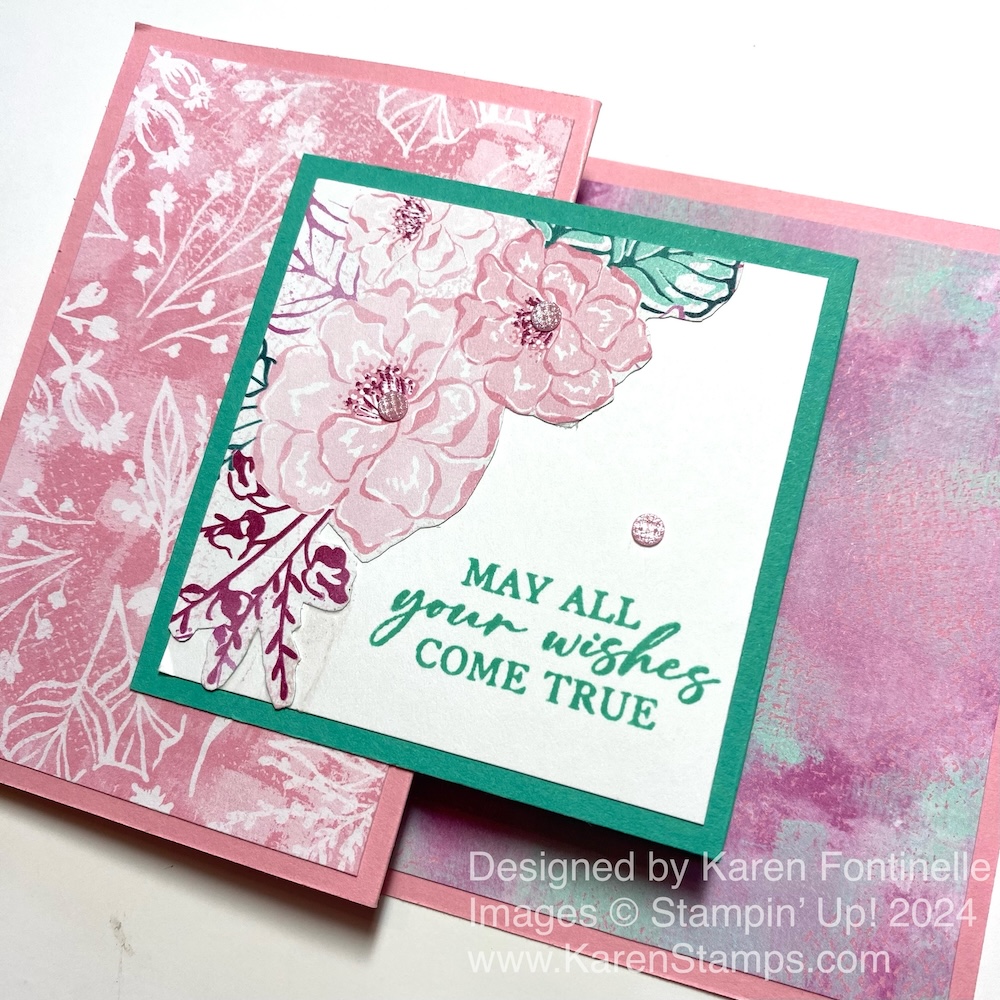
I chose the Unbounded Beauty Designer Series Paper in the new catalog for this card. You can make your own choice about colored cardstock and designer paper patterns, but you can see what I chose. I also used Basic White cardstock as a couple of layers to add the sentiments.

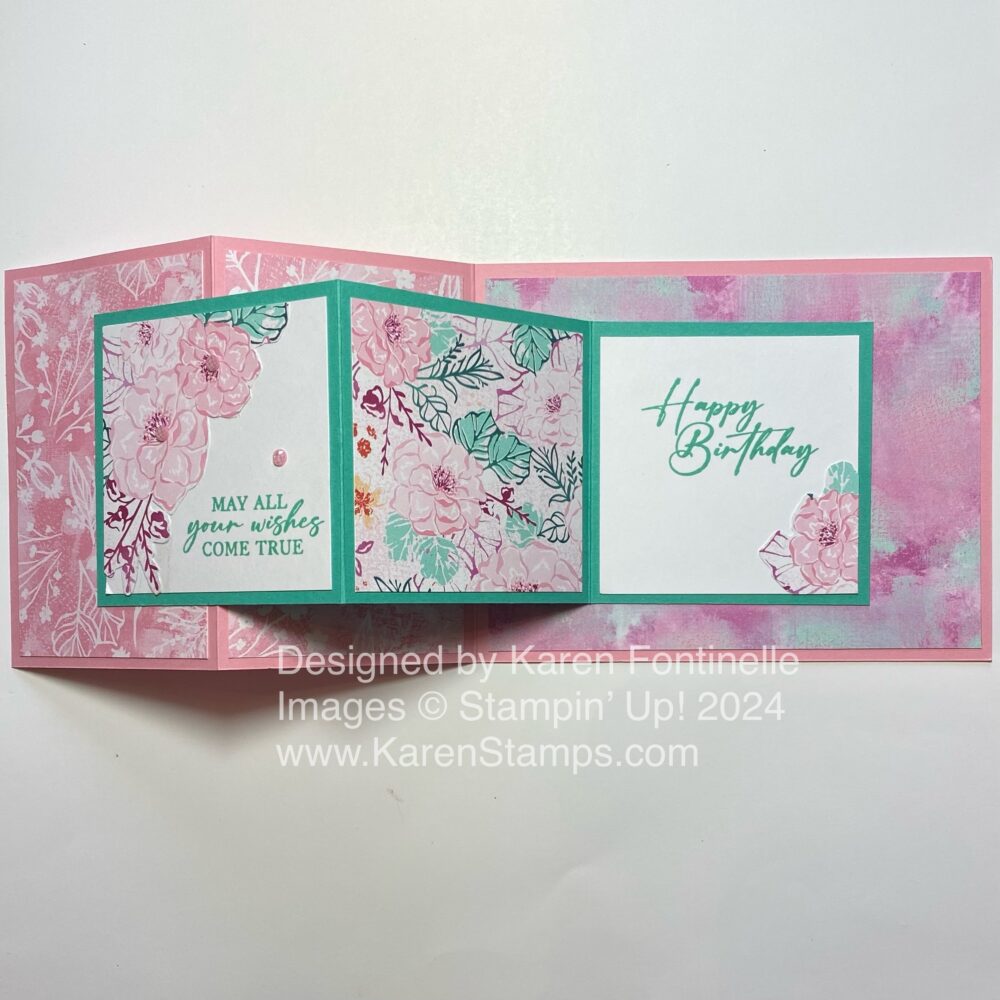
The layers for the Pretty in Pink card base are cut at 4″ x 2 1/2″ (two of these) and one at 5 1/4″ x 4″. The smaller layers for the Summer Splash cardstock are cut at 2 3/4″ x 2 3/4″. The first square on the Summer Splash is Basic White, but I cut out some flowers from the designer paper and adhered it to the corner of the Basic White cardstock to decorate it. The middle square is the same pattern. The third square is also Basic White with another little flower cut out of the designer paper in the bottom corner. After stamping any greetings on the Basic White pieces you can adhere all the layers but don’t adhere them to the card yet.

Double Z-Fold Unbounded Beauty Card

To assemble the card, first center the Summer Splash first square at the fold of the Pretty in Pink. Be sure to not put adhesive on the entire back, just on the left side that is going to adhere to the Pretty in Pink. Then fold up the Summer Splash strip, put the card face down on the table, and put adhesive on the back of the third square. Don’t try to adhere it to the back panel of the Pretty in Pink on your own. Now just fold the back of the card over onto the Summer Splash piece. This way the Summer Splash third square will adhere in just the right place to the inside back panel. It sounds confusing but it isn’t. Try it first before you use glue!

Unbounded Beauty Double Z-Fold Card Open

This is what the card should look like from the top.

Unbounded Beauty Double Z-Fold Card Top

The sentiments are in the Unbounded Love Stamp Set. I stamped these with Summer Splash ink. My new ink pad seemed to stamp a little heavy with the ink so I took a paper towel folded up and lightly dabbed on the ink pad just to get off some extra ink. Then I thought the stamped image looked better.

I also added some 2024-2026 In Color Shimmer Gems to the front panel of the card. These come in all five In Colors, in two different sizes. They are very pretty! This may seem like a lot of directions, but once you cut the two cardstock strips and score them, then you just have the difficult decision of which pretty designer paper to use!

Double Z-Fold Unbounded Beauty Card Gems

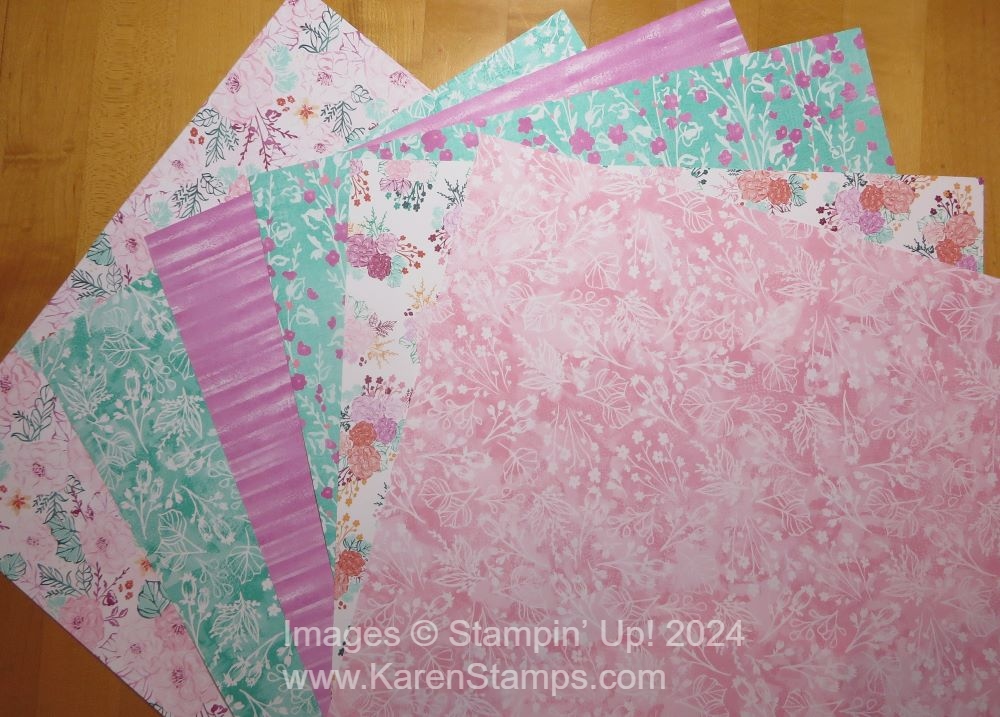
Here is my photo of the Unbounded Love Designer Series Paper.

Unbounded Beauty Designer Series Paper

Have fun trying out this Double Z-Fold card!

SHOP THE NEW CATALOG!!

It’s May Day! And New Catalog Day!

Stampin' Up! Annual Catalog Cover 2024

Happy May Day! The Farmers Almanac says that May Day celebrates the return of Spring, and Maypole dances and traditions celebrate agriculture such as the newly planted fields sprouting and cattle returning to pasture. We’ve all heard of Maypole dances and May Day baskets of flowers or treats being hung on neighbors’ doors. Today we celebrate May Day 2024 with a brand-new Stampin’ Up! Catalog!!! Maybe we all need to get together and sit around a Maypole reading our new catalogs to celebrate!

If you are one of my regular customers you should have received a catalog I ordered for you in the mail. Sometimes there are delays in the mail or glitches with the ordering system so if you didn’t get one, let me know. If you are new and interested in Stampin’ Up! products and want a hard copy of the catalog, send me your contact information and I can send you a catalog.

This new catalog has a different look and layout. If you are looking for themed projects with clear instructions and everything you need in one box you’ll find them in the Step-by-Step crafting section (pages 4-11). If you want a mix of products, check out the Quick & Easy options (pages 12-29). And if you are ready for innovative techniques, coordinating products and helpful tools, visit the Creativity Your Way section (pages 30-91).

Stampin’ Up! says, “Never underestimate how you can create, inspire, and connect with something as simple as a handmade card from the heart.” 

Today everyone can see inside the new Stampin’ Up! Annual Catalog!!

CLICK HERE to VIEW THE CATALOG ONLINE!

SHOP HERE TO SEE ALL THE PRODUCTS IN THE ONLINE STORE!

(You will see products that you notice don’t seem like Stampin’ Up! These are products added for the Close To My Heart Makers and customers already signed up with their CTMH account. More will come out later about Stampin’ Up! incorporating the CTMH people and some products after that company has closed. A note will come up if you click on one of those products.)

Remember, the Stampin’ Up! website could be very busy at times today so exercise patience if that little thing just spins around and goes nowhere! Hopefully, all will work perfectly and I can assure you it all works much better than it did many years ago when I was a newer Demonstrator! But computers are computers! If you have difficulty, just wait a couple of minutes and try again. Also, I would advise getting your very favorite products as soon as you can because you know how some products sell out pretty quickly.

Notice the new Core color, Basic Beige! It will be an interesting neutral. You’ll find an ink pad (#163806), reinker (#163815), cardstock (#164511), and ribbon (#163788)! You’ll want to stamp with Basic Beige and then try the No-LIne Watercoloring!

Watch this video and besides hearing about the new catalog, enjoy seeing the inside of the Stampin’ Up! Home Office in Riverton, Utah!

Lots more to talk about but go enjoy the new catalog!

It’s the Last Day For the Zoo Crew!

Zoo Crew Juggler Birthday Card

I thought I would share one more card with the Zoo Crew Designer Series Paper. Today is the last day you can buy it! I love all the fun little animals! Some are playing musical instruments or singing and performing. Some are camping and doing outdoor activities. There is also knitting, bike riding, juggling, baking, skating, juggling, painting, and even doing yoga!

For this card, I chose the koala bear who is celebrating a birthday by juggling cupcakes! I punched him out of the designer paper using a 2 1/4″ Circle Punch and then layered him on a Pool Party Deckled Circle diecut.

The card base is Pool Party, stamped with confetti in the Zany Zoo Stamp Set. Next, are three layers underneath the juggling koala. The Basic White layer is 3 1/4″ x 4 3/4″. The Pool Party layer is 3″ x 4 1/2″ and the black and white designer paper is 2 3/4″ x 4 1/4″. Then the koala bear layered piece is popped up on Stampin’ Dimensionals.

The greeting is in the Zany Zoo Stamp Set and is stamped in Pool Party ink and diecut with a banner die in the Stylish Shapes Dies.

To embellish the card, I adhered some Iridescent Rhinestone Basic Jewels by the koala plus two Glossy Dots on each side of the greeting.

It’s time to check out the Last Chance Products that are still available and the Stampin’ Up! Clearance Rack!

SHOP STAMPIN’ UP!

Bee Mine Gift Bag

Bee Mine Gift Bag

Another pretty thing that is retiring from Stampin’ Up! on Tuesday, April 30 is this cute Bee Mine Designer Series Paper. You only have today and tomorrow to pick up anything that is retiring that will likely be gone for good! Before time is up, I thought I would make one more thing with the honey jar pattern in the Bee Mine paper. This paper doesn’t have to be for Valentine’s Day. You could make this Bee Mine Gift Bag for any time of year for someone! It’s easy to make and would be nice for a “sweet” gift, maybe a special jar of honey and some cookies or tea!

You can vary the height of this bag if you want it taller or shorter. My gift bag starts with a piece of the Bee Mine Designer Paper cut at 6″ x 11″. You want to think about the direction of the pattern, if you use a paper like this one with a pattern. You wouldn’t want the honey jars to be upside down! Score at 2″ across the bottom of the paper, which is where the bottom flaps of the bag will be. Then score at 2″, 5 1/4″. 7 1/4″ and 10 1/2″. Cut up on bottom flap score lines up to that 2″ score line. Cut off the little corner piece that is 1/2″ x 2″. Crease and fold all the score lines and see how the bag is going to go together.

Fold the 1/2″ piece on one side to the inside and apply adhesive. Fold the other side over to adhere both sides to form the bag. Then fold in the bottom flaps and adhere. Stick a Bone Folder or ruler or something down inside the bag to press the bottom flaps together so the adhesive will hold.

You can leave the bag open at the top or pinch it closed, as I did. Then use a hole punch to punch holes for ribbon if you want to tie it closed. You could also use some kind of clip to just clip the top of the bag shut after you put the gift or goodies inside. I used the pretty Sweet Sorbet 1/4″ Bordered Ribbon. I hate to see that color and that ribbon retire!

To decorate the bag a bit, I stamped and punched out parts of the bee with the Bee Builder Punch. To help the bee stand out on the bag, I diecut a Deckled Circle in Sweet Sorbet. The greeting is in the Bee My Valentine Stamp Set. This stamp set and the Bee Punch are NOT retiring, but will not be available as a Bundle in the new catalog. So if you want to save 10% on the stamp set and punch, you need to purchase them before they retire.

Since the greeting was pretty long, I cut it apart and put one part of the greeting above the bee and the remainder at the bottom. I think it turned out cuter like that than one long strip across the bottom of the bag.

If you want to see another gift bag project, click HERE.

This is an easy and cute little project! Make the gift bag and hang on to it until you need it for a gift or treat! You will be happy to have something handy!

SHOP STAMPIN’ UP! HERE!

A Little Latte Hello There Card

A Little Latte Hello There Card

It had been a little while since I played with this A Little Latte Designer Series Paper. It’s so much fun because you can make little coffee scenes with it. Every sheet has something to do with coffee except maybe a plaid and a stripe. There are even patterns that look like coffee spills and coffee beans! This A Little Latte Hello There Card came about from looking through the designer papers and deciding on combining these two patterns.

The card base is Pecan Pie. You can use Early Espresso with this designer paper also, but I liked the lighter brown. I chose these two patterns for this card. The Calypso Coral paper with coffee beans gives a place to set the coffee cups. The two coffee cups are just cut out of one of the designer papers. They are easy to fussy-cut but there is a set of dies, the Latte Love Dies, that you might like to have. The little blue latte cup I glued down flat on the card and the yellow one I popped up with Stampin’ Dimensionals.

For the greeting, I chose one from the Latte Love Stamp Set. I stamped it on Basic White in Calypso Coral ink and then diecut it with one of the label dies in the Unbounded Love Dies. These are coming in the new Stampin’ Up! Catalog on May 1st. To help the greeting stand out better without a layer, I just sponged on some Calypso Coral ink around the edge, just a very narrow border around the greeting. Then the greeting is popped up on Dimensionals.

For some embellishment, I used the Adhesive-Backed Swirl Dots that come in the A Little Latte Suite Collection. Of course, you can buy each product separately, but if you want it all, just put in the one item number for the Suite and you get everything! If you are a coffee-lover, you probably do want everything in this Suite!

You’ll find all these Latte products in the Stampin’ Up! Online Exclusives!

Time to Shop at Stampin’ Up!

Last Chance April 2024 Banner Info

It’s time to shop at Stampin’ Up! THIS WEEKEND!! Tuesday, April 30th is the LAST DAY to shop the Last Chance Products! Take your time this weekend looking over the Stampin’ Up! 2023-2024 Annual Catalog and the January – April 2024 Mini Catalog (known as the Spring Mini) to check what is retiring that you want! Some products, especially in the Annual Catalog, are discounted.

Keep in mind that any Bundles of two products from the Annual Catalog that are carrying over to the new Annual Catalog will be “taken apart” so you will pay full price for each item rather than 10% off now during the current Annual Catalog. This is what they do and of course, there are new Bundles in the new catalog with a 10% discount.

Also, notice that some products are going up in price in the new catalog. If you have received your catalog, you might want to compare prices on basic products and maybe stock up, saving a dollar or two on each one. Some are very minimal price increases and some are about $2.50. That’s the theme anywhere we shop these days. Just ask me how much my favorite Blue Bell ice cream costs these days!!

Clearance Rack Banner April 2020

Check out the Stampin’ Up! Clearance Rack that was refreshed the other day! There were aboout two pages of products (not a lot) but now we are down to a little less than one page. There are some good deals on dies, several papers, a couple of ribbons. Just go look! It can change at any moment.

Enjoy your weekend and have fun shopping!!

Checking Out New Stampin’ Up! Products

Testing Markers

It’s so much fun receiving an order of new Stampin’ Up! products! As a Demonstrator, I got to preorder certain products from the new Stampin’ Up! catalog this month. One of the products I got were all the Stampin’ Blends Markers in the new In Colors. They are not all pictured in the photo above, but I did get all five new In Colors.

Here’s a tip when you get new Stampin’ Up! products! Check them over! After receiving the Stampin’ Blends alcohol markers, I sat down with a scrap of Basic White cardstock and tried out each color, brush end and tip end. You want to do this to make sure you don’t have a defective marker that maybe is dried out. I have rarely had this happen, but you know, stuff happens sometimes. I think sometimes there is a batch of a certain product that isn’t perfect. I just try out each marker, just scribbled a little test scribble. I suggest coloring on Basic White so you can see the true color of the marker. I have done it just on my grid paper but it’s not the same. You might find out if the markers all work properly, but scribbling on white cardstock lets you see the color. And that’s something you want to know with a new marker color!

Naturally, I forgot to order a few things on my first preorder so I had to place another order, like for the new Basic Beige cardstock and ink pad, plus the retiring Stampin’ Write Core Colors markers. These markers came out last year when we had the big color refresh to fill in the colors we already had. When I saw that these markers were on a good discount at 50% off I thought it was a great deal to get them!

As I said about the Stampin’ Blends markers, I sat down with a scrap of Basic White cardstock to test out all the Stampin’ Write Markers and make sure they were all working fine. They were! What I didn’t think about at first is that these are the new design of Stampin’ Write Markers! I realized they felt thinner than the markers I had plus the tip end had a new design! I really liked the new tip end! How do we get so excited about such things?! That’s why we are papercrafters I guess!

These Stampin’ Write Core Color Markers are 50% off!! So if you need to fill in these colors, or even most of them, it’s time to order them before they disappear. Actually, I thought they were sold out but more must have come in! The colors are Azure Afternoon, Berry Burst, Blueberry Bushel, Bubble Bath, Fresh Freesia, Lemon Lime Twist, Lemon Lolly, Lost Lagoon, Misty Moonlight, Pecan Pie, and Pretty Peacock.

And while we are talking about Stampin’ Up! colors, here are cardstock colors I stocked up on that I needed before prices go up. But when I held the packages together, I just thought “How pretty all these colors are!” So I had to take a photo to show you! One of the best things about Stampin’ Up! is how pretty their colors are and how the products all coordinate. You won’t get a red ink that doesn’t quite match the paper.

Stampin' Up! Colors

There are six days left of the Stampin’ Up! 2023-2024 Annual Catalog and the January-April 2024 Mini Catalog (the Spring Mini) and the discounts on the Last Chance List! Don’t miss out!

SHOP THE LAST CHANCE PRODUCTS!

SHOP THE CLEARANCE RACK!

Earth Day Zoo Crew Card

Earth Day Zoo Crew Card

Today, April 22 is Earth Day, a special day celebrated since 1970 and since 1990 observed in 190 other countries as well. I didn’t start with that theme as I began making this Earth Day Zoo Crew Card, but as I colored in the background of the alligator riding his bicycle with some dirt and grass, I thought maybe he is celebrating Earth Day today. Maybe he is just out riding his bicycle to enjoy nature, maybe he is on his way to a park to help plant a tree, or maybe he is going to plant the flowers in his basket somewhere! Who knows?!

I have loved this Zoo Crew Designer Series Paper and the Zany Zoo Stamp Set and am sorry to see them retiring in only about another week. The characters are all so cute and fun. You can find one of the animals doing almost any activity you are interested in!

The card base is Pool Party with a black and white dotted layer of one of the designer papers in the pack of Zoo Crew DSP. I added a strip across of another pattern of the paper.

The alligator I cut out by hand just for fun to layer on the label for the focal point of the card. I die cut a Basic White cardstock piece and a Pool Party piece from the Nested Essentials Dies. These two sizes are great to layer together. Before adhering together, I used my Pool Party Stampin’ Blend Marker to scribble in the sky background and the Smoky Slate Combo markers to scribble in some dirt and rocks at the bottom with a few blades of Lemon Lime Twist grass. Then I glued on the Zoo Crew alligator letting his tail extend beyond the label. I popped up this piece with Stampin’ Dimensionals. I added one of my last little Brushed Brass Butterflies following right behind the alligator!

The greeting is a little layered banner with the Zany Zoo Stamp Set birthday greeting. I tied a little black and white gingham bow at the top and added three Pool Party Glossy Dots.

If you enjoy these Zany Zoo characters, be sure to grab them before they retire!

SHOP STAMPIN’ UP! ONLINE HERE!

Simply Zinnia Melon Mambo Hello Card

Simply Zinnia Melon Mambo Hello Card

I just loved this designer paper and just had to make a card with it so that was the starting point for this Simply Zinnia Melon Mambo Hello Card. Melon Mambo is one of my favorite Stampin’ Up! colors! I thought it would make a good background for this card. I’d seen this idea online somewhere and thought it would be a good card design.

The card base is Melon Mambo with a layer of Pretty in Pink. Pretty in Pink is one of the new In Colors coming May 1st. But it is also an “old” color that we had some years ago so you may already have it. I layered on this Melon Mambo pattern in the Flowering Zinnias Designer Series Paper.

The flower is a zinnia die cut with the Simply Zinnia Dies. I used the same petal die for both colors, Pretty in Pink and Melon Mambo. To make the flower look full with these two diecut pieces, line them up one on top of the other, then move the top one to one side or the other until the petals fill in the empty spaces. I also die cut a Melon Mambo center for the flower and then Pretty in Pink for the circle of flowers around the center. I just looked up zinnia flower parts and that diecut part is called disc flowers and that is where the nectar is on a zinnia.

For the background, I die cut a piece of Basic White cardstock with the largest of the banner shapes in the Nested Essentials Dies. Before adhering the flower, I stamped the “hello” greeting in Melon Mambo ink on the banner. This is from the Simply Said Stamp Set, a new one coming May 1st! Make sure you stamp it low enough so that the flower doesn’t cover it up.

I adhered the zinnia flat on the banner and the banner flat on the front of the card. You could pop up one or both of these with Stampin’ Dimensionals if you wanted to. Then I added a bow with the Petal Pink ribbon in the Ribbon Duo Combo Pack. And for some sparkle, I added two Melon Mambo gems in the Glossy Dots Assortment. These are great because they are fairly flat which is great for mailing.

You will find the Flowering Zinnias Suite Collection in the Online Exclusives in the Stampin’ Up! Online Store. This collection of products is very pretty. As I write this the Shiny Sequins are backordered so the Suite isn’t available but you can order everything else individually. The Shiny Sequins should be back in stock next week.

SHOP STAMPIN’ UP! ONLINE HERE!

In Color Paper Strips Card

In Color Paper Strips Card

This In Color Paper Strips Card came about because I made bookmarks for my customers to go with the upcoming Stampin’ Up! Annual Catalog. I like to give them samples of the new In Colors with each catalog. Luckily, I am in an online Demonstrator group and someone usually makes up a document that we can use to make these bookmarks and other new catalog items to help our customers.

The way I made these bookmarks was to cut out 1/2″ x 11″ strips of each color of cardstock. Then I laid each strip across the whole printed page of the list of new In Colors. After all those were glued down, I cut the strips into 2″ wide pieces to make bookmarks. Each side of the printed cardstock needed 1/2″ cut off each side margin. That left these scrap strips with the new In Colors adhered from the edges of the printed page. It gave me the idea to lay them side by side, staggered to make a checkboard.

Bookmark Strips Card

I adhered these In Color strips onto a separate piece of Basic White cardstock. Then I trimmed that piece down where it needed to be to to make it fairly even. I used a card base of the new In Color Shy Shamrock and adhered this checkerboard to the card. I think it looks like an Easter card almost! The new In Colors do have a spring or Easter feel to them!

For a greeting, I used the new stamp set Simply Said, stamped in Shy Shamrock ink. It is cut out with one of the Unbounded Love Dies. For embellishment, I adhered a piece of Shy Shamrock 3/8″ Bordered Ribbon to the back of the greeting, going back and forth from top to bottom. Then it was adhered flat to the card. I also added some new 2024-2026 In Color Resin Dots in Petunia Pop to each side of the greeting. I will say the ribbon is very pretty and soft. I think you will like it. Also, the In Color Resin Dots are pretty and flat which is great for mailing so we don’t have so much thickness.

I supposed you could make a woven card to look like this which we used to do in school a lot when I was a kid or at home for fun. That would be fun to do with these pretty new In Colors! Be sure to check them out in your catalog and put them on your Shopping List for May 1st when the new Stampin’ Up! catalog goes live!

SHOP STAMPIN’ UP! ONLINE HERE!

Flowering Zinnias Thinking of You Card

Flowering Zinnias Thinking of You Card

This Flowering Zinnias Thinking of You Card isn’t the card I thought I was going to make when I started! It just goes to show you that anything can happen when you go to make something! When I got out the pack of Flowering Zinnias Designer Series Paper there was a scrap of the paper with the big flowers, which is the opposite side of the purple plaid you see in the background. That piece of paper just made me think of a narrow panel of designer paper down the front of the card with wider-than-usual margins on each side.

The card base is Berry Burst. The layer on the card is the purple plaid pattern I mentioned with flowers on the other side. The flower panel is cut at 3 1/4″ x 5 1/4″. I wanted the purple plaid to show a little bit.

The greeting is stamped from the Simply Zinnias Stamp Set. It’s pretty long but with very careful placement, I was able to diecut it with one of the banners in the Nested Essentials Dies. I wanted the smallest piece with this greeting not to cover up too much of the flowers. I thought I would need to use the next largest die for the greeting but I felt it was a little too large for the space. I got lucky fitting all the letters of the greeting on this diecut piece! I also cut the same size banner out of Berry Burst, then cut that piece in half horizontally so I could use the two pieces to layer under the top and bottom of the greeting piece to help it stand out.

For embellishments, I tied a bow with the Lemon Lime Twist ribbon in the Ribbon Duo Combo Pack with the Petal Pink ribbon also. This ribbon combo pack will be retiring at the end of the month and is discounted by $4.00 so it’s a nice deal! I also added three Berry Burst gems to the card from the Tinsel Gems Four-Pack.

This would be an easy card to duplicate now that you have the design and plan! Try it! Get all the Zinnia products in the Online Exclusives part of the Online Store!

SHOP STAMPIN’ UP! ONLINE HERE!

Zoo Crew Musical Birthday Card

Zoo Crew Musical Birthday Card

As I looked for a card idea to make with a stamp set that was retiring from the Stampin’ Up! Annual Catalog, I had a difficult time finding a set I had that wasn’t already sold out! This is the one I came up with and made this fun Zoo Crew Musical Birthday Card with this retiring designer series paper that I love! I wish this whole stamp set, dies, and designer series paper were sticking around another year! These little animals, doing various things from camping to crafting to playing instruments are just so cute and fun! It may be Tax Day, but these little guys will put a smile on your face!

For this card, I started with the Zoo Crew Designer Series Paper in the Zoo Crew Suite Collection. It was tough deciding which characters to use, but I decided on the musical guys. I used my Paper Trimmer to cut out each animal without getting too much other background. You could use a punch or rectangle die or whatever you like but I find just using the Paper Trimmer to be the easiest. Then I layered each animal on colored cardstock and then onto a narrow piece of black. You could do just one layer. I won’t put all the exact measurements because your cut-out animal might be a different size than mine.

The frog was already colored in, but I did decide to color in the bear and the first animal, whatever he is. Maybe he is a wild boar. I used Stampin’ Blends. Their instruments were already colored, I just colored the animal body. You could use Watercolor Pencils or some ink and a Blender Pen or even leave them blank. I didn’t think about how they weren’t colored at first.

The card base is Basic Black with a layer of Lemon Lime Twist. The background designer paper is in the Zoo Crew paper. You could choose from several different patterns.

Fitting these three musicians on the card was a little tricky, but I finally was satisfied with how I have them placed. I decided to pop all three of them up with Stampin’ Dimensionals. Where the corners overlapped, I did not put a Dimensional.

For the greeting, I chose one in the Zany Zoo Stamp Set and stamped it on a scrap strip of Basic White. I have a lot of these scrap strips of cardstock, and they are often handy for a narrow greeting. Rather than making banner ends on my greeting, I added some Iridescent Adhesive-Backed Discs to each end. These are great because they are flat and didn’t add any more bulkiness to the card.

As I am writing this, you can still get the retiring Zany Crew Suite Collection or the individual products in the Stampin’ Up! Online Store! Let me know if you have any questions about what is available or not available during this Last Chance retirement time!

SHOP STAMPIN’ UP! ONLINE HERE!

Layers of Beauty Anniversary Card

Layers of Beauty Anniversary Card

I thought I would try out this lovely new stamp set to make this Layers of Beauty Anniversary Card. We may have lots of floral stamp sets and dies but there’s always a new one that is so pretty we must have that one, too! This Layers of Beauty Stamp Set and Die is something new coming in the Stampin’ Up! Annual Catalog 2024-2025. There are also Layers of Beauty Decorative Masks in this Bundle that can be used to color this large floral piece.

My other goal with this card was to use some of the new In Colors 2024-2026. The card base is Petunia Pop cardstock. The layer of striped paper is in the Unbounded Beauty Designer Series Paper. I thought it looked good as a background to the floral piece without being too distracting.

The large floral piece fits on the largest acrylic block we have! That’s how big it is! It is stamped with Memento Ink on Basic White cardstock. I stamped it on a piece of 4″ x 5 1/4″ Basic White. Be careful how you place it before you put the stamp down on the paper so you get all the areas of the stamp.

To color in the floral piece, I used my brand new Stampin’ Blends Markers of the In Colors 2024-2026. For the roses, I colored in with Pretty in Pink, both Dark and Light. The daisy-like flowers are colored with Petunia Pop with little Peach Pie centers. The leaves are all colored with Light Shy Shamrock and then highlighted a little bit with Dark Shy Shamrock. Then I went back over the roses with a little bit of the Peach Pie Stampin’ Blend Marker just for fun.

After coloring the floral piece, I used the die to cut it out. It’s not too hard to figure out which way it fits on your stamped image, but take some time to make sure all the edges are lined up properly so you get a good diecut. This was glued down flat on the card but I almost popped it up with Stampin’ Dimensionals.

The greeting is stamped from the Layers of Beauty Stamp Set with Petunia Pop ink. I used one of the dies in the Unbounded Love Dies to cut it out. However, that die was a little big to fit on the card without taking up too much space. I took the die cut piece back to my Stampin’ Cut & Emboss Machine to trim off each end of the label by placing the die right on the diecut piece but sliding it down a tiny bit to make it shorter. I did this on the opposite end also. You can feel that the sides are lined up in the lines on the sides of the die. I only ran the die through just over each end, not across the whole piece. I popped up the greeting with Stampin’ Dimensionals.

Lastly, I added three 2024-2026 In Color Shimmer Gems in the Shy Shamrock color. It was hard to stop at three, but I did it!

Right now you can shop the Last Chance Sale at Stampin’ Up! to get select products at a discount or to stock up on your favorite papers, stamps, dies, and embellishments before they retire (or before the prices go up in the new catalog!). This sale lasts until April 30, 2024. And then the new Annual Catalog begins on May 1st!

SHOP STAMPIN’ UP! ONLINE HERE!

May Paper Pumpkin Kit!

Paper Pumpkin May 2024 Kit You're the Best There Is

It’s time for the next Paper Pumpkin Kit! The next Paper Pumpkin Kit is for May and is perfect for Father’s Day! Just join or subscribe to Paper Pumpkin by May 10th! It’s called “The Best There Is Kit” and will fill in the gap we sometimes feel when we are looking to make masculine cards.

Subscribe 11 April–10 May

  • Make cards for Father’s Day and more to express your gratitude and admiration!
  • Makes 9 cards: 3 each of 3 designs with 9 coordinating envelopes
  • Precut paper accent pieces and labels
  • Woodgrain textures and masculine earthy tones
  • Coordinating colors: Wild Wheat, Pool Party, Misty Moonlight (Classic Stampin’ Spot), Early Espresso, Crumb Cake, Basic Beige

And, the Kit coordinates with the Country Woods Designer Series Paper (item 163393), coming in the new Stampin’ Up Annual Catalog!

I always say Paper Pumpkin is the gift you give yourself! Once a month you get a fun Paper Pumpkin box in your mail. All you have to do is sit down, open the box, and start crafting. If it is your first kit, you will receive an acrylic block for the stamps. Maybe you will need scissors to cut some ribbon or twine. Otherwise, everything you need is included in the kit, including an ink spot and an exclusive stamp set. You can subscribe, try it out, skip a month if you need to, or cancel if it’s not for you. No risk, no obligation! Just try it out! If you tried it years ago, I urge you to give Paper Pumpkin another try because I think the kits have only improved through the years! The holiday kits are always my favorite!

You can subscribe by the month or you can add a Prepaid Kit to your regular Stampin’ Up! order. You can purchase different subscription lengths to your order, then set up an account and apply the code that Stampin’ Up! will email you to get credit in your account for the 3-months or 6-months of kits you ordered, for example.

JOIN PAPER PUMPKIN TODAY (or at least by May 10th!)