Author Archives: Karen Fontinelle

The New Mini Catalog Is Live Today & More!

Holiday Mini Catalog Cover SeptDec 2025

TODAY, September 3, is the big day when the September-December 2025 Mini Catalog goes LIVE! It’s the day we have been waiting for! Whether we can believe it or not, the holidays are going to be sneaking up on us fast! If you want to send some fall cards, perhaps around Thanksgiving or for fall birthdays,and then getting ready for Christmas, it really is time to start thinking and planning ahead! And it’s not just the Mini Catalog that is new today! There is MORE! Check all the links below!

SHOP THE HOLIDAY MINI CATALOG HERE!

SEE THE MINI CATALOG ONLINE HERE!

Available 1:00 pm MT

NEW ONLINE EXCLUSIVES AVAILABLE!

Check for Halloween products here in the Online Exclusives.

TWO NEW KITS AVAILABLE IN THE KITS COLLECTION!

AND ALWAYS KEEP AN EYE ON THE LAST CHANCE LIST!

Also: Water Painters are back! Stampin’ Up! had to discontinue these for awhile until they found a new manufacturer! But now you can buy them HERE! They’re great for doing a little watercoloring or splattering and other fun things!

It’s Time For Paper Pumpkin!

Paper Pumpkin Kit Sept 2025 Fall For Toile demo

“Send warm greetings to welcome the harvest season with the Fall for Toile Paper Pumpkin Kit. These elegant cards truly capture the beauty of this special time of year, with rich colors, traditional autumnal imagery, and luxe foil accents. Each kit comes with three different printed card base styles, three coordinating envelope designs, precut paper pieces, and grosgrain ribbon—as well as a stamp set perfectly suited for seasonal messages from the heart. And because this kit coordinates beautifully with the Autumn Toile Suite Collection, you’ll have even more opportunities to create seasonal magic!” 

September: Fall for Toile 

Subscribe August 11–September 10 

Design elegant cards with metallic foil and rich autumnal imagery. 

• Makes 9 cards: 3 each of 3 designs with 9 coordinating envelopes 

• Metallic foil details and grosgrain ribbon trim 

• Precut paper pieces and printed sentiment labels 

• Coordinating colors: Cajun Craze (Classic Stampin’ Spot), Crumb Cake, Darling Duckling, Early Espresso, Pecan Pie, Timid Tiger

If you want an easy way to make some fall cards to send, join Paper Pumpkin today and get your kit in the mail mid-September! No risk, no obligation. You can skip a month now and then when you need to or cancel any time. Shipping is included in the price. I say Paper Pumpkin is a gift you give yourself! What a treat to find a new Paper Pumpkin Kit in your mailbox!

Subscribe by September 10 to get this

all-inclusive kit!

LAST DAY of the Stampin’ Up! In Color Sale!

In Color Sale 2025 Sq Ad Info

Time flies when Stampin’ Up! has a sale! This In Color sale has been going on for a month, but surprisingly, the month of August ends TODAY! And so does the sale!

Stock up on all your 2025-2027 In Color basics, like cardstock, ink, ink refills, markers, ribbons! But there are other products, too, that contain these In Colors! Check it all out and don’t miss the 15% off sale that ends today!Here are more products I see listed on the sale in the Online Store besides the basics:

  • Sale includes select inks, cardstock, Designer Series Paper, embellishments, and other products that include these new In Colors. Only products featured on the 2025–2027 In Colors page are included in this promotion.
  • Some products are excluded from the sale, including the Month by Month Album Retreat 2025 kit (167338).
  • Products are available only while supplies last.
  • Sales Period: August 5 – 31:
  • Kits in the Kits Collection (many kits!)
  • Embellishments
  • Designer Series Paper (including the beautiful Painterly Pears Designer Series Paper and the Turtle-y Cute DSP!)
  • Scrapbooking Workshop Kits
  • Memories & More products
  • Two-Tone cardstock
  • Stampin’ Blends
  • Ephemera (these are so useful and fun!)
  • Puffy Stickers
  • Twine
  • Ribbon

SHOP and SAVE 15% at the 2025-2027 IN COLOR SALE!

Spooky Sweet Trick or Treaters Halloween Card

Spooky Sweet Trick or Treaters Halloween Card

I was so tickled with the Halloween card I made in my previous post that I had to make another one right away! Halloween decorations and things just make me happy! I won’t be decorating my house for at least another month, but I’m happy to start making Halloween cards and other projects to provide some inspiration for you.

I really wanted to use this Spooky Sweet Specialty Designer Series Paper with the little drawings of candies on the gray background. So cute! The card base is Granny Apple Green which goes with the paper, but I felt like the paper stood out more with a layer of black behind it. I made the margins very narrow so the Basic Black is 5 3/8″ x 4 1/8″ and the candies designer paper is the usual 5 1/4″ x 4″. I diecut a Pumpkin Pie circle from the Spotlight On Nature Dies. I could have used Stylish Shapes Dies or a large circle punch. It’s just meant to be a background to help show off the three trick or treaters, however, it also looks like a moon out on Halloween night. I could have tucked it behind the bottom strip of paper and made it look more like a moon. Either way, I think it works.

The three trick or treaters are fussy-cut from the sheet of costumed characters in the package of DSP. It wasn’t as difficult or “fussy” as you might think! It helps to leave a tiny bit of white margin around the image and that makes it easier to cut out. The first and third costumed characters are popped up on Stampin’ Dimensionals and the middle guy is glued flat on the card front. I did add that strip at the bottom of the candy designer paper. It is the opposite side of the candy pattern! I made it 5 1/4″ x 1 1/4″. You could make it whatever width you like. The characters just needed something to “stand” on.

The greeting is in the Spooky Halloween Stamp Set along with some cute character stamps and greetings. I stamped it with Memento ink on the opposite side of the character paper. To make it smaller to fit better and to look more interesting, I cut the greeting into narrow pieces and then popped each one up on Dimensionals. When I stamped the greeting, I noticed the little bats stamp in the set so I stamped some bats on the orange circle (before adhering the words!). There were also small blackbirds on the designer sheet so I cut two of those out and placed them on the card. Finally, because once you have them you can’t resist, I added some purple and white Shimmer Star Foam Stickers. These are so fun to use, you really should order some and I’m sure you can use them on other cards for other occasions, not just Halloween!

You’ll find this Spooky Sweet Suite Collection and individual products in the Stampin’ Up! Online Exclusives. If you love Halloween, too, you might like the Sweet & Spooky Kit in the Kits Collection to make some Halloween treat boxes. This is a very cute kit!

SHOP STAMPIN’ UP! ONLINE HERE!

Spooky Sweet Happy Halloween Card

Spooky Sweet Happy Halloween Card

This is my first Halloween card for this year, and I am so excited!! I love how it turned out and I enjoy anything cute for Halloween! This Spooky Sweet Happy Halloween Card was made with the designer paper and stamp from the Spooky Sweet Suite Collection in the Stampin’ Up! Online Exclusives!

The Spooky Sweet Specialty Designer Series Paper is going to be so much fun to use on Halloween cards, scrapbook pages, or other projects! Not only do you get papers with costumed animals, spooky haunted houses, and other printed papers to coordinate, but you also get diecut pieces of all types plus patterns to cut apart for tags or maybe labels for cards and scrapbook pages plus embellishments on your project. This paper is almost like a kit with all kinds of things you can use!

For this card, I started with a base of Basic Black cardstock. Next, I started cutting apart some of the Spooky Sweet Designer Paper and looking at the animal characters and the diecuts to see what I wanted to make. There are two full sheets that have street-like scenes of spooky houses, fences, and sidewalks. I cut apart this one house, although I didn’t cut it the size I intended to and almost started over with the other sheet of paper with the row of Halloween houses. But I stuck with it and just adhered it over to the right edge of the card with a strip of the back of another paper in the pack for the orange strip along the left side of the card.

Once I had that basic card design made, I played around with the other elements in the designer paper. I chose the goofy little bird carrying a pumpkin to be popped up on Dimensionals as if he is walking along the sidewalk, plus a couple candy corns because I couldn’t resist! For the greeting, I cut apart some of the tags/banners and stamped “Happy Halloween” with a stamp in the Spooky Halloween Stamp Set in Memento ink. I trimmed down the banner a tiny bit and cut the left side on an angle so I could angle the greeting. I also flagged the right side. It’s a Halloween card so you can do anything crazy on it that you want!

Luckily I remembered that I also bought the Shimmer Star Foam Stickers in the Suite. These are really different little things! They are actually foam, so if you stick the Take Your Pick Tool underneath them to get off the sticker page and onto your project you will feel the foam! It’s kind of odd when we are used to solid gems! But they are very sparkly and come in three sizes and three colors: White, Black, and Purple. I had fun putting them on this card!

If you want to save 10%, purchase the Spooky Halloween Bundle and get the dies that go with the stamp set. I couldn’t resist the characters and sentiments in this Bundle for Halloween!

Unfortunately, Stampin’ Up! didn’t put Halloween sets in the Holiday Mini Catalog, just the Online Exclusives. The Mini, however, does have a couple of nice fall/autumn stamps, dies, and papers. There are more in the upcoming Online Exclusives coming September 3rd, plus more Christmas! So get ready for lots more new things September 3rd with the new September-December 2025 Mini (Holiday Mini), Onlines Exclusives, and two new Kits in the Kits Collection. It will be a fun day!

SHOP STAMPIN’ UP! HERE!

2025-2027 In Color Sale Ends Sunday, Aug. 31

In Color Sale 2025 Sq Ad Info

The month of August has really flown by, if you ask me! This is your reminder that the Stampin’ Up! 2025-2027 In Color Product Sale is going on! It seems like yesterday that we had a WHOLE MONTH for this sale, but the sale ends Sunday August 31!

You might think this sale is only about the In Color cardstock and ink pads BUT it is also about other random products that have In Colors in them! You just have to check the Stampin’ Up! Online Store on the sale page and see what is included!

If you don’t have already have some In Color cardstock, I would get the  8 1/2″ x 11″ assorted package of all the colors. That way you can try them out and then order more of the ones you like. Or more assorted packages! Lots of Two-Tone cardstock assortments are on the sale as well.

Here are more products I see listed on the sale in the Online Store besides the basics:

  • Sale includes select inks, cardstock, Designer Series Paper, embellishments, and other products that include these new In Colors. Only products featured on the 2025–2027 In Colors page are included in this promotion.
  • Some products are excluded from the sale, including the Month by Month Album Retreat 2025 kit (167338).
  • Products are available only while supplies last.
  • Sales Period: August 5 – 31:
  • Kits in the Kits Collection (many kits!)
  • Embellishments
  • Designer Series Paper (including the beautiful Painterly Pears Designer Series Paper and the Turtle-y Cute DSP!)
  • Scrapbooking Workshop Kits
  • Memories & More products
  • Two-Tone cardstock
  • Stampin’ Blends
  • Ephemera (these are so useful and fun!)
  • Puffy Stickers
  • Twine
  • Ribbon

SHOP and SAVE 15% at the 2025-2027 IN COLOR SALE!

Traditions of Christmas Bouquet Card

Traditions of Christmas Bouquet Card

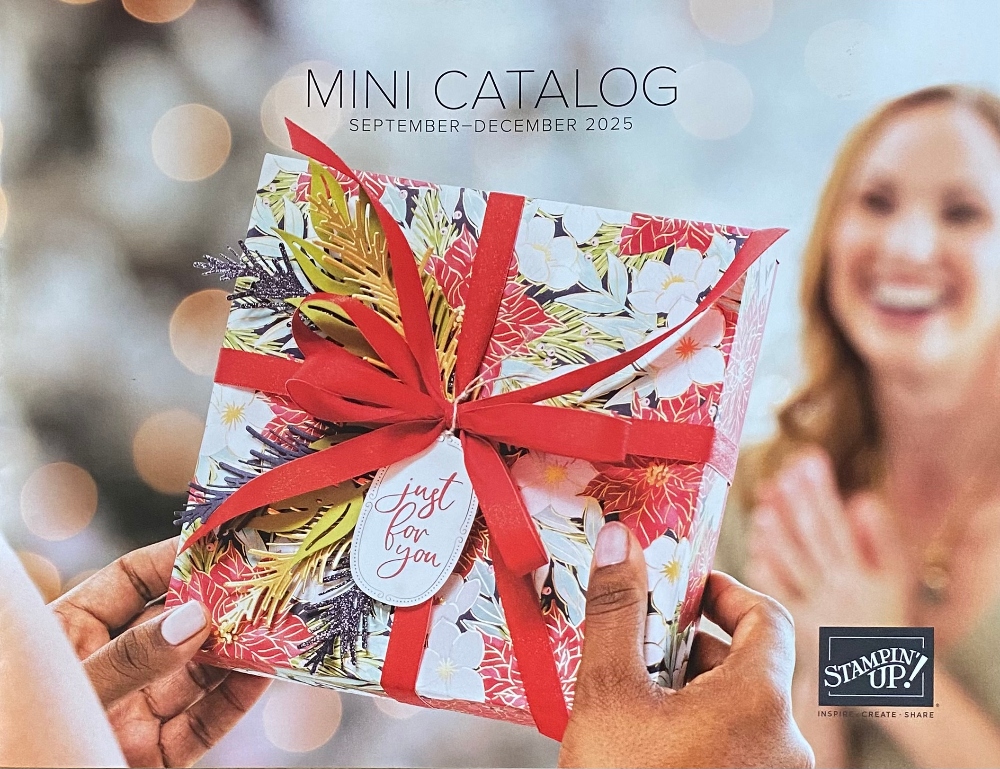
Can you believe four months from today is Christmas? I thought it only appropriate that I make my first Christmas card of the season, Traditions of Christmas Bouquet Card, for my blog post today! My box of Holiday Mini Catalog preorder goodies arrived just the other day so it was time to make a Christmas card. The Holiday Mini Catalog goes live on Wednesday, September 3, 2025 so you only have about another week to wait!

When you get to see the September – December 2025 Mini Catalog online or in person, if you like traditional Christmas colors and designs, you will probably gravitate toward the Traditions of Christmas Suite Collection! I can’t link to it yet, but it is beautiful! It is a very large Suite, so you can buy it ALL with just one number on your order, or you can pick and choose which products you want and still make beautiful cards even if you don’t have everything!

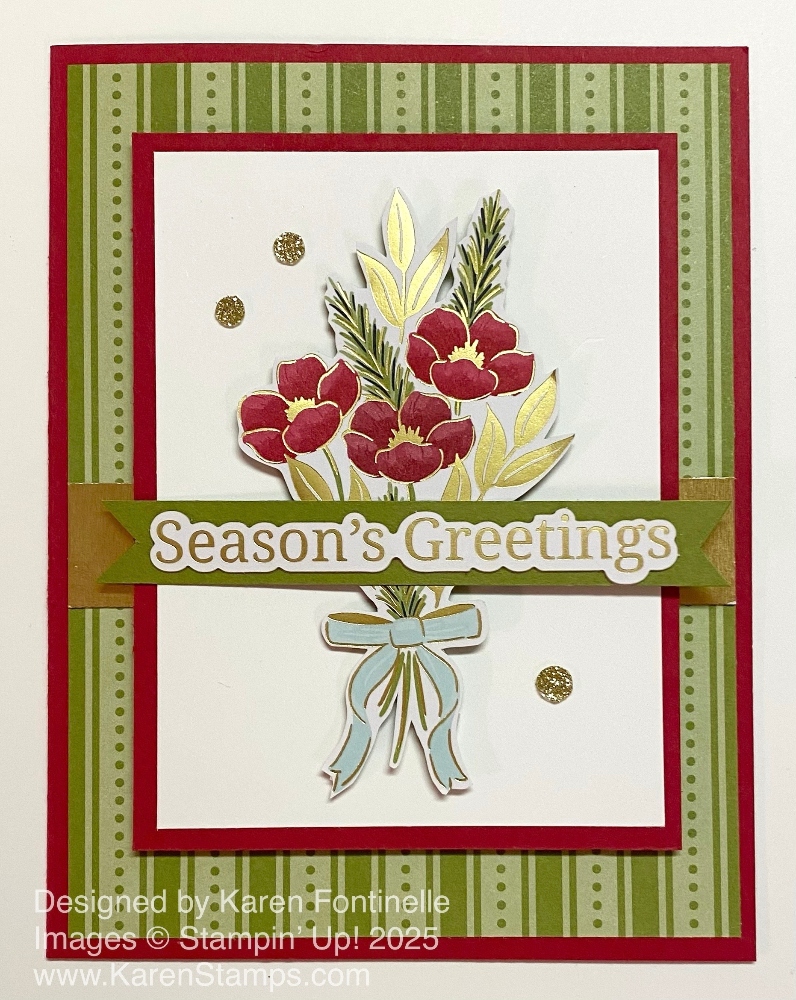
This card, of course, doesn’t do the whole Suite justice, but it does give you an idea of how pretty the designer series paper will be! I got the idea for this card from the Mini Catalog on page 24 but changed it up a little bit. The paper I used is the Traditions of Christmas Specialty Designer Series Paper. It is called “Specialty” because it has gold foil accents. The paper is made up of poinsettias and other Christmas flowers plus generic patterns on “the other sides” of the pretty floral papers. And one surprising, but fun color, in the package is the new In Color, Secret Sea! You wouldn’t think that deep blue color would be for Christmas cards in these traditional red and green colors, but it really is stunning.

The card base is Real Red with a layer of this Olive Green striped and dotted paper. The “other side” has the pretty flowers that I used for the focal point of the card. The bouquet may be able to be cut with a die in the Christmas Greenery Dies in the Suite or you can stamp a bouquet just like this one and color and cut out. My bouquet is fussy-cut so I’m not positive if the die fits it, but I think it might. The Basic White background is cut at 3″ x 4″ with a Real Red layer of 3 1/4″ x 4 1/4″. There are many bouquets on that designer paper page with flowers of varying colors. The bouquet is popped up on Stampin’ Dimensionals on this card, then a greeting is placed across the stems

The greeting in the catalog sample is stamped and gold embossed, but for my card I chose a greeting in the Greetings For You Ephemera Pack. It is on page 15 up at the top of the Mini Catalog. The greetings are all in gold foil and are diecut and adhesive-backed! Just peel off the release paper on the back and stick the greeting to your card or project. I adhered mine to a strip of Old Olive cardstock to help it stand out and flagged the ends. You may barely notice a strip of Gold Foil 4″ x 3/4″ going across the card under the popped up center piece but lined up underneath the greeting. The gold foil is glued flat on the card. The greeting is glued flat where it intersects the bouquet, but it’s probably a good idea to add a Dimensional on each end of the greeting to make it sturdier going across the popped up bouquet.

For some embellishment and sparkle, I added three of the gold Traditional Sparkling Sequins. You will want these for sure for your holiday projects. They look like gems but are nearly flat so will be good for mailing. They come in three different sizes in Real Red, Old Olive, Pool Party, and gold.

This beautiful Traditions Of Christmas Specialty Designer Series Paper will be wonderful for scrapbook pages and other projects, even giftwrap, not just for cards! Although you don’t have your new holiday products today, just for fun, to celebrate 4 months until Christmas, get out some paper from your stash and make a Christmas card! And mark your calendar for September 3 when there will be the new September-December Mini Catalog (Holiday Mini!), new Kits in the Kits Collection, and new Online Exclusives!

This beautiful Traditions Of Christmas Specialty Designer Series Paper will be wonderful for scrapbook pages and other projects, even giftwrap, not just for cards! Although you don’t have your new holiday products today, just for fun, to celebrate 4 months until Christmas, get out some paper from your stash and make a Christmas card! And mark your calendar for September 3 when there will be the new September-December Mini Catalog (Holiday Mini!), new Kits in the Kits Collection, and new Online Exclusives!

Sweet Jar Candies Card

Sweet Jar Candies

I ordered this stamp set, then it got lost in the shuffle and I kept forgetting about it. After awhile I remembered to take it out and made a card or two. But now I’m kind of getting into it and made a cute card with it for a friend’s birthday. And I’ve seen lots of cute cards of all sorts made with this stamp set and punch! So here is my Sweet Jar Candies Card that was fun to make!

If you like this Sweet Jar Bundle with the cute jar and lid punch, be sure to check out the Jar of Joy Stamp Set that is the holiday version and also works with the Sweet Jar Builder Punch. I’m anxious to try out that one! You’ll find it in the Online Exclusives.

For this card I used two patterns in the Celebratory Sips Designer Series Paper. You can see this paper is not only about drinks in spite of its name! The card base is Strawberry Slush, one of my current favorite colors. I cut it at 4 1/4″ x 11″ and scored at 5 1/2″ so the fold is at the top. Basically, this is cutting the sheet of cardstock in half lengthwise instead of our normal horizontal. The polka dot paper is 4″ x 5 1/4″. The Basic White background is cut at 3″ x 4 1/4″ and is layered on a piece of Strawberry Slush cut at 3 1/4″ x 4 1/4″. You could make these pieces larger if you wanted to. At the bottom of the Basic White piece I adhered a floral print pattern 1″ x 3″ to suggest a tabletop on which the jar is sitting.

The jar is stamped with the Sweet Jar stamp on a small piece of Basic White using Gray Granite ink. You could use black ink but I thought Gray Granite looked a little more like glass. I also heard the new In Color, Cloud Cover, is a good color to use stamping the jar. If you recall, the Cloud Cover ink pads did not meet Stampin’ Up! standard in the current ink pad style so they stopped selling them. However, the ink does work with the Stampin’ Spots.

If you want the Cloud Cover ink, you can buy the Uninked Stampin’ Spots and use the Cloud Cover Ink Refill OR you can purchase the Classic Stampin’ Spot Small Assortment 1 (this assortment is on sale in the In Color Sale right now) which has the Cloud Cover Ink Spot in the assortment. These Stampin’ Spots, if you don’t have any, are rather handy to have. They are good for inking a small area on a stamp and good for “going places” with your stamping supplies because they are so much smaller than regular ink pads to take along. And if you are subscribed to Paper Pumpkin then you already have a collection of other colors of ink spots because you get one new spot in every kit. However, I don’t think Cloud Cover has been in a Paper Pumpkin Kit yet.

The jar is kind of like two-step stamping. You stamp the jar and then you stamp the contents. There are several different stamps of contents in the Sweet Jar Stamp Set and you can improvise a little with those or just with the jar. For this card, I stamped the little oval shapes, which, on my card, are meant to be colored candies, but on my friend’s birthday card they were chocolate chip cookies! I had read a tip to stamp them in Basic Beige ink and then color over those inked images with markers if you want different colors. I did that and colored over the shapes with various colors of Stampin’ Blends, mostly going by what the coordinating colors were with the Celebratory Sips Designer Paper. I think they turned out fine. Next time I will try “stamping off” the ink once to get a lighter layer and see if that works a little better as far as coloring on top so that maybe the colors are a little more vibrant. But they are fine as is, really.

The Sweet Jar Builder Punch punches out the jar and the lid at the same time. Save those scrap lids. Even if they are the Basic White, you can color them with a marker to make them whatever color you want or punch a scrap of colored cardstock. For this card, I punched a lid out of the Gold Foil Sheets. I only needed the tiniest edge of a scrap of the gold foil. Put a tiny bit of glue on the top of the jar and adhere the lid. Or maybe you want to set the lid on the side of the jar as if the jar is open to reach inside.

The greeting is stamped on a small Strawberry Slush Stylish Shapes diecut circle in Memento Ink. It is in the stamp set as well as the word “Sweetness” which is stamped in Strawberry Slush ink, cut out in the little strip and adhered to the circle. The circle is then popped up on a small piece of a Foam Adhesive Sheet under which I stuck a small piece of Gold Striped 3/8″ Mesh Ribbon. I love this pretty ribbon and it certainly goes with the gold jar lid. The jar is also popped up on a scrap piece of the Foam Adhesive. These are small sheets and then you just cut the size and shape that you want. You could also use Stampin’ Dimensionals, which I always use, but this day I thought to use the Foam Sheet scrap I had which gives a little stronger backing to the piece and there’s only one piece to peel off instead of all those single covers that get everywhere! For a little embellishment, I used the Strawberry Slush & Pretty In Pink Gems. These are so pretty that I bought a second package, especially since it is on sale 15% off in the 2025-2027 In Color Sale! This sale runs through August 31 and that date is getting pretty close now! Don’t miss out!

You can save 10% by purchasing the Sweet Jar Builder Punch and Sweet Jar Stamp Set in the Bundle. Also remember, the Stampin’ Write Markers are being discontinued but are available while supplies last in the Last Chance category. The new 2025-2027 In Color Stampin’ Write Markers are on sale because they are in the In Color Sale. The other markers packages are still regular price.

Be sure to keep an eye on the Online Exclusives because there are a lot of great products in that category as well as the Last Chance category and possibly find some bargains.

SHOP STAMPIN’ UP! ONLINE HERE!

Surprising Product Changes at Stampin’ Up!

New Stamp and Die Packaging

Yesterday Stampin’ Up! announced some product changes that probably took almost all of us by surprise. There will be lots of different opinions about the changes depending on what you like, but I find that after everyone gets used to the new things it turns out okay.

Here are the changes.

  1. Stampin’ Up! is discontinuing red rubber cling stamps and all stamps will be photopolymer. I have been finding that I’m so used to the photopolymer and being about to see through the clear stamps that in some cases I’m disappointed I can’t see through the cling stamps for placement.
  2. Also being discontinued, are Stampin’ Write Markers. Oh my! We have had these markers since before I started stamping. We even had the nifty carrying case for ALL of the markers. BUT I have found that I rarely use mine any more because I use Stampin’ Blend markers all the time. But you still have a chance to get your hands on the Stampin’ Write Markers while they are available.
  3. New are the stamp and dies packaging! This will make some people happy who like saving space and having the artwork for the dies on the package which we don’t have now. Other people who don’t like their storage system changed up may not be happy. Even if you prefer another kind of storage and organization you can still do that with your own system.

Watch this video from Stampin’ Up! explaining the changes and the reasons why. Then I’ll give you the information on dates.

PS: That stamp set and dies you see pictured above? It’s a sneak peek of a new set and packaging coming in the November Online Exclusives!

Cling Stamps Info:

  • Starting with November 2025 Online Exclusives, all new stamps will be photopolymer.
  • The upcoming Sept – Dec 2025 Mini Catalog and the 2025-2026 Annual Catalog will be the last printed catalogs with cling stamps.
  • In December 2025, all cling stamps in the September–December 2025 Mini Catalog will move to Last Chance Products and be available while supplies last. No cling stamps from the mini catalog will carry over.
  • In April 2026, all cling stamps in the 2025–2026 Annual Catalog will move to Last Chance Products and be available while supplies last. No cling stamps from the annual catalog will carry over.
  • Final transition: In April 2026, all remaining cling stamps across our offering will move to Last Chance Products and be available while supplies last.
  • On August 20, 2025, all Stampin’ Write Markers will move to Last Chance Products* and be available while supplies last. So if you want to get any markers, I’d get on that website today and start ordering in case some colors sell out.

New packaging for stamp sets and dies!

  • New packaging measures 5-5/8″ x 9″ (14.3 x 22.9 cm).
  • Stamps and dies will now come in the same size and style of packaging, making it easy to store bundles and coordinating products together.
  • Packaging is clear with an insert that displays stamp or die artwork for quick and easy identification—yes, both stamp and die packaging will now show artwork!
  • Larger packaging dimensions allow us to showcase more stamp artwork at 100% on the insert.
  • Sleek, slim design will help you and your customers store more in less space.
  • Envelope closure includes a tuck-in flap for quick and easy opening and closing.
  • Packaging is sized to fit a variety of organization systems.
New Packaging Envelopes Standing

Let all this news sink in! If you have any questions just let me know! Or leave a comment about what you think!

Celebratory Sips Rosy Drinks Card

Celebratory Sips Rosy Drinks Card

This is one of those cards, this Celebratory Sips Rosy Drinks Card, that as relatively simple as it is, it was very pleasing to see the end result. I think the designer series paper and the greeting make the card! Not only is the designer paper fun to use, but all the elements just came together.

The Celebratory Sips Designer Series Paper may surprise you if you don’t look at it carefully online. It is in the Online Exclusives category PLUS is on sale during August because some of the coordinating colors are the new 2025-2027 In Colors. Get it for 15% off until August 31! What is surprising is that it’s not just pretty drinks! The papers also contain flowers, whimsical designs, citrus fruit images and watercoloring. And no need to assume that the “drinks” are alcoholic! They can be anything! Just refreshing summer drinks perhaps!

The card base is Strawberry Slush cardstock. It is also in the In Color Sale going on now! The designer paper, Celebratory Sips, would normally be cut at 4″ x 5 1/4″ but since I wanted to fold over one side of the DSP to show “the other side”, I cut it an inch wider, so 5″ x 5 1/4″, scored at 1″ on the left side, and folded it over. I glued it down, then wrapped around some ribbon. This is the Strawberry Slush 3/8″ Faux Linen Ribbon and it is a very lovely type of ribbon! And on sale! The bow is tied separately and stuck on with Mini Glue Dots or you can use a bit of Stampin’ Seal Adhesive right on the ribbon.

The greeting is in the Saying Something Ephemera Pack in the Annual Catalog. As I write this, it says “Low Inventory” so if you want it, I would order it SOON! It really is a fantastic product, especially when you want a quick greeting to finish off the card or you don’t have quite the right one in your stamp sets. There are all sorts of greetings, styles, colors, and shapes so you are almost sure to find one you can use. This one I found in the package I thought was PERFECT for this card, with the word “rosy” in it, just in case any of the drinks perhaps had some Rose wine in them! Or even just a reference to enjoying any of these drinks with their rosy color!

I also diecut a Stylish Shapes circle on which to pop up the greeting to help it stand out. For a little embellishment, I added three of the Strawberry Slush & Pretty In Pink Gems on the Strawberry Slush diecut circle. I love those particular gems so I recommend them!

You could make cards like this design with other designer series paper by just folding over one edge of the designer paper to show the other side, or cut a strip from another paper for a contrast to the main paper. We do have great designer series paper!

Here is another card I made with the Celebratory Sips Designer Series Paper but I cut out the larger drink images and used one of the other papers for the background.

SHOP STAMPIN’ UP! HERE!

Two-Tone Torn Paper Ocean Card

Two-Tone Torn Paper Ocean Card

I saw a card using the Two-Tone Cardstock that Stampin’ Up! now carries that reminded me that the Two-Tone cardstock could be torn and look like ocean waves! That is how this Two-Tone Torn Paper Ocean Card came about! Tearing paper was something everyone was doing when I first joined Stampin’ Up! many years ago and then I didn’t see it for awhile. I think it is back now and a fun and easy technique to use!

The card base is Crumb Cake but the entire front of the card is covered. There is no Crumb Cake margin showing as I usually do. I cut several strips of different widths of the Two-Tone Cardstock in various colors in 5 1/2″ lengths to fit completely across the card. The other dimension of the strips doesn’t really matter since they are going to get torn to make different widths, so I cut some at 1″ and some at 2″ or 3″ wide. Two-Tone cardstock means that it has a white core which is perfect for looking like white caps on ocean waves! Also, one side of the paper has one color and the other side has the same color but in a different shade, lighter or darker. That gives you a lot of choices with just one sheet of paper!

You can use whatever colors for water, sky, sand or landscape that you choose. My paper isn’t labeled and sorted yet, so I’m not positive about my colors. However, I believe I used Crumb Cake for the sandy beach, Pool Party and Night of Navy for the water, and just regular Daffodil Delight for the sun. I punched out the sun with a 1 3/4″ Circle Punch. You can use whatever size punch or die you have. The top piece of “sky” is Basic White, colored slightly with Balmy Blue ink and a Small Blending Brush. You could also use a sponge. I purposely left some areas of the paper whitish to look like clouds.

The trick to tearing strips is to tear the strip toward yourself with the side of the paper you want to use in the front to show off the torn edge. When you have some strips cut and torn, just play around with them a little bit and see how you like them laid out. You can apply glue only to the bottom edge of the strip, then you can adhere succeeding strips by slipping them behind the top of the bottom strip and so on. Or start at the top and work your way down. If you don’t like the way something looks, you can slip in a small torn piece or you can tear off the top edge of the paper a little more to fix it how you like it. The sun is just slipped in behind the top water strip.

I thought my card needed a boat, but I didn’t think I had one. Then I did remember there was a little sailboat in the Choose Happy Stamp Set. I stamped it in Memento Ink, colored with a brown and a red Stampin’ Blend marker, then cut it out carefully with scissors. I think it turned out to be a good size for my ocean! If you don’t have a sailboat stamp, just draw one yourself. It’s just a bowl shape for the boat and put a triangular sail on top.

The greeting is one I found in the Saying Something Ephemera Pack. When I came upon it, I knew it was perfect for this card! I popped it up with Stampin’ Dimensionals. Then you are finished with the paper strips on the card front, check and see if you need to trim off either or both sides of the card to even up everything. I like to use my very old Stampin’ Up! guillotine cutter, if you have that! But the Paper Trimmer will also work.

See what other ideas you can think of for using the Two-Tone Cardstock! I just thought of one myself!

SHOP STAMPIN’ UP! ONLINE HERE!

Kintsugi Inspirations Vases Thinking of You Card

Kintsugi Inspirations Vases Thinking of You Card

All you need are dies or scissors to cut out these beautiful images for this Kintsugi Inspirations Vases Thinking of You Card. And they are easy to cut out if you don’t have the dies!

If you like something different, this Kintsugi Inspirations Specialty Designer Series Paper is for you! I think a lot of us learned a new term….Kintsugi…when the new Stampin’ Up! Annual Catalog came out and this Suite was in it! Kintsugi is a traditional Japanese technique of repairing broken pottery with gold lacquer. These gold veins become a celebration of imperfection instead of hiding it.

The card base is Lost Lagoon cardstock, a color I really like but I don’t use very often for some reason. But it is one of the coordinating colors of the Kintsugi Inspirations Suite. After seeing some scrap strips in my package of DSP, I got the idea to use a strip at the bottom of the card as sort of a base or table for the vases.

The vases are all fussy-cut with scissors, but there are the Inspiring Imperfections Dies which would be great to have. These dies cut out the large vases and short ones, flowers, and even the shape for the gold veins or use it as a branch. For my card, the single flower is also fussy-cut and a slit put in that short vase or cup so I could slip the flower stem into the vase.

You can adhere the vases flat on the card or with Stampin’ Dimensionals or both. Two of my vases are popped up and one flat. Since I happened to have the Spotlight On Nature diecut vellum circle on my table, I decided to use that also on the card. I just slipped it behind the vase and under the table strip at the bottom. You have to be careful where you put adhesive when you are using vellum because it can show through, but usually there is a hidden spot where you can put adhesive and it won’t show. On this card sticking it behind the one vase and behind the paper strip at the bottom it was fairly well held down, but after adhering the greeting, I also put glue on the back of the vellum behind the greeting so it definitely won’t show.

The greeting is part of the Blooming Phrases Stamp Set. I thought the font went nicely with the card design. I wanted something simple and sophisticated. This greeting is stamped in Lost Lagoon ink on Basic White and then diecut with one of the Textured Notes Dies. For a little embellishment besides the gold foil on the vases, I used the Strawberry Slush & Pretty In Pink Gems in the clear color with a bit of gold on them that I thought went well with the card.

Don’t be afraid to cut out images from designer papers if you don’t own the matching dies or if there are not dies that match the images you want. Your cutting doesn’t not have to be perfection and you can do it as a relaxing exercise while you watch TV or just sit and relax!

For a different look to your cards, check out the Kintsugi Inspirations Suite and individual products that you can purchase separately.

SHOP STAMPIN’ UP! ONLINE HERE!

A Paper Pumpkin Kit For Fall!

Paper Pumpkin Kit Sept 2025 Fall For Toile demo

“Send warm greetings to welcome the harvest season with the Fall for Toile Paper Pumpkin Kit. These elegant cards truly capture the beauty of this special time of year, with rich colors, traditional autumnal imagery, and luxe foil accents. Each kit comes with three different printed card base styles, three coordinating envelope designs, precut paper pieces, and grosgrain ribbon—as well as a stamp set perfectly suited for seasonal messages from the heart. And because this kit coordinates beautifully with the Autumn Toile Suite Collection, you’ll have even more opportunities to create seasonal magic!” 

Here are the details about the September Paper Pumpkin Kit, Fall For Toile, which you will receive about mid-September. 

September: Fall for Toile 

Subscribe August 11–September 10 

Design elegant cards with metallic foil and rich autumnal imagery. 

• Makes 9 cards: 3 each of 3 designs with 9 coordinating envelopes 

• Metallic foil details and grosgrain ribbon trim 

• Precut paper pieces and printed sentiment labels 

• Coordinating colors: Cajun Craze (Classic Stampin’ Spot), Crumb Cake, Darling Duckling, Early Espresso, Pecan Pie, Timid Tiger

(And if you look closely on the Paper Pumpkin ad you will see a sneak peek of a beautiful fall suite, Autumn Toile, coming in the September-December Mini Catalog next month!)

JOIN PAPER PUMPKIN TODAY!

Reminder: In Color Sale Going On!

In Color Sale 2025 Sq Ad Info

I wanted to remind you that the Stampin’ Up! 2025-2027 In Color Product Sale is going on! You might think this sale is about the In Color cardstock and ink pads and it is! BUT it is also about other random products that have In Colors in them! You just have to check the Stampin’ Up! Online Store on the sale page and see what is included!

  • Sale includes select inks, cardstock, Designer Series Paper, embellishments, and other products that include these new In Colors. Only products featured on the 2025–2027 In Colors page are included in this promotion.
  • Some products are excluded from the sale, including the Month by Month Album Retreat 2025 kit (167338).
  • Products are available only while supplies last.
  • Sales Period: August 5 – 31

If you don’t have already have some In Color cardstock, I would get the assorted package of all the colors. That way you can try them out and then order more of the ones you like. Or more assorted packages!

Here are more products I see listed on the sale in the Online Store besides the basics:

  • Kits in the Kits Collection
  • Embellishments
  • Designer Series Paper
  • Scrapbooking Workshop Kits
  • Memories & More products
  • Two-Tone cardstock
  • Stampin’ Blends
  • Ephemera
  • Puffy Stickers
  • Twine

SHOP and SAVE 15% at the 2025-2027

IN COLOR SALE!

Floral Impressions Yellow Flowers Thank You Card

Floral Impressions Yellow Flowers Thank You Card

Sometimes you can use one of your own older cards as inspiration for a new one, like this Floral Impressions Yellow Flowers Thank You Card! Everyday in my email I get a few photos from “Memories of this Day”. The other day, one of the “memories” was a card I made like this one and I thought I should try that idea again! After all, we often hate NOT using the other side of the paper when we are using one side! This was a way to show off both sides at once!

This is the Floral Impressions Designer Series Paper. I have a difficult time not getting it mixed up with all the other floral paper we have! This one is not in the catalog. It was released in May 2025 as one of the Online Exclusives. This month of August you can buy it on sale 15% during the In Colors Sale because some of the coordinating colors are In Colors 2025-2027!

The card base is Crushed Curry with a layer of Pecan Pie. At first I was going to adhere the designer paper rectangles directly on to the card base but I wanted to add a little brown that was in the flowers so I used Pecan Pie as a layer. The designer paper pieces are cut at 1 7/8″ x 2 1/12″. I did glue them down first on a piece of Pecan Pie cardstock cut at 3 3/4″ x 5″ which is what a second layer on the card base would be sized at. Because I glued them down on another piece of cardstock first, I was able to trim off a smidgeon from each side to make sure everything was perfectly aligned. You can vary the sizes of any of these things depending on how you want your card to look.

The greeting is stamped on Basic White in Garden Green ink and is in the Bright Borders Stamp Set. Then use the To the Point Label Punch to cut the stamped leafy image and sentiment. The stamp set is on the Last Chance list and is marked down 10%. It’s a pretty nice stamp set to have along with the punch for a lot of kinds of cards and projects. To help the greeting stand out, I punched out two pieces of Garden Green with the same punch and cut each one in half to adhere behind the top, bottom, and sides of the white piece. This is a good trick to know when you want something layered behind something for which there is not larger punch.

The greeting is popped up on Stampin’ Dimensionals in approximately the center of the card. For a little something to add, I chose this Garden Green twine in the Natural Tones Linen Thread (retired). I cut two pieces the same length and tied them together into a bow to make it a little thicker. The bow is stuck on with a Mini Glue Dot.

All in all, this is an easy card to make and a great way to use your designer series paper. You can show off both sides! Make squares if you like in a smaller configuration. Anything is possible!

SHOP STAMPIN’ UP! ONLINE HERE!