Category Archives: 3-D, Gifts & Things

New Kits For December in the Kits Collection!

Kits Collection Banner Botanicals Kit Dec 2025

The Banner Botanicals Kit

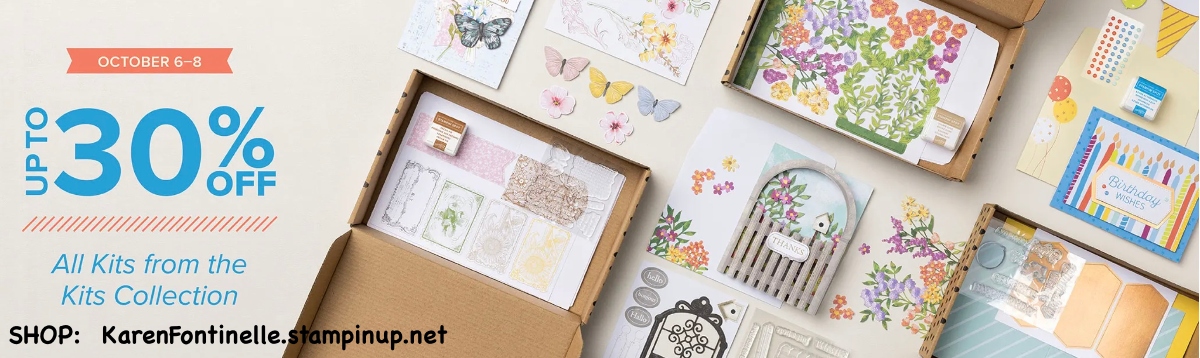
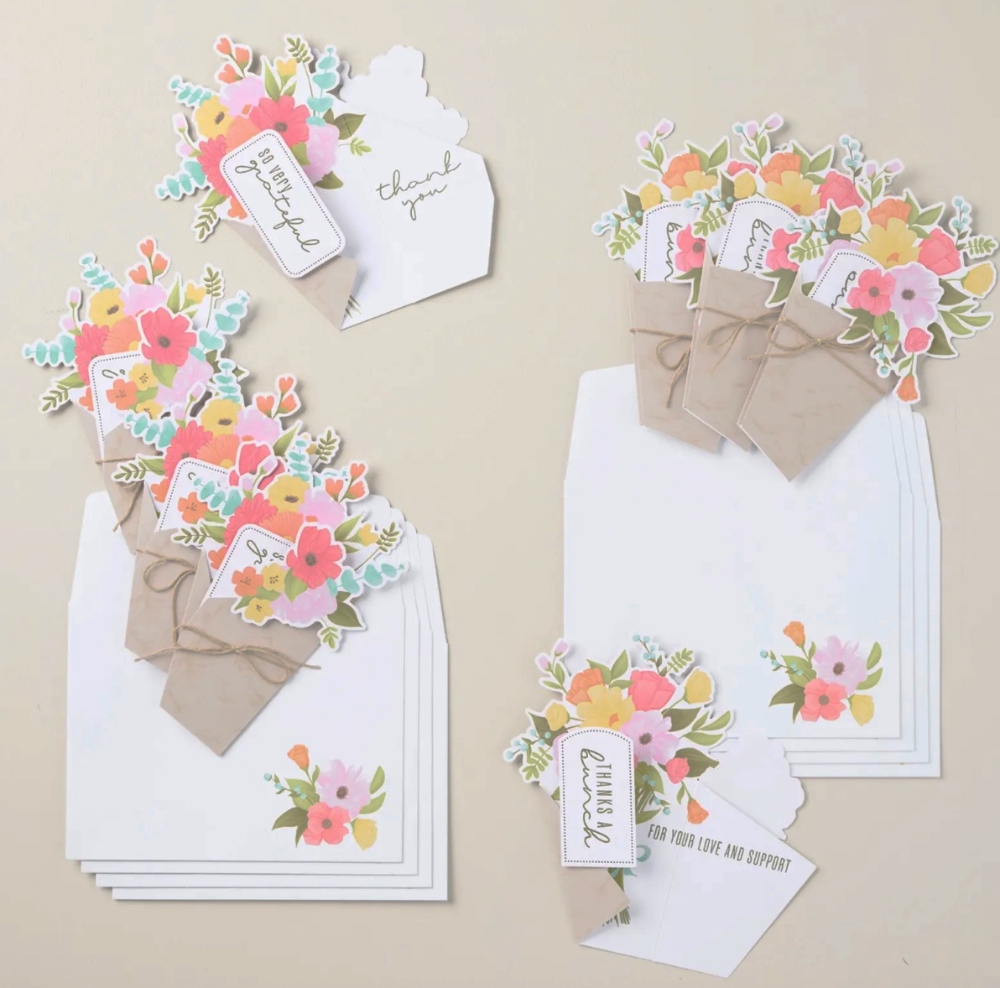
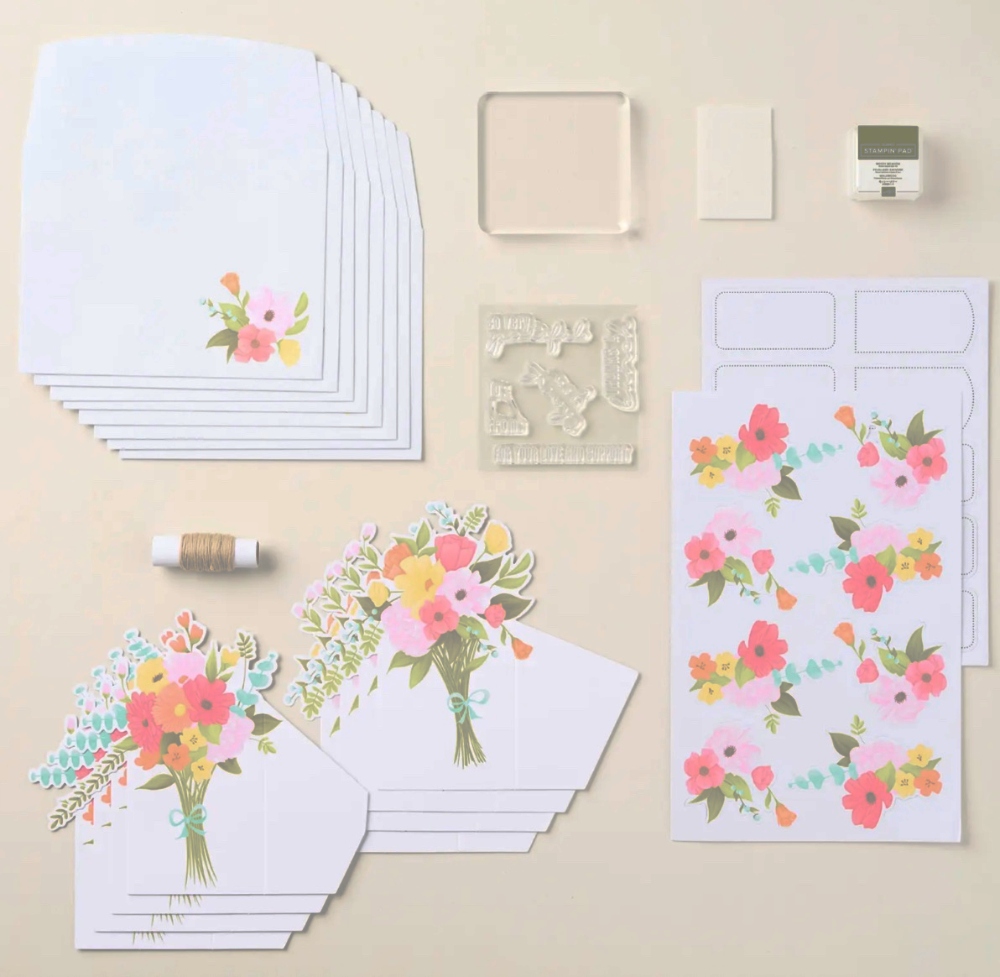
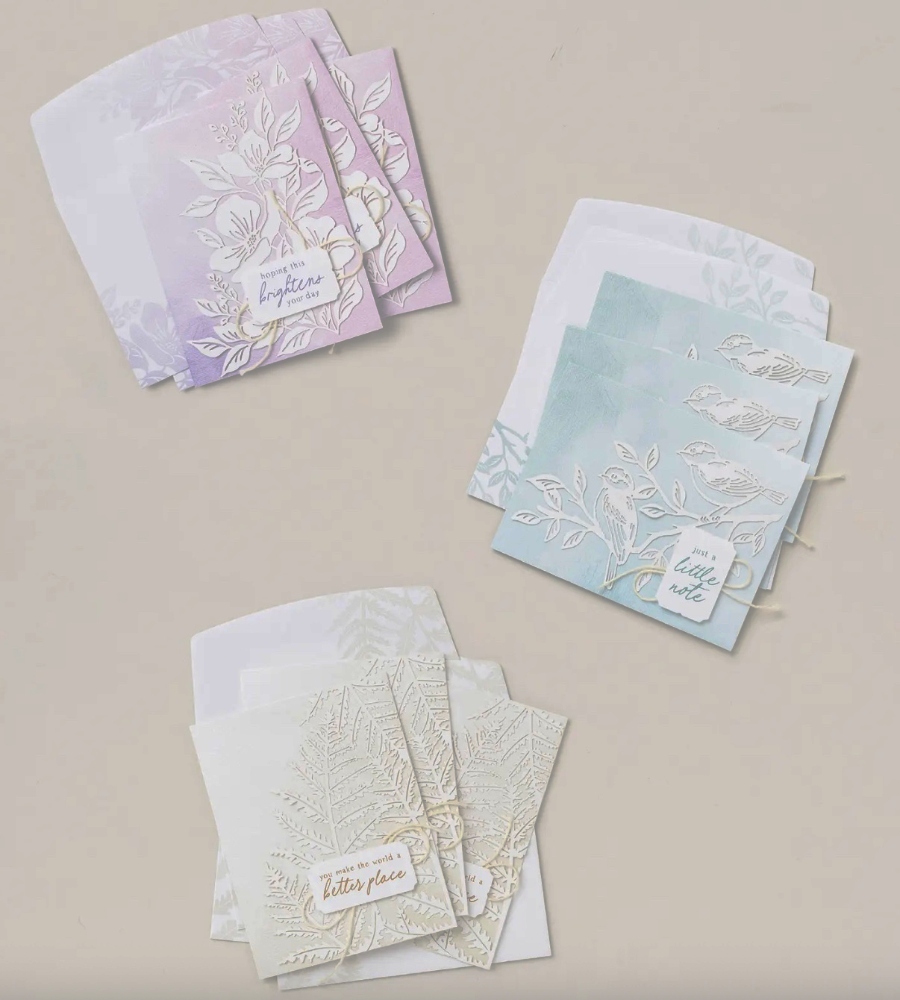
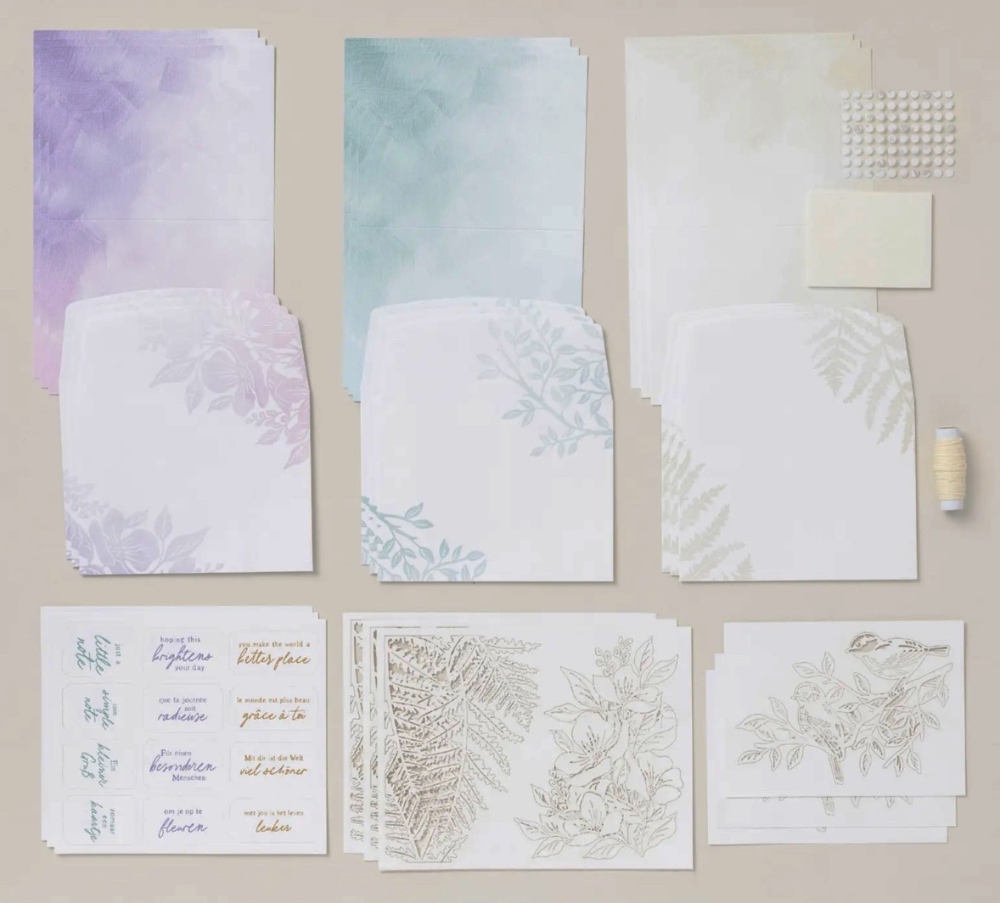
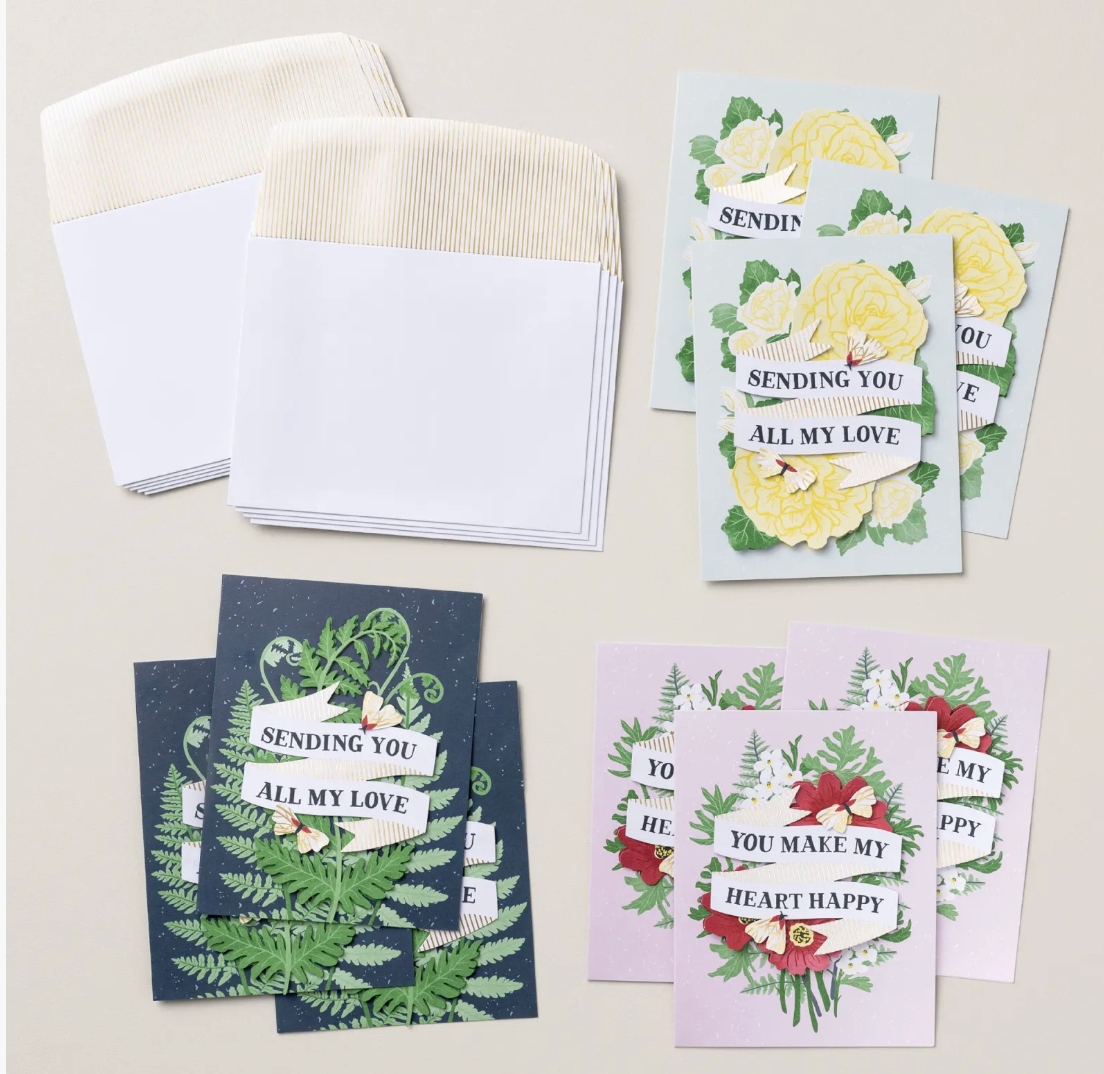
Create thoughtful cards with a botanical motif and heartfelt sentiment! Makes 9 cards, 3 each of 3 designs. Click the link above.

Kits Collection As You Grow Kit Dec 2025

The As You Grow Kit

Something different and wonderful to create for your own child or to make as a gift!

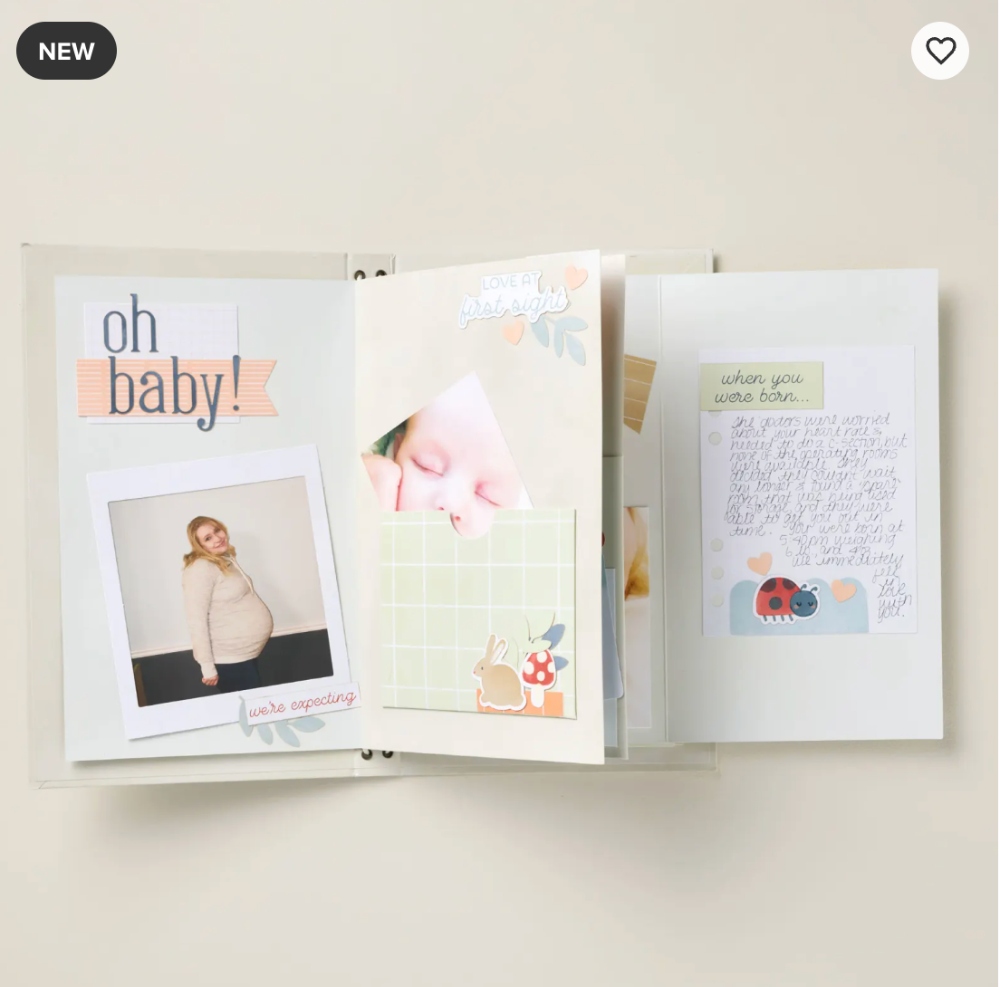
Create an adorable album to capture baby’s first year with the As You Grow Kit. This all-inclusive kit has everything you need to document sweet memories each month. With plenty of letter and number stickers and pockets for holding extra treasures, personalizing the album is a breeze! From baby’s first moments to first birthday, keep track of every unforgettable milestone with this kit!

DETAILS
– Makes 1 album
– Album size: 5-3/4″ x 9-1/4″ x 7/8″ 
– Colors: Basic Beige, Cajun Craze, Cloud Cover, Crumb Cake, Daffodil Delight, Pecan Pie, Petal Pink, Secret Sea, Soft Sea Foam, Timid Tiger
– Sentiments printed in English, French, and German

Kit includes one of each item listed below.
– Hard paper-wrapped album cover with elastics
– 2 fold-out pages
– 2 pages with pockets
– 3 precut printed journal pieces
– 12 sticker sheets: 3 sheets of sentiments (1 per language), 9 sheets of images, numbers, letters, and more
– Project suggestions (Feel free to get creative—follow the project suggestions or assemble any way you like)
– Adhesive

SHOP THE KITS COLLECTION!

Lots of choices and would make great gifts!

Make a Decorative Trees Gift Bag

Decorative Trees Gift Bag

I guess it’s time to be wrapping holiday gifts, if you’ve done your shopping, that is! One of my favorite things to do is create decorative gift bags for any occasion, such as this Decorative Trees Gift Bag, perfect for a Christmas gift.

You may have shopping bags like this kraft one from shopping at certain stores, usually nice gift shops. Even if they have the store name on the front, you can usually cover that up with your decorating. You can also buy a pack of gift bags in various sizes like this one, or sometimes in white or colors, at a craft store. It’s just like making a card except on a larger canvas! Creativity knows no ends!

This gift bag is actually the third version of my original idea. Actually, it’s not even close to my first idea except for involving Christmas trees, but creativity often evolves as you work on your project. I saw the Decorative Trees Stamp Set on my shelf and it is still current, on the Last Chance List discounted 50%! When I looked it up in the Stampin’ Up! Online Store, I saw a cute idea for a card which I just translated to a bag. Perhaps you have this stamp set from last year or whenever it came out.

For the background on this bag, I stamped the greeting “O Christmas Tree” in the stamp set diagonally across the bag in Crumb Cake ink. Then I stamped three different colors of trees, just the outline, in Garden Green, Shaded Spruce, and Old Olive. I didn’t want to look for the dies, but there are some although not available at Stampin’ Up!, so I just cut them out by hand. The first two are embossed and the third on has stamping on the inside. The first one is embossed with the Dotted CIrcles Embossing Folder. The second one is embossed with the Forever Plaid folder. I added a little Pecan Pie trunk to each tree. The center tree is popped up with Stampin’ Dimensionals.

If you don’t have tree stamps or dies, just cut some out by hand! We’ve all drawn Christmas trees by hand at least when we were kids, so just channel your inner child! If nothing else, just draw a triangle!

Then the fun began! Decorative the trees and bag with embellishments! Use whatever you have! The first tree has current Traditional Sparkling Sequins in gold and Pool Party (which almost looks like silver). The middle tree has retired Cherry Cobbler and Clear Berries gems (some name like that). I colored the clear ones with a Dark Cherry Cobbler Stampin’ Blend marker to look like berries. Some are in sets of three, some single. The third tree has adhesive gold stars in a strand that a special friend brought me all the way from Japan! They fit perfectly on this tree! And because I came across them, I used the small white stars in the Shimmer Star Foam Stickers to look like little stars or even represent little snowflakes.

Even though my first idea was to use a white paint pen and form a tree shape by drawing small snowflakes on the kraft bag, I thought I should make something that other stampers could copy. But if you wanted that look, you could use white craft ink and a snowflake stamp. There’s always a work-around for ideas!

You probably have a bag of bags in your house somewhere so check it out and personalize a bag or even gift wrapping. If you run out of fancy wrapping paper, use the kraft-colored grocery paper bags or plain wrapping paper. You can always decorate these things with your stamping and scrapbooking supplies!

Decorative Trees Gift Bag

Last-Minute Thanksgiving Ideas

Thanksgiving Place Cards

Make Place Cards For Thanksgiving Dinner

I used to love to make placecards, even just for regular family dinners with the grandparents! Sometimes my grandma had little seasonal stickers I could just stick on a folded paper with a name! Here are some easy ideas for your Thanksgiving table!

Turkey Sour Cream Treat Holder Side View

Turkey Sour Cream Treat Holder For Thanksgiving

This “sour cream container” turkey is easy to make and this treat idea is great for many occasions! Just make the easy container and cut out some tail feathers by hand or use a leaf punch or whatever you have!

Ribbon Turkey For Thanksgiving

Ribbon Turkey For Thanksgiving

Punch out a couple of circles and adhere various ribbons to the back for tail feathers! Add a backing to cover up the ribbons on the back. Super easy and something different.

Thanksgiving Punch Art Turkey Candy Bar Wrapper

Thanksgiving Punch Art Turkey Candy Bar Wrapper

I love decorating candy bars, big and little, for any occasion! Cover the candy bar with designer series paper or cardstock and add a punch art turkey or Thanksgiving image and greeting.

Top Note Thanksgiving Cello Bag Treat

Top Note Thanksgiving Cello Bag Treat

All you need is a little bag and a topper of any kind to decorate a little treat bag with candy or maybe a fancy cookie or other treat! Add a little Thanksgiving-type decoration or greeting and you’ve got a nice dinner favor or small hostess gift.

Nutcracker Tags Made From the Kit

Nutcracker Tags

I knew I wanted this Nutcracker Tags Kit the minute I saw it in the Stampin’ Up! Online Store! I could tell the tags would be so cute for Christmas gifts and maybe even to make into a card. Each nutcracker image is printed and diecut in bright festive colors. To embellish them, just adhere pieces of their costume with Dimensionals to the tag. Tie them onto a background striped tag and all you have to do is write your “To: From:” on the back when you add them to a gift. No stamping is required. Just add the pieces, the sentiments, and tie the tags together with the black baker’s twine. The tags and sentiments even have gold glitter to make it look extra festive and high-quality.

The Stampin’ Up! Kits Collection is great for anyone to make! I had the opportunity to stamp with my great-niece and worked along with her as we made cards from three different kits and she could easily do it. In fact, after a little while she didn’t even want to follow the directions, she just wanted to make her own creation with the contents in the kit! And that’s fine! The Kit is yours! If you want to change anything or add any of your own products, like extra cardstock, just go ahead and have fun!

At this time, the Nutcracker Tags Kit is sold out. It says “Currently Unavailable” and you can add your email address for Stampin’ Up! to send you an email if and when they get more in stock. I hope they do get more in stock because I really do like this kit. You would still have time to order and make the kit if they are restocked in the next few weeks. I hope so!!

But if you did already purchase the Kit, this is your reminder to get it out and make the cute nutcrackers! Your gifts will look more luxurious and festive with these tags!

SHOP STAMPIN’ UP! ONLINE HERE!

More Halloween Treat Boxes

Halloween Treat Character Boxes

I’m going to show you the last of my Halloween Treat Boxes I have made for the trick-or-treaters this year! Hopefully we will get a decent number of kids, but we don’t get as many as we had years ago.

These darling character boxes you see in the top photo I found online at www.stampingamore.com. This lady has made quite a few of these style boxes for different seasons and every one is cute! She has videos so you can watch and make at the same time.These boxes are super easy to make and then you just make whatever face or design you like on the front.

The first one I made, watching the video, was Dracula, the purple box. It turned out so cute I wanted to make more. The next one of hers that I copied is the black cat with a witch’s hat. I think I added some extra glimmer stars that I punched out. I did pull out some retired punches for all of these projects.

Next I made the green Frankenstein box. It is her design but by then I could whip up a box pretty easily and I’ve made lots of Frankenstein boxes and cards through the years.

By then I was ready to strike out on my own with the pumpkin box. I copied a face I saw on Pinterest but I think it was an ad and didn’t give a name. I wanted something to make it look more like a pumpkin so I simply cut a piece of cardstock in a curve and then sponged on Pumpkin Pie ink along that curve to give the pumpkin it’s curves! I dug out a retired stamp set with leaves the sizes wanted and stamped and fussy-cut some fall leaves in various colors of green and orange. The stem of the pumpkin is just a piece of Pecan Pie cardstock I cut by hand, with no thought! I tied a bow with some orange and black baker’s twine. I really liked my pumpkin treat box!

Halloween Pumpkin Treat Box

I also wanted to make a ghost. I just drew the ghost freehand because a ghost can look like almost any shape! The box is black but I sponged on some white kraft ink to look spooky. I also edged the ghost with a Smoky Slate Stampin’ Blend marker. To make the ghost even cuter, I die cut the letters for “Boo” in the Alphabet A La Mode Dies.

Halloween Pumpkin Treat Box

Here are all the treat boxes with cello bags of candy!

Halloween Treat Boxes with Candy

At the last minute I found some Square Pillow Boxes in my stash so I thought why not decorate those and fill with candy for Halloween! I pulled out my retired Cat Punch and also used the Spooky Sweet Designer Series Paper.

Halloween Square Pillow Boxes

I wanted this pillow boxes to be quick and easy so I just sponged on some Gorgeous Grape ink only on the front and on the top flap. I cut some circles in the Stylish Shapes Dies for backgrounds. And for embellishment, I added some little black adhesive stars that I had from “somewhere”, maybe a Paper Pumpkin Kit, and the fun Shimmer Foam Star Stickers and some rhinestones and sequins for a collar on the black cats.

And finally, one more Book Treat Box treat! This one has a stamped character from the Spooky Halloween Stamp Set, colored with Stampin’ Blends. It was so fun decorating these Book Treat Boxes!

Happy Halloween Book Treat Box

Halloween Mini Silver Gable Box

Halloween Mini Silver Gable Box

This Halloween Mini Silver Gable Box is a mix of old and new! When you look in your stash, you never know what you might find! I found this package of Mini Silver Gable Boxes and I thought they would make good Halloween treat boxes with the proper decoration. Whether or not you have these exact gable boxes, this shows you how you can transform any small box into a Halloween treat box!

I don’t remember when we had these silver gable boxes. When I first joined Stampin’ Up! there were large gable boxes. My first customer bought some and tried stamping on them, but with the coating on the outside the ink would never dry! It’s better to wrap paper around them!

This was super simple to decorate! I looked in my Spooky Sweet Designer Series Paper and saw that this pattern with all the little candies, my favorite pattern in this package, would do with the silver box! I cut two pieces of that paper (out of scraps) to fit around the box and adhered it with Stampin’ Seal. The little Halloween guy is stamped with the Spooky Halloween Stamp Set in Memento ink, colored with Stampin’ Blends alcohol markers, and fussy-cut. He is popped up on Stampin’ Dimensionals on the front of the gable box.

The greeting is stamped from the same Spooky Halloween Stamp Set and cut apart in two strips in order to fit on the box. I used another piece of designer paper in the package for the layer for the greeting. Because I had the small star punch in the A Little Cheer Mini Punch Pack right there on my table, I punched out five stars from the Three Color Glimmer Paper (retired). You could use something else, like gold foil. They are adhered to the box lid and the front panel. With the retired Gingham ribbon, I tied a little bow on the box handle. Cute little box for the trick-or-treaters or just a little Halloween treat for someone in your family, a neighbor, or a friend.

Check your older stash once in a while and see what you have that you can use!

Mini Halloween Treats

Mini Halloween Treats

If you want to make some quick and easy Mini Halloween Treats, these are the ones you should make! I’ve made them in the past, but as I was cutting the paper I was thinking that these were going to be too small. However, they are not too small! Does anyone else think the Halloween candy this year is very small? Even if it is, it fits in this little treat holder and so would a slightly larger piece of candy.

Cut the cardstock at 5 1/2″ x 2 1/2″. Score at 2 1/4″ and 3 1/4″. Crease and fold. Decorate the front panel. A piece of designer series paper would be 2 1/2″ x 2″. For these two treats, I used the Spooky Sweet Specialty Designer Series Paper.

On the Granny Apple Green cardstock treat, I added a stamped character in the Spooky Halloween Stamp Set that is colored with Stampin’ Blend Markers. Those colors kind of hurt your eyes! For a small greeting, I found “Happy Halloween” in the Greetings For All Ephemera Pack. I cut the words apart to fit better on the treat, although I see the “Happy” is obscured in the photos by the Darling Duckling ribbon!

The Pumpkin Pie treat has “the other side” of one of the papers and then the diecut witch’s cauldron and potion in the package of designer series paper is adhered to the front. I simply wrote”Boo!” on a little scrap banner and added that plus two Shimmer Foam Star Stickers. Who knew the Mossy Meadow & Gold Ribbon would be perfect for Halloween?

Put the candy inside (maybe using a bit of adhesive or glue dot to hold it in place) and punch a hole in the top. Tie shut with ribbon. Or perhaps you would want to staple the treat shut.

You can make these as cute and fancy as you like, depending on who you will be giving them to. Or just keep them super simple because a child is probably just going to rip it open to get the candy! You can vary the measurements if you want a larger treat holder to fit a larger candy. Just have fun with it because it is fun to make these cute little treat holders!

Mini Halloween Treats Side

Halloween Spooky Book Treat Box

Halloween Spooky Book Treat Box Inside

I’ve spent a lot of time looking for ideas for Halloween treat box ideas, and at some point I was reminded of the Book Treat Boxes that Stampin’ Up! came out with last year. They weren’t retired and now you will find them in the Stampin’ Up! Online Exclusives. I still had a few left in the package so I decided to try my hand at decorating them for Halloween treat boxes. This Halloween Spooky Book Treat Box is really easy to make! The boxes come already scored so all you have to do is fold and crease. They even come with adhesive on them where you need it to assemble the box inside and the book cover that surrounds the box.

To decorate these boxes, I used the Spooky Sweet Specialty Designer Series Paper. You can just put some simple effort into decorating these boxes or you can do a lot extra, like covering every surface that shows with paper, adding extra embellishments, styling the inside of the box in different ways. It’s all up to you and the occasion.

After folding all the score lines on the two pieces of the Book Treat Box, I adhered pieces of the “generic” sides of a couple of the Halloween papers….for the cover, the book spine, the back side and the three sides that show of the box. The cover and back of the cover is 3″ x 4″. You can trim the little rounded corners with a scissors. The spine of the cover is 1″ x 4″. Don’t adhere the paper to the front of the cover until you think about the closure. The box that goes inside is easy to assemble and has adhesive. You can adhere the designer paper before you assemble it or after or even after you adhere it to the cover. The box is adhered to the back inside cover and adhesive is already provided there. Take your time centering the box exactly how you want it. The sides measure 1″ x about 3 3/8″ and 1″ x 2 3/4″ if you want to cover them.

The only “tricky” part if figuring out how to keep the box closed after you decorate it. I forgot that part on the first box I made for Halloween! There are different ways you can do it. You can wrap a ribbon around, but it might disturb your design on the front. But you can slip the ribbon underneath the paper and tie the closure shut. Or you can pop up the cover with Dimensionals so there is space underneath your cover design to slip the closure tab underneath. Or you can put something popped up on the cover, like a layered circle or something and tuck the tab underneath that.

For this box on the top there is a generic paper covering the cover. Then I trimmed down one of the front porch scenes from the Spooky Halloween paper to layer on a piece of Pumpkin Pie cardstock. This whole piece is popped up on Stampin’ Dimensionals so that I could slide the tab of the closure underneath it. Just mind where you put the Dimensionals so they don’t interfere with the tab fitting underneath and not catching on the sticky Dimensional.

To embellish a little bit, I stamped the word “Spooky” from the Spooky Halloween Stamp Set and trimmed it down. I took my Timid Tiger Stampin’ Blend marker that was on my table and just ran the side of it along the edge of the greeting to make it stand out a little bit. That word is popped up on Dimensionals. I also added three purple Shimmer Star Foam Stickers to the scene.

Inside the box, you can add a piece of designer paper or cardstock if you like. And for Halloween you might even like to add a surprise, once the person takes out or eats the candy! You could draw a ghost, cut it out, and adhere it inside, or for this box, I added the diecut image from the designer paper of the hippo. Just add the Halloween candy to the box, secure the closure, and you have a cute little Halloween treat box to give out!

Halloween Triangle Boxes

Halloween Triangle Boxes

I have made many, many of these triangle boxes of various sizes through the years. They are so easy and can be made for any occasions! So here are a couple of Halloween Triangle Boxes you can try! Just remember to put candy inside before you tie the ribbon!

These are made with a piece of paper cut 4″ x 8″. You can make the size bigger or even smaller. Score in half at 4″. Make a mark at each end at the half spot which on these boxes would be 2″ on the 4″ end. The scoring will look complicated, but it will not be. The box is scored from the 2″ mark on the end to the 4″ center score line. Therefore, you will be scoring at an angle on each side, from the halfway end mark to the center score line.

Halloween Triangle Boxes Sides

Check out the sample below where you can clearly see the score lines and creases. As you go along, you will gather the two end folds together and punch a hole through both sides on each end. I used my retired Crop-A-Dile to punch the holes but you can use any hole punch you have.

Triangle Box diagram

After all the scoring, fold and crease each score line and punch the holes, unless you want to just glue the sides together after putting the treat or gift inside.

Halloween Triangle Boxes Sides

Halloween Triangle Box Open

Decorate your triangle box however you like! You can tie the ribbon to close the box and then decorate, but depending on what you are doing, it may be easier to decorate the front while it is flat and then close it up.

I used the Spooky Sweet Specialty Designer Series Paper for the one box. The candy paper forms the triangle box and then the figure on the front is cut out from another paper in the package. I simply punched a 2″ circle for behind the figure to help it stand out against the busy background of the box. I used part of a greeting in the Spooky Halloween Stamp Set and trimmed it down to be narrow with a banner end and popped it up on Mini Dimensionals. The box is tied with the Timid Tiger 3/8″ Faux Linen Ribbon.

The second box is made with Gorgeous Grape cardstock. Using cardstock makes the box a little sturdier. I decorated it with some Halloween diecuts that are included in the Spooky Sweet Specialty Designer Series paper. The box is tied with the Darling Duckling Faux Linen Ribbon, one of the new In Colors. Instead of a greeting, I added several of the Shimmer Star Foam Stickers

There are SO many possibilities with making these triangle boxes. Here is one blog post with last year’s Halloween triangle box. And another Halloween triangle treat box from the year before.

Try one of these Halloween Triangle Boxes for a few small pieces of candy or a small gift!

Halloween Triangle Boxes Sides

Day 2! Stampin’ Up! Kits Collection Sale!

Kit Collection Sale Oct 2025 Info Frame

Choose from all kinds of Kits in the Stampin’ Up! Kits Collection for a savings of 10-30% off! This sale even includes the newest Kits, just released October 1st! These kits come with all the supplies you need and are easy enough for anyone to make! Directions are included and you can even watch a video if you like (and I always watch the video regardless!). These Kits make birthday cards, home decor, all-occasion cards, small scrapbook-type albums, plus Kits for the fall and Christmas holidays!

Here is the Christmas Ornaments Kit in the Kits Collection that came out last year! I bought this kit and made these ornaments. I used them for an extra decoration on gift bags and packages which the recipient could then save and use on their Christmas tree or as a little decoration in the home or on future packages. A glue gun was helpful with this kit. It was fun to make and very nice! On some of the ornaments, I added some extra touches or just changed up the design a bit. You can do that with any of the kits if you like!

Christmas Ornaments Kit Stampin' Up! Kits Collection

Here is my blog post talking about making this Christmas Ornaments Kit! Put this Kit on your order if it is still available! Gold Hoops and little pinecones all included!

Sale Details:

  • All kits in the Kits Collection are 10–30% off.
  • Sale runs October 6th – 8th only.
  • Available while supplies last.
  • Sale excludes Paper Pumpkin, Scrapbooking Workshop Kits, and Starter Kits.

Choose your favorite Kits and maybe get some as gifts!
Shop early for the best selection!

Shop the Kits Sale Today!

3-Day Stampin’ Up! Kits Collection Sale!

Kits Collection Sale Oct 2025 Banner Info

This three-day sale is the perfect opportunity to stock up on your favorite kits from the Kits Collection. Our kits come with everything you need for a fun and creative experience. From season’s greetings to birthday wishes to home decor, you can find almost anything to suit your crafting needs in our Kits Collection. And with up to 30% off, now’s the perfect time to grab that kit (or two, or three!) that you’ve been eyeing. Some kits may sell out faster than others, so don’t wait to start shopping on October 6!

So many choices! But here is a Kit I would buy right now! It’s the Haunted Home Kit! I made my kit this past weekend and I was SO happy with how cute it is! My daughter was here and she liked it and even my husband commented that he liked it!! So you know it’s GOOD! It’s not teeny tiny either! Also, I used the cardboard that backed the package of supplies, covered it with some greenish designer series paper to look like grass and used that as a base for my Haunted Home! I can set the fence on that as well, but the tree has to go separately. I did use hot glue to assemble the house as the kit suggests. I also used it on the base of the house to adhere to the grassy base I just mentioned, but now I’m thinking maybe I should have left it unattached so I could put a flameless candle inside to like it up from the inside which would show through the yellow vellum windows.

Haunted Home Kit House Front

It’s not difficult to make, except maybe for the roof! The roof is in two parts – the main roof and the little roof on top of the top window. I just watched the video a couple of times until I got it!

Haunted Home Kit House Back

Here is the back side. Even on the back side it is cute with all the windows and shutters!

There are lots of fun kits to choose from and they are designed for anyone to make them. You don’t have to be a stamper or crafter! Just follow the pictorial directions or watch the video! Change up any kit if you like. The supplies are all there for you to use!

SHOP THE KITS COLLECTION TODAY!

Shop early for best selection, of course! Sale ends Wednesday!!

Elegant Pine Snowflakes Gift Bag

Elegant Pine Snowflakes Gift Bag

It might be a little early for Christmas gift bags, but I wanted to use this pretty paper on a gift bag to show it off, so here is the Elegant Pine Snowflakes Gift Bag. If you look through the Elegant Pine Snowflakes Designer Series Paper, you will find this one paper with this huge pine snowflake centered on the paper. How can any one cut up that sheet of paper with that design?! It would be beautiful on a scrapbook page….as long as you didn’t put any photos on it! So my best solution was to center it on a large gift bag!

You might have collected kraft or other gift bags from certain stores that you can use for gift bags. Or you can buy a bunch of them at a craft store, small or large. This bag is 10″ wide so I just trimmed an inch off each side of the designer paper. It is 7 1/4″ from top to bottom. For a border piece on the top and bottom, I was just going to have cardstock, but then I noticed the strips I had cut off from the designer paper, turned them over, and used those. To help offset all the colors and paper designs, I cut strips of Shaded Spruce. You can make these any widths you like. I made the top designer paper strip about 1 1/4″ wide, with 1″ showing and a little bit wider at the bottom. The Shaded Spruce cardstock strips are both 1/2″ wide.

Every gift bag needs a gift tag! I found an already diecut circle of Gold Foil using the Stylish Shapes Dies in my gold foil package. For the greeting, I used “merry & bright” in the Greetings For You Ephemera Pack. These are peel-and-stick greetings in golf foil so they are very easy to use. I also fussy-cut some foliage from the designer paper to decorate the tag. I used some retired Cherry Cobbler ribbon to tie the tag to the bag.

After I took the first photo of the bag, I realized the tag didn’t show up very well plus I remembered I intended to put some red berries gems on the tag to match the berries on the paper. These Cherry Cobbler & Pearl Adhesive-Backed Berries are perfect to go with this paper. You could also add some on the designer paper on the bag.

Elegant Pine Snowflakes Gift Bag Tag closeup

I love to decorate gift bags like this for any occasion and we’ll certainly need a lot of them for Christmas so it’s a good idea to start making some!

SHOP STAMPIN’ UP!

THREE New Kits From Stampin’ Up!

Three New Kits Banner Aug 2025

The Stampin’ Up! Kits Collection has many papercrafting kits to choose from for all kinds of interest. These Kits include predesigned projects that come in lots of different project types! Each Kit is easy enough for anybody to make. All materials you need are supplied, with directions and even a video you can watch. These are perfect for new crafters or experienced crafters who want quick and easy projects.

Here are the three new Kits just released on Tuesday, August 5th!

Harvest Home Garland Kit

Harvest Home Garland Kit

Create this beautiful garland for your autumn home decor with the Harvest Home Garland Kit. Layer die-cut leaves—including hints of copper foil—for a rich, nature-inspired look. The Kit makes one garland that is 5’5″ long. Colors in the Kit are Cajun Craze, copper, gray, Lost Lagoon, Old Olive, Pecan Pie, Very Vanilla, and white.

Harvest Home Garland Kit Contents

Bunch of Thanks Kit

Bunch Of Thanks Kit Aug. 2025

Brighten someone’s day with handmade floral cards from the Bunch of Thanks Kit. With hand-drawn designs, heartfelt gratitude sentiments, and preprinted pieces, this all-inclusive card making kit helps you craft stunning cards in minutes—no extra supplies needed.

DETAILS
– Makes 8 cards: 4 each of 2 designs
– Folded card size: approx. 3-3/4″ x 5-1/2″ (9.5 x 14 cm)
– Colors: Bubble Bath, Coastal Cabana, Crumb Cake, Daffodil Delight, Early Espresso, Old Olive, Mossy Meadow, Strawberry Slush, Timid Tiger
– Also available in French

Kit includes one of each item listed below.
– Bunch of Thanks Photopolymer Stamp Set
– Clear stamp block
– Mossy Meadow Classic Stampin’ Spot
– Step-by-step instructions
– 8 printed envelopes
– Adhesive

Bunch of Thanks Kit Contents

Brighten Your Day Kit

Brighten Your Day Kit Aug 2025

Create easy to assemble, nature-inspired cards with the Brighten Your Day Card Kit. The delicate, organic overlays and soft pastel colors pair beautifully with friendship and encouragement sentiments.

DETAILS
– Makes 9 cards: 3 each of 3 designs
– Folded card size: 4-1/4″ x 5-1/2″ (10.8 x 14 cm)
– Colors: Balmy Blue, Basic Beige, Fresh Freesia, Highland Heather, Lost Lagoon, Pecan Pie.
Sentiments printed in Dutch, English, French, and German

Kit includes one of each item listed below.
– Step-by-step instructions
– 9 printed envelopes
– Precut overlays
– Adhesive

Brighten Your Day Kit Contents

SHOP the Stampin’ Up! Kits Collection and see which Kits you would like to make!

Sweet & Spooky Kit Treat Boxes

Sweet & Spooky Kit Three Treat Boxes

If you are a Halloween lover as I am, you will want to get this Sweet & Spooky Kit in the Stampin’ Up! Kits Collection. Get a head start on Halloween! I only put together three of the treat boxes for the sake of storage at the moment, but I’m going to make all the tags to put on the boxes and then they will be almost ready to go at Halloween! Any of these, especially the one that looks like a haunted house, would make a cute Halloween decoration in your home!

The treat boxes are all easy to make! Sticky strip adhesive is even included. The boxes are all scored so all you have to do is crease on all the folds, maybe run a Bone Folder or something across the creases just to make them folded crisply, then adhere the sides and bottom. The directions show you exactly where to put the adhesive tape. The fun part is making the tags and the directions show which pieces you need and where to put adhesive. Just clip on to the box with the cute orange paper clips and the black & white twine tied through the tag.

Sweet & Spooky Kit Package

In your kit, you will find the package with directions and all the supplies you need.

Sweet & Spooky Kit contents

All the supplies are included in the kit in one package! In this kit you even get some star gems to embellish the treat boxes and tags.

Sweet & Spooky Kit Two Treat Boxes

Here are two of the finished treat boxes. You can always use the kit supplies however you like. If you wanted to, you could mix up the tag pieces and make your own creations.

Sweet & Spooky Kit Boo Treat Bag

Here is the third treat box with its cute “hey Boo” tag and a bat! These boxes hold plenty of candy, too! They are not small little treat boxes! I found this Sweet & Spooky Kit to be very cute and easy to put together! If you like Halloween, I say get this kit, maybe two kits!

Here are the Kit details:
– Makes 15 treat boxes: 5 each of 3 designs
– Colors: Basic Black, Bubble Bath, Fresh Freesia, iridescent, Pumpkin Pie

Kit includes one of each item listed below.
– Step-by-step instructions
– Printed and iridescent-foil precut pieces
– Paper clips
– Pressed wood picks
– Baker’s twine
– Adhesive-backed holographic stars
– Adhesive

You can even watch a video of Sara Douglass putting the kit together if you aren’t sure about something.

All of the Kits in the Stampin’ Up! Kits Collection are easy enough for new crafters or non-crafters and fun for experienced crafters as well! It’s fun to just open the box and get started on a project without having to think up your own idea! Try one and see for yourself!

SHOP STAMPIN’ UP! KITS COLLECTION!

Get the Haunted Home Kit While You Can!

Kits Collection Haunted Home Kit

You may remember that this Haunted Home Kit in the Kits Collection came out last year and sold out before Halloween! Stampin’ Up! said they would make it available again this year and it is in the Online Store NOW. Due to the popularity last year, I’m thinking if you want this, although it is July, order it now in case it should sell out again! Also, “some” Kits in the Kits Collection will have a price increase July 22. I don’t know which ones, but it would be a good time to get this Kit and any others you are interested in this week!

This Kit comes with all the materials you need to make your own haunted paper house with cardboard walls, vellum, and other pieces to accessorize. Just follow the directions to assemble the house, then add your own ghostly touches to it if you like!

Kit includes:
*Cardboard Home Pieces
* Predesigned projects
* Step-by-step instructions
* Precut vellum and die cut paper pieces
* Enough adhesive to complete projects
*A 10-1/2″ x 8-1/2″ x 1-1/4″ (26.7 x 21.6 x 3.2 cm) printed designer box for storage or crafting on the go.

Product colors: Basic Black, Crushed Curry, Gray Granite, Moody Mauve, Pumpkin Pie

Kits Collection Haunted Home Kit

AND….you might want to order two Haunted Home Kits and decorate one for Christmas! Yes, some people did that last year! You can use the pieces however you like. Now you might have to use some creativity to see how to make it into a Christmas house….or any other house….but I’m sure you can do it!

Get the Haunted Home Kit before everyone else does!