Tag Archives: True Beauty Stamp Set

True Beauty Flowers on Rings of Love Paper Card

True Beauty Flowers on Rings of Love Paper

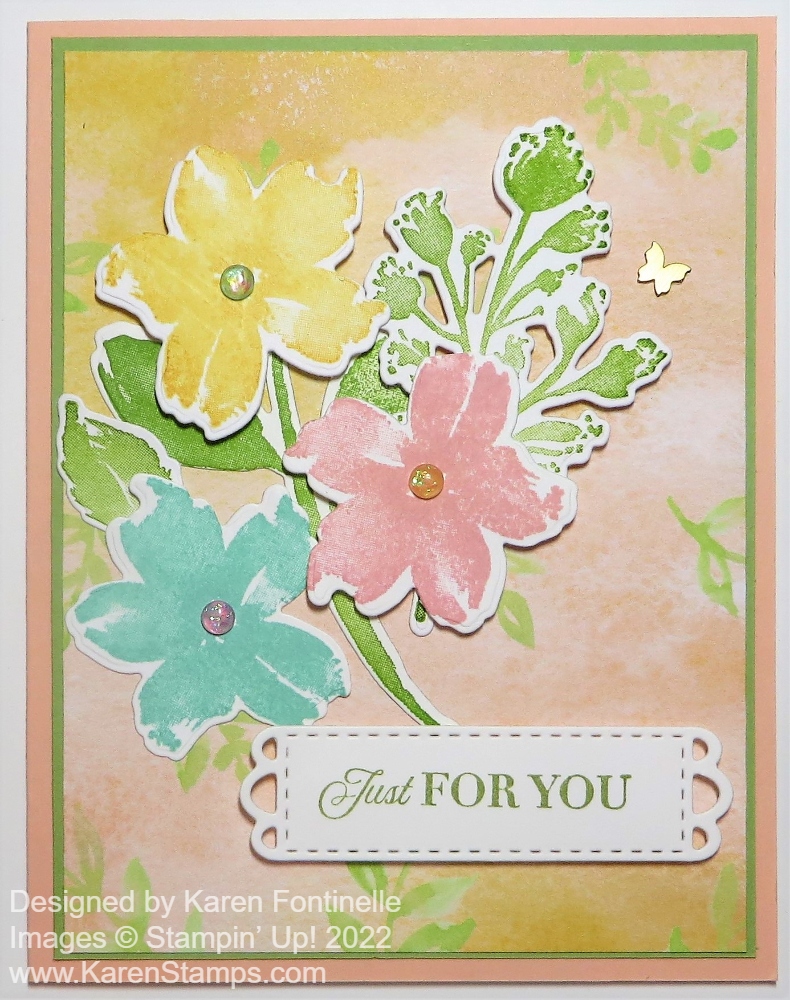
I was surprised to find the background of this card was the design on the back of the paper I used to make the gift bag on yesterday’s post. That side of the paper looks so “fallish” and this side of the paper is light and “springish”! But it caught my eye and I thought it would make a pretty card! And that’s how this True Beauty Flowers on Rings of Love Paper Card began!

I chose Petal Pink for the card base as it is one of the coordinating colors for the Rings of Love Designer Series Paper. This paper is one that is FREE during Sale-A-Bration with a $50 purchase of any Stampin’ Up! products. There’s only a little more than a month left of Sale-A-Bration! I chose Pear Pizzazz cardstock for a layer under the designer paper. This pattern of the designer paper has a soft background of pink and yellow with printed leaves and stems scattered around. While I was trying out some ribbons to use on the card, I came across a stack of already stamped and die-cut flowers and leaves from the True Beauty Stamp Set. I played around with those on the card and came up with this design! Some of the flowers and leaves are popped up on Stampin’ Dimensionals and some are adhered flat on the card.

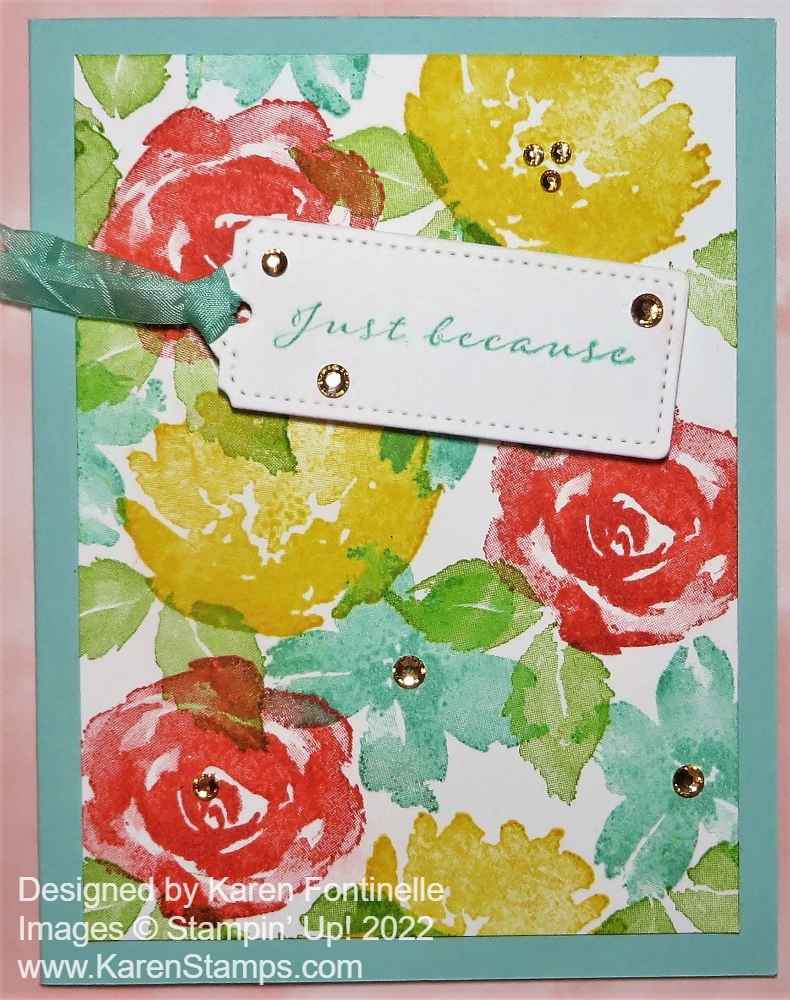
The greeting is stamped from the Celebrating You Stamp Set (a fantastic one for sentiments!) in Pear Pizzazz Ink. I used the die in the Meadows Dies to cut out the greeting. It is popped up on Stampin’ Dimensionals also.

For the finishing touch, I looked through all my embellishments and decided on the 2021-23 In Color Opal Rounds. I just chose colors that didn’t match the flowers for the flower centers and a little bling. I also love the Brushed Brass Butterflies and had to stick one on the card by the flowers!

Sometimes it is a surprise what goes together when you make a card or what you come up with that is unexpected! If you have trouble coming up with a design just look through your designer papers or samples in the Stampin’ Up! catalogs to copy or to wake up your inspiration!

SHOP STAMPIN’ UP! ONLINE HERE!

True Beauty Stamped Card

True Beauty Stamped Card

This True Beauty Stamped Card is not at all what I had in mind when I started to make a card! So you never know what you will end up creating, no matter what idea you have in your mind! And it’s okay if you don’t even have an idea in your mind, you will still create something.

I already had this True Beauty Stamp Set out as I used it on another project and some of the ink colors as well. I had some diecut flowers as well on my table, but in the moment I decided to stamp the flowers directly on the Basic White Cardstock. These flowers are a little large for a card front so it was difficult not to overlap them. But I decided that was okay! I still liked the way it looked and continued on with more flowers and leaves stamped in the spaces without getting too overdone!

The card base is Pool Party Cardstock with the Basic White stamped layer. I thought about putting an extra layer, either Basic White or Daffodil Delight under the stamped layer, but I liked it as it was. The stamped layer is a little smaller so the margins of the Pool Party show better. The Basic White layer is 5″ x 3 3/4″. The flowers are stamped in Calypso Coral, Daffodil Delight, and Pool Party inks with the leaves done in Granny Apple Green ink.

I chose a greeting from the same True Beauty Stamp Set, stamped it in Pool Party ink, and die cut it with one of the Tailor Made Tag Dies. I thought a Daffodil Delight ribbon would be good, but I changed my mind to Pool Party and colored the White Crinkled Seam Binding Ribbon with a Dark Pool Party Stampin’ Blend Marker. I popped up the tag with Stampin’ Dimensionals®. Since I saw some ink smudges on the tag (oops!) and added some Champagne Rhinestones Basic Jewels on the tag and around the card. It’s hard to stop!! There are a lot of other “bling” choices I could have used so use what you have.

Here is another card using the True Beauty Stamp Set with the flowers diecut and then adhered to the card front.

That’s all there is to this easy card. It’s fun to do some real stamping all over the page instead of doing a lot of diecuts and designer paper. In fact, if you wanted to make several cards at once, you could stamp randomly all over a piece of 8 1/2″ x 11″ cardstock and then cut it down for individual cards. Then you have made your own background and designer paper for your card! It feels good to stamp and stamp and stamp! Try it! I hope this True Beauty Stamped Card gives you an idea for a simple card using basic stamping!

Shop Stampin’ Up! Online Here! Don’t Forget the Last Chance Products!

True Beauty Floral Birthday Card

True Beauty Floral Birthday Card

I had so much fun decorating the Sweet Little Box on yesterday’s post, that I wanted to stamp and die cut more flowers and make a full-size card. I really wanted to try out the diecut background on this card. So here we have the True Beauty Floral Birthday Card!

I used the Shimmery White Cardstock, one of my all-time favorite papers. You can’t see it in the photo but this paper has just the slightest glimmer to it so it looks quite elegant, especially with flowers I think! I used the diamond-shaped lattice die, included with the other flower and leafy dies in the Organic Beauty Dies. If you have the Adhesive Sheets, you could attach that to the back of the paper you are using for this lattice die so that you can easily adhere it to your card or project after diecutting it. Or use teeny tiny dots of glue on the back. I cut mine out of Gold Foil.

The flowers are all stamped on Shimmery White Cardstock using the True Beauty Stamp Set and then diecut with the Organic Beauty Dies. You can get these stamps and dies together in the True Beauty Bundle and save 10%. I just chose some random colors for the flowers: Melon Mambo, Mango Melody, Daffodil Delight, Gorgeous Grape, and Granny Apple Green for the leaves.

I stamped and cut out a lot of flowers, stems, and leaves to play with. Then I just placed them around on the lattice background after it was adhered to the card front. Even when you have them how you like them, by the time you pick them up to apply adhesive, you might end up changing the design a little bit. I added some diecut stems and leaves, even one out of vellum.

The greeting is stamped from the Shaded Summer Stamp Set. It is die-cut with one of my favorite dies, this label die in the Meadow Dies. And for my favorite embellishment, I added some Iridescent Rhinestone Basic Jewels. You could add a different greeting on this card and it would still be appropriate. Flowers are good for lots of occasions!

Check out this Bundle or even the full Awash In Beauty Suite in the new Stampin’ Up! Annual Catalog and you will be ready to make all kinds of floral cards!

SHOP STAMPIN’ UP! ONLINE HERE!

Quick and Easy Awash in Beauty Card

Quick and Easy Awash in Beauty Card

When we talk about making an easy card, this Quick and Easy Awash in Beauty Card fills the bill! All you REALLY need is the designer paper and a card base!

The card base is Polished Pink although there are so many colors in the paper you could choose from many other colors. The Awash In Beauty Designer Series Paper is new in the Stampin’ Up! Annual 2022-2023 Catalog and is beautiful!

Awash in Beauty Designer Series Paper Package

As you can see, every paper is pretty enough to make a beautiful card! But one pattern, in particular, is interesting how Stampin’ Up! designed it. It is easy to cut up and make into cards.

Awash in Beauty Split paper

You could do lots of different things with this paper, depending on the size of the card you are making. I’ll describe how it works for this card. Since the paper is 12″ x 12″, you can cut it into three strips 4″ wide vertically to have the flowers on the top and bottom and white space in the middle. You can cut the strip in half at 6″ if you want but of course, that will be too long for a card. It needs to be cut at 5 1/4″ to fit on a card front. There you have a choice. If you want more white space at the top of your card then you can trim off a bit of the bottom of the flowers. If you want every bit of the floral part of the paper, then trim it 5 1/4″ from the bottom of the flower part. That’s what I did on this card so you can see how much white space you have at the top. If you wanted just a floral pattern on the left side of your card, you could cut it at whatever width lengthwise and could probably get two strips out of the one section. So you can play around with the paper to have differently designed cards!

Back to my card! I adhered the 5 1/4″ x 4″ piece of the Awash In Beauty DSP to the Polished Pink card base. For the greeting, I used a greeting in the True Beauty Stamp Set, part of the Awash In Beauty Suite. Then I cut it out with one of the Meadow Dies. I love this little label die! So pretty and almost the perfect size for a lot of greetings. I tied a piece of Polished Pink 3/8″ Open Weave Ribbon through the left side of the diecut. You could do both sides if your greeting isn’t so far to the right of the card. I popped it up on Stampin’ Dimensionals.

For a finishing touch, I added some Brushed Brass Butterflies flying among the flowers. For some sparkle, I added several Iridescent Rhinestones Basic Jewels on the greeting and the card. That’s all there is to it! That’s how you make the Quick and Easy Awash in Beauty Card with the pretty designer paper!