
If you are looking for a fairly quick Christmas card to make but still something a little special, this Painted Christmas Z-Fold Card might be the card for you! I have always thought a Z-Fold card, while easy to make, looks a little fancy. The only difference from a regular card is that you fold the front of the card back on itself.
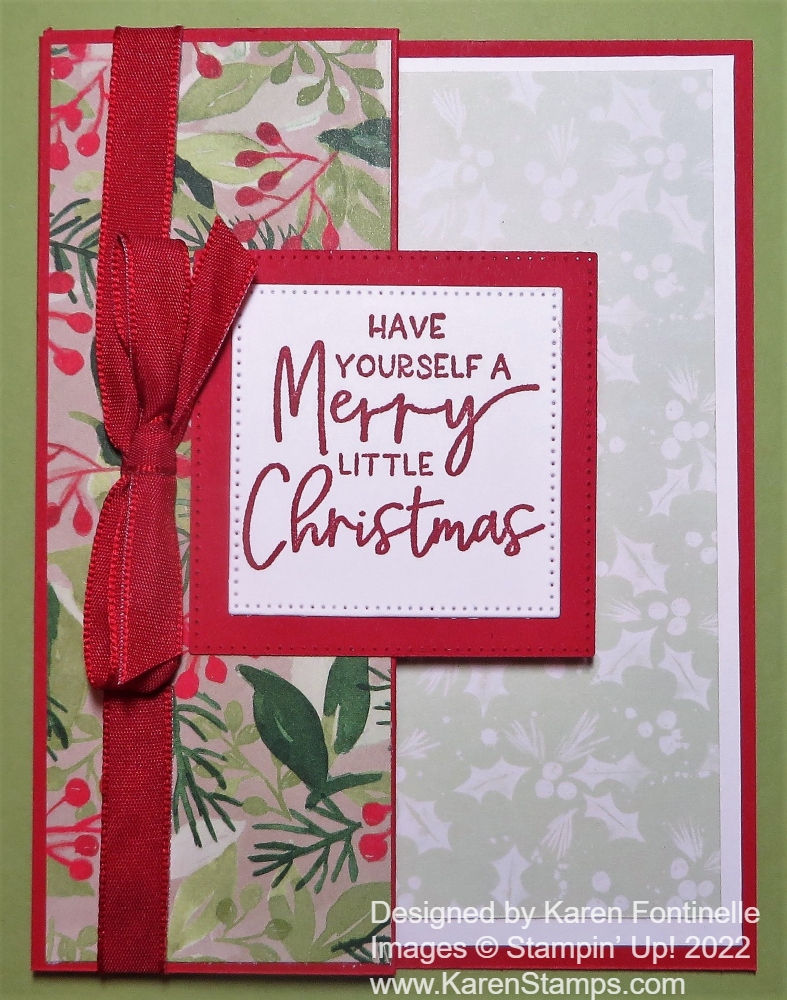
This Christmas card starts with a Real Red card base. After cutting the cardstock at 5 1/2″ x 8 1/2″, score it at 2 1/8″ and 4 1/4″. That gives you a score line on the front of the card. After creasing the card in half as you usually do, fold on the 2 1/8″ score line, which is the center of the card front, back toward the fold. See the photo below.
Depending on where you want to put the designer paper on this card, or stamping, choose which patterns you want to use and where you want to adhere them. On this sample, I cut a piece of the Painted Christmas Designer Series Paper for that narrow front area at 2″ x 5 3/8″. You can make it a bit narrower and shorter if you want. You could also add a piece on the inside of the front fold. I did not on this card.
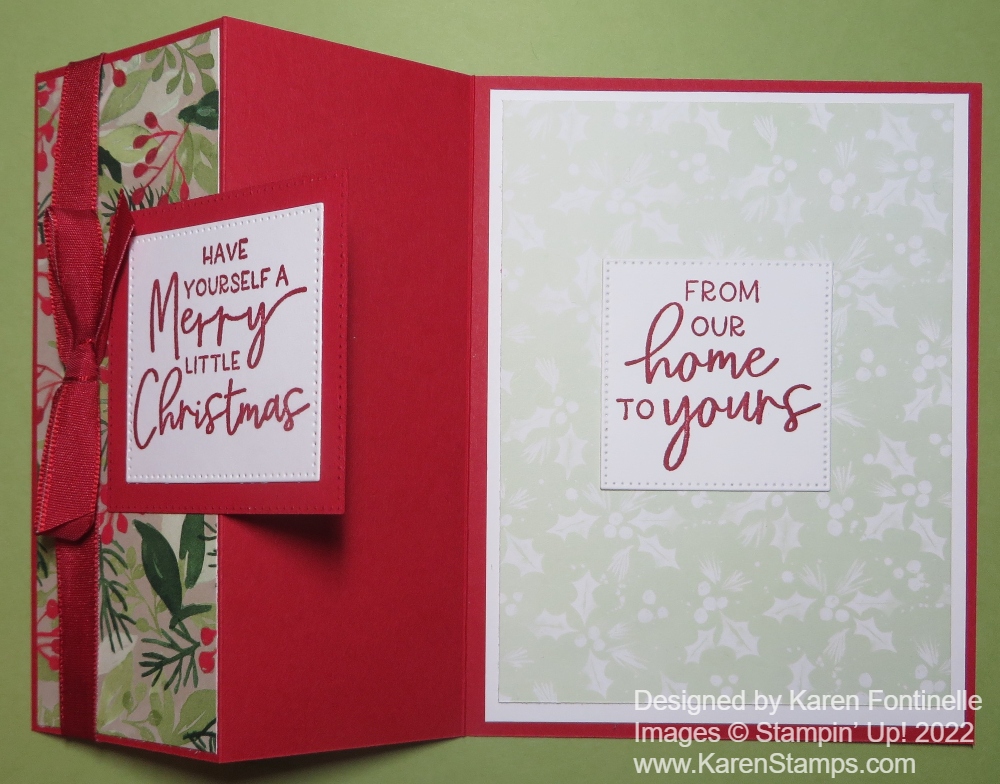
Since the inside of the card is a somewhat dark color, I added a layer of Basic White. When I saw this light green pattern of designer paper, I decided to add that as another layer that would show from the front and coordinate with the design on the front. Another choice would be to just add a narrow strip of designer paper to the right side of the inside of the card on the Real Red cardstock or on the Basic White layer if that was added.
For the greeting, I chose one from the Framed & Festive Stamp Set, a new offering in the Fitting Florets Suite. It is only available until January 4th or while supplies last. I love the font and the variety of greetings for Christmas cards and projects in this set! I stamped the greeting on Basic White with Real Red ink and diecut with one of the squares in the Stylish Shapes Dies. Then I cut out the next larger square in Real Red to be a layer for the greeting. When you adhere this to the front of the card, make sure you are only putting adhesive on half of the back so it only adheres to that folded front part of the card and not the inside too!
The “tricky” part is adding a greeting to the inside of the card. Ideally, you would like it not to show from the front of the card, so you want the greeting on the inside of the card to be completely behind the greeting on the front of the card. You could mark lightly with a pencil the area where that front greeting covers the inside so you know your boundaries. For this card, I stamped a greeting on Basic White the same size as on the front. I put adhesive on the back of that greeting and layered it face down on the back of the greeting on the front from the inside. When I had it placed properly, I folded the back of the card over so that the greeting would then adhere to the inside of the card in the correct spot. That worked pretty well, but you could use pencil marks or eyeball it!
For a finishing touch, I added some Real Red Ribbon tied around the front fold of the card. I anchored it under the bow and inside the fold with some Mini Glue Dots. You could add a Basic White panel to the back of the card if you wanted to write a note so that it wouldn’t show from the front.
This Painted Christmas Z-Fold Card is an easy one to make and the recipient will think you are a talented cardmaker! Try it today!