The Snowstorm of 2010

It's a cold, rainy day in Houston, TX but with hearing all the news reports on TV about the snow all over the country, particularly the East coast, I almost feel like I should look out the window and see snow piled up here!  An impossible reality, if you have seen my snow pictures of the "blizzards" we have had here in Houston resulting the grass barely being covered!  However, I did observe SLEET yesterday afternoon!  It was quite rainy and the temperature was about 48 degrees, but when I got out of my car I could HEAR sleet and if I looked against my black jacket sleeve and squinted, I could almost SEE the little sleet pellets and I could see them bouncing and rolling off my neighbor's roof!  So that was pretty exciting to have a minute amount of winter weather here in Houston!

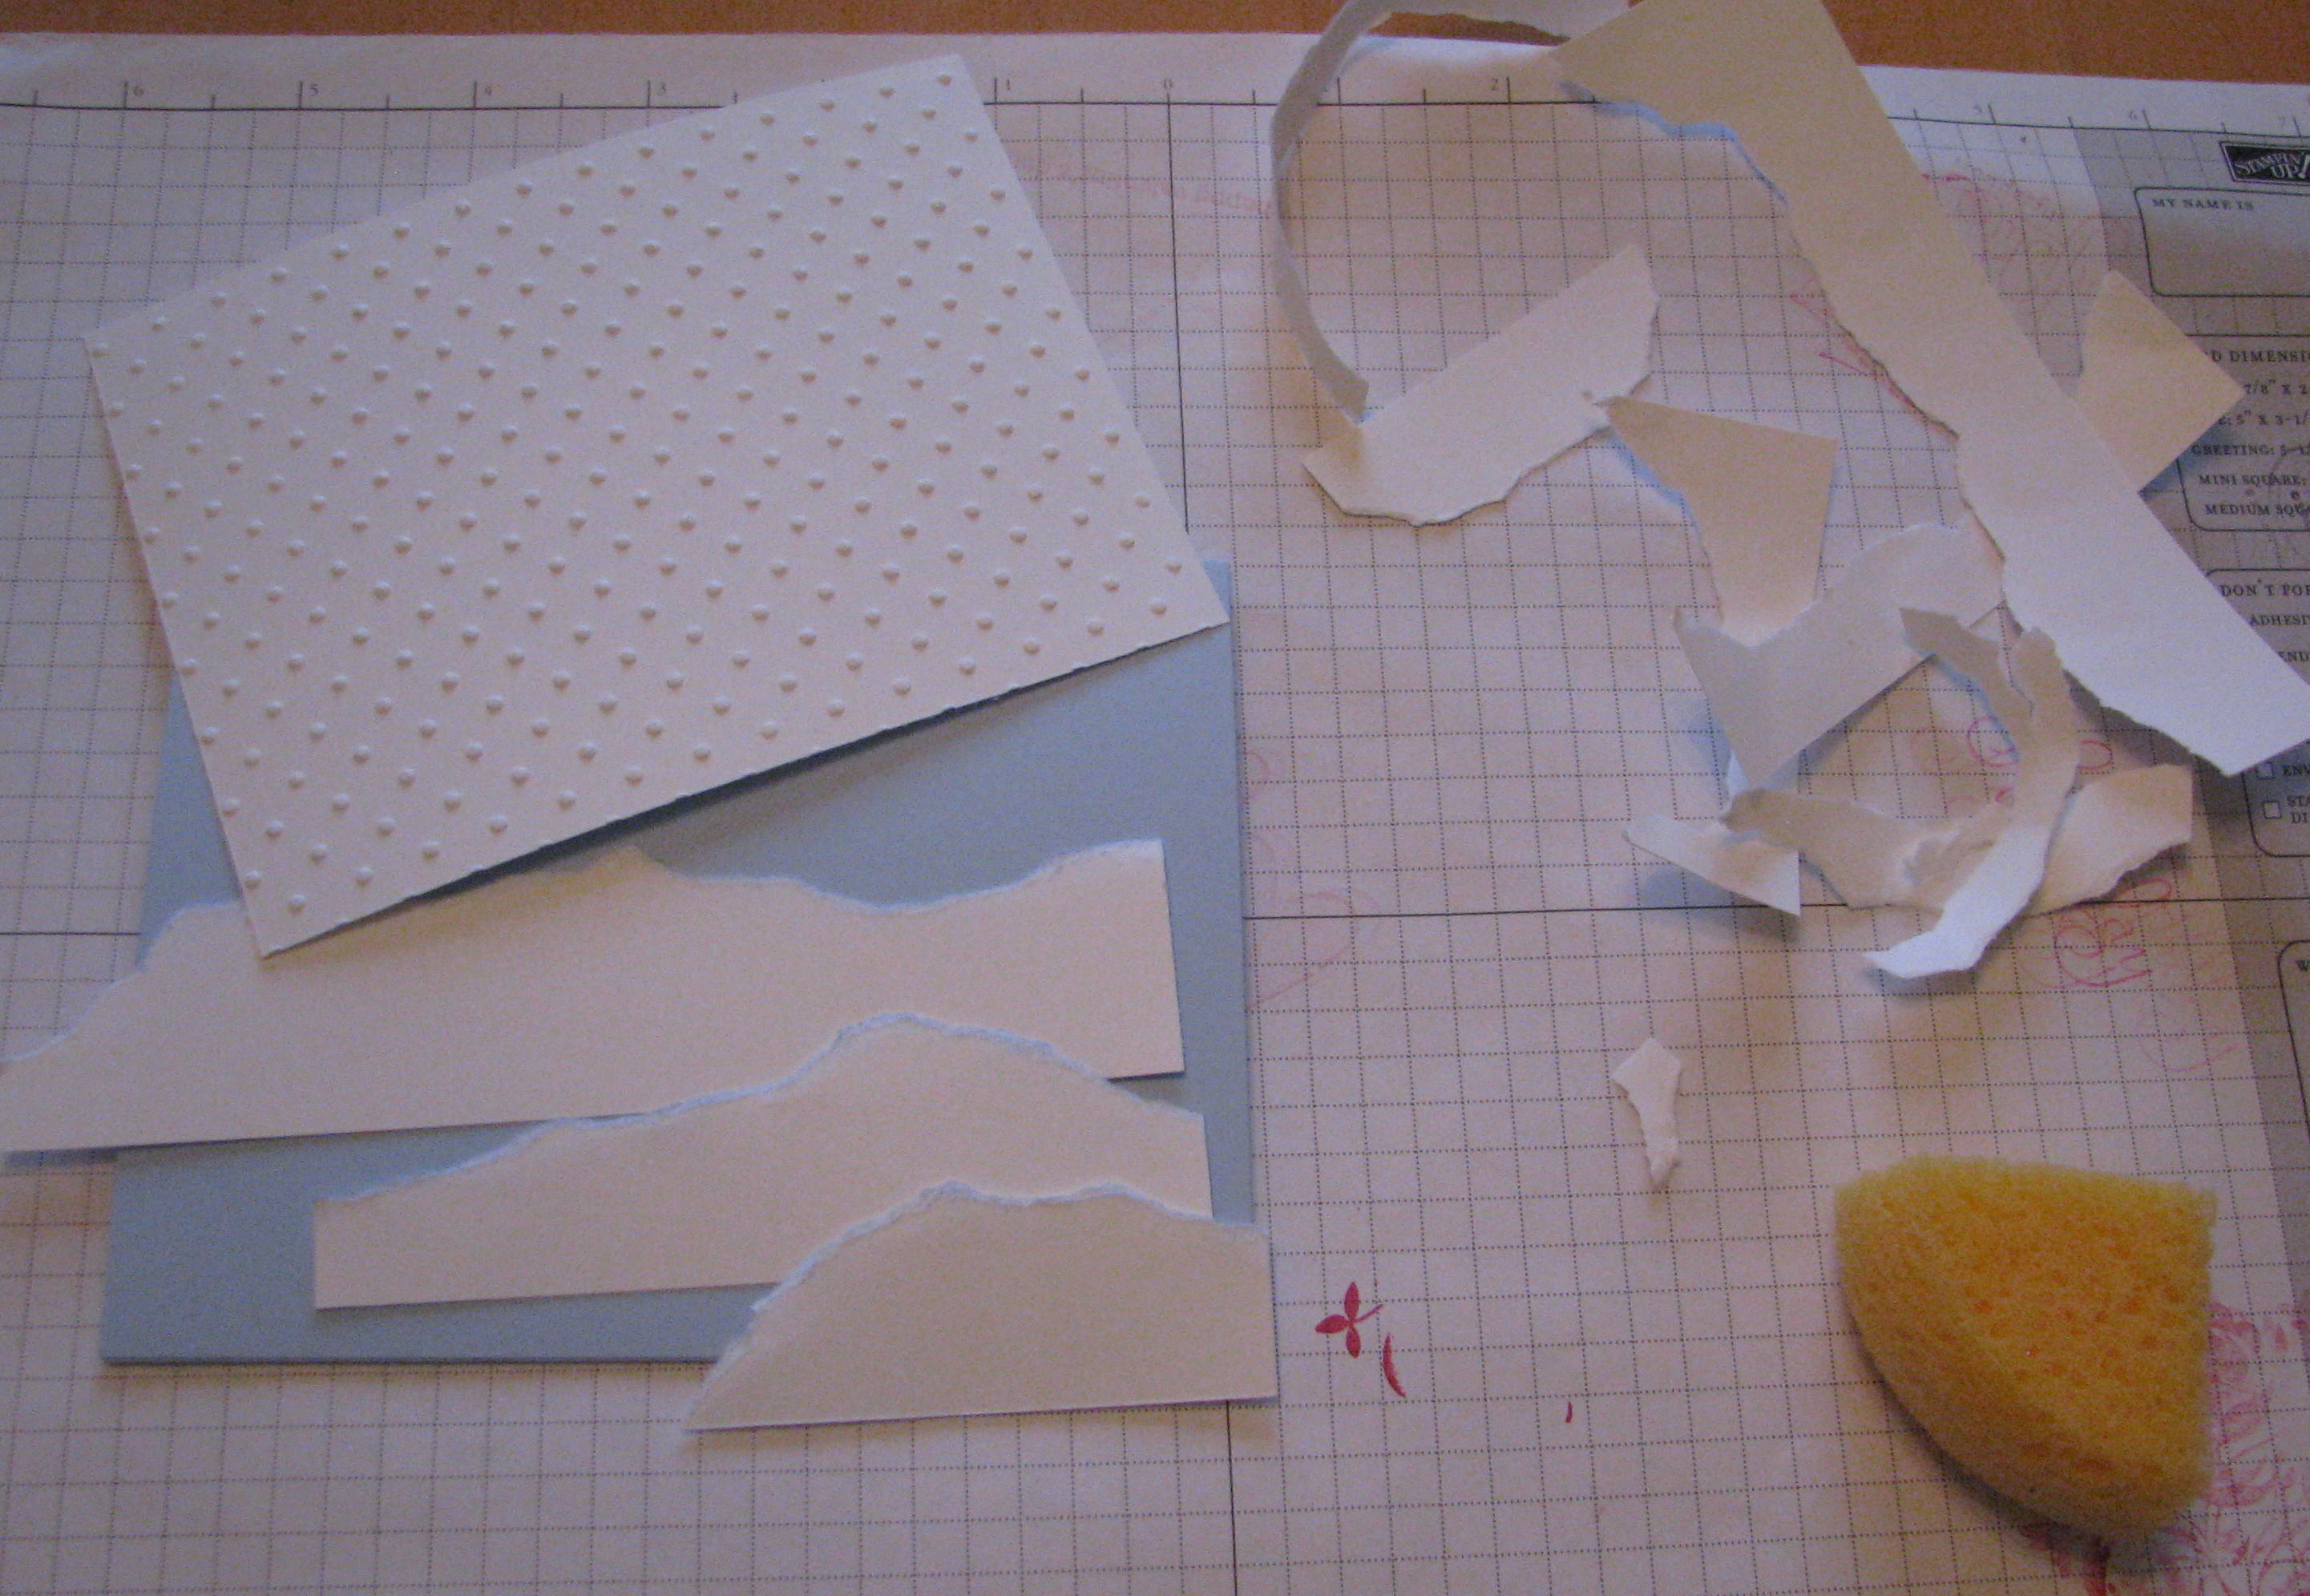
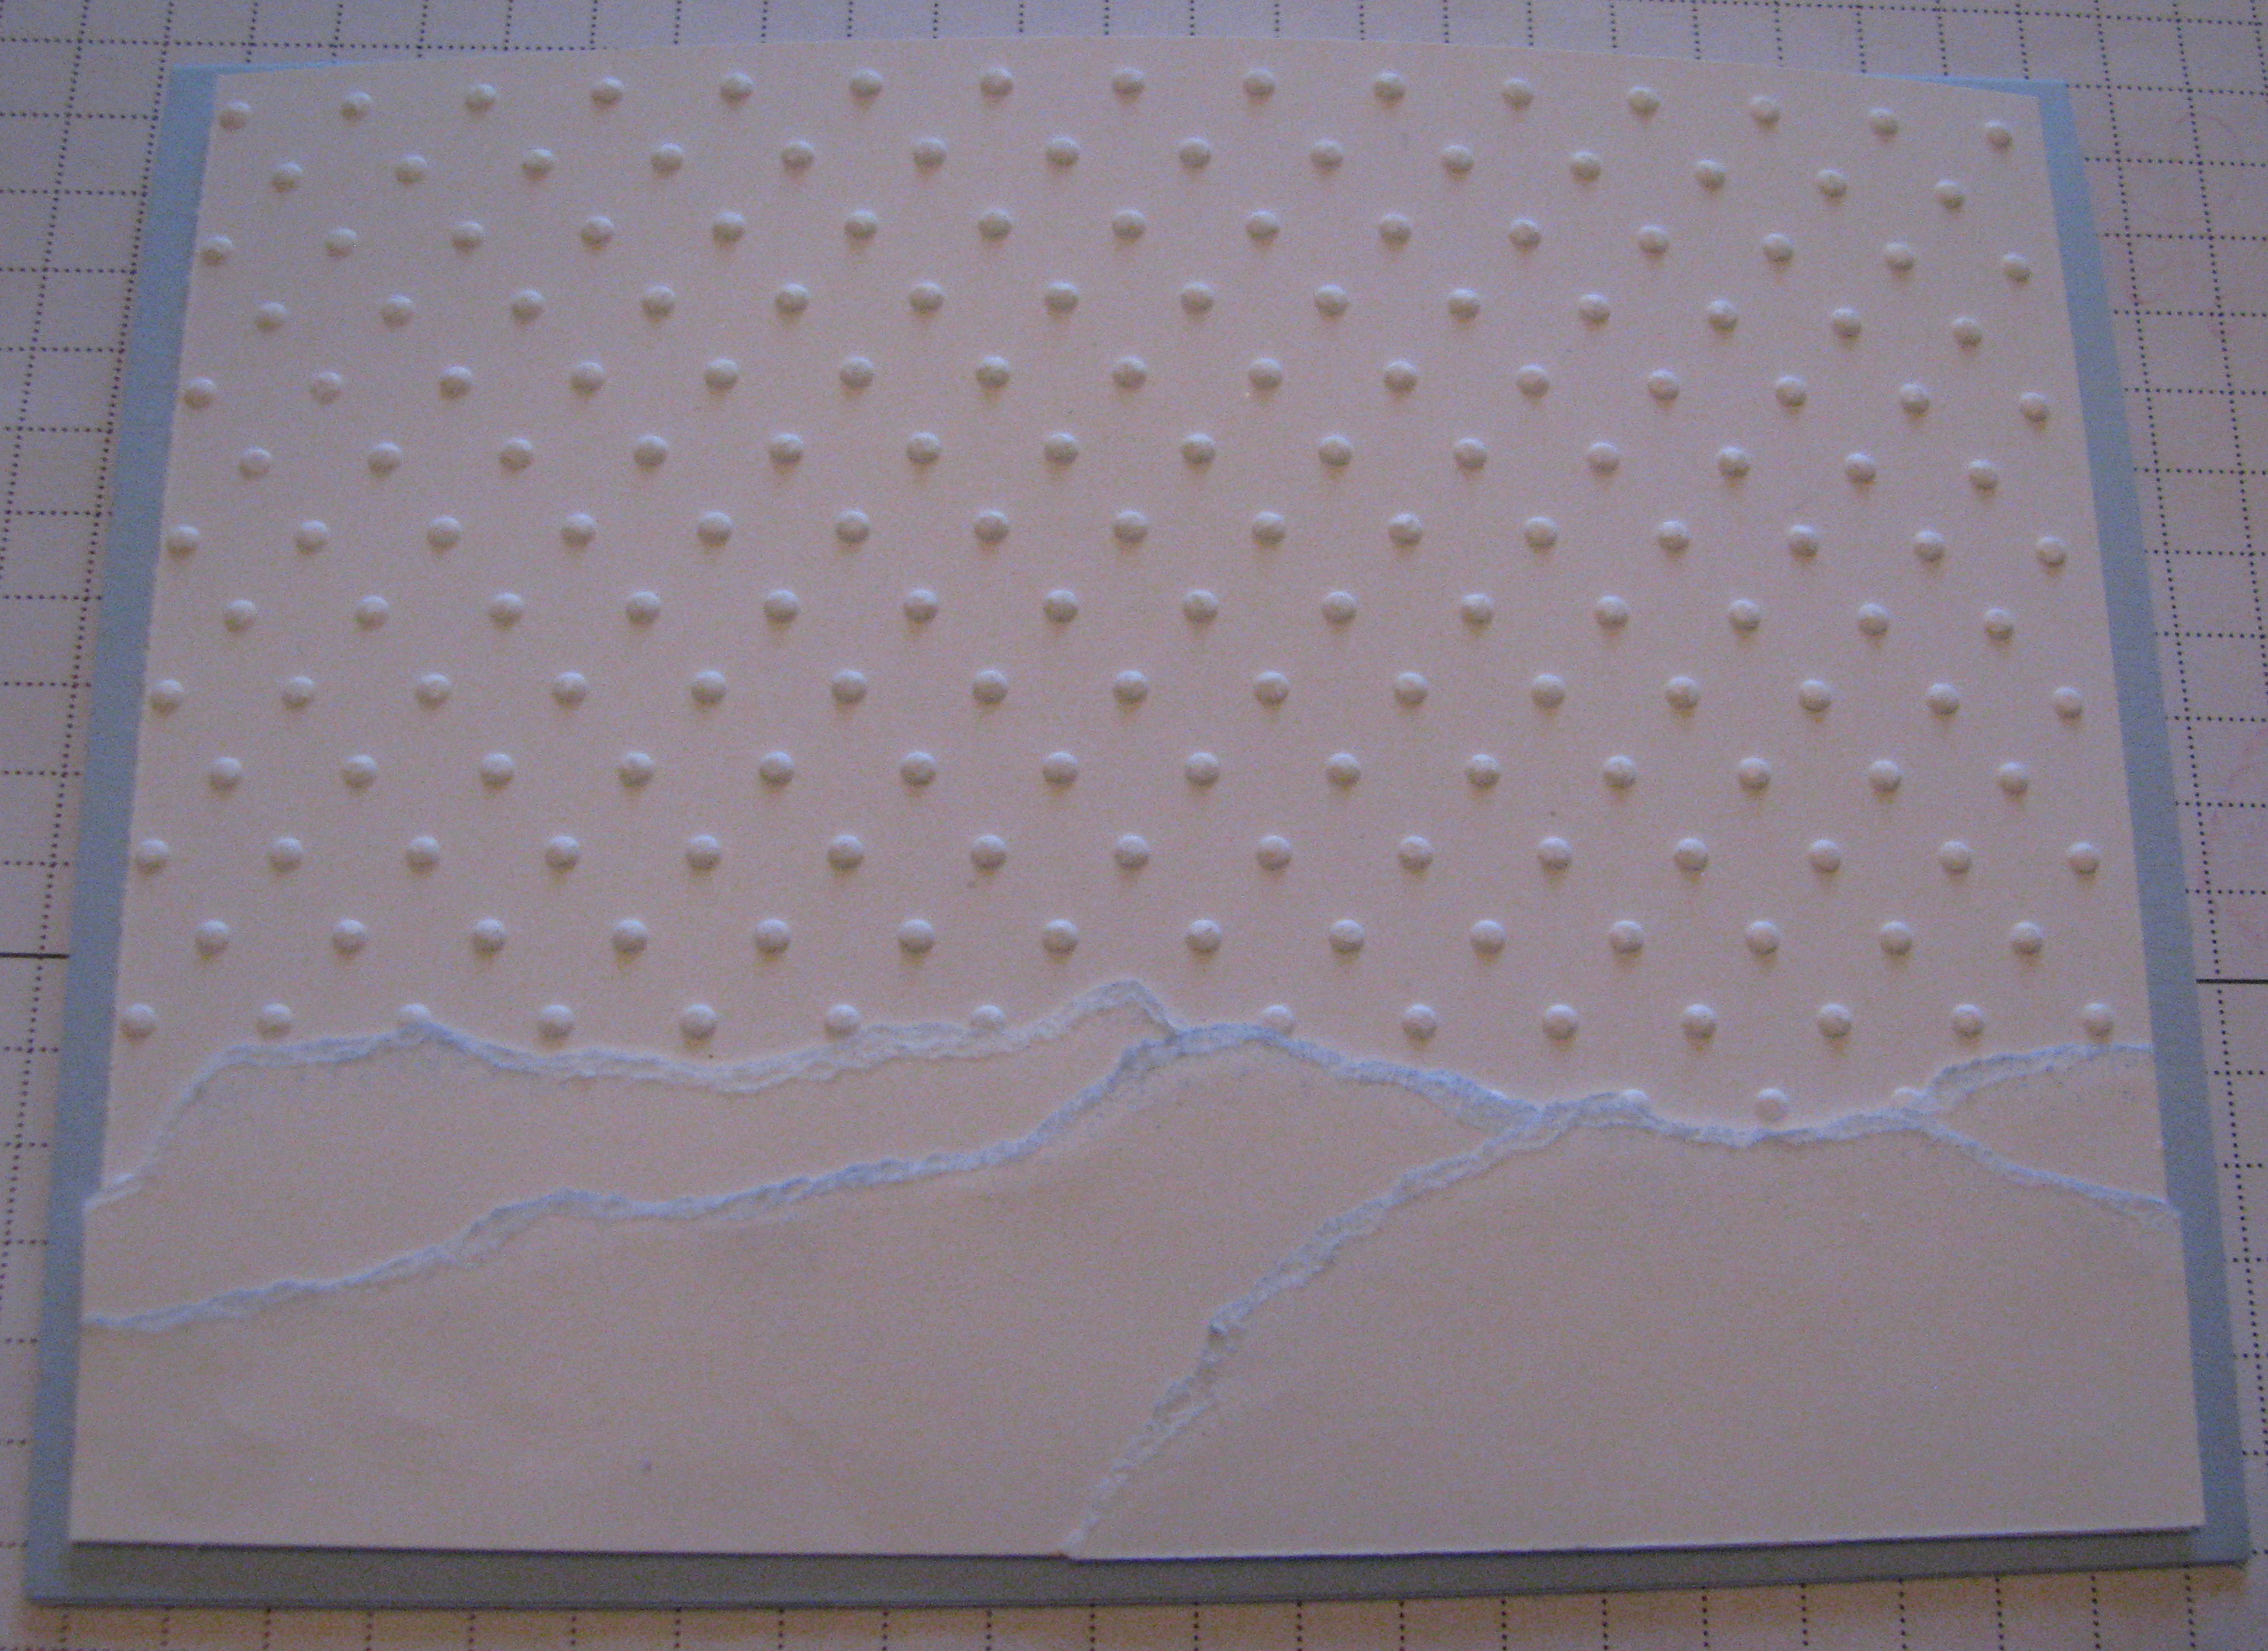
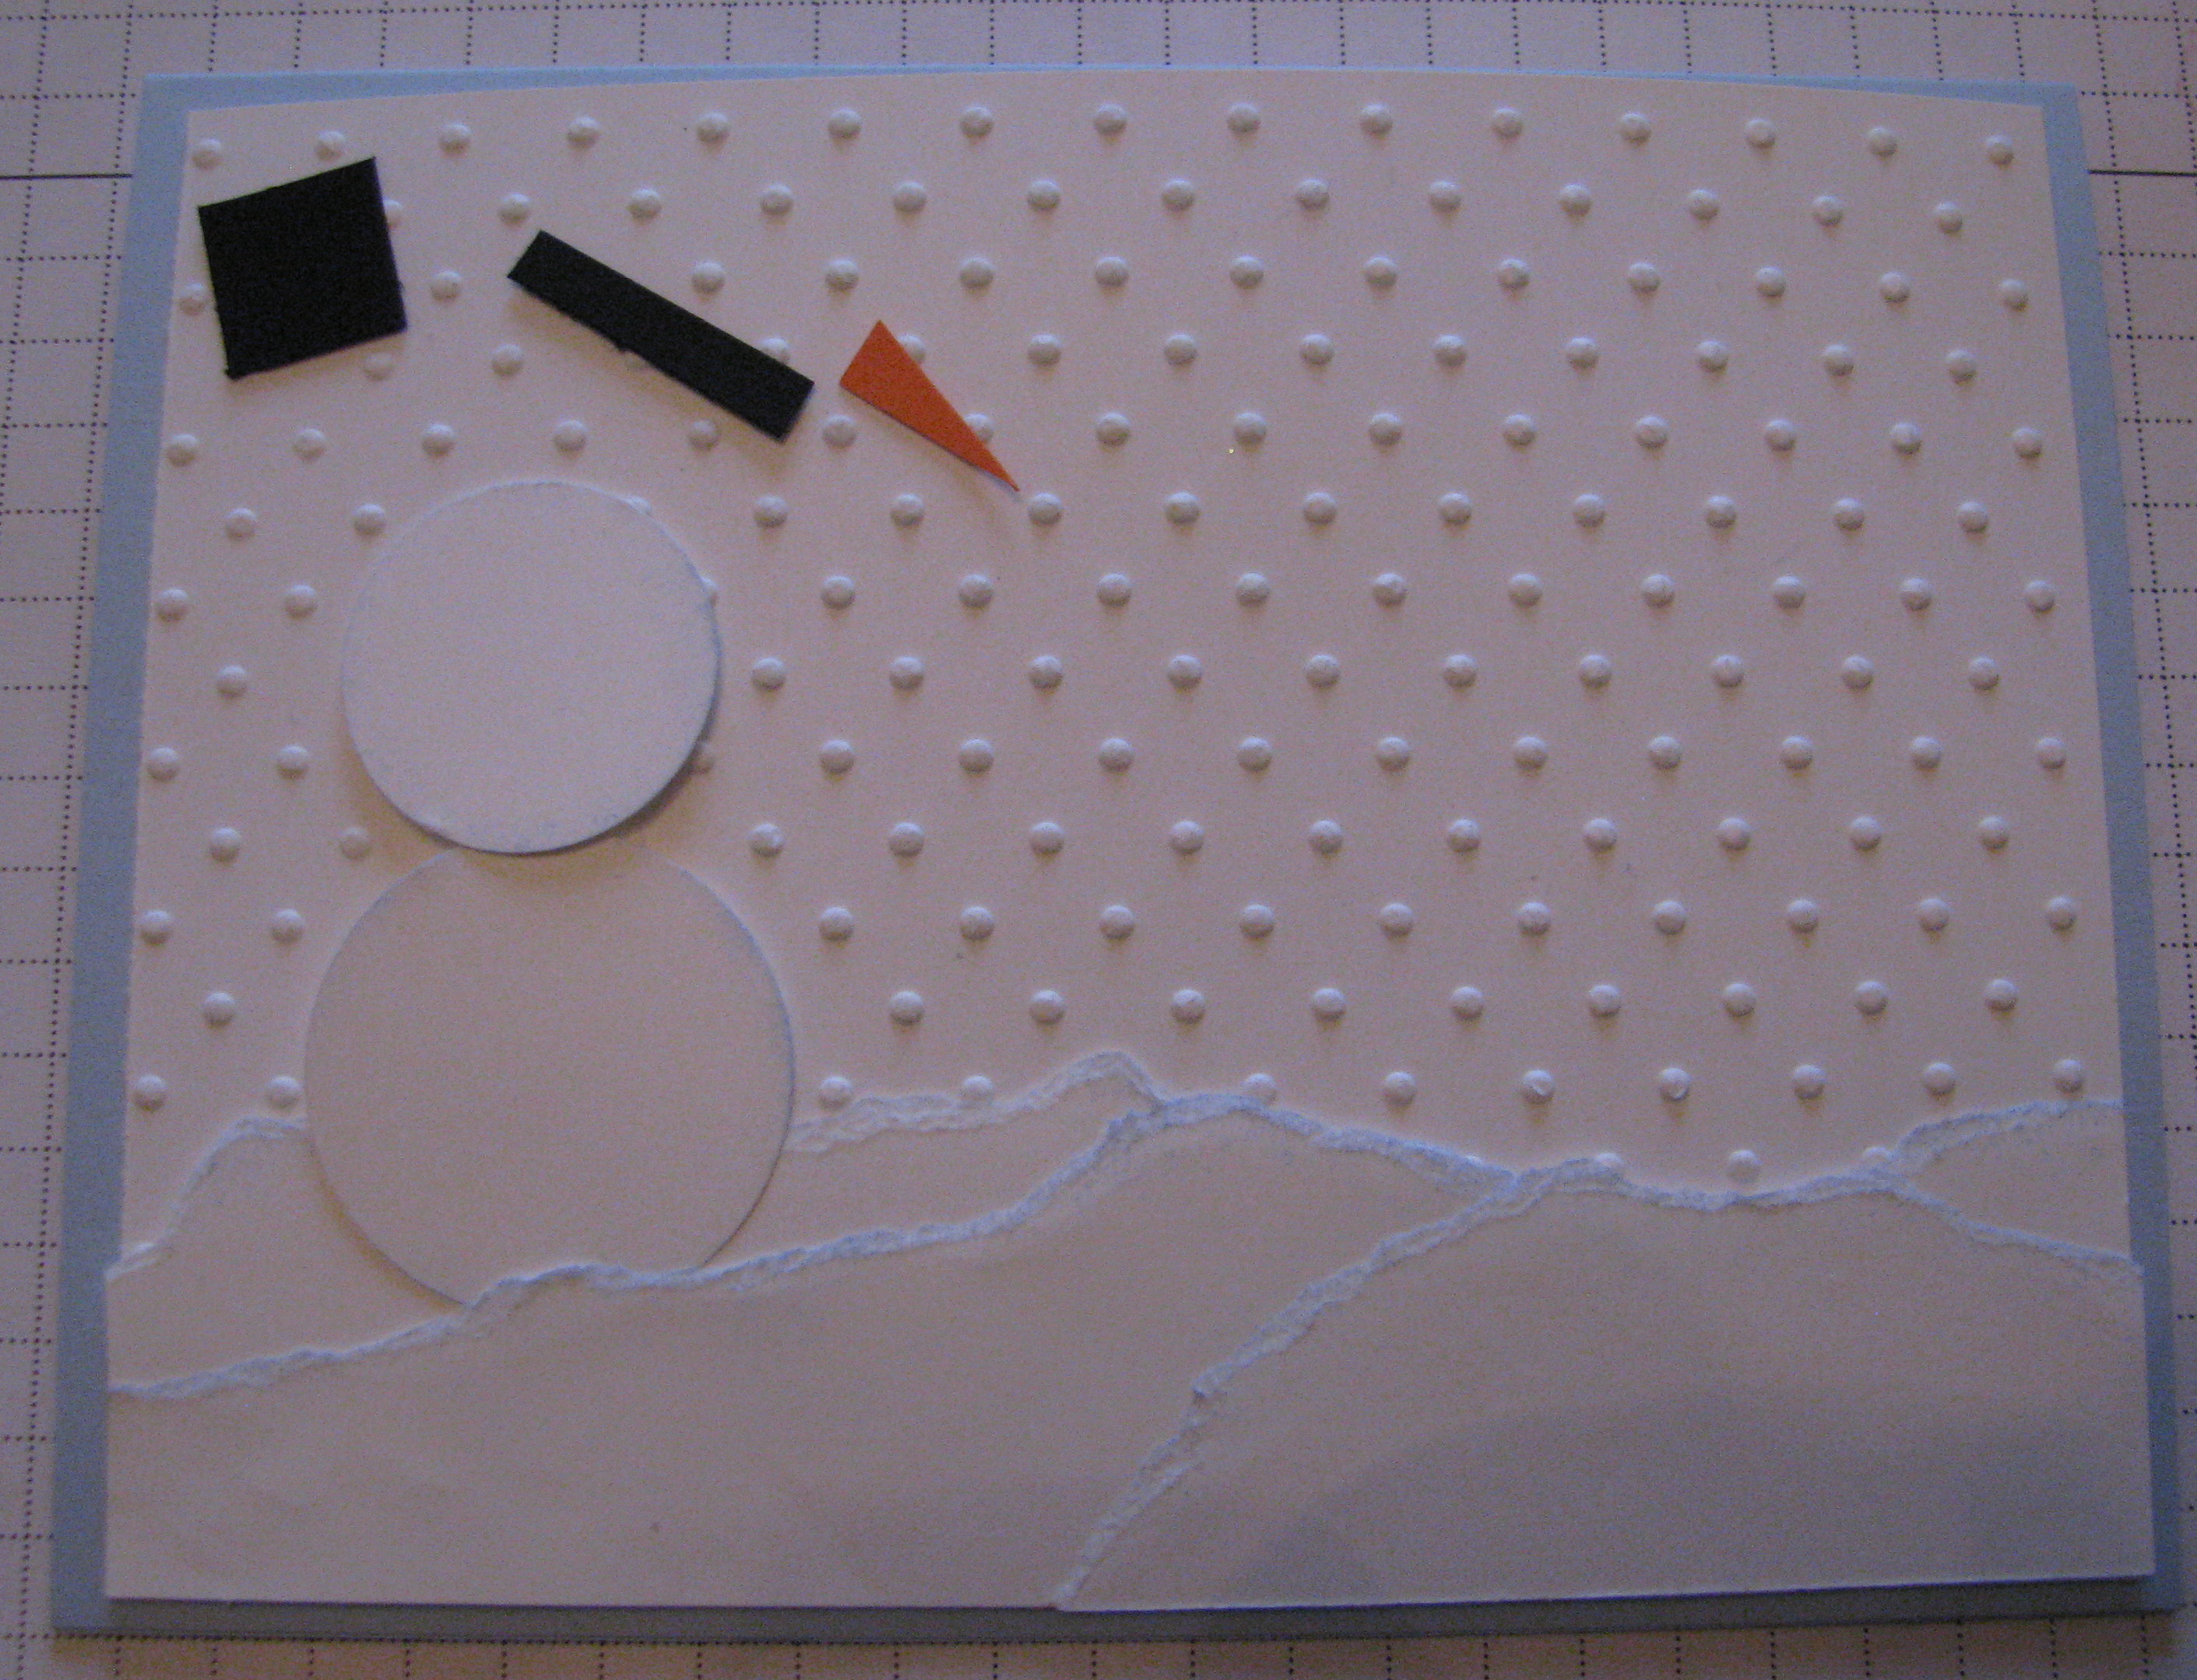
But in thinking about all the snow elsewhere around the country, I decided to make a snow card!  I used the Stampin' Up! Perfect Polka Dots Textured Impressions Folder (#117335) to create the "snowy" background in the Occasions Mini, page 35.  Then I tore some card stock to make the snowdrifts, punched out some circles for the snowman, cut out his hat, nose and arm and stamped a few snowflakes from the Hostess set Christmas Punch. (Did you know the Boho Blossoms Punch #110711 fits that trio of snowflakes?  You don't even have to cut them out!).  And what snow card would be complete without Dazzling Diamonds Glitter?

SnowCard 

SnowCard2 

SnowCard3
SnowCard4 


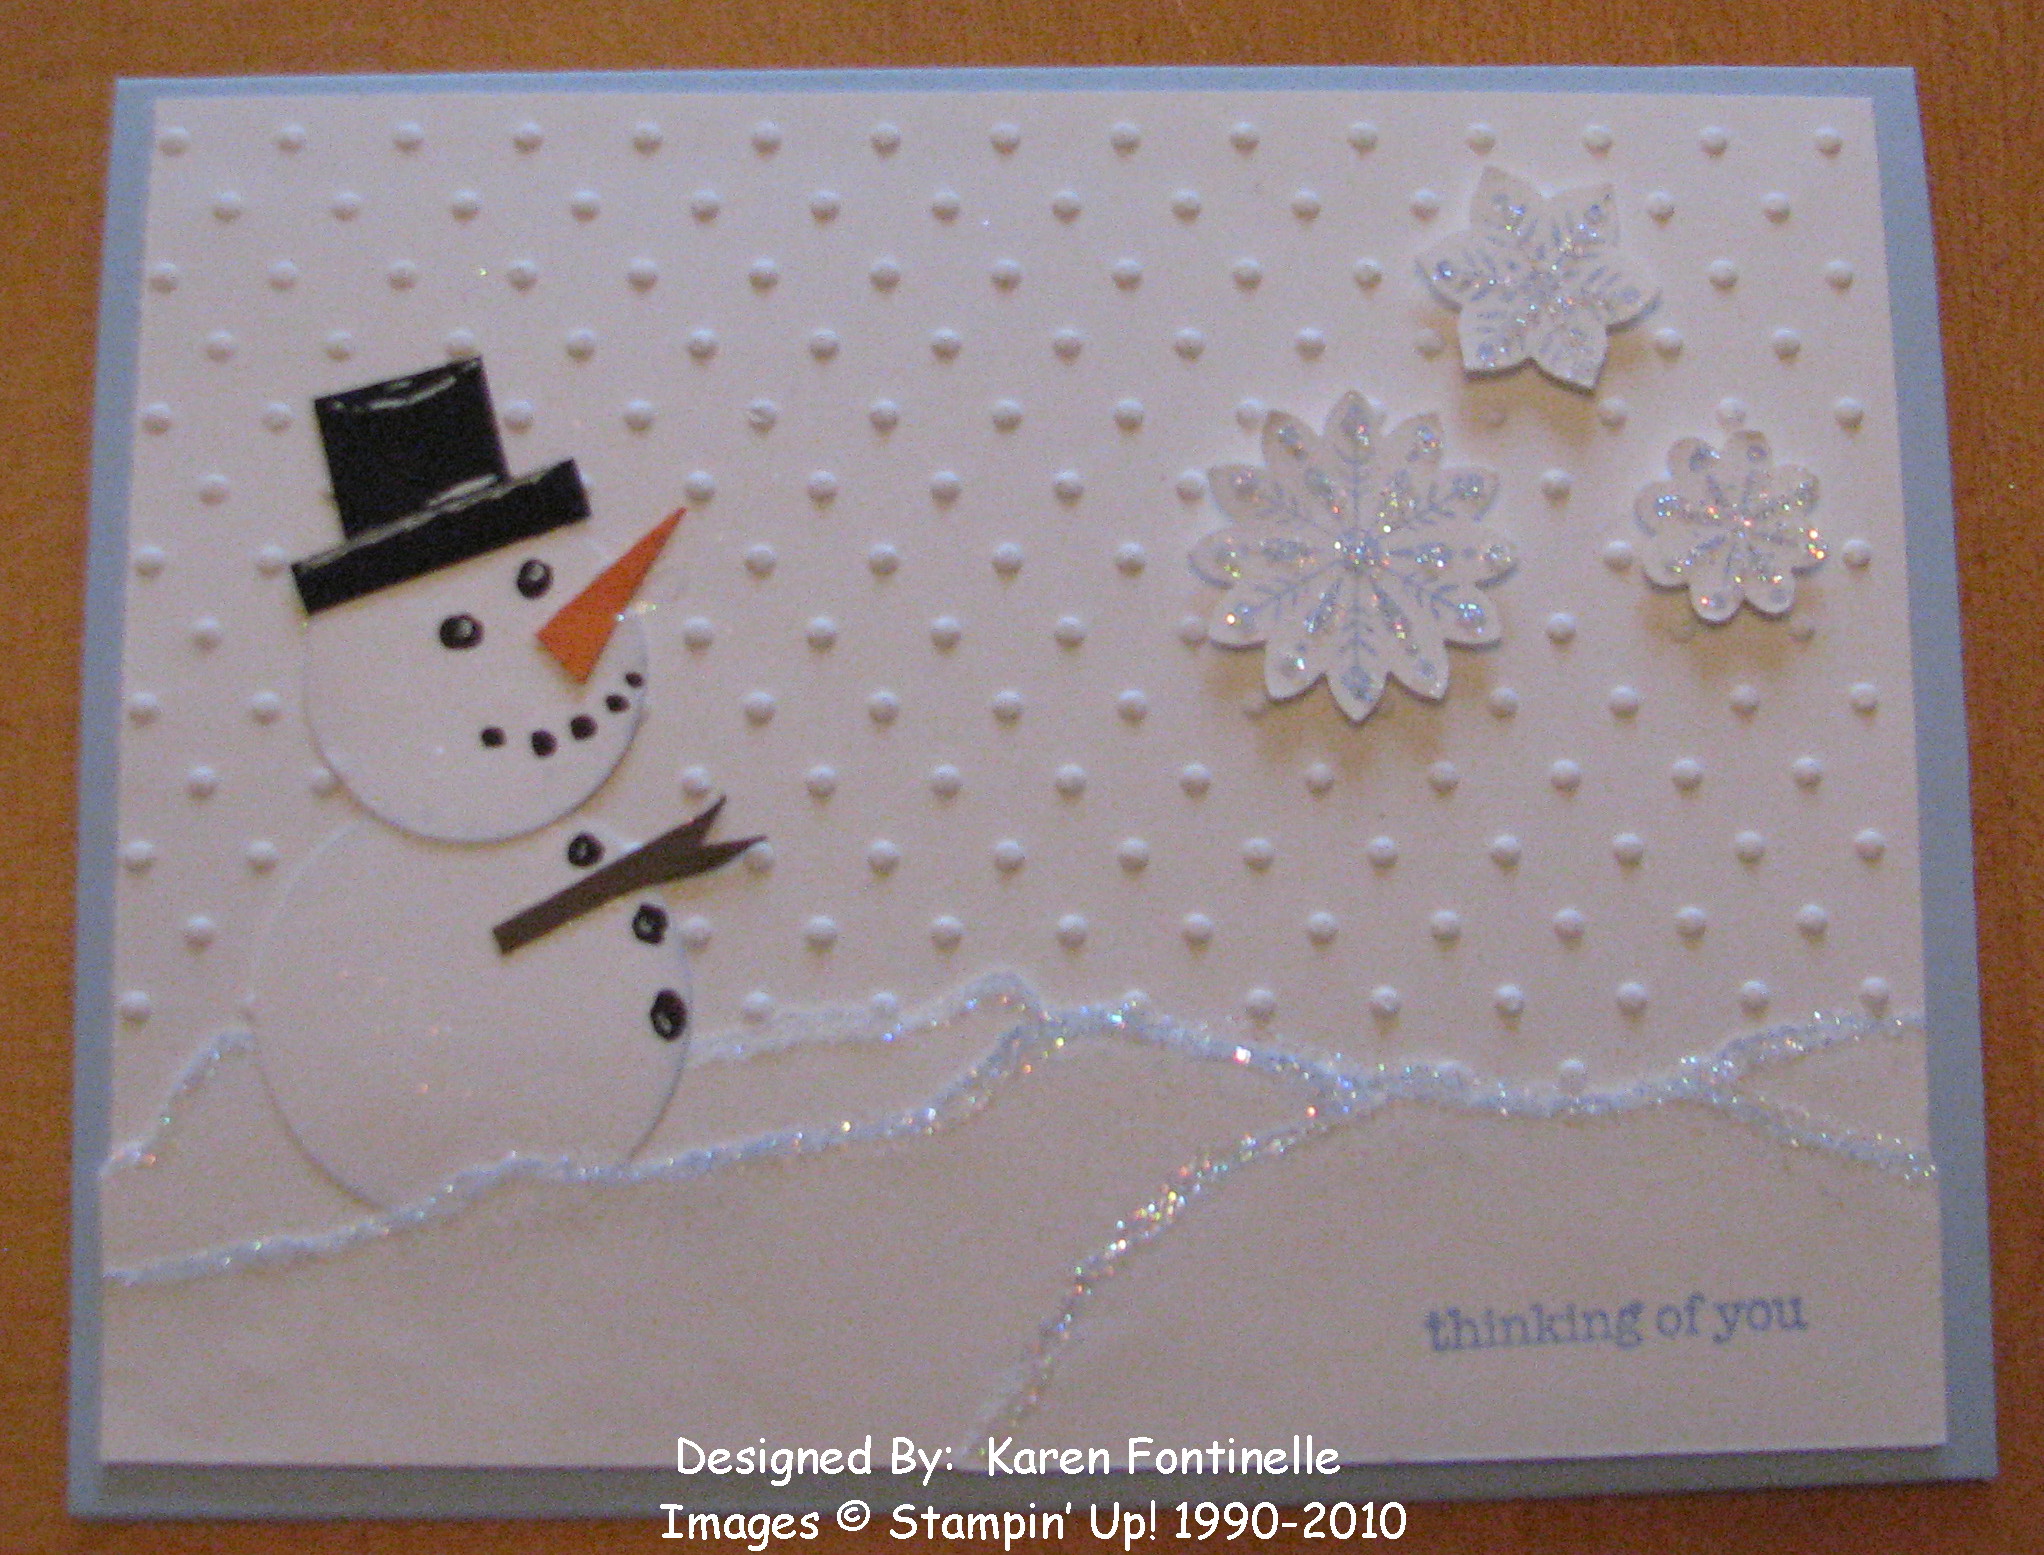
If you are snowed in and like this card, please leave me a comment telling me about the snow!  I wish I could zap myself to all that snow just for a little while! 


Flower Folds Fabric Flower

I think that is almost a tongue-twister!  I have really been enjoying making these fabric flowers with the Big Shot and the Flower Folds Die The Big Shot makes it so easy to cut out your  flowers, so I've been using my Big Shot like crazy!

Flower Fold Fabric Pin

If you want to purchase the Stampin' Up! supplies to make these lovely flowers, please contact me today!  It's a great deal during Sale-a-Bration

Big Shot Die-Cut Machine (#113439)

Extended Cutting Pads (#113478)

Stampin' Up! Flower Folds Die (#115970)

Country Living Cards a la Carte Stationery Kit

COUNTRY LIVING CARDS À LA CARTE


This is a special French-Country-style stationery kit from 

Stampin' Up! and Country Living Magazine.

This kit contains:


  • The exclusive Dinner Party stamp set, which you can see in the foreground
  • A Ballet Blue Stampin' Spot
  • Twenty-four sheets of 5 1/2" x 8 1/2" printed paper for your creative use
  • Twelve Very Vanilla Medium envelopes

Click HERE on my website!

New Stampin’ Up! Border and Corner Punches

Want to see a Stampin' Up! video of Bonnie Thurber demonstrating how to use the new Border and Corner Punches in the Occasions Mini and Sale-A-Bration catalogs?  I knew you would! 

I know you'll enjoy Bonnie on this video!  I've seen her on stage at Convention and not only does she do a great demonstration, but she can sing also!!  She doesn't sing on this video though!

Sale-A-Bration….Become a Stampin’ Up! Demonstrator!

Anytime is a good time to become a Stampin' Up! Demonstrator, but right now is a GREAT time!  Read about it HERE.

Did you know that Sale-A-Bration is in full swing and continues on until March 31? To become a Demonstrator, all you have to do is purchase one of the Starter Kits, a great value in lots of stamping product.  And right now, during Sale-A-Bration you can buy a Starter Kit for 15% off!!  Choose theStandard Starter Kit for 15% off the regular price of $199…..OR if you are interested, the new Digital+ Starter Kit with the new My Digital Studio software for 15% off $185.  Free Shipping on either kit!

AND…..during Sale-A-Bration choose a free stamp set (up to $47.95 value) when you purchase a Starter Kit!

Now that's a deal!  And a fun one at that!  Contact me if you are interested or need more information!  I'd love to tell you how much fun it is to be a Stampin' Up! Demonstrator!  But if you're very spontaneous and want to sign up on your own, just go to my website HERE, click on "Start Your Own Business", watch the video if you like, and then click on "Join Now" on the left.  The password you need is "karenstamps".

“I Heart Hearts” Valentine Treat Bag

Splitcoaststampers puts out a tutorial every week and this treat bag cover was from last week.  It's very easy and you could vary the dimensions according to whatever your own treat is.  I cut the Real Red card stock at 3 3/8" x 10 1/2" and scored at 4", 4 1/2", 5", and 9".  Then just accordion-fold what will be the base of the treat holder and fold the top flap over.  Fill your cello bag with your treat, attach with a little SNAIL to the inside, punch some holes for some ribbon to tie through if you want, decorate the front and you are done!

 TreatBag

TreatBagInside1

To decorate the front of my Treat Bag I used the I "Heart" Hearts Stamp Set in the Occasions Mini Catalog.  If you want to know you are doing some good while you are stamping, purchase this stamp set and Stampin' Up! will donate $2.00 to the American Red Cross for Haitian Relief. Already 6694 stamp sets have been sold as of a couple days ago.

Star Card for a Star!

Last week my son called to say the results were posted and he had indeed passed his first level CFA (Chartered Financial Analyst) exam that he took last December in Houston!  This is a self-study, graduate level program for investment professionals with three levels of exams, and if you do take and pass all three exams and meet the other professional and ethical requirements you will have earned for yourself quite a credential in the investment field.  There is an enormous amount of study required, on your own, for each exam, so it is quite a commitment and we were hoping all the time he had put in had paid off for him.  The results say that 34% of the 44,000+ candidates worldwide who took the test successfully passed it.  Of course, I thought, at a minimum, he deserved a special card of congratulations!

Star Card Congratulations 

StarCard3 

Star Card 

Star Card inside 

Now in Houston if you have an important event coming up, you have to hope that we don't have heavy rains which make the streets flood and become impassable at times….unless it is hurricane season….but flooded streets are much more likely.  As luck would have it, though, we had SNOW!  

Snow 

Snow in Houston 

The day before the exam it snowed like crazy, beautiful and fun!  It was great to have him home to share the excitement with (during his study breaks!).  But who would have thought the day of the exam we would have to worry about ice on the roads in Houston, TX?!!  We offered to drive him downtown so he wouldn't get lost or have to worry about parking, etc. since this test was SUCH A BIG DEAL!  We were lucky because we had no trouble, although we saw some accidents from icy spots going the opposite way.  Who would have thought!

Snow in Houston on bushes 


Valentine Pencil Bug

Last Saturday I had the pleasure of stamping with a troop of ten Girl Scouts, ages 7-8 and this was one of the projects we did!  I'd seen these around on the internet and thought they were so cute!  The one I first saw was made by another demo, Janet Wakeland.  

These Valentine Pencil Bugs/Caterpillar?? are so easy to make!  Just take a 12" strip of card stock or designer paper, score at 1/2" at the beginning and end, and every inch in between.  You will them punch a hole in the center of each inch space along the strip.  Now no hole punch I had was big enough to fit a pencil through so I punched several times to make the holes larger.  The strip looked pretty messy when I got finished, but once you shove the pencil through, the messy punches don't show!  Perhaps the new Small Heart Punch would work, but the hearts would be sideways unless you could accordion-fold and then punch two layers at a time.  I can't FIND my heart punch at the moment so I can't try it to be sure!  After punching the the holes, accordion-fold on all the score lines and insert the pencil (or you could use a Pixie Stix!)  To make the head, just punch a 1 3/8" circle and make a face however you like….you could use wiggly eyes.  The antennae were made from various swirls from the Tulipe Die for the Big Shot.  Just adhere the head to the 1/2" section at one end of the paper strip.

ValCaterpillar


Mini Milk Carton Birdhouse

Here is my first attempt at a little birdhouse made from the Mini Milk Carton Die (#117310) for the Big Shot.  It was so fun to make and there's lots of room for creativity!  I punched the hole with the 1" Circle Punch (#109046), the bird and branch with the new Extra-Large Two-Step Bird Punch (#117191), and the little flower with the Trio Flower Punch (#109183).  For the roof you can use any of the new border punches in the Occasions Mini or the Scallop Edge Punch…..or leave it plain.  Try it, you'll love making one!


 Birdhouse1 


Red Mini Milk Carton

Here's the first mini milk carton I made.  So cute for Valentine's Day in red or any time!  You can add any kind of decorations to them that you like!  I used the beautiful Sending Love Specialty Designer Series Paper, the Butterfly Punch, some flower stems from the Pretties Kit for its antennae and a Library Clip to hold the box closed.  Check out the Mini Milk Carton Die (#117310) in the Occasions Mini Catalog!

MilkCarton
 

Valentine Mini Milk Carton

Valentine colors are red and pink, but sometimes it is nice to change it up a little.  I love this Mini Milk Carton Die for the Big Shot (#117310) that is available in the new Occasions Mini Catalog on page 23.  The milk carton is made with Almost Amethyst card stock.  The medallion is a stamp from the set Love You Much (#113756) and punched out with the Scallop Circle Punch (#109043).  The center is stamped twice on Whisper White card stock, the center punched with the 1" Circle Punch and then the little heart colored in and cut out with a scissors.  After mounting the medallion on the side with Dimensionals, run a ribbon around the carton and tie a knot on the side.  Very easy!  Close the top with a Library Clip or maybe a brad so it can be opened by the gift recipient.  You can also open the top like a real milk carton!

MiniMilkCarton 

MiniMilkCarton2


Stampin’ Up! Haitian Disaster Relief

HeartsCard 

From Stampin' Up!

On January 12, 2010 a magnitude 7.0 earthquake struck Haiti, leaving in its wake devastation so overwhelming that the Haitian people and their leaders can only look for help from the outside to cope. 

From now until February 28, 2010, $2 from every I {Heart} Hearts stamp set sold will be donated to the American Red Cross’ Haiti Relief and Development Fund. The Red Cross is already well-established in Haiti, and this money will be used to provide immediate relief and long-term support through supplies, technical assistance and other support to help those in need. 

Product Name  Item #  Price 
I {Heart} Hearts – clear-mount  (block D recommended)  118571  $18.95 
I {Heart} Hearts – wood-mount  117010  $26.95 


SUHaitiflyer 


In the past, Stampin' Up! has also made charitable donations when terrorists attacked the Twin Towers, when a tsunami struck Indonesia, when a hurricane destroyed New Orleans, and when wildfires ravaged Australia.

Not only has Stampin' Up! made a commitment with this $2 donation from the sale of these stamp sets, but in addition, Stampin' Up! bought supplies for 5000 hygiene kits.  You can read about these and how the Stampin' Up! employees all pitched in to assemble these kits in one day on Shelli's blog HERE.


Fabric Flowers

I had great fun making the Simply Adorned Charm inserts, but I also had a ball once I made my first Fabric Flower with the Big Shot Bigz XL Flower Folds Die (#115970). Shelli Gardner made these at Convention last August and people are making them like crazy!  Bet you can't make just one……as you can see from my table!  Once I dug out by box of fabric out of my stash in the closet I went crazy cutting fabric with my Flower Folds Die.  These are so easy because you don't have to be perfect and the die makes it so easy.  Depending on your fabric, you may be able to cut several layers at one time, which really speeds things along.  I usually chose 3 of the 4 flowers, but not the largest one.  You need four flowers of the same size for each layer,  They can be four different fabrics or four of the same, thin, thick, whatever you want.  There is a certain way to assemble the four flowers, which I can take photos of another day, and then you just sew or glue the flower layers together, put a button in the middle and a pin on the back.  I also enjoyed getting out my collections of buttons….a tin from my mother-in-law from years ago, handy for craft projects…old buttons my mother and grandmother saved.  I think people used to save buttons, even from old clothing, in the "olden days".  These flower pins are very easy and every one can look different.  You can also attach them to headbands, hats, jackets, barrettes, etc.  Enjoy my mess!

FabricFlowers1 

FabricFlowercuts 

FabricFlowers2 

FabricFlower 

FabricFlowerpink 

If you need a Big Shot and the Flower Folds Die, just visit my online store!  You'll have so much fun with your Big Shot!!

And there is no better time to make a large purchase than during Sale-A-Bration!  Get your FREE products now!


Simply Adorned Charms

Now THIS was SO MUCH FUN this weekend!!!  I made two inserts for the Simply Adorned Charms, available in the . We've been waiting patiently for these charms and chains to become available since we saw them in person at the Stampin' Up! Convention last August.  Shelli Gardner even make a bunch of them and the Prize Patrol gave them out to the lucky winners one morning at Convention.  Talk about a hit!!

SimplyAdorned1 

SimplyAdorned2

You can make multiple inserts and change them out whenever you want to match your outfit or holiday or season.  This Simply Adorned Charm I have is 1" x 1 1/4" (#116798) plus the 24" chain (#116800).  I used both the Charming stamp set (#116519) from the Holiday Mini (which is still available for order due to the delay in the charms) and the new Tiny Tags stamp set in the current Occasions Mini.  The charm has two sides….one side has beveled glass and the other side is plain….so you can have both sides decorated if you want!  I also used our new punches, the Pinking Hearts Border Punch and the Scallop Trim Border Punch (which is available FREE in the Sale-A-Bration catalog!).  My initial was stamped with the beautiful Lovely Letters Alphabet and cut out.  I was in a Razzleberry Lemonade DSP mood as you can see in the background!  Really fun to use these punches, paper, and stamps!!  Wouldn't this make a beautiful gift for someone?!

Home Tweet Home Decor

While looking through the new Occasions Mini catalog for the millionth time, this little framed project on page 11 jumped out at me.  I needed a birthday gift and thought I probably had a frame in my "stash".  Well, I didn't have a wooden frame but I had this clear glass 6"x6" frame held together with clips, just the right size!  I should have taken my photo BEFORE putting under the glass frame, but I didn't so you may see some glare.

HomeTweetHome 

HomeTweetHome2 

HomeTweetHome3 


This project was relatively easy to make except for stamping the words!  I did use my great Stamp-Ma-Jig and some lightly drawn pencil lines to keep the letters straight and lined up.  Even then I didn't do a perfect job (so I suggest a practice run!).  This would probably be a perfect thing to make the words and print on My Digital Studio.  Then you could add on the other embellishments with your paper and punches to finish the project.  Somehow the word "tweet", even though it has one more letter, takes up the same space as "home" so you have to think of that as you are lining things up.  Not too hard, but does take a little thinking to make a neat project.

After stamping the words, I used my brand new Extra Large Two-Step Bird Punch (#117191) on page 11 of the Occasions Mini.  If you just punch once, you will have all your pieces the same color.  So you will have to punch several different times to get a certain color of card stock for the branch, the leaves, the bird, maybe the wing.  But the new punch is so great you won't mind!  I used card stock for the branch, but then a piece of Designer Series paper for the leaves and textured Bermuda Bay for the bird…and another piece of DSP for the wing.  I think most, if not all, the DSP used in this project came from the FREE Sale-A-Bration Designer Series Paper Pad "Welcome Neighbor". (a really cute selection of paper!)

Due to my type of frame, I couldn't use a regular button next to the bird, so I used my Big Shot (#113439) and the Buttons #5 Sizzlits Die (#113440) to make a paper button and threaded in some white floss.

For the little pieces of DSP decorating some of the letters, I just stamped the letter "e" on the DSP and then cut out the area I wanted to use.  For the centers of the "o"'s I found the 1/2" circle punch to be the correct size.

The alphabet I stamped with is "Contempo" in Melon Mambo, Soft Suede and Old Olive.  You can find the list of supplies used in this project from Stampin' Up! right HERE.  To order any supplies, just click the "Shop Now" Button HERE.