Make an Easy Triangle Box For a Treat With Year of Cheer Paper

Year of Cheer Triangle Box Side

If you need a cute little gift box for a treat or small gift, try making this easy triangle box with the Year of Cheer Designer Paper. I learned to make this triangle box a long time ago and it is SO easy!  You can vary the size, decorate it for any kind of occasion, make it as plain or simple as you want….it’s up to you! And did I say it was quick and easy?!

My sample starts with a piece of the Year of Cheer Specialty Designer Series PaperThis is beautiful paper with foil designs, one-sided, and perfect for special cards and projects. I used a  piece of paper cut 5″ x 10″.  All you have to do is score the paper at 5″, then mark on the short ends the center spot which would be 2 1/2″. Score from the 5″ score line to the center mark on the short ends on each side on each end.

This is what the scored paper will look like:

Triangle Box Scored

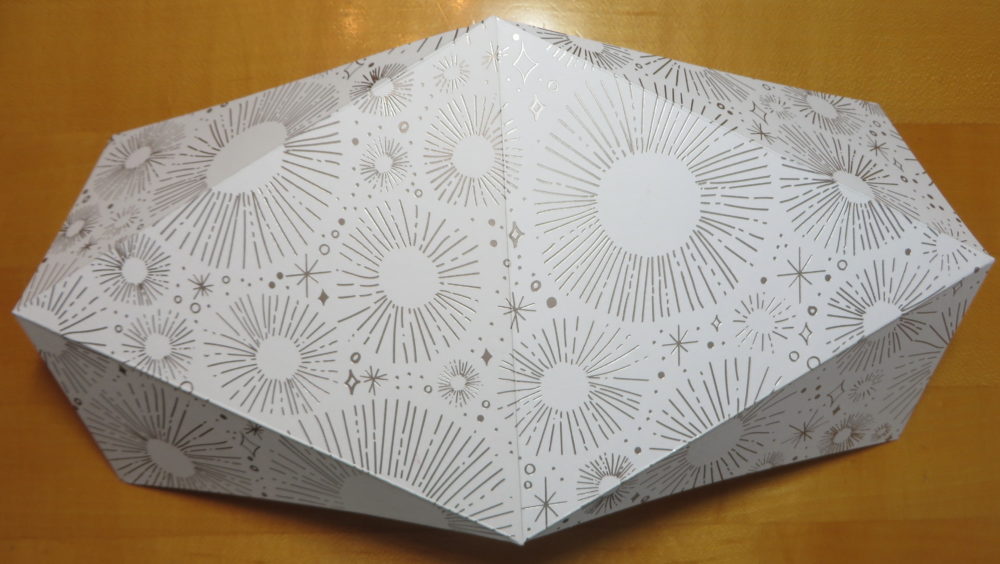
Fold all the score lines and practice folding into the triangle box shape. Then on each end you will need to punch holes so that you can tie all the ends together once you put the contents inside.

Here is one of my older posts with a diagram of how to score the box. You do the same thing even if the size is a little different.

Year of Cheer Triangle Box Front

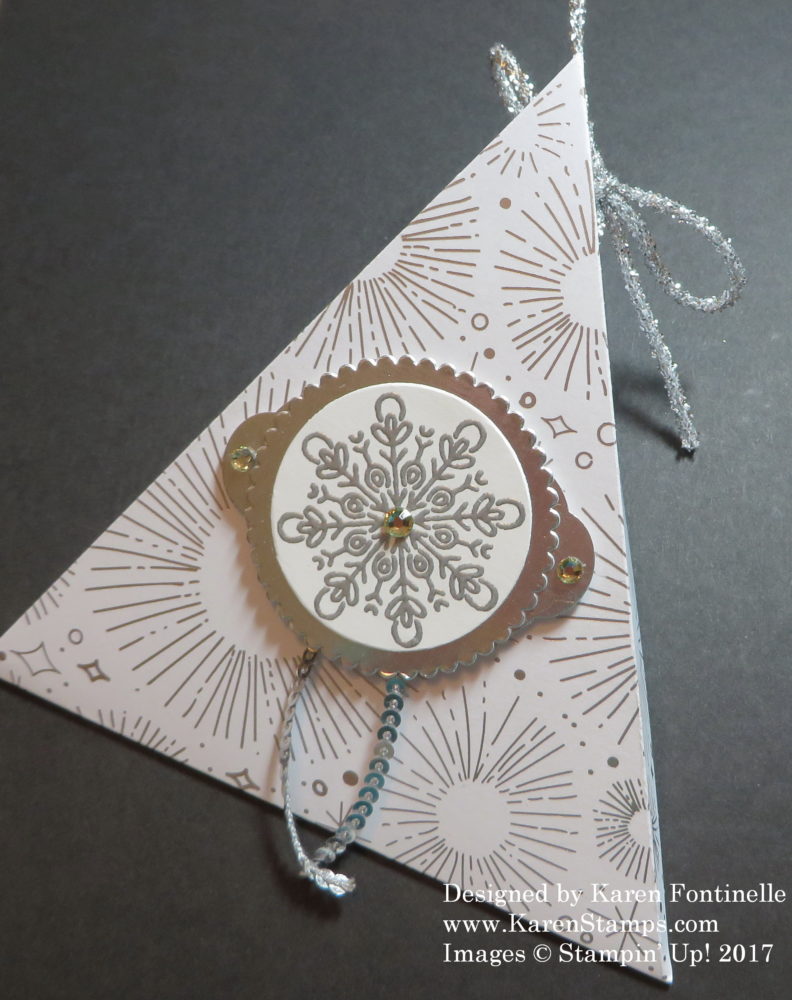
To decorate this triangle box, I embossed a snowflake image from the Cheers to the Year Stamp Set with the Heat Tool and Silver Stampin’ Emboss Powder. I punched out the snowflake with a Circle die that fit around it with a Silver Foil scalloped circle die. After adhering these two pieces together, I layered that piece on a piece of Silver Foil punched with the Pretty Label Punch.  I embellished this snowflake piece with a piece of Silver Mini Sequin Trim and Rhinestone Jewels.  The triangle box is tied with a piece of Mini Tinsel Trim.

Make an Easy Triangle Box For a Treat With Year of Cheer Paper for a small gift or a candy treat inside! It’s easy to make and the Year of Cheer Paper is elegant for any occasion!

SHOP STAMPIN’ UP! ONLINE HERE!

Don’t Miss Out on Paper Pumpkin This Month!

Join Paper PumpkinToday!

Click photo to subscribe!

We’re getting close to November 10th and that’s the last day to sign up for November’s Paper Pumpkin Kit!

Why should you sign up for Paper Pumpkin?

  • It’s fun to get the Paper Pumpkin box in the mail just for you!
  • Even those people who aren’t big crafters often like to make holiday projects. Paper Pumpkin makes that easy with all supplies included right in the cute box!
  • It’s a treat for experienced crafters to just open the box and GO! No designing a project or pulling out supplies. It’s all in the box!
  • Each kit is easy enough for anyone, crafter or non-, old or young, male or female! Get an extra kit and make yours together or send one to a loved one far away.

What’s special about the November Paper Pumpkin Kit?

  • When you open the box you will find ten little somethings that you might want to hang by the chimney with care—or on a wrapped gift or a neighbor’s door!
  • You won’t have to figure out something to make, just open the box!
  • You must subscribe by November 10 at 11:50 PM (MT) to get this Santa-approved kit!  Do it today so you won’t forget!

(Last month there was an opportunity for Paper Pumpkin subscribers or those who subscribed after the 10th of the month to purchase the “past” October kit in the Stampin’ Up! online store, but they sold out in 30 minutes! No guarantee there will be extra kits this month! Don’t depend on this opportunity. Go ahead and subscribe now! If it turns out you are really unhappy with your kit, contact Stampin’ Up! and let them help you.)

Paper Pumpkin Season of Style Banner New

Subscribe today and you will be billed Nov. 13 and kits will ship out!  You will receive an email that that your Paper Pumpkin Kit is on its way! Even if you were a past subscriber, this might be a good time to renew your subscription to get what promises to be a cute kit for the holidays!

Click HERE to subscribe with my personal link!

Stampin’ Blends Just Add Color Teapot Card

Stampin' Blends Just Add Color Teapot Card

I’ve read many times that coloring is actually very relaxing and good therapy for us, so because I wasn’t feeling well this morning, I decided to get my mind off myself by coloring with the fun new Stampin’ Blends alcohol markers and the Just Add Color Designer Series Paper. One of the patterns in the package have teapots and teacups, and that is what I chose to color.

Just Add Color Designer Paper Teapots

Do you have teapots or fancy teacups?  There seems to be something special about them. Perhaps we don’t use them as much these days, but when I see a nice teapot I think of my grandmother. I also think of all the fancy luncheon plates and teacups I have packed away in the closet because we just don’t entertain with nice things like that these days. My grandmother had a “tier table” with all kinds of tea cups on display.  She said some of them my grandpa got as party favors when he was young! That sounds very odd to me, but that’s what she told me. I did get a teacup at a bridal shower a few years ago as a favor!

Here are some of my teapots!  The one in front is my own from a trip to Canada a million years ago (before kids) and the two behind were my grandmother’s. There are more scattered around my house!  So I think there is something special about teapots!

Teapots

After starting to color the teapot and teacup on the Just Add Color paper, I decided I would cut them out and put them on a little “shelf” with some lace trim underneath!  The card base is Berry Burst, one of the new In Colors. The Naturally Eclectic Designer Paper background is layered on Whisper White Cardstock to help it stand out.  The little shelf is made from a scrap of the wood-look paper in the Wood Textures Designer Series Paper StackAlong the underneath edge of the shelf, I adhered a piece of the Very Vanilla 1/2″ Lace Trim.  The greeting is stamped from one in the Special Celebrations Stamp Set.

The Stampin’ Blends are the new alcohol markers and so pleasant to color with!  You can buy the markers individually or get the whole collection.  There is no price difference, so you can choose whatever works best for you!  Get at least a few and try them out and see how you like them! For coloring, they do work better than the Stampin’ Write Markers that are always so popular, but they have their advantages and the Blends have theirs! So of course you need both!

If you like my Stampin’ Blends Just Add Color Teapot Card and have a special story about teapots or teacups, please add a comment!  Click the Reply button at the top of the post.

Shop Stampin’ Up! for color-coordinating papercraft supplies!

Have Fun Coloring with the Color Me Happy Project Kit

Color Me Happy Project KitThe Color Me Happy Project Kit is perfect to go along with the new Stampin’ Blends alcohol markers!  Get some practice using the Stampin’ Blends while making 16 cards. One of my favorite parts of this kit are the foil-edged envelopes that match the cards!  Very pretty!

Here are the contents of the kit:

Color Me Happy Project Kit ContentsYou get the card bases and envelopes plus all the card pieces and embellishments for the cards.  These are cute little tassels, sequins and gold foil seals. Opening these project kits are so much fun to see all the pieces you get, all right there ready for you to use!

You will also need the Color Me Happy Stamp Set.  These are outline images, perfect for coloring with your new Stampin’ Blends!  You can buy the stamp set and project kit together in a Bundle and save 10%.

Color Me Happy Stamp SetThose two little birds are really cute, don’t you think?  And great sentiments to add to add to any of your cards!  You can certainly get lots of use out of this stamp set in all of your stamping. Get it while it is still available.

Shop Stampin’ Up! Online for the new Stampin’ Blends and Color Me Happy items!

Houston Astros World Series Stampin’ Blends Card

Houston Astros World Series Stampin' Blends Card

Well, the Houston Astros did it last night, they WON the WORLD SERIES!!! That’s never been done before in Houston so I thought I would also use something new to make this card, the new Stampin’ Up! Stampin’ Blends alcohol markers!

The sentiment is one of the images in the new Color Me Happy Stamp Set, available now to help you get used to the Stampin’ Blend markers and have some good images for coloring to use. This stamp set and matching card project kit are avaiable while supplies last.

I didn’t so much worry about “blending” today making this card. The word was pretty narrow and really I just wanted to emphasize the colors that “sort of” represent the Astros colors. I just love the feel of using these new markers!

The word “Astros” is die cut with the Little Letters dies, which are retired. (Too bad!  I like those!)

It’s fun to have my stamping supplies with which to make cards for special occasions like this! Otherwise I would probably have to run to the craft store and buy something or other to use to make some project. As you can see, even though my card is about winning the baseball World Series, there’s not one “baseball” thing on my card!  This shows that you can often make cards without having the exact stamp for that occasion. Often you can just get across the idea using colors, stars, embellishments, etc.

Check out the new Stampin’ Blends markers!  Order just a few colors to try them out if you like or go for the whole collection!

I thought using the Thank You in the new Color Me Happy Stamp Set was perfect to thank the Houston Astros for all their work this season and all the effort they put into the World Series games. Nobody can deny their heart wasn’t in it. You could probably say that about any teams that make it into a championship, but after Houston and the larger area around us were so affected by Hurricane Harvey and the flooding, the players were really playing for the city of Houston as a whole! One player said he had a picture of a flooded home taped in his locker so that if he thought he had problems if he had a bad game, all he had to do was look at that picture and realize that others had it much worse than him.  Many of the players stated in interviews that they were playing to win for Houston after all so many have been through!

Did you see Carlos Correa propose to his girlfriend and give her a ring, on the field, after the game while he was being interviewed?!  What a night for him!

Tomorrow is a parade in downtown Houston for the Astros and all the fans!  They are even closing schools I just heard!  People from far and wide are invited.  What a day it will be to celebrate the Houston Astros World Series win for the first time ever!!!

New Stampin’ Blends Markers Available Today!

Stampin' Blends Brochure

Click to Read!

Today is the day!  The new alcohol markers from Stampin’ Up! are called Stampin’ Blends and are available for purchase by customers today, November 1, 2017 in the Stampin’ Up! Online Store! I love the feel of these new markers while coloring! Since they make blending easy, you can make the shading on your images look beautiful without even being an artist!

Click the photo above or HERE to view the Stampin’ Blends Brochure!

The Stampin’ Blends are being sold singly so that you can easily choose which colors you want or which ones you need to replace down the road.  These markers are consumable, which  means they won’t have refills or anything like that – the pricing makes it easy enough to simply replace a used marker.  To save time, just enter #147475 for the entire collection.  The markers will still come singly in your box, but you don’t have to enter each number in order to get all of them!

Stampin' Blends Price List

Images (c) Stampin’ Up!

If you purchase the whole collection, add a little more to your order to reach $150 to get Stampin’ Rewards, which means you will get 10% of the amount to spend on free merchandise!

Make sure you have the Tuxedo Black Memento Ink Pad to use with these markers because of the alcohol. I strongly suggest buying the Refill right away to have on hand.  With the introduction of these markers, I think the Memento ink might go fast so I’d suggest ordering as soon as possible.

Stampin’ Up! recommends using the Whisper White Thick Cardstock with these markers.  The Shimmery White Cardstock is also good (and beautiful to use on special cards all the time!)

If you like, check out the Color Me Happy Project Kit and the Color Me Happy Stamp Set (in wood-mount or clear-mount).  You can buy both together in a Bundle, as well, and save 10%.

Color Me Happy Project Kit

Check it all out at the Stampin’ Up! Online Store and let me know if you have any questions!


Coloring Fun With Just Add Color Specialty Designer Series Paper

Just Add Color Designer Paper

This Just Add Color Specialty Designer Series Paper might be a pack of paper you would overlook, but now that the new Stampin’ Blends alcohol markers are coming out tomorrow, you might want to consider this paper!  You can make something with the paper, or you can just sit down and color! The paper is heavyweight so it is nice to color on.  Do a little at a time or a lot!  Coloring is good for us!

Stampin Blends Are Coming

The new Stampin’ Blends alcohol markers will be available for ordering starting tomorrow, November 1st!  There will also be a project kit and stamp set available for purchase that goes with the Stampin’ Blends to practice with your new markers and blending! Don’t worry that you have to be an artist in order to use these markers.  These markers make YOU look like an artist with ease! You will get two markers, one dark, one light, with which to blend.  And if you want, JUST COLOR!  You don’t HAVE to do any blending and all that…..just color…..although I bet you won’t be able to resist trying both! Even coloring some of these sprinkling cans on this page, I would think I would “just color” but then I just had to use the other marker and play with that too.  These markers are just fun to use, I almost can’t describe it. They do kind of bleed through the paper, even this heavyweight paper, so always have something underneath. On this paper I can see the coloring from the other side, but it didn’t really make any marks on my paper underneath.

Today is the last day for the Designer Series Paper Buy 3 Get 1 Free and this “Just Add Color” DSP is on the list!  Buy three packs of paper and the 4th one you enter will be free.  So put the most expensive ones first.

Have a Happy Halloween tonight!


Almost the Last Day! Designer Paper Sale Ends Oct. 31

Designer Paper Sale 2017

Click to Read!

This Stampin’ Up! Designer Series Paper Buy 3 Get 1 Free has been going on all month, but amazingly October is almost over! If you wanted to stock up on some designer paper, you have today and tomorrow to take advantage of this sale.When you order, be sure to put the three least expensive papers in first, then the fourth paper you put in will be free!

SHOP THE DESIGNER PAPERS ON SALE!

The Merry Patterns Host Promotion also ending Oct. 31. Place a $300 order, yours or a group, and get this cute Merry Patterns Stamp Set FREE!
SU Merry Patterns Host and Sample

Shop Stampin’ Up! Online TODAY!

Last Minute Halloween Ideas

Here are some of my favorite Halloween posts from last year all in one place, if you need some last minute Halloween ideas!  If you don’t have this year’s Halloween stamps and paper, perhaps you have ones from last year or you can just use something else. Substitution is easy! It doesn’t always have to be “Halloween” paper or stamps.  Just use the ideas!

Halloween Witch's Boot Candy Treat Holder

Halloween Witch’s Boot

Easy to make with a toilet paper roll or paper towel roll! Very cute and fun to make!

Halloween Night Washi Tape Halloween Card

Halloween Night Washi Tape Halloween Card

Use some washi tape, whatever you have, criss-crossing at the bottom of the card and do a little stamping at the top!

Halloween Chocolate Candy Treat Bag

Halloween Chocolate Candy Treat Bag

Even if you don’t have the narrow cello bag, use the idea of wrapping chocolate nugget candies with designer series paper for a Halloween treat!

Halloween Small Hexagon Box

How to Make a Halloween Small Hexagon Box

This cute little hexagon box isn’t as hard as it looks!  Give it a try for any occasion!

Swirly Bird Pumpkins Halloween Card

Swirly Bird Pumpkins Halloween Card

Use the Swirly Scribbles dies to make pumpkins for Halloween!

Halloween Night Candy Bars

Halloween Night Candy Bars

Decorate candy bars of any size with designer paper and Halloween images.

I hope you can use these ideas to inspire your own ideas with the materials you have! Actually most of these could be used as Christmas ideas or for a birthday party.  Just change the colors, the paper, the images.

Have fun making some last minute Halloween treats for family, friends, or your trick-or-treaters!


Houston Astros Win Game 3 of the World Series!

Houston Astros Rainbow Card

Exciting times in Houston, Texas as the Astros made it into the World Series and last night was Game 3, the first game in Houston after two games in Los Angeles against the Dodgers. Houston is SO excited to be playing in the World Series and to have the game at home for three nights!

After Hurricane Harvey the end of August, this is a great distraction for those who have been dealing with the flooding and aftermath for almost two months. As someone said on TV, Houston deserves to win the World Series!” We’ll see what happens! I’m sure the Dodgers think they deserve to win just as much after a long wait to get in the World Series!

Of course being able to stamp and make cards makes it fun when we have a special event like the World Series going on!  This is a card I made sort of looking like a certain vintage Astros sweater that was recently made oh so popular as Kate Upton was spotted wearing it (she’s engaged to one of our Astros pitchers, Justin Verlander!). With all the colors of paper that Stampin’ Up! has, there usually is something to use for most any occasion when you are trying to match colors.  The letters I made on the card spelling out Astros were die cut with the Little Letters Thinlits Dies, which are retired…..but they fit just perfectly on my card!

Stay tuned tonight for Game 4! I’m keeping my fingers crossed for another win!

Stampin’ Up! Reminders

The Designer Series Paper Sale, Buy 3 Get the 4th Paper Free, ends Oct. 31. That’s Tuesday!

The Merry Patterns Promotion ends October 31.

JOIN PAPER PUMPKIN by November 10th to get the second coordinating kit (but each kit stands alone!).

NEW Stampinn’ Blends Alcohol Markers available to purchase November 1!  Get yours right away!


Frankenstein Mini Treat Bag For Halloween

Frankenstein Mini Treat Bag For Halloween

As I was reading something online, I saw a mention of Frankenstein, and I realized with Halloween almost here, I’d almost forgotten about Frankenstein.  We used to make lots of fun cards with one of the original steel dies we used to have, the Top Note Die.  It was perfect for a Frankenstein head!  But as I glanced through some images of Frankenstein to refresh my memory of how his face looked, I noticed people were using various punches to make Frankenstein, perhaps a little smaller though!  I saw one candy project using the Everyday Label Punch, and decided to make a Frankenstein face with that punch.

The face turned out small, naturally, using a punch, and I could have added it to many different things, like the Clear Tiny Treat Box for one thing.  Since I love the Mini Treat Bag Thinlits Dies so much, I decided to make a Mini Treat Bag out of the Spooky Night Designer Series Paper and make the Frankenstein face the focal point.

This is how you start using the Everyday Label Punch to make the Frankenstein face:

Everyday Label Punch for FrankensteinI punched one label out of Lemon Lime Twist Cardstock and one out of Basic Black. The Basic Black one I cut in a little less than half and then just snipped the bangs with my Paper Snips. Then I glued the black hair piece on top of the green face piece. I suppose you could leave the “lump” on top of his head, but I cut mine off, just following along that straight line on top.

For the Frankenstein face, I used the 1/2″ Circle Punch for his nose and sponged it with a little bit of Lemon Lime Twist Ink. For the eyes, I missed having the Owl Punch and forgot that would have been good to use for the eyes.  Use whatever punch that you have to punch out the white eyes.  You can punch smaller dots for the eyes, but the simpler thing to do is just color in the black part of the eyeballs with a black marker.  I used my 1/4″ Handheld Punch for the white eyes. They are a little small but that’s okay.  Just draw on his mouth and scar with a black marker.

To make Frankenstein stand out on the Mini Treat Bag, I just layered him on an Oval die cut, also one with the scalloped edge, and one of the Stitched Shapes Framelit Dies.  The greeting is from the Spooky Cat Stamp Set.

Check out Stampin’ Up! Online for all your papercrafting and stamping supplies!

Halloween Candy Corn Treat Boxes

Halloween Candy Corn Treat Boxes

Someone asked me to make some kind of treat boxes for a school festival, and these Halloween Candy Corn Treat Boxes are what I came up with after looking at a whole bunch of ideas online. As it turned out, these were made with the boxes in a Paper Pumpkin Kit a couple of years ago. The kit came out in time for Thanksgiving and the boxes were designed to look like a piece of pie. Since it’s usually just three of us at Thanksgiving, I saw no need to make these boxes so of course I saved the kit. Sometimes hoarding is good!

Even if you don’t have an old Paper Pumpkin Kit with pie shaped boxes, you can easily make your own triangle boxes yourself out of cardstock.  You can see one I made HERE in this post.  Just cut a strip of cardstock, score in half, then score from the halfway mark on each side to the middle point at each end.

Triangle Box Drawing

I pretty much copied the sample box I saw online. Instead of trying to cut the colored cardstock strips to an exact length and angle, which which have been a little difficult to measure ahead of time, I just adhered each “too big” strip onto the box lid and then trimmed off the excess length with scissors.  Just make the strips whatever width you like, no need to measure.  Just fit them on the box.

The bats were punched with a retired Bat Punch from Stampin’ Up!.  The greeting, as it turns out, after I searched through many old stamp sets, was from a Paper Pumpkin Kit!  Even when you make the project, you still have an exclusive little stamp set to keep! After filling the box with some candy corn in a cello bag, I closed up the box and tied the Pumpkin Pie ribbon around the sides and added a bit of Gold Sequin Trim. We used to have bigger sequin trim but now we have Mini Sequin Trim.

Just for an extra surprise in the box, I decided to make the little black cat Halloween ornament.  All that took was to die cut a circle out of lightweight cardboard and cover with designer paper.  In this case I used some retired paper. Then I used the Cat Punch, a small circle for the moon and sponged the edges, stamped the greeting from Teeny Tiny Wishes (still one of the best stamp sets!) and punched the greeting with the Classic Label Punch.

This was such a fun project to make! Try your hand at making the triangle box!  You can make so many variations for treats or small gifts for most any occasion!

SHOP STAMPIN’ UP! ONLINE HERE!

Easy Halloween Ghost Card

Halloween Ghost Card

If you want to make a quick and easy Halloween card, this Halloween Ghost Card is it! This creative idea is actually one of the things that made me sign up to be a Stampin’ Up! Demonstrator fifteen years ago this month! Sometimes it’s the little things! I was already buying Stampin’ Up! products as a customer from my friend who introduced me to the company, when she suggested I sign up to be a Demonstrator, partly so we could go to the Convention together! When I visited her in October that year, she took me along to a team meeting of other Demonstrators and I got to see even more samples of cards and projects.  I was overwhelmed with all the creative ideas, but when I saw you could make a ghost out of half of a heart shape, I was sold! Who thinks of these things?!  And that thrill has never diminished for me as I see what other ideas stampers come up with!

This card base is Pumpkin Pie Cardstock with a Basic Black layer. The designer paper is Spooky Night.  The “Boo!” words are handwritten with the White Stampin’ Up! Chalk Marker.

This is all you have to do to make this Halloween card. Die cut various size hearts with the Sweet & Sassy Framelits Dies. Or perhaps you have retired heart punches…..or just cut out some hearts with Paper Snips. After you get the heart shape, just cut it in half! Add some eyes or face or whatever you like to make a ghost!  Then put you ghost peeking out from the side of the card or project!

Heart Diecuts

Here is another card explaining the process with another sample!

I always love making Halloween cards and projects, but this was one idea, making ghosts out of hearts,  was one that really stuck with me!  Try it on any Halloween project you want to make!

SHOP STAMPIN’ UP! ONLINE TODAY!

Get on the Stamping With Karen Mailing List! Don’t Miss Out!

Don't Miss My 12 Weeks of Christmas Emails!

Tomorrow, October 25, my next holiday email hits Inboxes with a new project! It’s free, but you have to be on my mailing list! This is a special gift each week to my email subscribers each year and I enjoy doing it! I love seeing new ideas as often as possible! Whether these ideas inspire you to create the same thing or change it to your own liking, it’s all for our stamping fun!  It’s a good way to “get going” before we really get strapped for time before Christmas!

Sign up before 1:00 PM Wed. Oct. 25 to get the next 12 Weeks of Christmas holiday email!

Join my Mailing List by adding your name and email in the box below!


Subscribe to My Mailing List! 

Exclusive Projects

Stampin’ Up! News & Updates

FREE Welcome Gift!

We respect your email privacy

Don’t Miss Out on Getting the Paper Pumpkin October 2017 Holiday Kit! Second Chance!

Paper Pumpkin Kit October 2017 Cards and Envelopes

UPDATE:  These October Paper Pumpkin Kits, Pining For Plaid, will go on sale in the Stampin’ Up! Online Store at 2:00 PM Mountain Time (3:00 PM Central Time) TODAY! Remember, you must be a Paper Pumpkin Subscriber FIRST:  JOIN PAPER PUMPKIN HERE! After you subscribe, you can then purchase ANY past Paper Pumpkin kits or refills that are available. (And you can add any other Stampin’ Up! products to your order as usual.)

These are the two cards you can make in the October Paper Pumpkin Kit, which was already mailed out to subscribers.  These are really easy and fun shaker cards, great for the holiday season!  Not only are the cards cute, but the kit comes with matching envelopes, lined with the same paper pattern as the card base.

The October Paper Pumpkin Kit coordinates with the upcoming November Paper Pumpkin Kit!  This is something new for Paper Pumpkin, to have coordinating kits. This is particularly great for the Christmas holidays when kits are so popular to save all of us time and enable even beginning and non-crafters to make something fantastic with only the supplies in the box and only a little bit of creative time. No figuring out what to make or how to make it or buying supplies.

Watch the video and see how easy these cards are to make! Then read more to find out how to get this kit.

If you missed the October Paper Pumpkin Kit and these cute shaker cards, you have another chance to get this kit! This afternoon, October 23, Stampin’ Up! is adding the kits to the Stampin’ Up! Online Store to be available for purchase. Past Paper Pumpkin Kits are only available to current Paper Pumpkin subscribers, so in order to purchase these “past” October kits, you must subscribe to Paper Pumpkin first.  After you are a Paper Pumpkin subscriber, you can go to the Online Store, as if you were placing any Stampin’ Up! order, and look under the Paper Pumpkin category. If you are a subscriber, then you will see a sub-category of Past Kits. That is where you will find the October 2017 Paper Pumpkin kit called “Pining For Plaid”.

If you like the October Paper Pumpkin Kit and the cute shaker Christmas cards, you will certainly want whatever is coming in the coordinating November Paper Pumpkin Kit. In order to receive the November Paper Pumpkin Kit, you will need to subscribe by November 10, 2017. However, I think the October kits being released later today (after they get them all assembled) might go fast so I would suggest getting subscribed to Paper Pumpkin right away and then be ready to place your order for the October kit when it becomes available.

Click Here to JOIN PAPER PUMPKIN TODAY! 

Then SHOP HERE to get the October Paper Pumpkin Kit!

Paper Pumpkin Kit October 2017 Xmas Cards