A Valentine Card Just For You

A Valentine Card Just For You

You still have a little bit more time to make some Valentines, maybe like this Valentine Card Just For You. It’s really funny how cards come together sometimes. You may have an idea of exactly what you want to make and you make it  You may be copying an idea you saw and you make that. Or you make something and it’s not quite right but with a little tweaking, you get it right to your satisfaction. And sometimes maybe you don’t have an exact design in mind but you start with some paper, add some embellishments and a greeting and it turns out great.

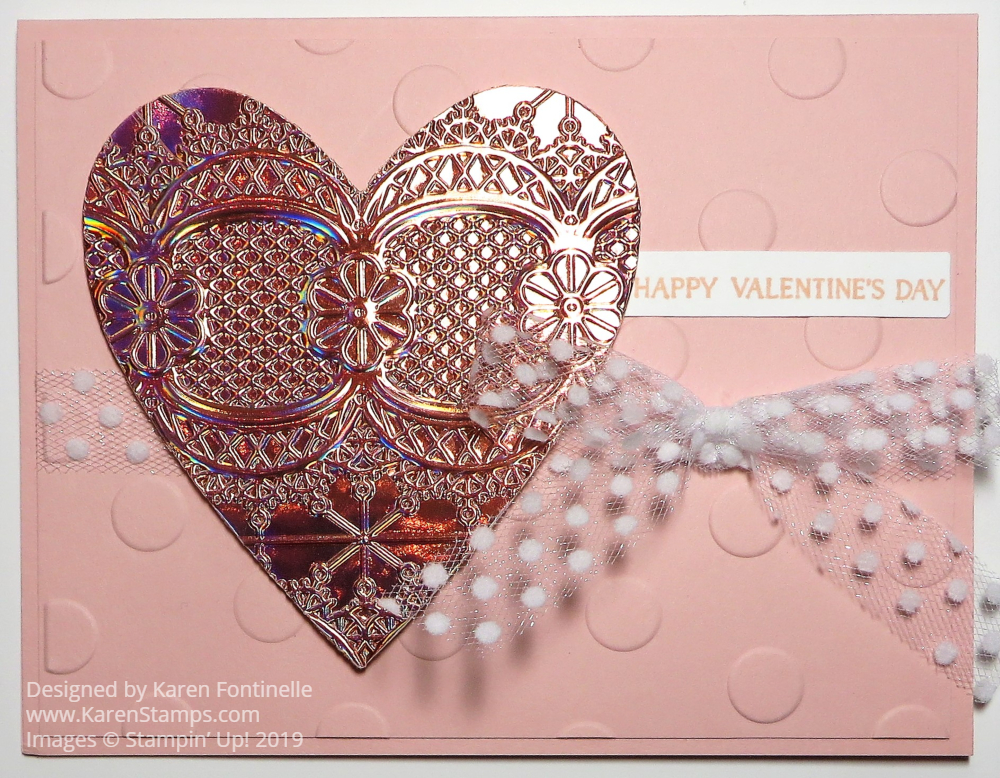
This card started out with just wanting to use the heart patterned paper in the All My Love Designer Series Paper.  The card base is Lovely Lipstick Cardstock with a Whisper White layer and then the heart paper.  On my table, in a pile of extra die cut pieces that I didn’t end up using, I found this large heart cut out with the Be Mine Stitched Framelits Dies out of the Lovely Lipstick Foil.  I cut it out to use on another card but couldn’t make it work.  So I tried it on this card and I like it!

For the greeting, I used the stamp in the Meant To Be set.  I die cut that with a square in the Stitched Shapes Framelits Dies.  It is layered on a larger square in the same set cut out of the Lovely Lipstick Foil.  (That foil is just so gorgeous you would be amazed to see it in person!)  Then this square greeting is layered over the large heart.  I think it works!  What do you think?

For one more touch, I found the little swirly die cut piece out of Lovely Lipstick Cardstock with the die in the Be Mine Dies. It seemed to fit perfectly under the greeting.

Make a Valentine for someone. It might be too late to mail, unless the person would rather get a card late than no card! Or make one for your family or a neighbor or friend  Just have fun for Valentine’s Day making cards!


So Hoppy Together Frog Valentine Card

So Hoppy Together Frog Valentine CardI have to admit, this So Hoppy Together Stamp Set has been a lot cuter than I would have thought when I first saw it in the Sale-A-Bration Brochure!  Frogs, okay.  But once I started stamping with it myself and seeing lots of fun samples online, I quickly came to love it! You can even use it to make a valentine like this So Hoppy Together Frog Valentine Card.

My first idea was for the frog to be holding a very big heart, but then I saw that his hands (feet?) were pretty far apart and the tip of the heart was going to come down over his face!  So I found this small heart that seemed like the right size for one hand!  I always enjoy coloring these frogs with the Stampin’ Blends markers!  If you don’t have any yet, you might want to order a few and try them out.  I find it so relaxing to color with these markers!

And then I felt like some watercoloring was in order!  Since I had used Shimmery White Cardstock, I was able to do a little watercoloring on the paper.  Regular Whisper White might not hold up as well to the water.  We do sell Watercolor Paper, which is the best, but Shimmery White works well, too.  I used my Aqua Painter to pick up just a little bit of ink from the lids of ink pads and just swiped across the card front.  Then I stamped the greeting over the watercoloring (when it was dry).  The greeting is from the Meant To Be Stamp Set.

I couldn’t resist adding a few little Gold Foil hearts die cut from the hearts die in the Be Mine Stitched Framelits Dies.  I love that die with the group of hearts!  You can use all the little hearts of various sizes that come out of the die cut…..OR you can use the piece with the hearts out of it.  Either way is great.

Remember, Sale-A-Bration is going on at Stampin’ Up!  Just spend $50 on any products and choose a FREE Sale-A-Bration item!  Spend $100 and choose two or choose one $100 level product.  The more you spend, the more you get free, in $50 increments!  You might want to choose this cute froggy stamp set, So Hoppy Together!

Here is another of my frog cards!  You just can’t help but love the stamp sets that Stampin’ Up! designs!  So if you already have the So Hoppy Together Stamp Set, make a valentine with it like my So Hoppy Together Frog Valentine Card.  And after Valentine’s Day, use the frogs for other fun cards!  Just have fun with your stamping!

CHECK OUT STAMPIN’ UP! SALE-A-BRATION!

Valentine Candy Clear Tiny Treat Box

Valentine Candy Clear Tiny Treat Box

If you already have the Clear Tiny Treat Boxes then you are always ready to make a treat of some kind to give someone, like this Valentine Candy Clear Tiny Treat Box. These are so easy to assemble and then decorate to hold a small gift or a candy treat!

With Valentine’s Day just a few days away, you might still need some ideas for treats for classes, office co-workers, friends, or neighbors. You could use these Tiny Treat Boxes for party favors for any occasion. Even if all you did was fill the box with candy or whatever treat and tied a ribbon around, you would have something cute to give!

One easy way to decorate a Clear Tiny Treat Box is to wrap around a piece of designer paper. In this case, I used a piece of the All My Love Designer Series Paper, the pattern with all the hearts. One thing that’s really nice is that you can see the pattern on the other side of the paper, flowers, from the inside of the box.  I had various hearts that were already die cut so I chose a few and layered them on the front of the box.  These came from the Be Mine Stitched Framelits Dies, which you can use way beyond Valentine’s Day.  Depending on the dies, sometimes it is useful to just die cut extras, maybe in various colors, so you have a little stash of pieces to use on cards and projects.

Have you seen these gigantic M&M’s??  They are way bigger than the regular ones!  Really fun to put in a treat box like this one! (And certainly fun to eat!)

For another idea, I had also made this treat box using the So Hoppy Together frog! In this project, I didn’t wrap paper around so the green candies could be seen easily to match the frog!  I always have a package or two of these Clear Tiny Treat Boxes  on hand because they are so useful and easy to come up with creative ideas!

Clear Tiny Treat Boxes

Have fun making your preparations for Valentine’s Day, if that is a big holiday for you and your family!  Valentine’s Day just holds so many memories for most of us since we have been making valentines since we were children!  Take some time to relax and make some valentines to give away!

SHOP STAMPIN’ UP! ONLINE HERE!

All My Love Hearts Valentine Card

All My Love Hearts Valentine Card

This All My Love Hearts Valentine Card came about mostly from scraps on my kitchen table!  At first, I couldn’t come up with any decent design so I just walked away for a while.  Then I looked online for some inspiration and found a card with the print heart that I used on this card, which I already had cut out in the pile on my table. Suddenly it all came together, but really it’s just a simple card.

The card base is Lovely Lipstick Cardstock.  The print heart is from the All My Love Designer Serie Paper, die cut with the narrower heart from the Be Mine Stitched Framelits Dies.  When you use this die to cut out a heart, it cuts out the inside heart and then you can poke out the narrow border heart from the die.  I almost forget it is in there!  In this case, I just used the opposite side of the paper for the heart outline.

The gold grouping of little hearts is another die in the same Be Mine Stitched Dies. It was just on my table but didn’t quite fit across the card……so I cut it in half and the heart covers it so it doesn’t have to stretch all the way across.!  You can do that with a lot of things!

Next, the card needed a greeting somewhere, somehow.  I decided to just stamp right on the card with this greeting which fit perfectly.  I wanted to put Happy Valentine’s Day but that didn’t fit right so I stamped that on the inside of the card!  I used the Stamparatus to stamp the greeting on the front of the card so I wouldn’t mess it up since I already had the heart and gold foil adhered to the layer.

Since the inside of the card would be the Lovely Lipstick Cardstock, I added a layer of Whisper White so I could stamp a greeting, which, as I said, turned out to be “Happy Valentine’s Day.  Since there were some little heart stamps in the set, I stamped a few in the corner.  Then I took a wild and crazy chance and stamped two on the front of the card.  I think that finished it off nicely and I didn’t need to add anything else.  Know when to stop!  Sometimes I don’t!

Are you going to be busy making Valentines this weekend?  It is time to make them and send them!  You can either make one design and make several of the same card in assembly-line fashion or have fun making all different designs.  Just don’t make them too complicated or you won’t get as many finished!  Do you have any doctor or hair appointments this week?  Make some Valentine treats to take to the office staff!  They really appreciate that.

You could also stand at your Big Shot and die cut a bunch of pieces at one time out of different papers and cardstock, then go back to your craft table and see what you can come up with!  Either way, have fun making some Valentines like this All My Love Hearts Valentine Card.

SHOP STAMPIN’ UP! ONLINE HERE!

PS:  Sign up to get Paper Pumpkin today so you don’t miss the deadline (tomorrow, Feb. 10th)!

Behind the Scenes of the February Paper Pumpkin Papercrafting Kit

Paper Pumpkin Feb 2019 Inside Look BannerSee a little hint in the banner above about the upcoming February Paper Pumpkin Kit? Usually Stampin’ Up! keeps the kit a complete surprise, but this time they have been giving us lots of behind-the-scenes glimpses of how the artists plan a kit.  I think it has been fun and I’m excited to get my kit as soon as it comes out (and the post office feels like delivering it!).

Here are a few more photos of how the Stampin’ Up! artists worked on their concept for the kit!

Paper Pumpkin Feb 2019 FB Photos SUIf you are thinking maybe they are sending us all succulents…..probably not!!  Although my daughter sent me one last year for my birthday or Mother’s Day, so I am already trendy! Succulents are trendy so be sure you are “hip” and subscribe to Paper Pumpkin today!

So what are they doing with all this dirt and succulents?? Taking photographs from all angles to get the best look from each succulent!

Paper Pumpkin Succulent Photography

Then they will take the photographs and use them to design papers to use in the kit!

If you want to know if the Paper Pumpkin kit is cards or some other project, just ask me! Usually, we don’t know and I don’t want to spoil the surprise for anyone.  Funny how some people don’t like surprises and really want to know each month what the kit is going to be and other people love the surprise of opening the box and seeing what is inside!  Either way, even if you know, I think it is still a fun surprise to receive the Paper Pumpkin red box in your mailbox and then open it and actually see the contents!  Everything is included, even adhesives, plus an exclusive stamp set and ink spot. If you don’t like the project, use the materials to make something else.  There are always alternative ideas posted online after people have a chance to work on their kit.

Try Paper Pumpkin and see how you like it! If it is not for you, you are not obligated to continue for any certain time.  Just cancel by the 10th of the month.  Too busy or traveling?  Just skip a month in your account…again, by the 10th of the month. Really dissatisfied with your kit?  Give Stampin’ Up! a call and talk to them about it as they guarantee all Paper Pumpkin Kits.

I consider Paper Pumpkin a treat for myself each month!  I deserve it and so do you! It’s an easy way to stop the world and do some crafting without finding an idea, getting out your supplies and spending time getting it just right.  Just open the Paper Pumpkin Kit box at your kitchen or craft table and it’s all right there waiting for you!  So fun to see all the extra little supplies or embellishments they put in the kit!

You only have until Sunday, February 10th to sign up for Paper Pumpkin to be assured of getting this kit!  Do it right now while you are thinking about it!  I know I don’t always read my “To-do” list after I make it so don’t let time get away from you!

JOIN PAPER PUMPKIN TODAY!

(This is my personalized link so you don’t have to put in my name!  But if you have your own Demonstrator you want to sign up under, please just go to www.paperpumpkin.com.)

Floral Romance Sympathy Card

Floral Romance Sympathy Card

While we all hate to make sympathy cards because it means the loss of someone we knew and cared about, we usually want to make a special card to send to the family, and with the Floral Romance Specialty Designer Series Paper you can’t go wrong as on this Floral Romance Sympathy Card.  The paper is so beautiful in itself I think it is perfect for this type of card. It’s pretty but soft and calming.

The Floral Romance paper is 12 sheets: 6 sheets of vellum, 2 each of 3 designs and the 6 sheets of regular printed paper.  The vellum is really pretty and something different.  Being printed, adhesives don’t seem to show through the paper so that makes it easier to use than regular plain vellum.

This card base is Petal Pink, one of the coordinating colors with this sheet of vellum.  The vellum is adhered to a piece of Whisper White Cardstock of the same size which shows off the design of the vellum.

The sympathy greeting is from the Flourishing Phrases Stamp Set.  This stamp set has some beautiful greetings plus very nice images. It’s one of those sets you will go back to many times.

The greeting is stamped on Whisper White Cardstock, die cut with the Big Shot and Stitched Shapes Framelits Dies.  I love the Stitched Shapes Dies and use them a lot. This piece is then layered on a Petal Pink scalloped oval, die cut with the Layering Ovals Framelits Dies.

The ribbon is the beautiful Rich Razzleberry 1/4″ Velvet Ribbon.  Although it is not one of the official coordinating colors, I thought it looked nice with the paper and certainly the ribbon itself is pretty and rich-looking. I couldn’t resist a few sequins on the card.  We all love the Basic Adhesive-Backed Sequins because they are easy to use!  No more tiny drops of glue!

You’ll find this pretty Floral Romance Designer Paper in the Occasions Catalog.  Although this card is a sympathy card, I had previously made a similar card you can see HERE with a different greeting, of course.  I sent this one to my daughter as a congratulatory card when she ran a 5K race and came in first in her age group!

Add this Floral Romance Designer Paper to your order.  Remember, with a purchase of $50 you can choose a free Sale-A-Bration item!  You will be able to use all this Floral Romance Paper on many different kinds of cards, including sympathy cards when necessary.

Shop the Stampin’ Up! Online Store HERE!

Precious Parcel Sale-A-Bration 2019 Card Kit

Precious Parcel Sale-A-Bration 2019 Card Kit Finished

Sale-A-Bration is the biggest promotion Stampin’ Up! has during the year and the one that everyone gets the most excited about, because who doesn’t like free stuff like this Precious Parcel Card Kit?!  With every $50 you spend on any Stampin’ Up! products, you may choose a FREE Sale-A-Bration item!  This promotion goes on through the end of March and a few new SAB items to choose from will be available February 15th.

One of the choices this year in the Sale-A-Bration Brochure is this Precious Parcel Card Kit.  It makes eight beautiful cards, four each of two designs. And they are unusual cards with the special card that is inserted in the slot on the front of the card where you can write or stamp a note or greeting plus the card actually opens with plenty of room for a personal greeting.

Everything is included in the kit and adhesive strips are already applied to the inside of the card. I have to say this is probably the easiest card kit I have ever put together and it looks so nice when finished!  The only hard part is remembering to tie on the little twine bow through the front holes of the card before adhering the folded portion of the card!  But even then I was able to reach inside and insert the twine through those poked holes!  And if not, I could have just tied the bow and glued it to the front!  The little gold foil accents to look like metal pieces for the corners of the card as so cute.  And I love the little clip and stamp that is attached to the inserted card in the “mailbox”.  The whole thing is very cute and I loved making these cards!

This Precious Parcel Card Kit has been very popular so if you are planning to order and really want this kit, you might consider getting it soon so that it doesn’t go on backorder just when you want it.  This and the Grapefruit Grove and Lovely Lipstick Foil Sheets are both in danger of backorder.  Might not happen, but both of these items are really great!

Precious Parcel Sale-A-Bration 2019 Card KitPrecious Parcel Sale-A-Bration 2019 Card Kit Contents

If you would like something where you just sit down and make beautiful cards with no planning, no getting out supplies, then choose this Precious Parcel Kit with your $50 or more purchase during Sale-A-Bration!

SHOP STAMPIN’ UP! DURING SALE-A-BRATION!

Red Money Envelopes For Chinese New Year 2019 Year of the Pig

Chinese Red Money Envelopes Year of the Pig 2019

It is the Chinese tradition to give out red envelopes with money inside to celebrate the Chinese New Year, which begins today. Here are Red Money Envelopes For Chinese New Year 2019 Year of the Pig, handmade for a Chinese acupuncture doctor who has asked me to make some for her for a couple of years now.  She likes them all different and a few without the animal of the year, so it is both a challenge and great creative fun to come up with many different designs for the envelopes.  It’s really like making a card, maybe just in a different shape.

One of the time-savers of this process is using my Envelope Punch Board.  I used Real Red Cardstock, cut to a certain size, and then punched and scored with the punch board very easily. Next, I creased all the score lines and assembled with Multipurpose Liquid Glue. So that she can put the cash gift inside and seal the envelope later, I just put a Stampin’ Dimensional on the envelope flap that will seal the envelope when she removes the little paper on the dimensional.

To design the envelopes, I looked back at past money envelopes I made, such as these from last year and ideas for the stamp sets I might use. This year, the Year of the Pig, it was easy to choose the  This Little Piggy Stamp Set in the Annual Catalog.  When I am doing custom projects for someone, I often pull out retired stamp sets and accessories and embellishments to use, so you may see some things that are not current.

Here are some more money envelopes with stamping, coloring, and other embellishments.

Chinese New Year Red Money Envelopes 2019

Great to use the Large Numbers dies again.  They come in handy for projects like this.

Chinese New Year 2019 Money Envelopes

I did some embossing on some of the envelopes to add an interesting background.
Chinese New Year 2019 Money Envelopes
It’s fun using the little piggy in different positions and with a little bit of glimmer through paper or Wink of Stella.

Chinese Red Money Envelopes 2019 Year of the Pig

Chinese New Year 2019 Red Money Envelopes

Chinese New Year 2019 Red Money Envelopes

I especially loved using my Stampin’ Blends alcohol markers to color in all the pigs! I love the feel of those markers when I am coloring!

If you have some Chinese friends or family, you might like to surprise them by making your own red money envelopes to celebrate the Chinese New Year!  You can find templates online or make your own envelopes easily with the Envelope Punch Board from Stampin’ Up!

Happy Chinese New Year!


Need Super Bowl Football Card Ideas?

Today is Super Bowl LIII, the New England Patriots playing the Los Angeles Rams, so if you would like to make a card for your favorite football fan, here are some Super Bowl Football Card Ideas from years past!

Super Bowl 2017 Owl Punch Art Football Game Card

Super Bowl 2017 Punch Art Football Game Card

One of the most popular punches of all time (I would think!) was the Owl Punch, used to make these football players out on the field! Just using a couple of narrow strips of paper can make a card look like a football field.

Super Bowl LI Football Card

A Football Card For Super Bowl LI in Houston, Texas

A couple years ago we were so excited and proud in Houston to host the Super Bowl! Maybe someday our Houston Texans will actually be IN the Super Bowl!  Maybe!

Super Bowl 2017 Card With Punch Art Football Helmets

Super Bowl 2017 Card With Punch Art Football Helmets

Make some football helmets for your card with a few punches!  Use your team colors!

Super Bowl Sunday 2016 Football Owl Punch Card

Super Bowl Sunday 2016 Football Owl Punch Card

Here are these owls again playing football!  Substitute one of our current animal stamps if you don’t have the Owl Punch in your stash!

Lace Embossed Heart Valentine Card


Lace Embossed Heart Valentine Card

The Lovely Lipstick Foil Sheets are beyond gorgeous, as you can see on this Lace Embossed Heart Valentine Card.  They are something you can earn FREE during Sale-A-Bration with a $50 purchase and you get two colors! Check out this card I made with the Grapefruit Grove Foil Sheet the other day.

Foil is difficult to photograph with the glare so you can expect that the paper in real life is much more beautiful than this photograph can capture!  Not only is the color of the foil gasp-worthy every time you look in the package, but when you use the Lace Dynamic Textured Impressions Embossing Folder you really come up with something fancy!

This card base is the Lovely Lipstick Cardstock with a layer of Whisper White Cardstock embossed with the very pretty Tufted Dynamic Textured Impressions Embossing Folder.  This is another very nice embossing folder to have for when you want a little texture or interest in the background but nothing overwhelming.

The greeting is stamped from the Forever Lovely Stamp Set in Lovely Lipstick Ink.  It is popped up on Stampin’ Dimensionals over the die cut heart.

TIP:  When you are die-cutting and embossing, be sure to do the die-cutting first, then emboss.  If you emboss first, then run the piece through the Big Shot again to die-cut it, you run the risk of flattening out the embossed design.

The little design at the bottom is made of two die cut pieces of the Lovely Lipstick Foil.  It is a die in the Be Mine Stitched Framelits DIes.  It is shorter than the width of the card so I cut two pieces and trimmed off just a tiny piece of a swirl so it would better match the other piece it was connecting with.  It adds a nice little fancy border without taking anything away from the main focal point of the card.  I just used teeny tiny dots of Multipurpose Liquid Glue to adhere that piece.  Adhesive sheets would be good to use!

The large heart is also die-cut with the Be Mine Stitched Framelits Dies.  You might consider the Meant to Be Bundle containing these dies plus the Meant to Be Stamp Set and save 10%.  Not to mention, purchasing the Bundle earns a FREE Sale-A-Bration item!  And if you order another $50 worth of product, you can choose two FREE Level 1 Sale-A-Bration items or 1 of the Level 2 Choices.  What a great deal!!

It’s time to make Valentines so make sure you have all the supplies you need!  Just remember that hearts are for any time, not just Valentine’s Day so don’t hesitate to purchase Stampin’ Up! hearts whenever they have them!  Think of weddings, engagements, anniversaries, even just thinking of you or graduation. Lots of opportunities to use hearts!  And these are lovely ones this year!

Lace Embossed Heart Valentine Closeup

SHOP STAMPIN’ UP! ONLINE HERE!


So Hoppy Together Frog Card For Anyone

So Hoppy Together Frog Card For Anyone

This So Hoppy Together Frog Card For Anyone came about because it is a drizzly, dreary day here in Houston Texas so I thought I would try out one of the bright patterns in the Happiness Blooms Designer Series Paper that I just purchased the other day! However, when I looked through the paper, this more muted pattern was the one that inspired me!  Go figure!

I thought of the frogs in the So Hoppy Together Stamp Set immediately, I guess because of the green!  You can get this stamp set FREE during Sale-A-Bration with a $50 purchase through March 31.  You KNOW you can easily spend $50 on Stampin’ Up! products once you start looking at the catalog!!

This card has a card base of Call Me Clover with a thin layer of Whisper White to help the designer paper stand out a little.  I punched the tag with the Scalloped Tag Topper Punch, a favorite of mine!  Then I used just the stamps in the So Hoppy Together Stamp Set for the images and the greeting.  I used my Stampin’ Blends to color the frog and the little flies.  I just love coloring with those Blends alcohol markers. There’s something about how smoothly they color on the paper or something!  And a little piece of Daffodil Delight 1/4″ Cross-Stitched Ribbon to tie on to the tag for some brightness!

That’s all there is to it!  This is a very easy card and you can adapt just the design to almost anything!  At least this stamp set and designer paper are not backordered…..yet!

SHOP STAMPIN’ UP! ONLINE HERE!

Embossed Grapefruit Grove Foil Heart Valentine Card

Embossed Grapefruit Grove Foil Heart Valentine Card

How about this Embossed Grapefruit Grove Foil Heart Valentine Card?  Isn’t that foil heart just magnificent?  I’m not bragging, I just love that Grapefruit Grove Foil Paper and embossing it with the Lace Dynamic Textured Impressions Embossing Folder really puts it over the top!

The good news is that the package of Grapefruit Grove & Lovely Lipstick Foil Papers is just gorgeous!  Every time open the package I just gasp at how pretty the colors are!  The bad news is that Stampin’ Up! says it is possible they will run out before the end of Sale-A-Bration, so if you want these foil papers you should order them as soon as possible.  The fact that they are FREE during Sale-A-Bration with a $50 purchase is amazing.

The base of this card is the same color as the first layer.  I wanted to use pink.  I think I used Powder Pink.  The top layer is embossed with the Polka Dot Basics Textured Impressions Embossing Folder.

The foil heart is quite large so it fits nicely on this card.  I put it off to the side so I could use the Whisper White 5/8″ Polka Dot Tulle Ribbon to wrap across the front and tie in a bow.  I love this ribbon!

The greeting is from the Forever Lovely Photopolymer Stamp Set.  I played around with the greeting to see where the best place would be to place it.  When you are designing a card don’t be afraid to move things around, try different things, whatever it takes and you will be able to tell when it all comes together!

Valentine’s Day is in two weeks so you have time to order supplies and make some Valentines!  What could be more fun?!  Remember, the price of postage went up to $.55 although if you have the “Forever” stamps they are fine. Just check the USPS site for all the postage prices.

Shop Stampin’ Up! For Valentine Supplies!


An Inside Look at the February 2019 Paper Pumpkin Kit

Paper Pumpkin Feb 2019 Inside Look Banner

If you would like a Paper Pumpkin Sneak Peek for February,  read below!!

Every Paper Pumpkin kit is specially designed at Stampin’ Up! by our designers and concept artists. These talented individuals develop original patterns, artwork, designs, photography, and more to create kits that you love.

This video gives you an inside look at this creative process through the eyes of the designer and concept artist themselves; plus, it gives you a taste of the themes, colors, and elements you can expect to see when kits arrive in February.  The video won’t spoil any surprise, really.

If you want to be surprised in February, don’t read any further!

*

*

The February 2019 Paper Pumpkin Kit will be:

  • An all-card kit
  • Makes 9 full-sized cards in 3 unique designs (3 of each design)

Here are some photos on the Paper Pumpkin Facebook Page of the design process!  Who would think to design cards you would be working with dirt and succulents?!

Paper Pumpkin Feb 2019 FB Photos SU

Here’s how to get YOUR Paper Pumpkin Kit mid-February when they ship out:

SUBSCRIBE HERE ON THE PAPER PUMPKIN PAGE AND CHOOSE MY NAME AS YOUR DEMONSTRATOR:  KAREN FONTINELLE

OR

SUBSCRIBE HERE AT MY PERSONAL LINK AND YOU DON’T HAVE TO CHOOSE A NAME!

JOIN Paper Pumpkin by February 10th in order to get the February Kit!  But better to do it early just in case they would sell out!  You will not be charged until the kit ships in February.

Each kit contains all the supplies you need for the project right there in the box!  With your first kit, if you are a new subscriber, you will receive a special acrylic block on which to mount the stamps, so you will have everything you need even if you are not a big stamper or crafter.  The kit comes to you in the mail once a month, but you can skip a month any time or cancel if you must.  Each kit is guaranteed by Stampin’ Up!

Let me know if you have any questions!  If not, go ahead and JOIN Paper Pumpkin NOW!!


Easy Floral Romance Card

Easy Floral Romance CardIf you want to make a beautiful card easily, just grab the Floral Romance Specialty Designer Series Paper and start creating! Some of the pages are vellum, like this one on this card. It is really beautiful paper that you will love!  The papers of Floral Romance are perfect for weddings, anniversaries, birthdays, or simply to say “Hello” and that you are thinking about that person. Everyone would love to get a personal handmade card in the mail instead of more junk mail!

I started with a card base of Fresh Fig Cardstock because it is one of the coordinating colors and then a layer of Whisper White to be placed under the printed vellum.  I just applied the Multipurpose Liquid Glue to the darkest colors on the backside of the vellum and I don’t think it is showing through.  This printed vellum is great for that!

For the greeting, I stamped with Petal Pink, another coordinating color of the designer paper, on a piece of Whisper White with a stamp from the Forever Lovely Stamp Set. That was punched with the 1 1/4″ Circle Punch and layered on a die cut from the Stitched Labels Framelits Dies.  I used Petal Pink for the circle die cut.

I tried several ribbons to tie around the side of the card but nothing looked quite right so I went with a piece of the Whisper White 5/8″ Flax Ribbon, although it is currently on backorder until mid-February. It is just adhered underneath the circle die cut and greeting.  If you don’t already have the Flax Ribbon, just substitute some other wide ribbon.  If you have narrow ribbon, try winding it back and forth underneath for another look! And of course, a few Petal Pink Basic Adhesive-Backed Sequins.

Here is a birthday card I made using a different pattern of the Floral Romance vellum.

Remember to put the new postage on your envelope and all your mail beginning today! This easy Floral Romance card could be sent for a Valentine, birthday, so many occasions! Just let someone know you are thinking of them!


Two Easy Small Square Valentines

Two Easy Small Square Valentines

Here are Two Easy Small Square Valentines to show you how you can use both sides of the beautiful designer paper and make some smaller, simpler Valentines that are still lovely! Often when we start cutting up our designer paper, which we hate to do in the first place (heaven forbid that we USE those beautiful 12″ x 12″ sheets of paper!), we hate that we are not using the opposite side!  We pick the side we want to show on our card or project, but then we hate that the other side is hidden because we like that side, too! So here I have made a Valentine with the side of one pattern of designer paper and another Valentine showing the other side of the same paper

Both cards are 8″ x 4″, folded in half so that the card base is 4″ x 4″.  Lots of times I make these cards 4 1/4″ x 4 1/4″ so choose whatever you like.  I used Whisper White Cardstock for the card base and the All My Love Designer Series Paper.

The card on the left with the flowery pattern of designer paper has the Whisper White card base, then a layer of Flirty Flamingo Cardstock since that is a coordinating color of the designer paper, and then the designer paper.  Before adhering, I added a piece of Whisper White 1/8″ Sheer Ribbon and tied a separate cheater bow which I then adhered over the ribbon. Use Mini Glue Dots or a tiny drop of Multipurpose Liquid Glue.

For the heart, I stamped a greeting from the Meant To Be Stamp Set on a piece of Flirty Flamingo and then die cut with a heart in the Be Mine Stitched Framelit Dies.  With this die, the heart comes out plain but there is also a heart frame die cut with the stitching.  Just remember to poke it out of the die!  If you die cut another heart in a different color, like I did with Whisper White, you can use the other color for a frame around your heart!

On to the next Valentine with the other side of the flowery All My Love Designer Paper.  The complement of this paper is Lovely Lipstick Cardstock which I used for the layer on the Whisper White Cardstock.  This time I stamped the greeting on a piece of Whisper White, die cut the heart, then die cut the fancy heart in Lovely Lipstick. The fancy heart is then layered over the white heart. I stamped a small greeting since it is a small space in the center of that fancy heart.  For a finishing touch I added a bow in the Lovely Lipstick 1/8″ Grosgrain Ribbon at the top of the heart.

There you have two very easy Valentines to make and you got to enjoy using both sides of one sheet of designer paper! If you have a lot of valentines to make, you might like using a smaller size to save on paper and using a simple layout design.

The All My Love Designer Series Paper is not just for Valentine’s Day so be sure to order it to use all year.  The same is true with the Be Mine Stitched Framelit Dies.  Hearts are for lots of things!  I always miss then when Stampin’ Up! somehow takes them out of the catalog! But these are here now so don’t miss them!  Save 10% on the Bundle containing the Meant to Be Stamp Set and the Be Mine Stitched Framelit Dies.  Then have some fun making some Easy Small Square Valentines.

SHOP STAMPIN’ UP! HERE!