Category Archives: Halloween

More Halloween Treat Boxes

Halloween Treat Character Boxes

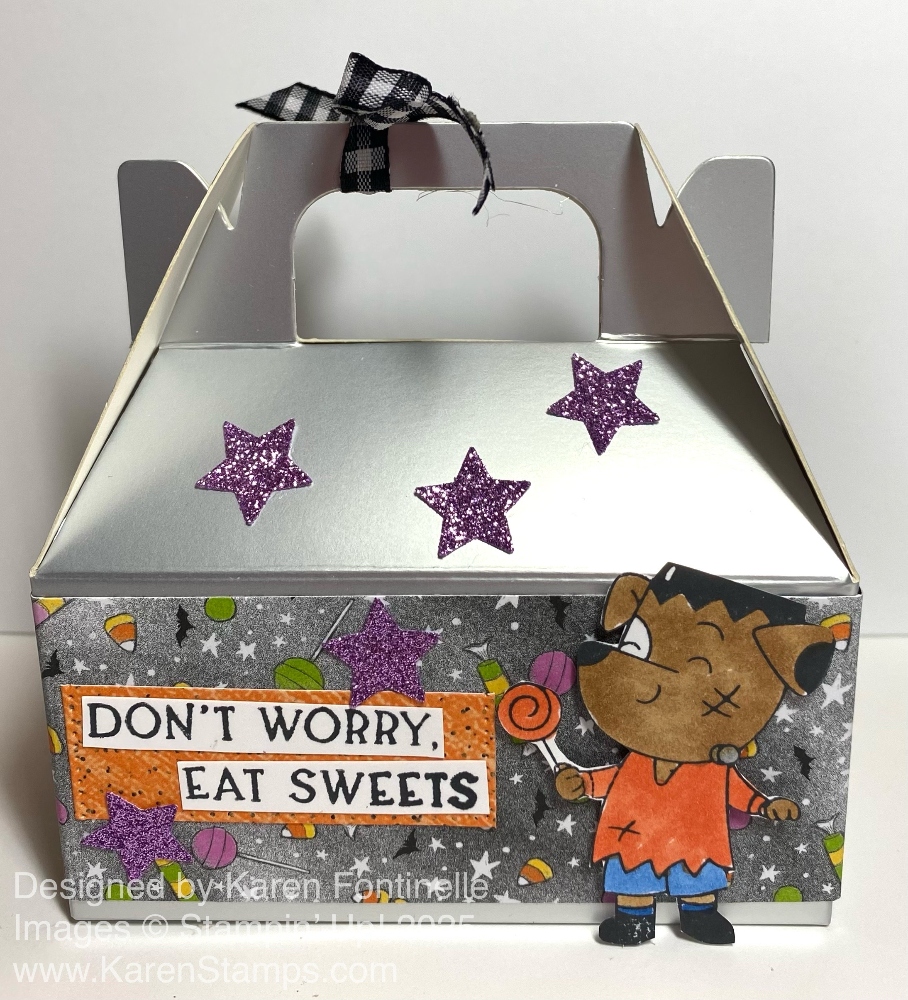
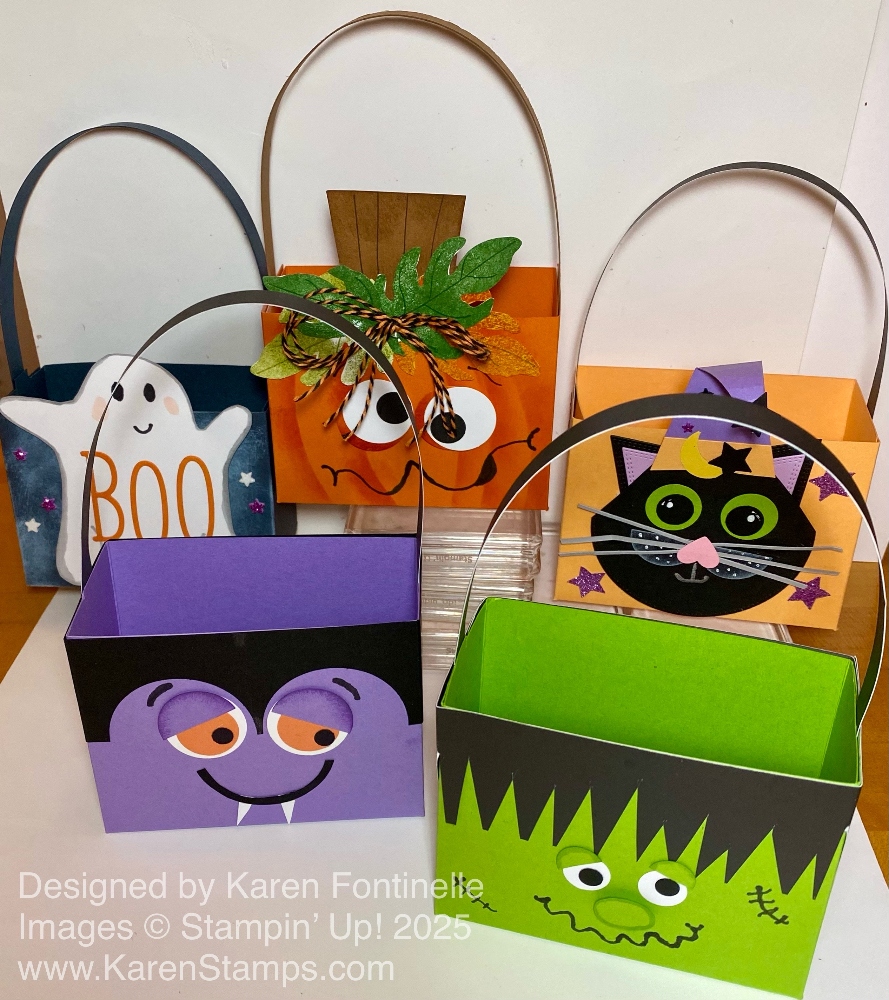
I’m going to show you the last of my Halloween Treat Boxes I have made for the trick-or-treaters this year! Hopefully we will get a decent number of kids, but we don’t get as many as we had years ago.

These darling character boxes you see in the top photo I found online at www.stampingamore.com. This lady has made quite a few of these style boxes for different seasons and every one is cute! She has videos so you can watch and make at the same time.These boxes are super easy to make and then you just make whatever face or design you like on the front.

The first one I made, watching the video, was Dracula, the purple box. It turned out so cute I wanted to make more. The next one of hers that I copied is the black cat with a witch’s hat. I think I added some extra glimmer stars that I punched out. I did pull out some retired punches for all of these projects.

Next I made the green Frankenstein box. It is her design but by then I could whip up a box pretty easily and I’ve made lots of Frankenstein boxes and cards through the years.

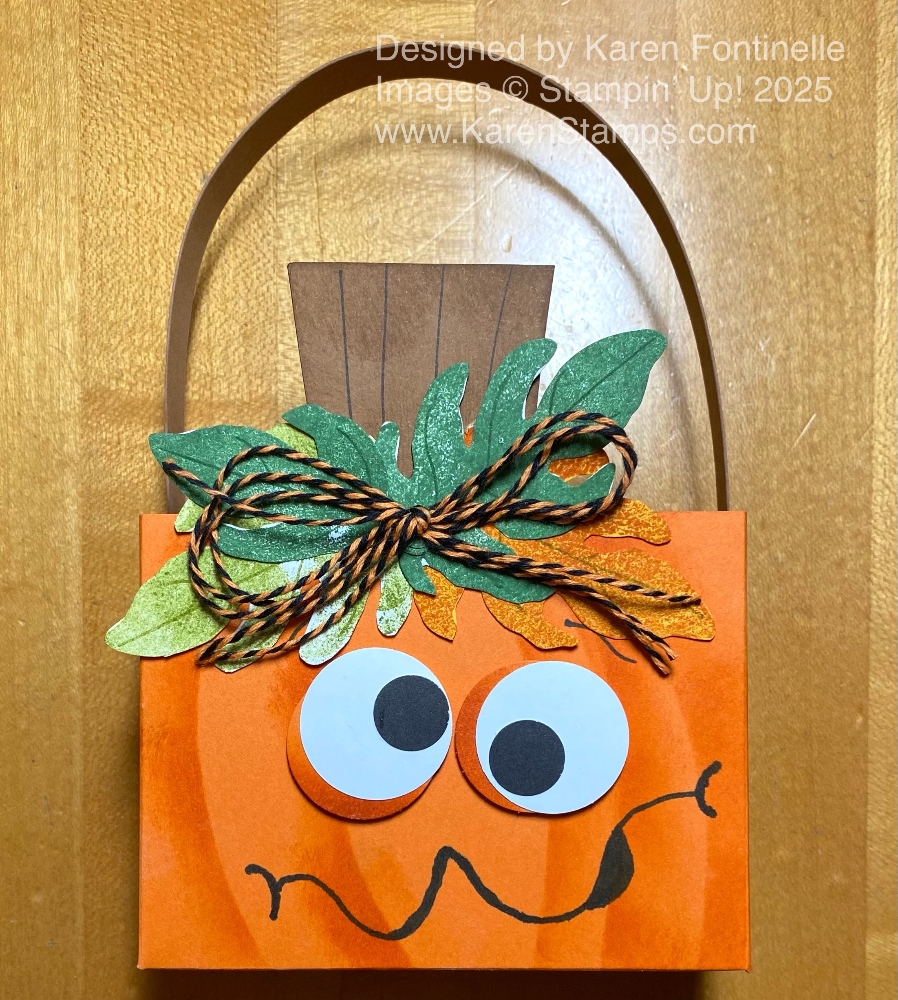
By then I was ready to strike out on my own with the pumpkin box. I copied a face I saw on Pinterest but I think it was an ad and didn’t give a name. I wanted something to make it look more like a pumpkin so I simply cut a piece of cardstock in a curve and then sponged on Pumpkin Pie ink along that curve to give the pumpkin it’s curves! I dug out a retired stamp set with leaves the sizes wanted and stamped and fussy-cut some fall leaves in various colors of green and orange. The stem of the pumpkin is just a piece of Pecan Pie cardstock I cut by hand, with no thought! I tied a bow with some orange and black baker’s twine. I really liked my pumpkin treat box!

Halloween Pumpkin Treat Box

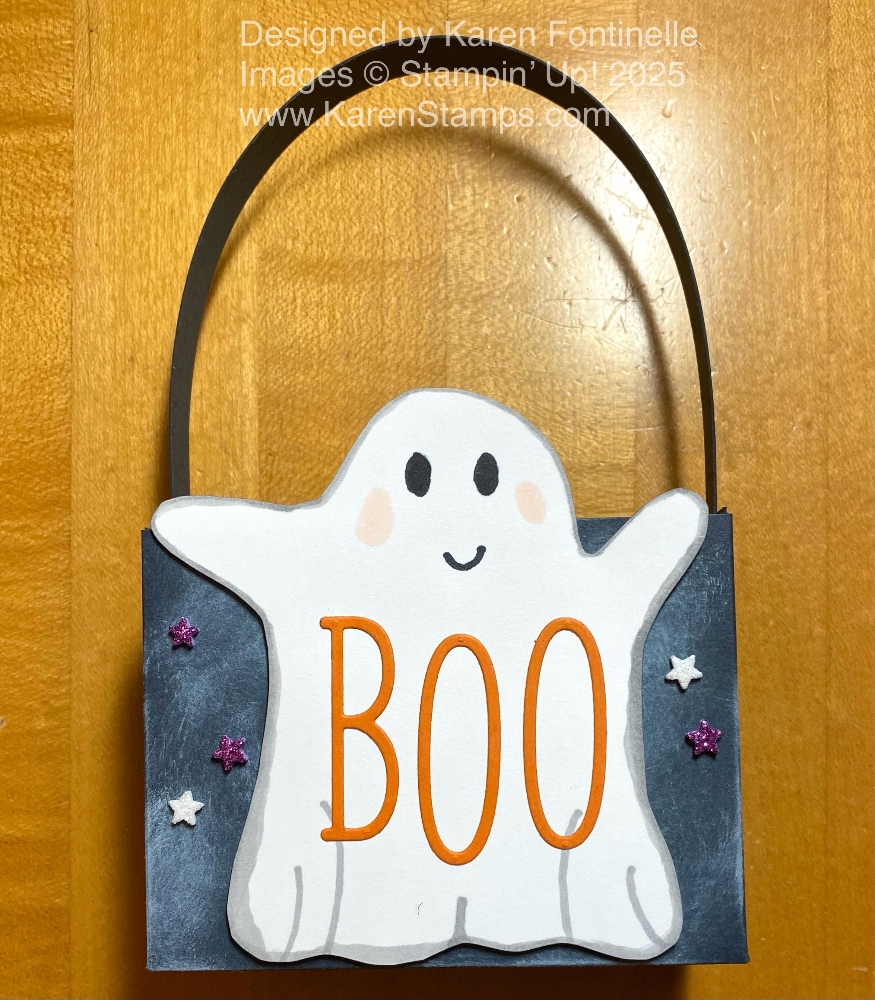
I also wanted to make a ghost. I just drew the ghost freehand because a ghost can look like almost any shape! The box is black but I sponged on some white kraft ink to look spooky. I also edged the ghost with a Smoky Slate Stampin’ Blend marker. To make the ghost even cuter, I die cut the letters for “Boo” in the Alphabet A La Mode Dies.

Halloween Pumpkin Treat Box

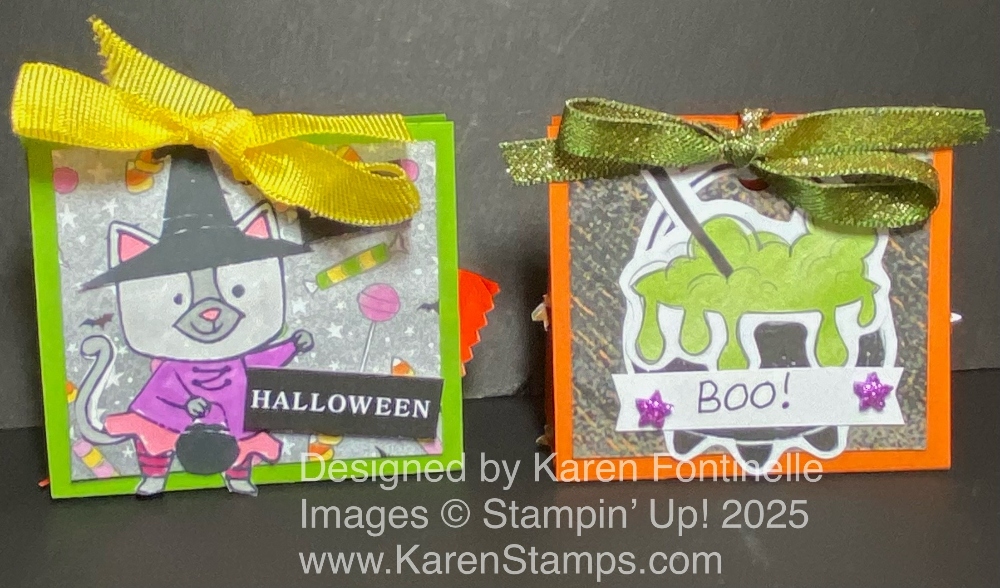
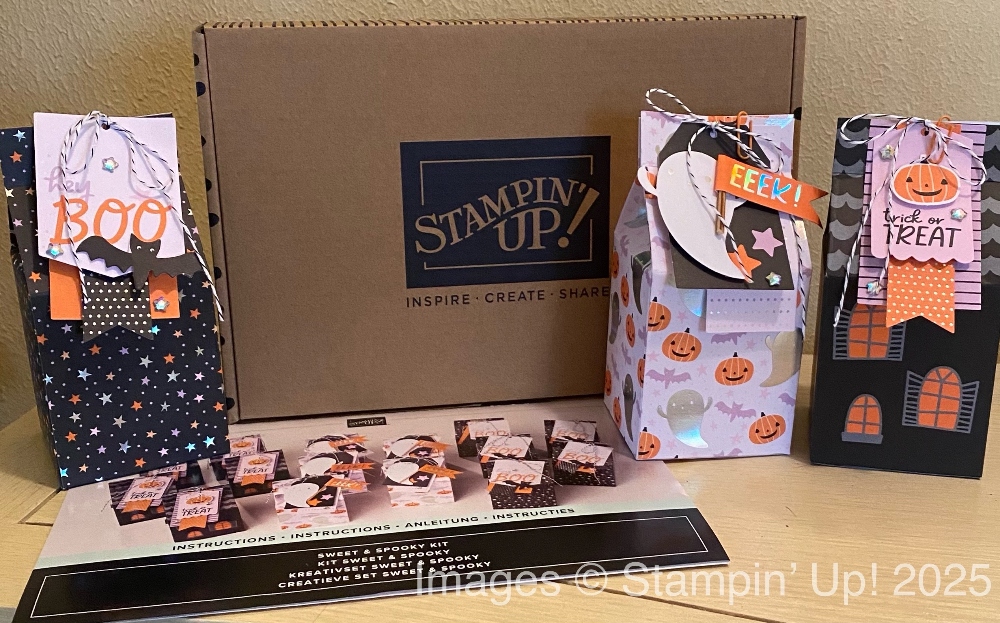
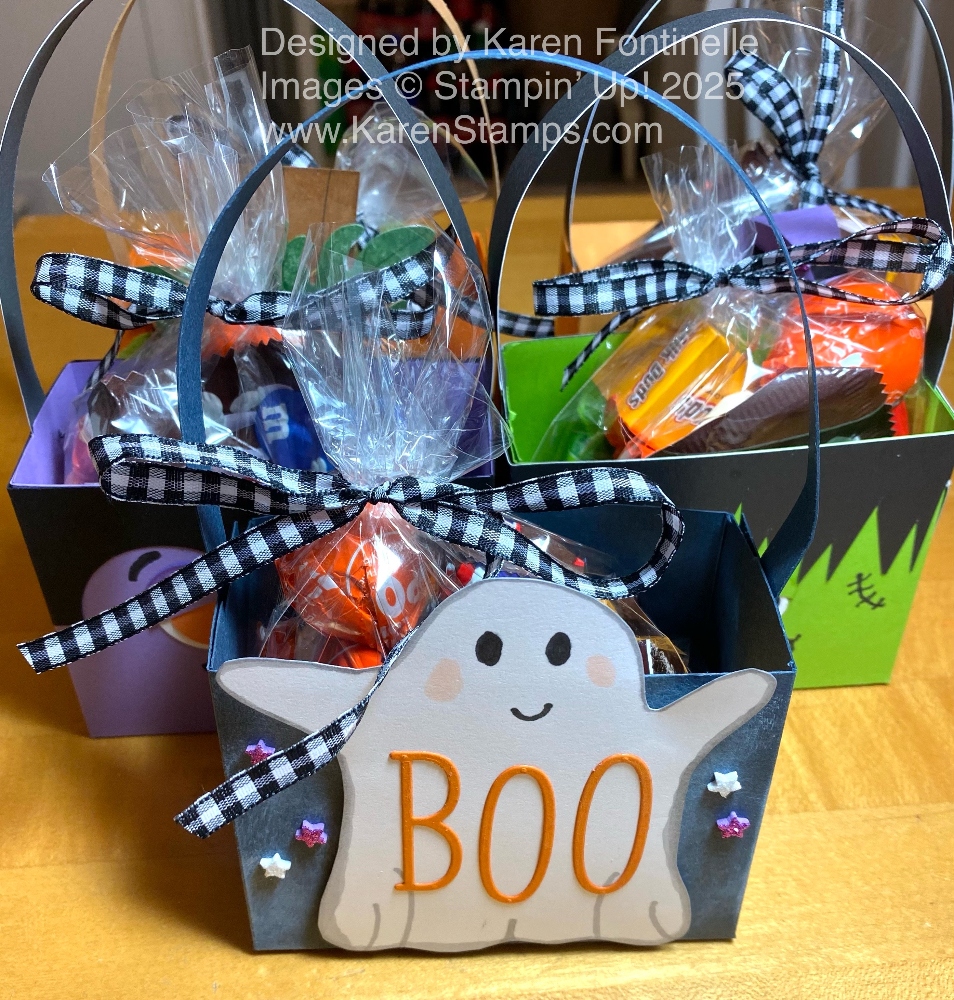
Here are all the treat boxes with cello bags of candy!

Halloween Treat Boxes with Candy

At the last minute I found some Square Pillow Boxes in my stash so I thought why not decorate those and fill with candy for Halloween! I pulled out my retired Cat Punch and also used the Spooky Sweet Designer Series Paper.

Halloween Square Pillow Boxes

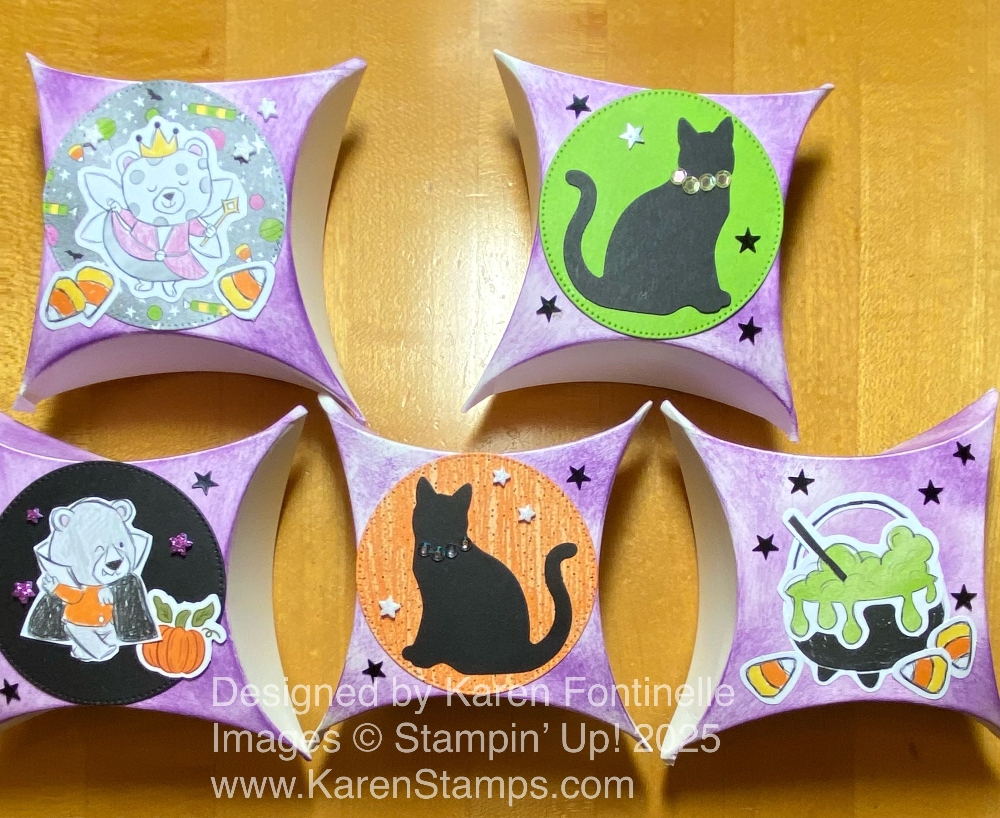
I wanted this pillow boxes to be quick and easy so I just sponged on some Gorgeous Grape ink only on the front and on the top flap. I cut some circles in the Stylish Shapes Dies for backgrounds. And for embellishment, I added some little black adhesive stars that I had from “somewhere”, maybe a Paper Pumpkin Kit, and the fun Shimmer Foam Star Stickers and some rhinestones and sequins for a collar on the black cats.

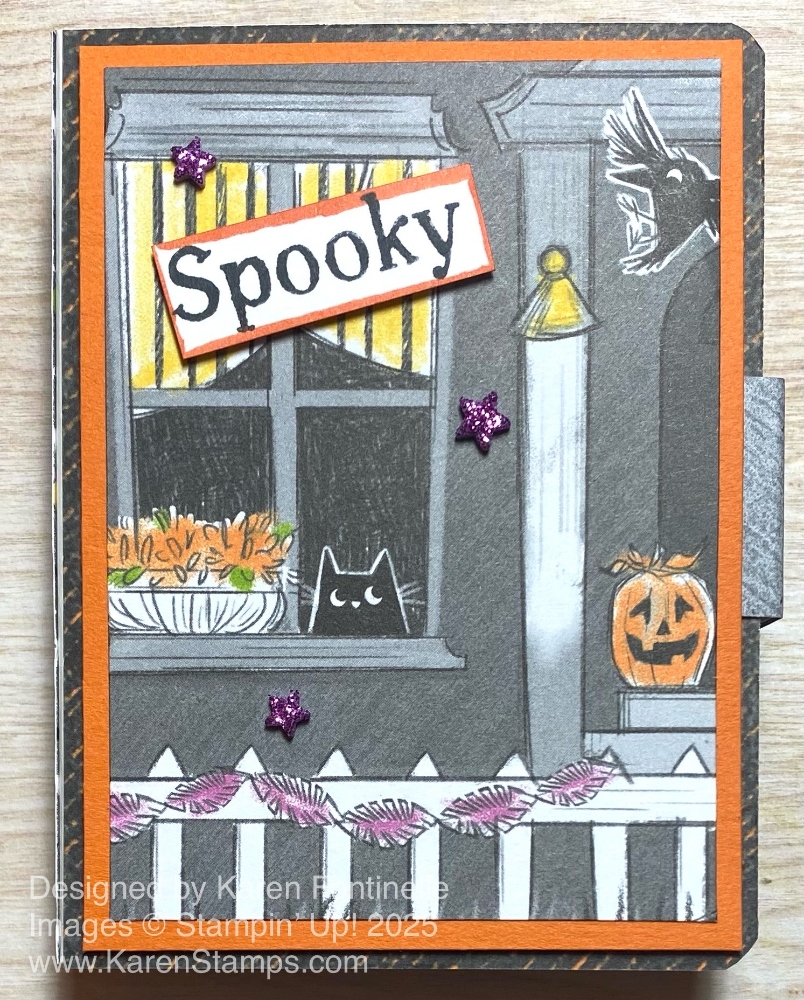
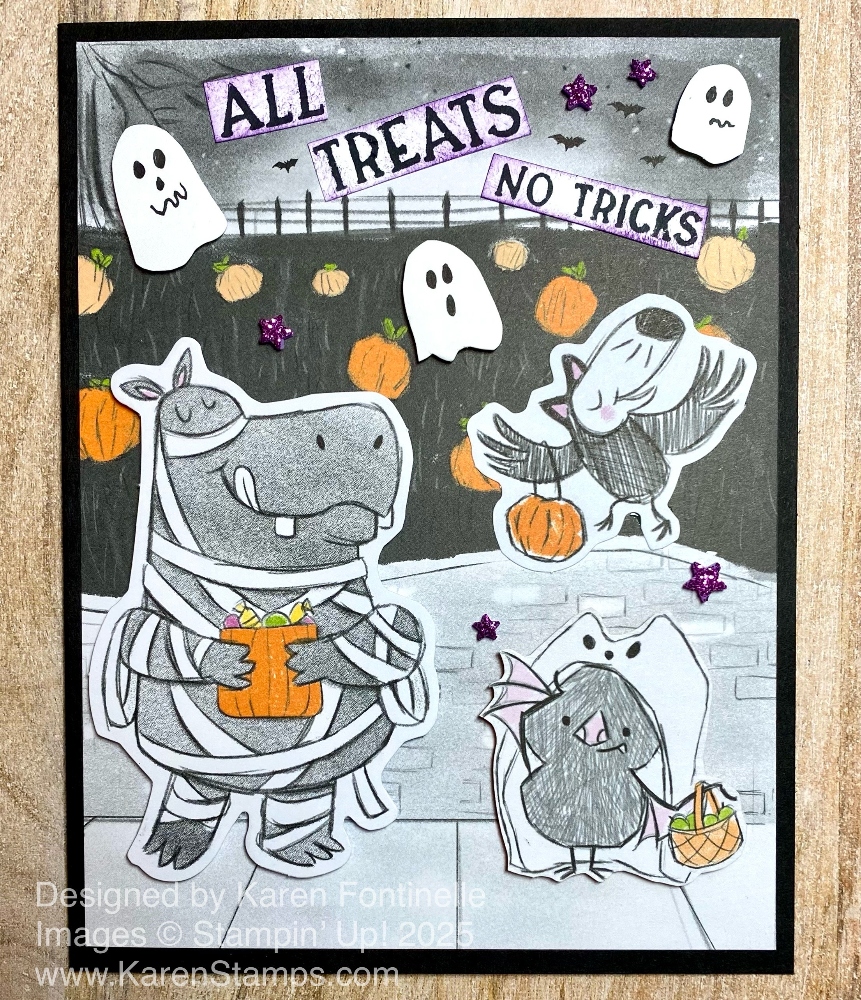
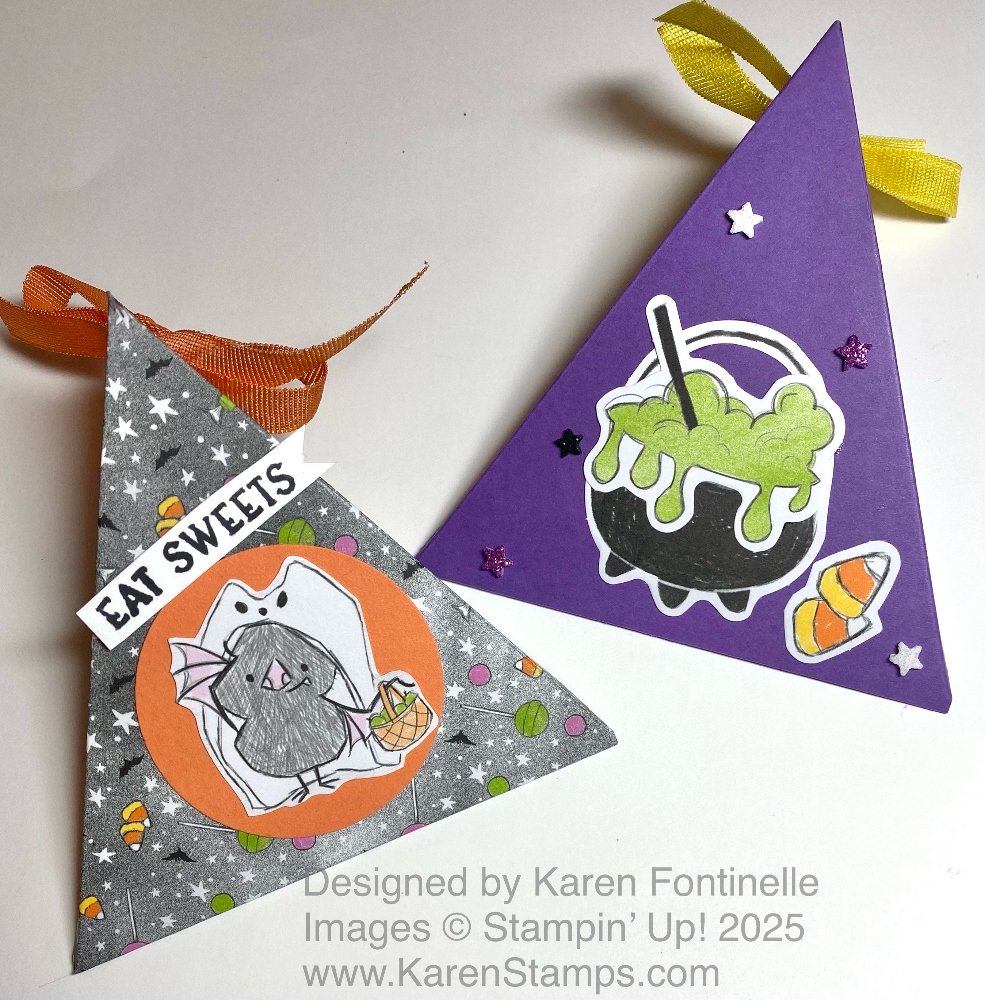
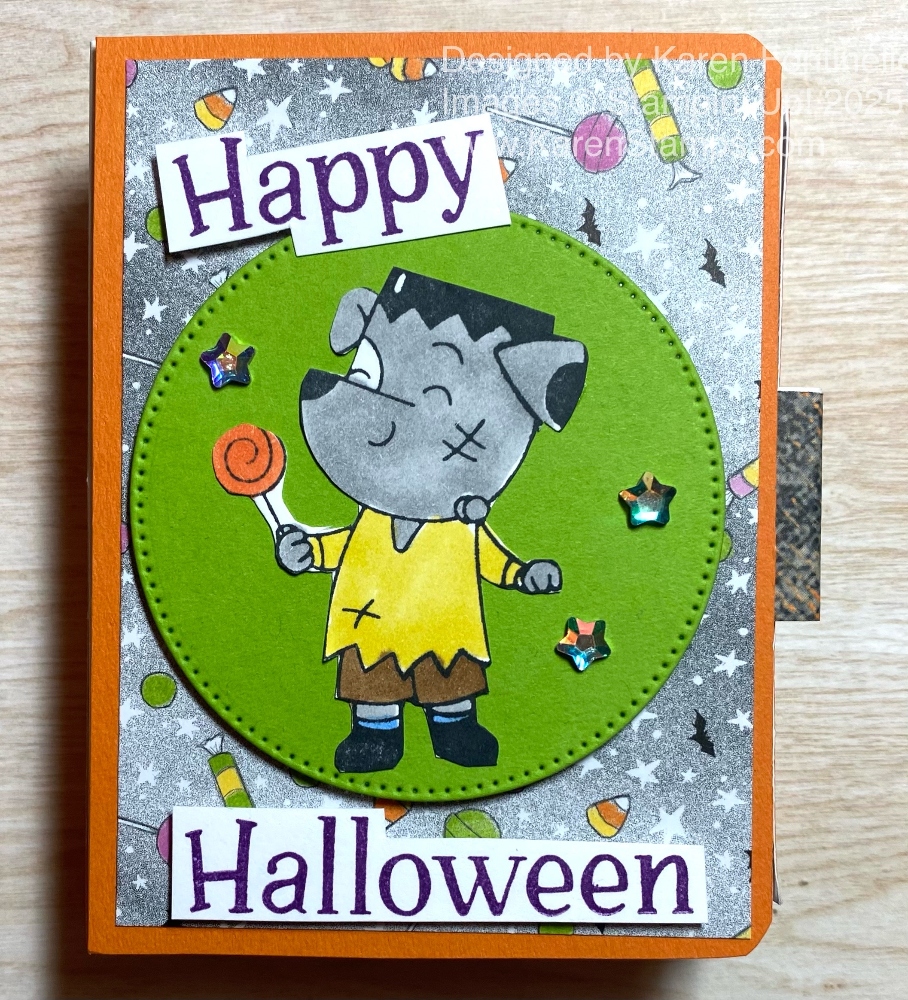
And finally, one more Book Treat Box treat! This one has a stamped character from the Spooky Halloween Stamp Set, colored with Stampin’ Blends. It was so fun decorating these Book Treat Boxes!

Happy Halloween Book Treat Box

Halloween Mini Silver Gable Box

Halloween Mini Silver Gable Box

This Halloween Mini Silver Gable Box is a mix of old and new! When you look in your stash, you never know what you might find! I found this package of Mini Silver Gable Boxes and I thought they would make good Halloween treat boxes with the proper decoration. Whether or not you have these exact gable boxes, this shows you how you can transform any small box into a Halloween treat box!

I don’t remember when we had these silver gable boxes. When I first joined Stampin’ Up! there were large gable boxes. My first customer bought some and tried stamping on them, but with the coating on the outside the ink would never dry! It’s better to wrap paper around them!

This was super simple to decorate! I looked in my Spooky Sweet Designer Series Paper and saw that this pattern with all the little candies, my favorite pattern in this package, would do with the silver box! I cut two pieces of that paper (out of scraps) to fit around the box and adhered it with Stampin’ Seal. The little Halloween guy is stamped with the Spooky Halloween Stamp Set in Memento ink, colored with Stampin’ Blends alcohol markers, and fussy-cut. He is popped up on Stampin’ Dimensionals on the front of the gable box.

The greeting is stamped from the same Spooky Halloween Stamp Set and cut apart in two strips in order to fit on the box. I used another piece of designer paper in the package for the layer for the greeting. Because I had the small star punch in the A Little Cheer Mini Punch Pack right there on my table, I punched out five stars from the Three Color Glimmer Paper (retired). You could use something else, like gold foil. They are adhered to the box lid and the front panel. With the retired Gingham ribbon, I tied a little bow on the box handle. Cute little box for the trick-or-treaters or just a little Halloween treat for someone in your family, a neighbor, or a friend.

Check your older stash once in a while and see what you have that you can use!

Mini Halloween Treats

Mini Halloween Treats

If you want to make some quick and easy Mini Halloween Treats, these are the ones you should make! I’ve made them in the past, but as I was cutting the paper I was thinking that these were going to be too small. However, they are not too small! Does anyone else think the Halloween candy this year is very small? Even if it is, it fits in this little treat holder and so would a slightly larger piece of candy.

Cut the cardstock at 5 1/2″ x 2 1/2″. Score at 2 1/4″ and 3 1/4″. Crease and fold. Decorate the front panel. A piece of designer series paper would be 2 1/2″ x 2″. For these two treats, I used the Spooky Sweet Specialty Designer Series Paper.

On the Granny Apple Green cardstock treat, I added a stamped character in the Spooky Halloween Stamp Set that is colored with Stampin’ Blend Markers. Those colors kind of hurt your eyes! For a small greeting, I found “Happy Halloween” in the Greetings For All Ephemera Pack. I cut the words apart to fit better on the treat, although I see the “Happy” is obscured in the photos by the Darling Duckling ribbon!

The Pumpkin Pie treat has “the other side” of one of the papers and then the diecut witch’s cauldron and potion in the package of designer series paper is adhered to the front. I simply wrote”Boo!” on a little scrap banner and added that plus two Shimmer Foam Star Stickers. Who knew the Mossy Meadow & Gold Ribbon would be perfect for Halloween?

Put the candy inside (maybe using a bit of adhesive or glue dot to hold it in place) and punch a hole in the top. Tie shut with ribbon. Or perhaps you would want to staple the treat shut.

You can make these as cute and fancy as you like, depending on who you will be giving them to. Or just keep them super simple because a child is probably just going to rip it open to get the candy! You can vary the measurements if you want a larger treat holder to fit a larger candy. Just have fun with it because it is fun to make these cute little treat holders!

Mini Halloween Treats Side

Halloween Spooky Book Treat Box

Halloween Spooky Book Treat Box Inside

I’ve spent a lot of time looking for ideas for Halloween treat box ideas, and at some point I was reminded of the Book Treat Boxes that Stampin’ Up! came out with last year. They weren’t retired and now you will find them in the Stampin’ Up! Online Exclusives. I still had a few left in the package so I decided to try my hand at decorating them for Halloween treat boxes. This Halloween Spooky Book Treat Box is really easy to make! The boxes come already scored so all you have to do is fold and crease. They even come with adhesive on them where you need it to assemble the box inside and the book cover that surrounds the box.

To decorate these boxes, I used the Spooky Sweet Specialty Designer Series Paper. You can just put some simple effort into decorating these boxes or you can do a lot extra, like covering every surface that shows with paper, adding extra embellishments, styling the inside of the box in different ways. It’s all up to you and the occasion.

After folding all the score lines on the two pieces of the Book Treat Box, I adhered pieces of the “generic” sides of a couple of the Halloween papers….for the cover, the book spine, the back side and the three sides that show of the box. The cover and back of the cover is 3″ x 4″. You can trim the little rounded corners with a scissors. The spine of the cover is 1″ x 4″. Don’t adhere the paper to the front of the cover until you think about the closure. The box that goes inside is easy to assemble and has adhesive. You can adhere the designer paper before you assemble it or after or even after you adhere it to the cover. The box is adhered to the back inside cover and adhesive is already provided there. Take your time centering the box exactly how you want it. The sides measure 1″ x about 3 3/8″ and 1″ x 2 3/4″ if you want to cover them.

The only “tricky” part if figuring out how to keep the box closed after you decorate it. I forgot that part on the first box I made for Halloween! There are different ways you can do it. You can wrap a ribbon around, but it might disturb your design on the front. But you can slip the ribbon underneath the paper and tie the closure shut. Or you can pop up the cover with Dimensionals so there is space underneath your cover design to slip the closure tab underneath. Or you can put something popped up on the cover, like a layered circle or something and tuck the tab underneath that.

For this box on the top there is a generic paper covering the cover. Then I trimmed down one of the front porch scenes from the Spooky Halloween paper to layer on a piece of Pumpkin Pie cardstock. This whole piece is popped up on Stampin’ Dimensionals so that I could slide the tab of the closure underneath it. Just mind where you put the Dimensionals so they don’t interfere with the tab fitting underneath and not catching on the sticky Dimensional.

To embellish a little bit, I stamped the word “Spooky” from the Spooky Halloween Stamp Set and trimmed it down. I took my Timid Tiger Stampin’ Blend marker that was on my table and just ran the side of it along the edge of the greeting to make it stand out a little bit. That word is popped up on Dimensionals. I also added three purple Shimmer Star Foam Stickers to the scene.

Inside the box, you can add a piece of designer paper or cardstock if you like. And for Halloween you might even like to add a surprise, once the person takes out or eats the candy! You could draw a ghost, cut it out, and adhere it inside, or for this box, I added the diecut image from the designer paper of the hippo. Just add the Halloween candy to the box, secure the closure, and you have a cute little Halloween treat box to give out!

Spooky Sweet Pumpkins and Ghosts Card

Spooky Sweet Pumpkins and Ghosts Card

Make another fun Halloween card using the Spooky Sweet Specialty Designer Series Paper by using one of the scenes on the papers plus the spooky characters on the paper and cut-outs. There is so much you can do with this paper! For this card, the Spooky Sweet Pumpkins and Ghosts Card, I even added a few little ghosts floating over the field of pumpkins!

The card base is Basic Black cardstock. It goes with the nightime scene out in the pumpkin field. All I did was add some Halloween characters out on the sidewalk from the designer paper. The rhinoceros is a diecut and is popped up on Stampin’ Dimensionals. His little friend, the bird carrying a pumpkin bucket, is standing on the brick wall in the background. The little bat dressed up like a ghost is fussy-cut from the designer series paper. He is also popped up on a few Dimensionals and the bird on the wall is adhered flat to the card.

Just to make the card spookier, I cut out three little ghosts by hand. You can sketch a little ghost by just drawing an arch and then a wiggly bottom of some kind. Add a face for your ghost and cut out. I popped up all the ghosts with one Dimensional each!

The greeting is stamped with the Spooky Halloween Stamp Set on Basic White with Memento ink. To fit them on the card better, I cut all the words apart and made them as narrow as possible. To make them spooky, I sponged them each with a little bit Gorgeous Grape ink. While I thought the card was busy enough, there was no way I could skip adding some Shimmer Star Foam Stickers for a little sparkle.

You still have time to make some Halloween cards for friends and family and get them in the mail! Have fun with whatever supplies you have to make some fun or spooky cards!

Halloween Triangle Boxes

Halloween Triangle Boxes

I have made many, many of these triangle boxes of various sizes through the years. They are so easy and can be made for any occasions! So here are a couple of Halloween Triangle Boxes you can try! Just remember to put candy inside before you tie the ribbon!

These are made with a piece of paper cut 4″ x 8″. You can make the size bigger or even smaller. Score in half at 4″. Make a mark at each end at the half spot which on these boxes would be 2″ on the 4″ end. The scoring will look complicated, but it will not be. The box is scored from the 2″ mark on the end to the 4″ center score line. Therefore, you will be scoring at an angle on each side, from the halfway end mark to the center score line.

Halloween Triangle Boxes Sides

Check out the sample below where you can clearly see the score lines and creases. As you go along, you will gather the two end folds together and punch a hole through both sides on each end. I used my retired Crop-A-Dile to punch the holes but you can use any hole punch you have.

Triangle Box diagram

After all the scoring, fold and crease each score line and punch the holes, unless you want to just glue the sides together after putting the treat or gift inside.

Halloween Triangle Boxes Sides

Halloween Triangle Box Open

Decorate your triangle box however you like! You can tie the ribbon to close the box and then decorate, but depending on what you are doing, it may be easier to decorate the front while it is flat and then close it up.

I used the Spooky Sweet Specialty Designer Series Paper for the one box. The candy paper forms the triangle box and then the figure on the front is cut out from another paper in the package. I simply punched a 2″ circle for behind the figure to help it stand out against the busy background of the box. I used part of a greeting in the Spooky Halloween Stamp Set and trimmed it down to be narrow with a banner end and popped it up on Mini Dimensionals. The box is tied with the Timid Tiger 3/8″ Faux Linen Ribbon.

The second box is made with Gorgeous Grape cardstock. Using cardstock makes the box a little sturdier. I decorated it with some Halloween diecuts that are included in the Spooky Sweet Specialty Designer Series paper. The box is tied with the Darling Duckling Faux Linen Ribbon, one of the new In Colors. Instead of a greeting, I added several of the Shimmer Star Foam Stickers

There are SO many possibilities with making these triangle boxes. Here is one blog post with last year’s Halloween triangle box. And another Halloween triangle treat box from the year before.

Try one of these Halloween Triangle Boxes for a few small pieces of candy or a small gift!

Halloween Triangle Boxes Sides

Spooky Sweet Candy Corn Tree Halloween Card

Spooky Sweet Candy Corn Tree Halloween Card

This Spooky Sweet Candy Corn Tree Halloween Card was a quick and fun card to make at the last minute with no plan! With no card idea in mind except that I wanted to make a Halloween card, I pulled out the Spooky Sweet Specialty Designer Series Paper pack and took it from there!

This Spooky Sweet designer paper is called “Specialty” because it comes with a couple sheets of diecut images. All you have to do is punch them out and adhere them somewhere on your card, project, or scrapbook page. It also comes with “cut-apart” images that could be tags for a candy treat bag or background Halloween scenes of haunted houses or city streets. What got this card started was the strip of paper above the houses that is a Petunia Pop background and an iron fence. That is what I placed on the bottom of my card! My card has a Basic Black card base with a layer of Petunia Pop cardstock, one of the In Colors from last year and now in its second year.

After I had the fence, I just built a scene! I hadn’t used the diecut trees yet so I adhered one with Stampin’ Dimensionals to pop it up. With the little candy corns being individual diecuts, I thought, why not make a candy corn tree?! Haven’t we all wondered where candy corn comes from? Well, it certainly must come from spooky Halloween trees! You can see them growing right on this tree! I also added the pumpkins with a crow on top and the little Halloween fairy. She is popped up on Dimensionals.

The greeting is stamped in Petunia Pop ink from the Spooky Halloween Stamp Set. I love the greetings in this stamp set. There is also a die set that is very cute that you can add to the stamp set and purchase in the Spooky Halloween Bundle. There still is time to order these Halloween sets and designer paper and be able to make and send Halloween card and treats and certainly to make scrapbook pages to record fun Halloween memories. To help the greeting fit and to look a little more interesting, I cut the words apart and even cut around the shapes of some of the letters in order to fit in the space beside the candy corn tree. For a little sparkle on the card, I also added some Shimmer Star Foam Stickers in all three colors – black, white, and purple. I love these foam stickers! I love that they come in three colors and in different sizes so you can really mix and match depending on your project.

It’s time to make some Halloween cards to give and send so copy some of my ideas and have fun making your special Halloween creations! Remember, the Halloween products are in the Online Exclusives, not in the Holiday Mini Catalog.

SHOP STAMPIN’ UP! ONLINE HERE!

Spooky Sweet Haunted Street Halloween Card

Spooky Sweet Haunted Street Halloween Card

You know Halloween is really going to sneak up on us! And if you want to mail cards to people, you have to think ahead (note to self!). This Spooky Sweet Haunted Street Halloween Card is an easy card to make if you have the Spooky Sweet Specialty Designer Series Paper. This paper even comes with some diecut images that you just pop out and adhere to your card or project.

The designer paper in this package is so fun and interesting. Two of the sheets feature different Halloween scenes, such as a street of haunted houses that can be cut apart and used however you like. For this card, I cut just this single house and cut it to fit on this card front. I cut the bottom edge and also along the roof lines on the top. The card base is Petunia Pop cardstock with a layer of Basic Gray cardstock. When you trim down this image on the designer paper it will fit on the card.

After getting the basic card made, I looked at the diecut images on two of the sheets that come in the package and chose the two pumpkins with the crow on top and a couple of bats. The pumpkins are popped up. The greeting is stamped with the Spooky Halloween Stamp Set. I stamped the words with Memento Ink on Pumpkin Pie cardstock, then trimmed it down as narrow as I could and separated the words. I popped up the greeting on Dimensionals. I really like this technique of cutting the words apart or making them very narrow to make them fit better on the card. I also added several Shimmer Star Foam Stickers in purple and black. Love these things!

Just get out your designer papers, look through them, and see what ideas you come up with. You might even find a good paper to use for Halloween in a package of birthday paper or who knows what! Have fun with creating!

SHOP STAMPIN’ UP! ONLINE HERE!

Day 2! Stampin’ Up! Kits Collection Sale!

Kit Collection Sale Oct 2025 Info Frame

Choose from all kinds of Kits in the Stampin’ Up! Kits Collection for a savings of 10-30% off! This sale even includes the newest Kits, just released October 1st! These kits come with all the supplies you need and are easy enough for anyone to make! Directions are included and you can even watch a video if you like (and I always watch the video regardless!). These Kits make birthday cards, home decor, all-occasion cards, small scrapbook-type albums, plus Kits for the fall and Christmas holidays!

Here is the Christmas Ornaments Kit in the Kits Collection that came out last year! I bought this kit and made these ornaments. I used them for an extra decoration on gift bags and packages which the recipient could then save and use on their Christmas tree or as a little decoration in the home or on future packages. A glue gun was helpful with this kit. It was fun to make and very nice! On some of the ornaments, I added some extra touches or just changed up the design a bit. You can do that with any of the kits if you like!

Christmas Ornaments Kit Stampin' Up! Kits Collection

Here is my blog post talking about making this Christmas Ornaments Kit! Put this Kit on your order if it is still available! Gold Hoops and little pinecones all included!

Sale Details:

  • All kits in the Kits Collection are 10–30% off.
  • Sale runs October 6th – 8th only.
  • Available while supplies last.
  • Sale excludes Paper Pumpkin, Scrapbooking Workshop Kits, and Starter Kits.

Choose your favorite Kits and maybe get some as gifts!
Shop early for the best selection!

Shop the Kits Sale Today!

3-Day Stampin’ Up! Kits Collection Sale!

Kits Collection Sale Oct 2025 Banner Info

This three-day sale is the perfect opportunity to stock up on your favorite kits from the Kits Collection. Our kits come with everything you need for a fun and creative experience. From season’s greetings to birthday wishes to home decor, you can find almost anything to suit your crafting needs in our Kits Collection. And with up to 30% off, now’s the perfect time to grab that kit (or two, or three!) that you’ve been eyeing. Some kits may sell out faster than others, so don’t wait to start shopping on October 6!

So many choices! But here is a Kit I would buy right now! It’s the Haunted Home Kit! I made my kit this past weekend and I was SO happy with how cute it is! My daughter was here and she liked it and even my husband commented that he liked it!! So you know it’s GOOD! It’s not teeny tiny either! Also, I used the cardboard that backed the package of supplies, covered it with some greenish designer series paper to look like grass and used that as a base for my Haunted Home! I can set the fence on that as well, but the tree has to go separately. I did use hot glue to assemble the house as the kit suggests. I also used it on the base of the house to adhere to the grassy base I just mentioned, but now I’m thinking maybe I should have left it unattached so I could put a flameless candle inside to like it up from the inside which would show through the yellow vellum windows.

Haunted Home Kit House Front

It’s not difficult to make, except maybe for the roof! The roof is in two parts – the main roof and the little roof on top of the top window. I just watched the video a couple of times until I got it!

Haunted Home Kit House Back

Here is the back side. Even on the back side it is cute with all the windows and shutters!

There are lots of fun kits to choose from and they are designed for anyone to make them. You don’t have to be a stamper or crafter! Just follow the pictorial directions or watch the video! Change up any kit if you like. The supplies are all there for you to use!

SHOP THE KITS COLLECTION TODAY!

Shop early for best selection, of course! Sale ends Wednesday!!

Beautiful Gallery Happy Halloween Card

Beautiful Gallery Happy Halloween Card

This Beautiful Gallery Happy Halloween Card I thought was somewhat of an original idea when I made it, but then I saw that Sara Douglass had made something very similar on Instagram on the @stampinupofficial account! I got the idea to use one of the scenes in the Beautiful Gallery 6″ x 6″ Designer Series Paper as the background for a Halloween card from seeing people buying framed paintings of scenery like in a thrift store and then painting extra things on the picture. I think I also saw something on an Instagram story from one of my favorite gift shops that reminded me of that. It all made me think of the Beautiful Gallery paper as a background for the two stamped characters in the Spooky Halloween Stamp Set .

I’ll tell you how I did mine, then tell you about Sara’s, and show you what the paper looks like on its own. My card base is made with Crumb Cake cardstock. I chose a scene in the Beautiful Gallery DSP that I thought could work with the two Halloween characters. It has a grayish/brownish sky, some green hilly land, and some white stalky flowers in the forefront. I cut this paper down to 4″ x 5 1/4″ to fit the front of the card. Before adhering it, I colored in the sky a little bit to make it look a little spookier. I used a Small Blending Brush to lightly add some Petunia Pop ink in the clouds and some Pumpkin Pie ink in the lighter horizon area just above the trees and hills.

The two characters were stamped from the Spooky Halloween Stamp Set on Basic White with Memento ink. Normally I would color them with Stampin’ Blends markers, but I felt they might be too vibrant for the Halloween scene so I used Watercolor Pencils instead. I chose a variety of colors of the pencils from my old set. You can choose from Assortment 1 HERE or Assortment 2 HERE. I used to love to color with these pencils! After coloring, if you like, you can use a Blender Pen to smooth out the lines or blend some colors. If you are using Basic White, you want to color lightly and not overdue it or the paper will pill a tiny bit, Or you can stamp on watercolor paper. You could also use Water Painters, which are now back in stock. I forgot I bought the Spooky Halloween Dies so I fussy-cut these two costumed characters. You can buy the stamp set and dies together in the Spooky Halloween Bundle and save 10%.

The two Halloween guys are popped up on Stampin’ Dimensionals, some little bitty pieces, although you could adhere them flat on the card as well. The greeting is in the Spooky Halloween Stamp Set and is stamped in Petunia Pop ink on Basic White, then cut apart with Paper Snips scissors. I also used my Small Blending Brush to add a little bit Pumpkin Pie ink to make it look a little spooky. The greeting is also popped up on Dimensionals. The little stars in the sky are from a gift a special friend brought back for me from Japan as she visited all kinds of stationery stores on her trip!

This was such a fun card to make and I’m happy with the way it turned out. This is what the paper looked like before I started.

Beautiful Gallery Paper Halloween Card

On the @StampinupOfficial Instagram account, Sara Douglass used one of the other papers, the one with the cottage. She used reinkers in Gorgeous Grape and Smoky Slate with a Water Painter to add color to the sky. She used White Craft ink to draw in two little ghosts in the foreground and one tiny one farther and added eyes to the ghosts with a Black Stampin’ Blend Marker. I love what she did with the scenic paper and the little ghosts! Go check it out.

Spooky Sweet Slimline Halloween Card

Spooky Sweet Slimline Halloween Card

I thought it would be fun to make a Halloween card again so I pages through the Spooky Sweet Specialty Designer Series Paper. I hadn’t used this paper with the building fronts on it, and I wondered how I would use that on a card. After seeing it in my mind as looking like a spooky high-rise apartment building, I decided on this Spooky Sweet Slimline Halloween Card. A slimline card would look like a tall building with multiple spooky windows!

The Basic Black card base is cut at 6″ x 6″ so I could score and fold it in half at 3″. That makes the card 3″ x 6″ which fits in some regular office-style envelopes I usually have on hand. You can make a slimline card taller and wider if you want.

For the designer paper layer, the Spooky Sweet Specialty Designer Series Paper, I cut it just “a smidge” smaller than the 3″ x 6″ card base. That’s technically 2 7/8″ x 5 7/8″. Or you could cover the entire front, or make the margin the normal size. For the inside of the card, I used “the other side” of this pattern with all the spooky windows which just has some light orange lines across it. Since it was fairly light, I was able to stamp “Happy Halloween” inside, from the Spooky Halloween Stamp Set. I also stamped some bats for fun!

Back to the front of the card! I stamped the word “Spooky” from the Spooky Halloween Stamp Set in Pumpkin Pie on Basic White cardstock, then just cut around each stamped word. I think the words fit better on the card this way. It’s a great technique to use when you need to save space. I popped up all the words with Mini Stampin’ Dimensionals.

For a little bit of embellishment, I added a few of the purple stars in the new Shimmer Star Foam Stickers. These little things are so fun to use! They really are foam so they feel very funny when you slide them off the sheet! The are sparkly and fun and come in three sizes and three colors – white, purple, and black.

This Spooky Sweet Paper is called “Specialty” because also included in the package are cut-apart images and diecut images you can use for extra fun on cards, Halloween projects, and scrapbook pages! Check out all the Halloween products in the Stampin’ Up! Online Exclusives!

SHOP HALLOWEEN AT STAMPIN’ UP!

Spooky Sweet Slimline Halloween Card inside

Spooky Sweet Trick or Treaters Halloween Card

Spooky Sweet Trick or Treaters Halloween Card

I was so tickled with the Halloween card I made in my previous post that I had to make another one right away! Halloween decorations and things just make me happy! I won’t be decorating my house for at least another month, but I’m happy to start making Halloween cards and other projects to provide some inspiration for you.

I really wanted to use this Spooky Sweet Specialty Designer Series Paper with the little drawings of candies on the gray background. So cute! The card base is Granny Apple Green which goes with the paper, but I felt like the paper stood out more with a layer of black behind it. I made the margins very narrow so the Basic Black is 5 3/8″ x 4 1/8″ and the candies designer paper is the usual 5 1/4″ x 4″. I diecut a Pumpkin Pie circle from the Spotlight On Nature Dies. I could have used Stylish Shapes Dies or a large circle punch. It’s just meant to be a background to help show off the three trick or treaters, however, it also looks like a moon out on Halloween night. I could have tucked it behind the bottom strip of paper and made it look more like a moon. Either way, I think it works.

The three trick or treaters are fussy-cut from the sheet of costumed characters in the package of DSP. It wasn’t as difficult or “fussy” as you might think! It helps to leave a tiny bit of white margin around the image and that makes it easier to cut out. The first and third costumed characters are popped up on Stampin’ Dimensionals and the middle guy is glued flat on the card front. I did add that strip at the bottom of the candy designer paper. It is the opposite side of the candy pattern! I made it 5 1/4″ x 1 1/4″. You could make it whatever width you like. The characters just needed something to “stand” on.

The greeting is in the Spooky Halloween Stamp Set along with some cute character stamps and greetings. I stamped it with Memento ink on the opposite side of the character paper. To make it smaller to fit better and to look more interesting, I cut the greeting into narrow pieces and then popped each one up on Dimensionals. When I stamped the greeting, I noticed the little bats stamp in the set so I stamped some bats on the orange circle (before adhering the words!). There were also small blackbirds on the designer sheet so I cut two of those out and placed them on the card. Finally, because once you have them you can’t resist, I added some purple and white Shimmer Star Foam Stickers. These are so fun to use, you really should order some and I’m sure you can use them on other cards for other occasions, not just Halloween!

You’ll find this Spooky Sweet Suite Collection and individual products in the Stampin’ Up! Online Exclusives. If you love Halloween, too, you might like the Sweet & Spooky Kit in the Kits Collection to make some Halloween treat boxes. This is a very cute kit!

SHOP STAMPIN’ UP! ONLINE HERE!

Spooky Sweet Happy Halloween Card

Spooky Sweet Happy Halloween Card

This is my first Halloween card for this year, and I am so excited!! I love how it turned out and I enjoy anything cute for Halloween! This Spooky Sweet Happy Halloween Card was made with the designer paper and stamp from the Spooky Sweet Suite Collection in the Stampin’ Up! Online Exclusives!

The Spooky Sweet Specialty Designer Series Paper is going to be so much fun to use on Halloween cards, scrapbook pages, or other projects! Not only do you get papers with costumed animals, spooky haunted houses, and other printed papers to coordinate, but you also get diecut pieces of all types plus patterns to cut apart for tags or maybe labels for cards and scrapbook pages plus embellishments on your project. This paper is almost like a kit with all kinds of things you can use!

For this card, I started with a base of Basic Black cardstock. Next, I started cutting apart some of the Spooky Sweet Designer Paper and looking at the animal characters and the diecuts to see what I wanted to make. There are two full sheets that have street-like scenes of spooky houses, fences, and sidewalks. I cut apart this one house, although I didn’t cut it the size I intended to and almost started over with the other sheet of paper with the row of Halloween houses. But I stuck with it and just adhered it over to the right edge of the card with a strip of the back of another paper in the pack for the orange strip along the left side of the card.

Once I had that basic card design made, I played around with the other elements in the designer paper. I chose the goofy little bird carrying a pumpkin to be popped up on Dimensionals as if he is walking along the sidewalk, plus a couple candy corns because I couldn’t resist! For the greeting, I cut apart some of the tags/banners and stamped “Happy Halloween” with a stamp in the Spooky Halloween Stamp Set in Memento ink. I trimmed down the banner a tiny bit and cut the left side on an angle so I could angle the greeting. I also flagged the right side. It’s a Halloween card so you can do anything crazy on it that you want!

Luckily I remembered that I also bought the Shimmer Star Foam Stickers in the Suite. These are really different little things! They are actually foam, so if you stick the Take Your Pick Tool underneath them to get off the sticker page and onto your project you will feel the foam! It’s kind of odd when we are used to solid gems! But they are very sparkly and come in three sizes and three colors: White, Black, and Purple. I had fun putting them on this card!

If you want to save 10%, purchase the Spooky Halloween Bundle and get the dies that go with the stamp set. I couldn’t resist the characters and sentiments in this Bundle for Halloween!

Unfortunately, Stampin’ Up! didn’t put Halloween sets in the Holiday Mini Catalog, just the Online Exclusives. The Mini, however, does have a couple of nice fall/autumn stamps, dies, and papers. There are more in the upcoming Online Exclusives coming September 3rd, plus more Christmas! So get ready for lots more new things September 3rd with the new September-December 2025 Mini (Holiday Mini), Onlines Exclusives, and two new Kits in the Kits Collection. It will be a fun day!

SHOP STAMPIN’ UP! HERE!

Sweet & Spooky Kit Treat Boxes

Sweet & Spooky Kit Three Treat Boxes

If you are a Halloween lover as I am, you will want to get this Sweet & Spooky Kit in the Stampin’ Up! Kits Collection. Get a head start on Halloween! I only put together three of the treat boxes for the sake of storage at the moment, but I’m going to make all the tags to put on the boxes and then they will be almost ready to go at Halloween! Any of these, especially the one that looks like a haunted house, would make a cute Halloween decoration in your home!

The treat boxes are all easy to make! Sticky strip adhesive is even included. The boxes are all scored so all you have to do is crease on all the folds, maybe run a Bone Folder or something across the creases just to make them folded crisply, then adhere the sides and bottom. The directions show you exactly where to put the adhesive tape. The fun part is making the tags and the directions show which pieces you need and where to put adhesive. Just clip on to the box with the cute orange paper clips and the black & white twine tied through the tag.

Sweet & Spooky Kit Package

In your kit, you will find the package with directions and all the supplies you need.

Sweet & Spooky Kit contents

All the supplies are included in the kit in one package! In this kit you even get some star gems to embellish the treat boxes and tags.

Sweet & Spooky Kit Two Treat Boxes

Here are two of the finished treat boxes. You can always use the kit supplies however you like. If you wanted to, you could mix up the tag pieces and make your own creations.

Sweet & Spooky Kit Boo Treat Bag

Here is the third treat box with its cute “hey Boo” tag and a bat! These boxes hold plenty of candy, too! They are not small little treat boxes! I found this Sweet & Spooky Kit to be very cute and easy to put together! If you like Halloween, I say get this kit, maybe two kits!

Here are the Kit details:
– Makes 15 treat boxes: 5 each of 3 designs
– Colors: Basic Black, Bubble Bath, Fresh Freesia, iridescent, Pumpkin Pie

Kit includes one of each item listed below.
– Step-by-step instructions
– Printed and iridescent-foil precut pieces
– Paper clips
– Pressed wood picks
– Baker’s twine
– Adhesive-backed holographic stars
– Adhesive

You can even watch a video of Sara Douglass putting the kit together if you aren’t sure about something.

All of the Kits in the Stampin’ Up! Kits Collection are easy enough for new crafters or non-crafters and fun for experienced crafters as well! It’s fun to just open the box and get started on a project without having to think up your own idea! Try one and see for yourself!

SHOP STAMPIN’ UP! KITS COLLECTION!