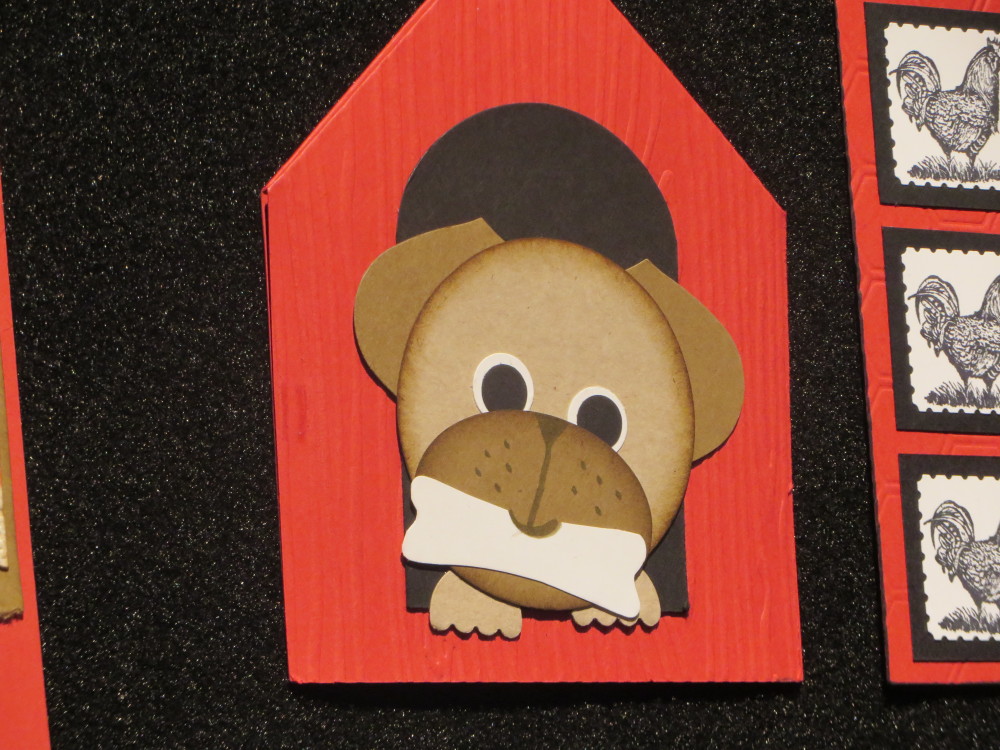
Category Archives: Cards

Spring Sampler Flower Card

Spring Sampler Flower Card

It's funny how I don't always end up making what I thought I was going to make!  Since I had fun with the Spring Sampler stamp set in yesterday's post, I decided to make another card with it.  I was going to select an image for a baby card and just stamp it in one color on the Whisper White layer, maybe put a ribbon or strip of designer paper down the side.  Simple, simple.

I got out the Bashful Blue pack of paper and in there was a piece already cut but the front was narrower than the back. Either I cut it wrong the first time or I didn't end up using it. Since I had already pulled out the Sunshine & Sprinkles Designer Series Paper to possibly use, I decided to adhere a strip of it to the inside edge which would make it show on the front.  I love the colors in the striped pattern of the paper!! That changed the theme of the card from baby to flowers, choosing colors that coordinated with the paper….Melon Mambo, Daffodil Delight and Marina Mist.  On the Color Coach Marina Mist is the "Dynamic Duo" match with Bashful Blue, if you were doing a monochromatic color scheme.

And since I didn't stamp a couple of the flowers perfectly and since "there are no mistakes in stamping" I decided to stamp some extra flowers, cut them out, and pop them up with Stampin' Dimensionals over the "boo-boo" flowers.  No one would know I didn't plan it this way!

Although it is pretty cool outside today, the sun is out and the weather is gorgeous!  So I think this flowery, spring card is just perfect!

Spring Sampler Flower Card Front

Scallop Square Spring Sampler Card

Spring Sampler Scallop Card
One of the many things that is on the Stampin' Up! Retirement List is the Scallop Square Bigz Clear Die, so when I found one already die-cut in my stash, I decided to make a spring card with it!  I attached a 4" x 8" card base (folded in half) to the back of the scallop square. The scallop square is Melon Mambo with a Daffodil Delight layer. The Spring Sampler Stamp Set seemed like the perfect set to use for this card. So many cute little images to choose from!
Since it is snowing in some parts of the country, raining and flooding in others, and here we have a cold front on its way to drop the temperature from near 80 this morning down to 44 by tomorrow morning, I thought a card that reminds us of spring was a good idea! Although I will be miserable in the cold the next two days, I'm hoping it will cool down the upcoming summer!!  Any cooler weather we can get here in Houston, especially from this month on, I am all in favor of it!
A card like this with nine little stamped squares is a little tedious to make, but once I colored on the stamps with markers and stamped on Whisper White card stock, it was easy to punch them out with the 1" Square Punch and then the layers with the Postage Stamp Punch.

You'll find the Spring Sampler Stamp Set in the Spring Catalog…and by the way, that catalog is only good until May 31st so don't forget to order what you want out of it this month!
If you have nasty weather where you live, why not make a card to cheer yourself up!

Make an Easy Card with the Print Poetry Paper Stack

Print Poetry Easy Card

Today I found the Print Poetry Designer Series Paper Stack on my desk underneath a bunch of stamping stuff, so I thought why not use this somehow? I realized I hadn't used it much, but gee, the paper inside is beautiful! This green print on the bottom of my card is from the other side of the top design!  So easy to coordinate!

If you want to make an easy card, this layout is the simplest ever! The card base is made with a  5.5" x 4.25" piece of Very Vanilla card stock folded in half. Next I cut two pieces of the Print Poetry paper and adhered together.  At that point, I should have wrapped a strip of the ribbon around just the designer paper….but I forgot and glued it down to the card base! Since there are no mistakes in stamping(!), I just wrapped the 3/8" Primrose Petals Stitched Satin Ribbon around the front of the card and attached a separate bow.

For a little greeting, I stamped the word "friends" from the stamp set Sweet Essentials and layered it on the Ticket Duo Punch #126883.  You could use any greeting and any coordinating punch and you have an easy to make card for any occasion!

For these great Stampin' Up! products, visit my Online Store here!

Stay Tuned!!  RETIRED LISTS coming this Wednesday,

April 24!

If you are new, what does that mean?  Each year around this time, Stampin' Up! retires stamp sets and accessories in order to make room for NEW products in the NEW catalog coming out soon! It's an exciting time and a time to stay in touch with me so you can purchase any retiring products you really want but haven't gotten yet. This won't be the time to procrastinate! In fact, I would suggest not waiting for the list, but getting the products you really want NOW before there is a run on them.  No one can predict what will be retired and what won't…or what will sell fast and what won't.  Just fair warning!  

If you have any questions, please email me at Karen@KarenStamps.com…..and make sure you are on my Mailing List here!

Using Epic Day This and That Designer Washi Tape

My camera is broken at the moment so I thought I would just post some ideas I have seen or had for using the great new Epic Day This and That Designer Washi Tape. You can order this tape as a separate item #131269 from my Stampin' Up! store….but the better idea would be to purchase the entire Epic Day This and That Bundle before the end of April so you can get a 15% discount on the whole package.

Of course the obvious use for Washi Tape is to adhere, decoratively, your photos and memorabilia to your album or journal or whatever. But you can also use the tape itself as a decorative item. Here are a few ideas:

  • Wrap washi tape around a tea light base (use a battery-operated one).
  • Decorate plastic cups, straws, plasticware for a party with washi tape.
  • Wrap washi tape around a gift box or gift bag as decorative borders.
  • Use washi tape on a card or scrapbook page just placing it as lines of tape on the project, as borders or stripes or small banners.
  • Wrap washi tape around a glass jar as a decoration or even as a identifier of the contents.
  • Before making a rosette, place a long strip of washi tape on the strip of paper and you'll have a design on your rosette after you fold it!
  • Tape pieces of washi tape in long or short strips down or across a notebook cover to add color and design.
  • Adhere washi tape around a glass votive holder to decorate your candle.
  • Adhere washi tape on clip clothespins to decorate.  Add a magnet to the back.
  • Decorate a plain file folder with washi tape.

So there you have a FEW ideas to get started!

Get your Stampin' Up! Washi Tape here at my Online Store!


New Dolled Up Birthday Kit from Stampin’ Up!

Dolled Up Birthday Kit

Images copyright Stampin' Up! 2013

If you like kits, I'm sure you will love this brand new Dolled Up Birthday Kit Stampin' Up! just released today! It was designed by another demonstrator and then Stampin' Up! made it into a kit! You know anything with the Vanilla Flower Trim is going to be gorgeous!

The Dolled-Up Birthday kit includes the following:

  • Dolled-Up Birthday Clear-Mount Stamp (1)
  • 8-1/2" x 5-1/2" Crumb Cake Cardstock (6 pieces)
  • 2" x 4-1/4" Very Vanilla Cardstock (6 pieces)
  • Very Vanilla Medium Envelopes (6)
  • Tea Lace Paper Doilies (6)
  • Dress Up die-cuts (6)
  • Soft Suede Classic Stampin' Spot (1)
  • Vanilla 5/8" Flower Trim (6 pieces)
  • Sponge Dauber (1)

Get everything you need to make six cards for only $15.95 (item 133913)!*

*Adhesive not included.

To assemble one card, follow these simple instructions:
1. Place the stamp rubber side up and ink with the Soft Suede Classic Stampin’ Spot.
2. Stamp “Happy Birthday” at the bottom of the card front.
3. Ink the Sponge Dauber with Soft Suede ink and gently antique the doily and the edges of the dress form.
4. Adhere the pieces to the card front in this order:
1. Doily
2. Very Vanilla Cardstock
3. Dress form
4. Flower

I think this one is a winner if you like kits and a "girlie" one at that! And nothing says you can't change it up a bit to follow your own creativity!

Find the Dolled Up Birthday Kit in my Stampin' Up! Online Store.


De-Stress on Tax Day—Make a Pop-Up Posies Card!

Pop-Up Posies Designer Kit Pieces

Today is Tax Day, so if you have paid your taxes, maybe it is time to de-stress by making a card! Or in my case, maybe I will make another card to de-stress from having my post I just wrote disappear! Anyway….the Pop-Up Posies Designer Kit can make it easy for you! You get all the materials pictured above in your kit PLUS a "Just for You" stamp. Add some card stock and put something together and you will have a beautiful card!

After I took the photo above, my camera decided to act up….maybe it's going to be "one of those days"!! Here is a photo of the card I made, although it's not very good. Maybe I just need new batteries.

Pop-Up Posies Designer Kit Card

To get this Pop-Up Posies Designer Kit in your hands, just go to my Stampin' Up! Online Store and order! It is #131395 and you might like some Very Vanilla, Calypso Coral, Pool Party and Summer Starfruit card stock to coordinate with your flowers and kit!  You can find the Pop-Up Posies Designer Kit in the Stampin' Up! Spring Catalog!

All Dressed Up Belated Birthday Card

All Dressed Up Belated Birthday Card

Do you have trouble getting birthday cards sent out on time? I can know a birthday is coming up for weeks and then still not get the card mailed on time or in enoughtime! That's why I like the greeting in the stamp set All Dressed Up. That's not exactly what it says, but I used parts of it to make the greeting I wanted. The stamp set All Dressed Up is really fun to play with, especially to use the Dress Up Framelits Dies with it and save yourself all that cutting time.  There are lots of ways to play with these dresses,whether you are using the stamped dress or making your own with the Dress Up Framelits DIes.

To make the necklace, I just used a piece of Baker's Twine and a Rhinestone Jewel.

For any stamping supplies you may need, please visit my Stampin' Up! Online Store!

Scallop Envelope Baby Gift Card

Scallop Envelope Baby Gift Card

This is the little card I made with the Scallop Envelope Die to go with my baby shower gift in this post. I didn’t photograph the back of it, unfortunately, but the scalloped flap of the envelope in folded in and the bottom up and the side flap in to form the pocket. The other side flap is left open, as you can see.

Scallop Envelope Baby Gift Card Opened

The little window is punched with the cute Petite Curly Label Punch. The little greeting is stamped with the Ciao, Baby! stamp in the Stampin’ Up! Spring Catalog. The pink ribbon is Melon Mambo 3/8″ Striped Organdy Ribbon. The blue is the 1/8″ Taffeta ribbon in Marina Mist.

Shelli Gardner, Founder and CEO of Stampin’ Up!, made this project on a local TV show! You can buy this Scallop Envelope Die at my Stampin’ Up! Online Store!  It’s one of those cute and useful ones!


Baby Shower Gifts Handmade!

Baby Tin

A few weeks ago I needed a baby shower gift and kind of reverted back to something that was popular to do when I first started stamping. It was popular way back when (and still a good idea!) to buy a new paint can, decorate it and attach a certain poem someone made up. The idea was the new parents would be busy with the new baby and might not have time to write everything down they wanted to record in the baby book, so perhaps they would jot a quick note and throw it in this can and enter it in the baby book later.

Instead of a paint can, I used a white tin I had in my stash. It's decorated with Twitterpated Designer Series Paper and also a strip of Patio Party Designer Series Paper. It's easy enough to wrap two sheets of paper around the bottom of the tin (start at the back first). I like to use Stampin' Up! Anywhere Glue Sticks for a project like this, but you could also use the Multipurpose Glue or some like Sticky Strip tape. Rather than work around the handle at the top, I chose to just make some flowers with punched and distressed scallop punches and Glimmer Brads.

I also covered a little notebook with some Patio Party Designer Paper and inserted some matching paper into an RSVP pen to decorate it.

Baby Memo Book and Pen

And a few baby thank you cards for the new mom to use (using a retired baby stamp set, but one of my favorites!)

Baby Thank You Notes

And here's everything on the inside of the tin. You can read the poem I attached to the inside of the tin. Just click on the photo to enlarge. I used the Labels Collection Framelits Dies.

Baby Tin Poem in Lid

I also made a card with a picture of the "real" gift that the expectant mom would receive but I will post that another day!

Don't forget, today is the last day for FREE SHIPPING from Stampin' Up!  That doesn't come around everyday, so if you need some stamping supplies, please browse through your catalogs and online and see what you need!  We all know we "need" more!!

Order TODAY at my Online Store for FREE SHIPPING!  TODAY ONLY!!  LAST DAY!


Cross-Stitch & Papercrafting: Sweet Threads Simply Sent Card

Sweet Threads Simply Sent Card

If you like making cards and papercrafting, and you also like cross-stitching, then this cute Sweet Threads Simply Sent Kit from Stampin' Up! is for you!  My friend Sally was visiting recently and ordered this kit when she was here.  The kit makes 8 printed cards, each of 2 colors. The needle holes are prepierced and the kit comes with embroidery floss and needles. It was a really pleasant surprise to receive this card in the mail from her the other day! She had also ordered the Scallop Trim Border Punch after playing with mine here and you can see her punching on this card!  The greeting is from the Friendly Phrases stamp set.

Sweet Threads Simply Sent
Sweet Threads Simply Sent Card Cross-Stitch Close-up

Sally said there was plenty of thread for the designs and that even though she pulled her stitches tight, she didn't break any of the pierced holes! So she thought it was fun to make!

If you want to add something extra to your card-making, please try this kit!  You can also purchase the Essentials stamp set with the words "Thank You" and "Happy Birthday" to go with it….better yet, purchase the Sweet Threads Bundle (the stamp set and the kit) for a 15% savings!

Order it this weekend when Stampin' Up! is offering FREE SHIPPING April 6-8, 2013! Everything is available for FREE SHIPPING so take advantage of this great deal!!  Just click that link to go directly to my Stampin' Up! Online Store!

Free Shipping at Stampin’ Up! April 6-8, 2013

Stampin' Up! Retiring Colors 2013

Images copyright Stampin' Up! 2013

Click picture to enlarge

Stampin' Up! announced a "Color Refresh" the other day, and I made this display above in My Digital Studio of all the retiring colors! As you can see, the discontinued Stampin' Up! colors are:

  • Regal Rose
  • Pretty in Pink
  • Bashful Blue
  • Certainly Celery
  • Baja Breeze
  • Riding Hood Red
  • Bravo Burgundy
  • Not Quite Navy
  • More Mustard
  • River Rock

Stampin' Up! is also having FREE SHIPPING starting NOW and going until Monday night at 11:50 MT.  I'm guessing that a lot of people will be wanting to stock up on these retiring colors….but not just the card stock and ink…..think about refills for each one, ribbon, buttons, markers, designer paper…whatever has these colors in it!

Of course the FREE SHIPPING is on EVERYTHING Stampin' Up! sells….so take advantage of it! It's rare that Stampin' Up! offers free shipping!  Check the annual catalog, the Spring catalog, all the specials….the clear stamps, the Dude You're Welcome Kit, the new preview stamp set A Round Array, the new Petite Curly Label Punch,…especially the new This and That line in the bundle at a 15% discount!

Also, remember Watercolor Crayons are being discontinued, due to problems with the supplier, so the Neutrals, Subtles, and Regals are available while supplies last! Watercolor Pencils are no longer available either.

Once you are ready to order, go to my Online Store here!  Sign in or Create an Account. You can see all the New Arrivals, Specials, Clearance Rack…all on the left sidebar.

If you prefer, you can email your order to me although you will have to give me your payment information.  Email me at Karen@KarenStamps.com.

"Like Me" on Facebook or check back here on my blog and I'll try to keep you up-to-date if anything sells out or if there is any new information!

Let me know if you have any problems or questions!  The retiring colors are only available while supplies last!

Check my blog post here for more information, if you want.

Just be sure to go directly to my Online Store here…don't start at Stampinup.com…especially if you have a large order so you get the best prices, etc.

Have fun shopping!!

Make an Easy Black and White Card to Make

Easy Black and White Card to Make

With all the talk about our wonderful Stampin' Up! colors yesterday, I thought I would post an easy card I made with just black ink and white glossy card stock!  There's never anything wrong with just black and white! I remember doing a swap a long, long time ago using just black and white and it was one of my favorites! I like to use Glossy White card stock to add a little something to the card. (although it is difficult to photograph without glare!)  The base of the card is just Whisper White card stock with Basic Black layered on top of that.

Can you guess what stamp set I used on this card??  It might be tricky! Obviously I used lots of circle punches and popped some up with Stampin' Dimensionals.  The greeting is from Perfectly Penned.

Try your hand at just using black and white on a card or scrapbook page! I used the Jet Black StazOn Ink Pad, which is good for that real black…and for stamping on Glossy card stock.

So did you figure out what stamp set I used??  It's from the Holiday Catalog, although still available to order……It's Ornament Keepsakes!  Did you guess I used ornament stamps on this card….and it's not even Christmas?!  Once you alter the shape of the stamped image, it no longer is Christmas-y!  I just used circle punches to punch out the centers of the ornaments!  Get more use out of your "Christmas" stamps!

If you want to order some Christmas ornament stamps this weekend (Ornament Keepsakes!)…remember it is FREE SHIPPING from Stampin' Up! April 6-8…. just go to my Online Store and place your order! Get some Glossy White card stock, too, if you have never tried it!

Happy Easter to You!

Easter Cross Card

Here’s an Easter card that just popped into my head to make.  I know years and years and years ago someone made these little individual wooden crosses to stand on wooden bases for our family with an artificial flower stuck on the middle. Perhaps one had little white flowers all over the cross, I don’t quite remember, but it is the image I had in my mind when I made this card. I just punched out some white flowers with the Itty Bitty Punch Pack, poked them with my bone folder to get them to curl up a bit, and put a rhinestone in the middle.

I hope you are spending a wonderful Easter Sunday with your family; and if you have little ones, really treasure this time!

Here are some Texas Bluebonnets in our yard that always make me think of Easter time!

Bluebonnets

IMG_5255

IMG_5259

And some of the last of the azaleas for the season!

IMG_5260

Make a Card for Easter with an Easter Bunny

Everybunny Easter Card

It’s not too late to make a card for Easter!  This one is easy to make and you can do it with whatever supplies you have. The bunny is from the Stampin’ Up! stamp set Everybunny in the Stampin’ Up! Annual Catalog.  Just stamp in Black Stazon Ink…or even any color of ink (and don’t necessarily color in). If you stamp in Black Stazon, you can watercolor with markers, ink, Blender Pen, brush, or Aqua Painter.  I used my Watercolor Crayons and Aqua Painter.  Love using those! The Easter bunny is then die cut with the Labels Collection Framelits and put on a layer of Melon Mambo.  If you don’t have those framelits, use some other shape or even just layer rectangles. That’s how we did it before framelits! I used a strip of Sunshine & Sprinkles Designer Series Paper….I love how “Eastery” and “springy” those colors look!…. and tied a piece of 5/8″ Whisper White Organza Ribbon around the middle of the card.  The greeting is already included in the Everybunny set, punched out with the Large Oval Punch and layered on the Scallop Oval Punch.

If it is too late to mail, hand it to a friend, a neighbor, or someone at church on Easter Sunday!

You can find all of these supplies in my Stampin’ Up! Online Store here!

If you don’t have the bunnies, stamp a flower instead and a greeting, add a pretty strip of designer paper, or not, and you can make a card you can be proud to give someone for Easter!

Make a Card for the First Day of Spring!

Sycamore Street Spring Card

Today is the first day of spring, so why not make a card for someone to brighten their day even more! On this card I used some Sale-A-Bration products that you can get free with each $50 purchase.  The Whisper White card layer is embossed with the Big Shot and the Vine Street Embossing Folder. For the look of flowers growing, I just punched some of the Sycamore Street Designer Series Paper for the flower design and backed it with some card stock colors. Of course I had to add a little Rhinestone Jewel to the center of each flower.  The stems I cut by hand. The greeting is from the Tea Shoppe stamp set.

As you can see from this card, you don’t even need flower stamps to make a flower card!  Use some designer series paper and punch out some designs that can look like pretty flowers!

If you want to place an order before Sale-a-Bration ends on this Friday, March 22, just go to my Online Store here.  Make sure you see my name in the upper right corner and you are set!  Spend $50, get a free Sale-a-Bration Stampin’ Up! product!  Spend $100, get two!  Spend $150, get three SAB products plus Hostess Rewards plus a free pack of Silver Glimmer Paper!!

Let me know if you have any questions! Here are your SAB choices below!SAB 2013 Flyer1

SAB 2013 Flyer2