Author Archives: Karen Fontinelle

Check out the Stampin’ Up! Last-Chance Retiring Products!

Stampin' Up! Retiring List Logo 2018

It’s time to shop for the Stampin’ Up! Last Chance Retiring Products!  This includes products from both the Annual Catalog AND the Occasions Catalog!

If it is a lazy, rainy Saturday (or a bright, sunshiney one!) and your taxes are done, take some time to peruse your Stampin’ Up! Annual Catalog and Occasions Catalog and make up your order of retiring (and other!) products that you want before they are gone!

If you don’t have those catalogs and don’t have a Demonstrator you work with and want the hard copies in your hands, please email me at Karen@Karenstamps.com and I’ll put them in the mail to you for your last minute shopping!

Click HERE!  Check out the products in my Stampin’ Up! Online Store!

See things you want?  Don’t hesitate or they might be gone!

Click HERE for the PDF of Annual Catalog Retiring Products!

Click HERE for the PDF of Occasions Catalog Retiring Products!


Relax this weekend and check out the Stampin’ Up! Last-Chance Retiring Products!

Sweet Soiree Fancy Cake Birthday Card


Sweet Soiree Fancy Cake Birthday Card

I was actually struggling to make a card with the striped side of this designer paper and one of the cakes I’d cut out by hand, when I flipped the paper over and made this Sweet Soiree Fancy Cake Birthday Card. As soon as I turned the paper over, the cake designs layered over the pretty Powder Pink card base, looked beautiful and perfect. There was no point in trying to force a card that wasn’t working when all I had to do was flip the paper over and make a simple card out of it! The Sweet Soiree Paper is so pretty!

To embellish the card, I adhered a strip of the Powder Pink 3/8″ Shimmer Ribbon across the bottom of the card.  It’s a real shame to cover up ANY part of a paper pattern as pretty as this one! Then I tied the bow separately to adhere on top of the ribbon.  Luckily I held off until I had the greeting ready.

I finally found a pretty small “Happy Birthday” stamp in the Beautiful Bouquet Photopolymer Stamp Set. I could punch it out with the 1 3/8″ Circle Punch after I stamped the birthday greeting using Powder Pink Ink and Whisper White cardstock and layered it on a small silver foil doily in the Metallic Foil Doilies package.

I played around with where to put this greeting on the card, when finally I figured out the best place was on the ribbon with the bow on the bottom of the greeting since there was some empty space there anyway!

This Sweet Soiree Fancy Cake Birthday Card is a very easy card to make since the paper is so pretty by itself.  How can it be retiring??!

Be sure to check out the retiring Stampin’ Up! products in the Online Store.


How to Make an Easy Gift Bag With Half a Sheet of Paper

Sweet Soiree Easy to Make Gift Bag Assembled

In this blog post, I will show you how to make an easy gift bag with half a sheet of paper. I recently saw this tutorial on Splitcoaststampers, but I have made similar bags and boxes the same way many times. For this project, I chose to use the beautiful Sweet Soiree Specialty Designer Series Paper for the little gift bag. This bag is a decent size for a small gift or generous amount of chocolates!

Start with a 12″ x 12″ sheet of paper, whether card stock or designer paper.  Cut in half at 6″ x 12″.  Use the scoring blade on the Stampin’ Trimmer or use the Simply Scored scoring board. Personally, I like to use the Simply Scored when I am making a project like this as opposed to just a card.  I also think it works better when working with designer paper, especially this heavier weight specialty designer paper.

Place the paper in the scoring tool with the 12″ side at the top.  Score at 4″, 5 3/4″, 9 3/4″, and 11 1/2″. Turn the paper so the short edge is at the top and score at 1 3/4″. Now take some scissors and cut those short bottom tabs up to the 1 3/4″ score line. Cut off the little 1/2″ tab on the bottom. If you haven’t already folded on all the score lines and (I prefer) creased with a bone folder, do this now and see how the bag will go together. It’s good to figure out what will be the front of the bag so that you have the “raw edges” where pieces come together facing the back.

Place the paper with the design for the outside face up on the table.  Apply a strong adhesive as shown in the photo. I used Tear & Tape. Remove the release paper on the tape when you are ready to assemble the box. Make sure everything lines up properly.  For the bottom, fold in the sort tabs first, then the piece with the adhesive, and finally press down the last piece which will be the bottom of the bag.

Sweet Soiree Easy to Make Gift Bag Unassembled

At this point, you can leave the bag open as is, almost like a box without a lid, or you can pinch the top together and close one way or another.  Be sure to put your treat inside first! For this gift bag, I punched two holes in the top and tied with Calypso Coral 1/4″ Ombre Ribbon.

The Sweet Soiree Paper is pretty enough not to need any embellishment, but I went ahead and made a little label for the front of the gift bag. For this label I used the Pretty Label Punch to punch out a stamped piece of Calypso Coral Cardstock stamped with an image from the Label Me Pretty Stamp Set. On Whisper White I stamped a sentiment from the same set and punched out with the 1 1/4″ Circle Punch and layered on a piece of Powder Pink Cardstock punched with the 1 3/8″ Circle Punch. For a little bling, I added two dots from the Metallic Enamel Shapes.  

The Sweet Soiree Specialty Designer Series Paper is unfortunately on the Last Chance Retirement List so if this is a paper you want in your stash, be sure you put it on your next Stampin’ Up! order.  The Metallic Enamel Shapes and the 1 3/8″ Circle Punch are also on the list.

Whatever paper you use, this is an easy to make gift bag using just a half sheet of paper, so keep it in mind for when you need a last minute bag for a small gift for any occasion! It might save you a trip to the store for gift wrap and bags!

SHOP STAMPIN’ UP! ONLINE FOR LAST CHANCE PRODUCTS & MORE!

Make a Mini Treat Bag Birthday Card

Mini Treat Bag Birthday Card

Make a Mini Treat Bag Birthday Card quick and easy using the Mini Treat Bag Thinlits Dies which are retiring!!  So sad!  I have loved these Mini Treat Bag dies since they came out and have encouraged everyone to buy a set!

You can use these dies to make more than just a treat bag!  Many times I make the bag plus a card to put inside, all of which makes up the greeting card as you see above.  You can also fold the top over and hold closed with a ribbon or belly band with a small gift or candy inside. So many different options.

To make this Mini Treat Bag Birthday Card, I used the Painted With Love Specialty Designer Series Paper.  This paper is in the Occasions Catalog and is retiring. You might have thought it was only for Valentine’s Day since it was in the Occasions Catalog, but this paper can be used lots of ways. Here I did choose the paper with the little hearts because I think it is such a cute pattern. Then I could coordinate with the heart die cut in the MIni Treat Bag Thinlits Dies and also the Watercolor Words Stamp Set.  This stamp set is also on the retirement list and is one of my favorites! I’ve always loved the font, the size and the greetings and images themselves in this set.

I used our Tear & Tape Adhesive, which is staying, to adhere the bag. The die cut puts score lines on the paper so it is easy to assemble.  I used Melon Mambo cardstock for the card inside and the heart on the front, plus Gold Foil for the other heart.  Very quick and easy!  I could even embellish the front of the card more if I wanted to.

See how I made a little treat bag for Halloween in THIS POST by folding over the top of the bag!  You can use the Search box on the right side of my blog to find more examples using the Mini Treat Bag Thinlit Dies.  They are so fun!  I don’t know what will take their place for me!  But we have to give up old products to make room for the new!

Mini Treat Bag Birthday Card with Hearts

Check out the Last Chance Products in the Stampin’ Up! Online Store so you don’t miss out on any of the great retiring products!

You just might want to make a Mini Treat Bag Birthday Card like this one for someone special!


The Stampin’ Up! Color Revamp of 2018!

Stampin' Up! Color Revamp 2018 Banner

Wow!  If you checked out the retiring products list yesterday and noticed the Stampin’ Up! Color Revamp of 2018, your head was probably spinning wondering what was going on!  I know mine was!  I halfway expected some kind of color changes because it had been a few years since our last one, but we weren’t told of any ahead of time so it was a complete surprise!  I think it is a good one, although I was surprised to see Real Red switched to the Regals color family!  What?!!

This is being called a “Color Revamp” because Stampin’ Up! changed many of the core colors. They say when they change a few core colors, they will call it a color refresh. Stampin’ Up! has planned to make changes to the color selections every three to five years. What’s funny is that a few colors that we had in the past are coming back!  These colors are:

  • Poppy Parade
  • Mossy Meadow
  • Flirty Flamingo (in the outgoing In Colors now!)
  • Coastal Cabana
  • Mint Macaron
  • Blackberry Bliss

So if you have your old colors stashed in the closet, get them out!

The In Color offering will continue as it has. Stampin’ Up! will introduce five new In Colors each year that will be available for two years. And now we will have five NEW In Colors for 2018-2020.

Here are the new In Colors and the current ones from last year carrying over:

Stampin' Up! In Colors 2018

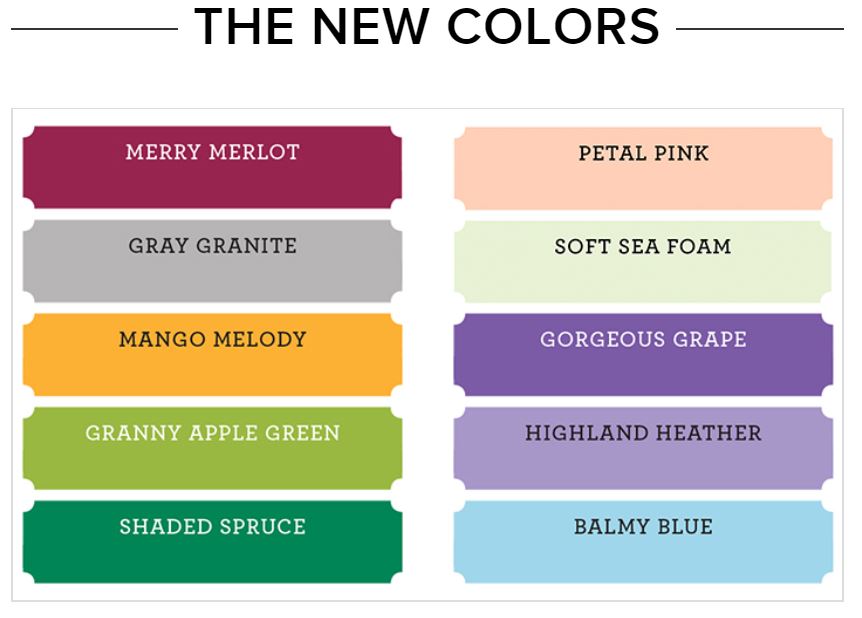
Here are the new Colors:

Stampin' Up! New Colors 2018And here are all the colors and color families together! Stampin' Up! New Color Collections

So there you have it!  What do you think??  We currently have 50 colors (10 In Colors + 40 Core Colors), but in the new catalog we will have 53 colors (10 In Colors + 40 Core Colors + 3 Basics).  Basic Black, Whisper White, and Very Vanilla will be in the Basics category, leaving space to add rich colors in the Neutrals!

So Stampin’ Up! is keeping 27 of the core colors that we have, 13 colors are going away, adding 10 new core colors, and adding 6 returning In Colors that will now be core colors!

Whew!!

AND…..INK PADS!!!

Who would have known, but our ink pad cases are made in molds and because they were wearing out, rather than replace them with the same design, Stampin’ Up! decided to design new ink pad cases to improve some of the features! Plus it’s a good time with the new ink colors.

  • The new ink pad cases are simpler and easier to open. Just insert your thumb in the “lip” at the front and lift it to open. The ink pad inside is still stored upside down to keep it juicy!
  • The ink pad cases are stackable!
  • New color stickers, one to place inside the pad instead of us having to cut our own.
  • As long as they were redesigning the ink pads, yes, they did improve the ink as well. They added “defoamer” to the ink to prevent the ink bubbling like it did sometimes with new ink pads and especially the lighter colors in our old pads. This should help to get an even coating of ink on the stamp and give the stamped image a smoother, solid look.
  • The Archival Ink is going away and Basic Gray will be offered in Classic Ink. Tuxedo Black Memento ink is staying and STAZON is COMING BACK!!  Yea!!
  • The new ink pads will fit in the current Color Caddy (that’s what I use) but since they are thinner, they will fit looser.  Just don’t spin the Color Caddy fast! (not that it spins fast anyway!) Stampin’ Up! is working on something new!
  • Current and new ink refills will work in the new and the old ink pads except for Archival Basic Gray cannot be used with Classic Basic Gray. The new catalog will have the new ink refills.
  • You can see a portion of the new ink pad design in the banner at the top of the page.

Retirement Lists

Shop for Retiring Products in the Online Store!  Click HERE!

Get PDF List of Retiring Annual Catalog Products HERE!

Get PDF List of Retiring Occasions Catalog Products HERE!

  • All retiring items are only available while supplies last and will be discontinued after May 31.
  • Due to high demand for retiring stamp sets, retiring stamp sets will be guaranteed available until May 25; all other products are not guaranteed and are only available while supplies last.
  • Don’t delay in ordering things you really want lest they sell out!

That’s enough information to make your head spin for now!  Note that all Bundles in the catalogs are retiring although the individual products may not be retiring.  You just won’t be able to buy them in a Bundle at the 10% discount.  Get them now!

Stay tuned as we go through this retirement period together! It will all sink in and not feel as overwhelming as we get our heads around all of it!  AND customers will have a chance to  get some sneak peek products in May! More details later!

Remember, if you want to see what’s inside the new catalog NOW and get to pre-order some of the new products early, you will want to sign up to be a Stampin’ Up! Demonstrator!  There are some perks and this is one of the best times to be a Demonstrator as we change over to the new catalog!  Ask me if you would like some information or have questions!

Leave a comment on this blog post or let me know what you think about this Stampin’ Up! Color Revamp of 2018!

SHOP STAMPIN’ UP! ONLINE HERE!

The Stampin’ Up! Last Chance List of Retiring Products Is Here!

Stampin' Up! Retiring List Logo 2018

It’s time to shop for the Stampin’ Up! Last Chance Retiring Products!  This includes products from both the Annual Catalog AND the Occasions Catalog!

Click HERE!  Check out the products in my Stampin’ Up! Online Store!

See things you want?  Don’t hesitate or they might be gone!

Click HERE for the PDF of Annual Catalog Retiring Products!

Click HERE for the PDF of Occasions Catalog Retiring Products!

Sadness and fun at the same time!  I hate to see some of my favorite products leave, but Stampin’ Up! never disappoints!  There are always great new products on the horizon!

Leave a comment below if if you have any questions or opinions of the list! Or email me at Karen@Karenstamps.com.


Make Easy Cards Designed With 2016-2018 In Colors

Cards Designed With 2016-2018 In Colors

My mojo kicked into high gear thinking about the probable retiring 2016-18 In Colors, and these Easy Cards Designed With 2016-2018 In Colors are the result!  I wanted to make a card with each of the 2016-18 In Colors, which we all assume will be on the upcoming Stampin’ Up! retiring list, scheduled to be released this afternoon.

If you have any of these In Color ink pads and don’t have the ink refills, I would be ready to pounce on your order as soon as you see the retirement list today, if not sooner!  No one can predict, but in the past, the ink refills have sold out pretty quickly, and you don’t want to pay some higher price on an auction site later on!  Chances are, the ribbons and papers that have any of these In Colors in them will also retire.  To make these easy cards I chose designer papers that had these colors in them.  You can look at the back of your designer paper package for the list of coordinating colors (I always write them in marker, larger, on the back, so I can read them at a glance!  If you are under 40, you might not need to do this step!!) See how I do it in this post HERE. (It’s a very old post but the advice is the same!)

These easy to make cards use each of the retiring In Colors from 2016-2018. If you like them, stock up!

Check back around 1 PM MT and I will get up the Stampin’ Up! Retiring List and information as soon as I can! Assuming my computer is compliant!

My Stampin’ Up! newsletter will come out tomorrow with all the retirement information plus whatever other updates Stampin’ Up! has, so be sure you are on my Mailing List.  Sign up HERE.

Make easy cards designed with the 2016-18 In Colors getting inspiration from the ideas I posted above!

Shop Retiring Products from the Stampin’ Up! Annual Catalog and also the Occasions Catalog in my Stampin’ Up! Online Store TODAY after 1:00 PM Mountain Time (2:00 PM Central Time).


Give Yourself a Treat With Paper Pumpkin! Special 50% Offer!

Paper Pumpkin Projects Banner

It’s time to give yourself a treat with Paper Pumpkin and take advantage of the 50% off your first two months special offer!   This offer is for new subscribers so you can try two months of Paper Pumpkin at a fantastic rate!

In each Paper Pumpkin box you will receive an exclusive photopolymer stamp set, an ink spot to use on the project, and all the materials ready to go to make the project.  Often there are “leftovers” you can use on other papercrafting projects.  With your first kit, you will receive an acrylic block on which to mount your stamps in case you are brand new to stamping so you will have everything you need!

Shipping is included in the price of the kit, which is normally $19.95 a month for a Paper Pumpkin Kit. So consider that at only $10 for each of two months, to get an entire Paper Pumpkin kit of supplies, plus  a stamp set in each, and no additional payment for shipping….WHAT A DEAL!!!

The kit is designed for even non-crafters or non-stampers with directions and even a special video to watch for help in assembling the project. Most kits are cards but each month is a surprise, which is part of the fun, and may be something like a party favor, home decor item, mini album….you name it!  I love anticipating the arrival of my Paper Pumpkin kit in my mailbox each month.

Check out this post about the Paper Pumpkin Kit from March.

My daughter enjoys Paper Pumpkin at her own home for the simple reason that she doesn’t want a ton of supplies like her mother has, but she enjoys some crafting now and then! This way everything she needs comes in the box, she can assemble the project and she’s done! Some months she “skips” if she doesn’t feel she has time, and then she reactivates her subscription when she is ready again!  It’s the perfect kit, or even gift, for someone in this situation.

Join Paper Pumpkin by Tuesday, April 10th  and receive the April and May kits at 50% off!  Kits ship the middle of the month.

Join April 11 – May 10th and receive the May and June Kits.

Click Here to Join Paper Pumpkin

Use Promo Code:  SAVEFIFTY0418

Go ahead!  You deserve a treat each month!  Try Paper Pumpkin for two months and if you don’t love it, just cancel. I’ll even help you do it. No problem whatsoever.

Busy one month?  Just go into your account and “skip” a month!  No problem whatsoever.

It’s a win-win treat for yourself or even as a gift for someone else!  I have a friend who sends Paper Pumpkin to her mother-in-law every month and she loves it!

Read more about Paper Pumpkin HERE if you want more information.

Remember, you get two months of Paper Pumpkin for half price each month!  You can’t pass that up!

SUBSCRIBE TO PAPER PUMPKIN HERE!

Stampin’ Up! Retirement 2018 Coming Soon!

Stampin' Up! Retirement 2018 Coming Soon Banner

Can we even believe it, that Stampin’ Up! Retirement 2018 is coming soon?

It’s coming Monday, April 9, 2018!

Monday afternoon at 1:00 PM (MT).

On Monday afternoon, Stampin’ Up! will post the  retiring lists for the 2018 Occasions Catalog and the Stampin’ Up! 2017-2018 Annual Catalog. These last-chance products will only be available through May 31 or while supplies last — so check this website, www.Karenstamps.com on April 9, and be ready to make your “must have” list!

If past years are any indication, anything with the 2016-2018 In Colors will retire. It has seemed in the past that the ink refills went particularly fast, so if you have the ink pads and either want the ink refills or want extras, you want to be able to order those right away. But there are other things with the In Colors…..cardstock, ribbon, designer papers.

Tune in Monday, April 9th to find out all the details about the annual Stampin’ Up! retiring list! Although we hate to see any of the products leave, there will be wonderful new products to replace them in the NEW Annual Catalog when it comes out June 1st!

I will be ordering new catalogs for my regular customers that will probably go out mid-May. If you are interested in Stampin’ Up! products and do not have a Demonstrator to help you, send me your contact information so I can send one to you. In fact, if you are interested and do not have the current catalogs right now, I may have a few available that I can send to you to enjoy during this retirement period and also have the catalog for future ideas! Just email me at Karen@Karenstamps.com.  If you already have a Demonstrator you work with, I’m sure she will be happy to supply you with catalogs.

Stampin’ Up! is hopeful that they have enough inventory to fulfill orders through this fun retirement period, but if there is somethings you really want, I would not wait long to order! We have seen Stampin’ Up! taken by surprise several times recently! Just sayin’!

Another tip to keep in mind is that any products that are in Bundles and priced at 10% less, will be un-Bundled and will not have the savings.

However, last year there were some discounted products on the list so maybe you will find some bargains! We just have to wait for the details on Monday!

SEE all the retiring products Monday, April 9th at 1:00 PM (MT) in my Stampin’ Up! Online Store HERE!

Check my Blog Post HERE on Monday afternoon for the Retirement List and information.

(12 Noon Pacific Time, 1:00 PM Mountain Time, 2:00 PM Central Time, and 3:00 PM Eastern Time)

Check back Monday afternoon, April 9th, for all the information about the Stampin’ Up! 2018 Retirement List!

Petal Palette Narrow Note Cards and Envelopes

Petal Palette Narrow Note Cards and Envelopes

One of the fun new products in the Occasions Catalog are the Narrow Note Cards & Envelopes, so I made these Petal Palette Narrow Note Cards and Envelopes using the Petal Passion Designer Paper and the Petal Palette Stamp Set.

These Narrow Note Cards and Envelopes are just the right size for some stamping fun! I used a sample in the catalog for inspiration (that means to copy!) I cut a piece of the Petal Passion Designer Paper just a tiny bit smaller than the note card to layer on top.  Then I stamped some flowers from the Petal Palette Stamp Set, colored them in, and die cut with the Petals & More Thinlits Dies.  I also die cut a Whisper White circle with the Stitched Shapes Framelits Dies for a background for the flowers.  The flowers on the note cards on the left and rght are popped up on Stampin’ Dimensionals.

The note card in the middle is simply stamped, no die-cutting! I stamped the flowers, colored in with Watercolor Pencils and a Blender Pen. I’ve loved the Blender Pens since I started buying from Stampin’ Up! as a customer!  So they have been around almost forever! Trying to blend the bluish background I had scribbled in, though, was making my paper pill a tiny bit since I was just using Whisper White so Blender Pens are really perfect for smaller areas, like the flowers and leaves, unless you use some other kind of paper, like Watercolor Paper or Shimmery White Paper.

The note card with the blue flowers is colored with Stampin’ Blends markers.  These markers were taken out of the Online Store temporarily. due to supply issues. Hopefully they will be back around the time of the new catalog Fingers crossed! The greeting from the Petal Palette Stamp Set is stamped and then the words cut apart to adhere them on the card. I don’t often think of doing a greeting this way, but it’s a cute idea, something different!

The note card with the pink flowers is colored with a drop of ink refill and my Aqua Painter.  That really is almost all you need for coloring, is a drop or two of ink refill.  You can put that drop in the ink pad lid, on an acrylic block, or on top of the stamp case. The just pick up the ink with the Aqua Painter (make sure you don’t have too much water coming out of your Aqua Painter.  Wipe it off on a towel if you do.) and color.  I love using the Aqua Painter.  You get two in the package.  One has a larger brush and one a smaller brush.  I almost always use the smaller brush.

So even without the Stampin’ Blends alcohol markers, there are other ways to color with Stampin’ Up! products.  It just depends on which method you prefer!

And don’t forget to stamp a few leaves on the note card envelopes!  Remember, these note cards are too small to mail in these envelopes, they are more suited to put with a gift in person or just hand to someone  However, you could also put the narrow note card in a larger envelope and mail. There are always choices!

Shop Stampin’ Up! Online for all sorts of stamps, paper, ink and accessories for your papercrafting projects. Use my ideas with these Petal Palette Narrow Note Cards and Envelopes to make some cards of your own!

Petal Passion Black and White All-Occasion Card

Petal Passion Black and White All-Occasion Card

One of the prettiest products in the Occasions Catalog this spring is the Petal Passion Suite with which I made this Petal Passion Black and White All-Occasion Card.  I have seen so many beautiful cards made with the products in this suite!  It all has that watercolored look, so popular right now!

I had actually already colored this flower on one of the patterns from the Petal Passion Designer Series Paper awhile back.  I used the Stampin’ Blends markers, which unfortunately are not available right now, but hopefully will return maybe in June. You don’t have to have those markers to duplicate this card, though, just use another coloring technique such as the Watercolor Pencils, ink pad and Sponge Daubers, ink refills and Aqua Painter.  You can read the post about my coloring therapy with this paper HERE.

When I saw in my package of Petal Passion papers that I had already colored this flower, I just cut it out and cut the leaves off separately. I chose the white polka dot paper in the collection as the top card layer and layered it on Rich Razzleberry Cardstock since that was what color I had made the flower.

I adhered the flower to the cardfront with Stampin’ Dimensionals to pop it up a little bit and adhered the leaves just flat to the card with Snail Adhesive. For a little pizzazz I found a small  gold doily in the package of Metallic Foil Doilies and cut it in half. Then I adhered each half behind the two sides of the flower.

The greeting is from the Petal Palette Stamp Set.  I think it is such a sweet saying.  It is stamped and then die cut with the Stitched Shapes Framelits Dies and layered on a larger scalloped Layering Oval Die. You could put almost any greeting on this card.  It would suit a lot of occasions.

You will love the stamp set and designer paper in the Petal Passion Suite, not to mention the Petals & More Thinlits Dies.  I always forget about these dies for some reason! Order the products you want from this Suite in the Stampin’ Up! Online Store and make some cards like this Petal Passion Black and White All-Occasion Card.


Paper Pumpkin Special Offer 50% Off!

Paper Pumpkin Special Offer 50% Off!

Now is the time to try Paper Pumpkin, the papercrafting kit that Stampin’ Up! sends to you in the mail every month with an exclusive project inside. Right now try the Paper Pumpkin Special Offer 50% Off! This offer is for new subscribers only.

Join Paper Pumpkin by April 10th (coming up soon!!) and receive the April and May kits at 50% off!  Shipping is included, and you will receive a clear block to use with your enclosed stamp set with your first kit. Kits ship the middle of the month. It is quite the deal!!

Join by May 10th and receive the May and June Kits.

I love the anticipation of that red box arriving in my mailbox every month!  Everything you need for the project is included in the kit. You can have some crafting time without having to think up what you want to stamp!  Just sit down and open the box!  Maybe watch the Stampin’ Up! video (link in the box). Make the project according to the directions or make an alternative project.

Go ahead!  Try Paper Pumpkin!  Just click HERE to join!

Use Promo Code:  SAVEFIFTY0418

Oh So Eclectic Springtime Card With Flowers

Oh So Eclectic Springtime Card With Flowers

Images (c) Stampin’ Up! 2018

Somehow this Oh So Eclectic Springtime Card With Flowers came together this morning.  I think I am having withdrawal after Sale-A-Bration ending! Plus we had been on vacation in Arizona for a week, and as of last night I thought I had lost all my mojo, even dropping an ink pad on the floor (luckily it landed ink pad up!).  After thinking so much about the free Sale-A-Bration products, it’s time to go back to the Stampin’ Up! Annual Catalog! Somehow this stamp set and dies, plus paper, popped into my head, but I waited until this morning when perhaps I would remember how to stamp a card!!!

The card base is Peekaboo Peach, one of the In Colors that will be retiring soon. Honestly that group of In Colors wasn’t my favorite so I need to use up some of the cardstock!  If you don’t know what colors to use together, take a look on the back of the package of Designer Paper and see what coordinating colors could be used together.  I chose the Naturally Eclectic Designer Series Paper and Berry Burst was one of the coordinating colors. I used Berry Burst for the layer underneath the Whisper White.

Next I used the Eclectic Layers Thinlits Dies to cut out the rectangular shape and some flowers. You can purchase the Oh So Eclectic Stamp Set along with the dies and save 10% off the purchase price in the Oh So Eclectic Bundle.

And finally I added some Peekaboo Peach 5/8″ Crinkled Seam Binding Ribbon as an embellishment.  This is a fun ribbon to use!  It has a nice feel and the crinkled look is something different.  And it will probably retire since Peekaboo Peach is one of the retiring In Colors. (I assume!)

I left off the greeting until I decide which one I want to use on this card.  It could be almost any occasion, the colors and designer paper have such a happy look to it. Oh, and behind that die cut design I cut a piece of the Naturally Eclectic Designer Paper to adhere behind the open design.  The multi-colored pattern I choose makes a colorful background!

Fun card to make and the die cuts make it easy! Whether you stamp or use die cuts, you can make something springy and happy like this Oh So Eclectic Springtime Card With Flowers.

SHOP STAMPIN’ UP! ONLINE TODAY!

Looking For Last Minute Easter Papercrafting Ideas?

Easter Collage

In case you are looking for some last minute Easter papercrafting ideas, here are some of my projects from past years! If you don’t have the newest Stampin’ Up! products, maybe you have some of these supplies!  Even if you don’t make this exact project, it might just give you an idea of something close that you want to make with the supplies that you have!

I think the Circle of Spring Easter Card is a beautiful card to make with that pretty wreath that you can customize for any season or occasion.  You can just stamp the wreath with the Circle of Spring Stamp Set and then easily color it in with markers or an Aqua Painter. If you have the Wonderful Wreath Framelits Dies you can cut out the wreath and then adhere it to the front of your card.

The Easter Lamb Easter Card is one of my favorites!  I loved that Easter Lamb stamp from a previous year in the Occasions Catalog!  The background was stamped with the Watercolor Wash Background Stamp.

The card with the Easter cross is actually pretty easy and you can make it with any little flower punch or die you have! I accented each flower with a little Rhinestone Jewel in the center. The back layer is embossed with an embossing folder, don’t remember which one.

You can also make an oval Easter egg-shaped card if you have the Layering Ovals Framelits Dies or the older retired Oval Die. Then the egg is colored with the curved swish from the Work of Art Stamp Set.

I used the Easter Lamb again on the Easter Basket made with the Berry Basket Die (retired). There are many ways you can make a little Easter basket, much like you would make a gift box.

And the last card is the Emboss Resist  Watercolor Easter Egg CardIt’s fun to make by stamping with Versamark Ink on Watercolor Paper and then embossing with Clear Embossing Powder and watercoloring over it.  The embossing resists the watercolor so it’s almost like when you dye Easter eggs but first write on the eggshell with a wax crayon! Remember doing that as kids?!

There are lots of fun spring and Easter papercrafting ideas, just find some project you like and go for it!

Shop Stampin’ Up! Online 24/7