Monthly Archives: August 2013

Do YOU Need Stampin’ Up! Paper Pumpkin In Your Life?

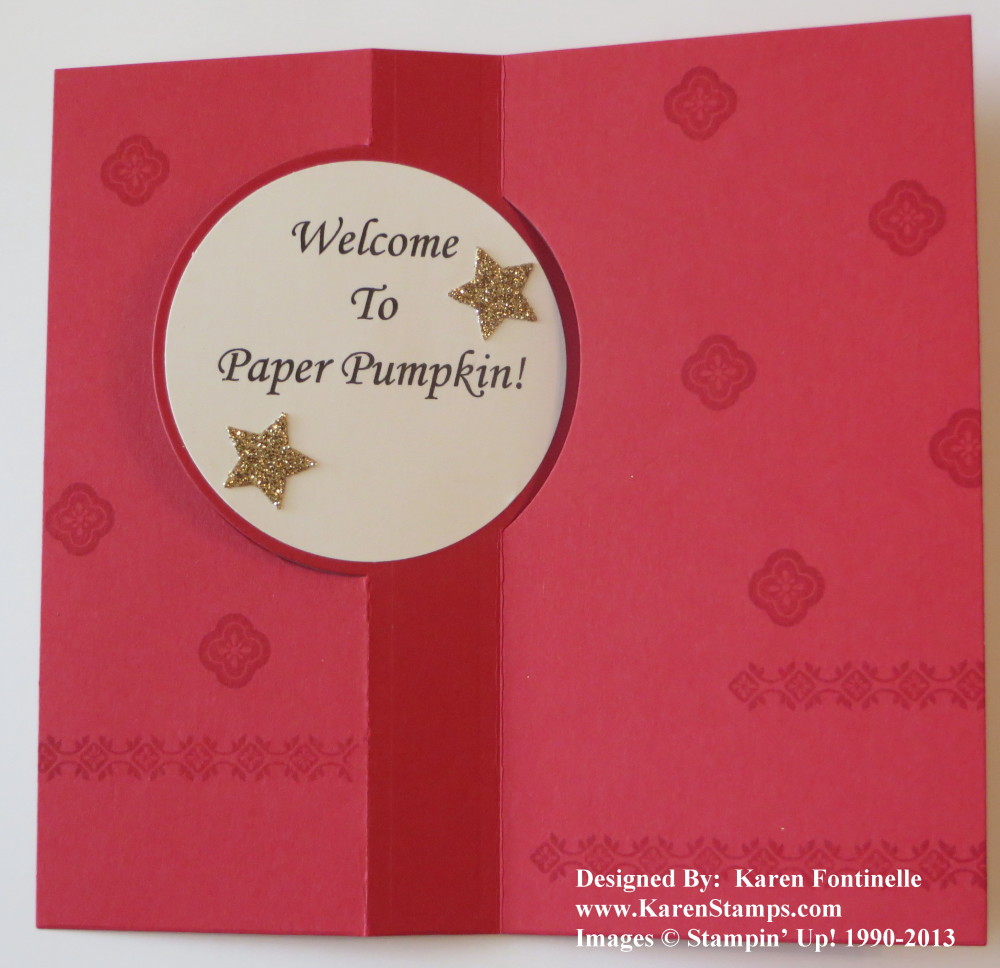
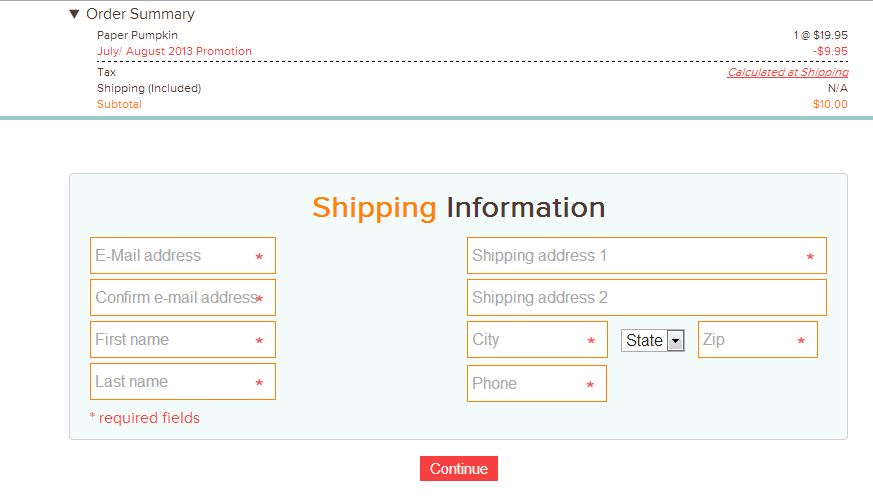
Subscribe to Paper Pumpkin today, a monthly subscription papercrafting kit that comes in the mail to you every month with a new surprise project!  Today is the last day to subscribe for only $10 a month for the first two months, then the price will be $19.95 per month. Be sure to use the Promo Code PUMPKINDEAL.

It’s great for new crafters, new stampers, those without many supplies, those who don’t WANT too many supplies, young stampers, senior stampers, college students away from home, someone you know would LOVE stamping but hasn’t tried it yet, someone who likes a surprise in the mail, someone like YOU!

What else can I say to convince you?  Just try it! For two months you get this cute little red box in the mail with everything you need to make a project, except adhesive. You can cancel if you must after that, but will you want to??  For only $10 a month for two months’ worth of fun (and that includes shipping!)

The commercial above was made by a Stampin’ Up! demonstrator and shown at the Stampin’ Up! Convention this past July.  I think it was the 4th place winner (they added a place!) but the audience just roared when we saw it!  We thought it was great and probably worthy of 1st place in the contest!

This special offer expires today, Saturday August 31. Just click Add Promo Code and type in PUMPKINDEAL. Subscribe right now so your kit will arrive in mid-September! You get a free clear block in the first kit so you’ll have one to use with your stamps! Click on the link below to go right to the page!

Subscribe to Paper Pumpkin today!  Use Promo Code PUMPKINDEAL!

Don’t Miss the Stampin’ Up! Paper Pumpkin PUMPKINDEAL!

Paper Pumpkin card

If you would like to get an easy papercrafting kit from Stampin’ Up! in the mail each month, then the Paper Pumpkin monthly subscription is for you!  And if you subscribe today or tomorrow, you can get the kit for only $10 a month for the first two months! This offer is only good until Saturday, August 31, 2013.  That’s tomorrow!

The first kit you receive will be the Welcome Kit, which includes a bonus clear block to mount your stamps.  I think the cards you can make in the kit are even cuter than the photos you see!  All you need is adhesive. The clear block is included and is an $8.50 value so you will have it to use with future stamps and kits and is practically worth the cost of the kit itself.

Sign up for Paper Pumpkin and get this card from me!  Just go to the special Paper Pumpkin website HERE.  You can find out all about it and sign up right there. If you sign up today or tomorrow, be sure to click Add Promo Code and then type in PUMPKINDEAL.  On the next page you will see your discounted price at the top in the Summary.

After the first two months, the price will go to the regular price of $19.95 a month. There is never any obligation or commitment.  You can cancel at any time or just “pause” your subscription for a month or two if you like.  The date to remember is the 10th of any month:  subscribe, cancel, or skip before the 10th of any month and that will take effect in that month.  If it is after the 10th of the month, it will take effect the following month.

Give yourself a surprise in the mail, or even give it as a gift to someone special.  This is a great opportunity to try it for a great price.  You have nothing to lose!

Don’t you deserve half an hour every month for some creative moments??  I think we all do!

Subscribe at Paper Pumpkin and enter the Promo Code PUMPKINDEAL for the $10 offer!

Paper Pumpkin Welcome Card for Joining

Get a Welcome card from me when you subscribe!

Then sit back and wait for your darling box to arrive in the mail!

Stampin' Up! Paper Pumpkin Monthly Kit

Subscribe today and don’t miss out on this special PUMPKINDEAL at My Paper Pumpkin!

Stampin’ Up! Butterfly Bundle Save 15%!

Stampin' Up! Butterfly BundleSave 15% when you purchase the Papillion Potpourri Stamp Set and the Bitty Butterfly Punch in a Butterfly Bundle! It’s a September special from Stampin’ Up! but it starts NOW!! Butterflies are so versatile to use in your stamping, whether stamped or punched!  And now you can do both! Get a head start on your Labor Day weekend and the September special by ordering this bundle today and save 15%!

Stampin' Up! Butterfly Bundle Prices Save 15%

Click on the flyer below for more information and to see the stamp set.

Stampin' Up! Butterfly Bundle

Just go HERE to my Stampin’ Up! Online Store to order!

You can choose wood- or clear-mount stamps!  You’ll love the cute little Bitty Butterfly Punch also!

While you’re there, check out the newest “Best Of” stamp set for September, Best of Autumn, also available NOW!

Best of Autumn Stamp Set Bet of 25 Years

Exciting New My Digital Studio Downloads

Stampin’ Up! never fails to disappoint with their newest downloads every week!  This week you can get the FREE September calendar download! Just order it the same way you would order anything online, but it will be FREE!

View the PDF of these downloads HERE!

MDS Downloads


MDS Downloads


MDS Downloads


MDS Downloads


To get more information on these MDS Downloads, just check them out at my Stampin’ Up! Online Store HERE.  To find out more about My Digital Studio, the digital papercrafting design software, please check it out HERE.

New Circle Card Thinlits Die Halloween Card

Circle Thinlits Halloween Card

I LOVE the new Circle Card Thinlits Die! And I loved making this first Halloween card of the season for me!  I didn’t even know what, exactly, I was going to make so actually what I came up with was a pleasant surprise!  I knew I would start with a card base of Basic Black card stock with some Witches’ Brew Designer Series PaperThen I got out my new Halloween stamp sets in the Stampin’ Up! Holiday Catalog to see what I could use. I decided to stamp the flying witch in the stamp set  Halloween Hello on a piece of Summer Starfruit punched with the 1 3/4″ Circle Punch.  It is layered on a scallop circle die cut which comes with the Circle Card Thinlits Die and that is layered on a 2 1/2″ Circle Punch  of Champagne Glimmer Paper.  The die also comes with a small star die but for this card I used the star punch in the carryover punch pack from last year’s Holiday Catalog, Merry Minis Punch Pack #126882.

The Halloween greeting on the front is part of a stamp in the Halloween Bash Stamp Set in the Holiday Catalog.  I covered up the top part I did not want to ink up with a part of an old business card and inked the bottom part with Versamark.  Then I embossed it with White Stampin’ Emboss Powder.

For the inside circle, I thought a surprise was in order since it is a Halloween card and what could be a better surprise than a ghost!  Do you know how I made that ghost?  Just use the Stampin’ Up! Owl Punch! Snip off the feet of the owl and turn him upside down!  You could punch out some eyes and mouth but I just used a black marker.  The “Boo” is handwritten with the brand new White Stampin’ Chalk Marker in the Holiday Catalog.

Circle Thinlits Halloween Card

Here is a close-up of the focal point of the card. The scallop circle die cut does not come with the holes in the scallops.  I wanted more of the Glimmer Paper to show through so I grabbed a hole punch in my stash and punched those holes. I had also considered doing some doodling with the Chalk Marker.  So whatever works for you!  The Summer Starfruit circle is also sponged with some Pumpkin Pie ink and even a little bit of Gumball Green.

Circle Thinlits Halloween Card

I hope you enjoyed my first Halloween card.  You know the fall season is fast approaching!

Go to my Stampin’ Up! Online Store and check out the products in the Holiday Catalog and get yourself in the mood!  I’m sure you will want and enjoy the new Thinlits Dies, too!

Pop’ N Cuts Dress Form and Card Base Birthday Card

Pop n Cuts Birthday Card

These Pop’ N Cut Dies were introduced in the Stampin’ Up! Spring Catalog and honestly, I didn’t pay much attention to them.  I think I had already added so many things to my order that by the time I got to their page in the catalog I wasn’t interested. I didn’t take any time to see what they were about, although I did order the Dress Up Framelits Dies.  Those seemed easy enough.

But then as so often happens, I started to see really cute things other people made and also watched some videos made by the designer of the dies, Karen Burniston. That’s when I put them on my next order!  The shape of the Card Base Pop’ N Cuts Die is a Stampin’ Up! exclusive, made with the decorative edge and made so you can tuck it into the slits to close. You can use just this without the pop up portion.

Pop n Cuts Birthday Card Inside

The pop up portion is easy to do once you get the hang of it. You want to be careful not to fold things that shouldn’t be folded.  In order to get the pop up going, it works best if you get your fingers behind that table part and then you will see and feel where the score lines are and how to get the pop up to pop up!

Dress Form Pop n Cuts Inside Card

Once you get the pop up popped up, you can adhere it to the card base.  Just be careful to see where the adhesive should go and shouldn’t go.  I haven’t gotten the hang of that yet! Even though I think I’m being careful, I always get adhesive where it shouldn’t be!  But as long as you pay a little bit of attention, you’ll be okay!  Then you can embellish and decorate your card however you like on the inside and on the front!

Pop n Cuts Birthday Card Side View

This is what the pop up looks like from the side.  You want to get that rectangle shape from the side.  That’s how you know you have it right!  Once you get that shape, then the rest will take care of itself.

These Pop’ N Cut dies are easy enough to use and fun besides!  You can also trim that dress shape off the pop up and add another piece of card stock for a gift card holder or for a message or other design.

Here are the Pop’ N Cuts dies I used plus the framelits:

Just go to my Stampin’ Up! Online Store any time! Just think what magical cards you can make with the Pop’ N Cuts Dies!

August Paper Pumpkin Kit from Stampin’ Up! Monthly Subscription

August Paper Pumpkin Kit Contents

Paper Pumpkin, the monthly subscription kit from Stampin’ Up! for new and ANY papercrafters, arrived in my mailbox! The box itself is so cute (see previous post)!  I wonder what the post office thinks when they see a bunch of these bright boxes going through the system! And the wrapping inside just gets you more excited to see what is in the box! In the picture above, you can see the contents of my August Paper Pumpkin kit. This month had two stamps included, which you punch out of the die-cut rubber, remove the white covering and mount on the label if you like.  You will already have a clear block from your first kit, the Welcome Kit.

Here is the card I stamped and assembled exactly as the instructions indicated.

August Paper Pumpkin Kit Card with Bicycle

The card base just had to be folded in half and already had the blue polka dots printed on them.  I applied the strips across the card and the little banners (all had adhesive on the back) and then stamped the bicycle and the “thanks” banner.  Done!

Then if you want, you can play around and make your own designs! Or you can make the cards all the same.  It’s your time to be creative!  Do what you want!

August Paper Pumpkin Kit Extra Cards

If you would like to receive Paper Pumpkin in YOUR mailbox in September, hurry and subscribe. Right now, until next Saturday, August 31, you can subscribe for only $10 a month for the first two months with the special promo code of PUMPKINDEAL!  You will receive the Welcome Kit first which contains your complimentary clear block (worth the price of admission right there!). I have to say I think the Welcome Kit is cuter in person than in the photos.  I enjoyed it.

Then in October, you will receive whatever surprise kit everyone else is receiving. Yes, it’s a surprise! You’ll find out what the kit is when you open your box! That’s part of the fun!

After two months of the special price, the price will go to the regular price of $19.95 a month, which does include shipping. You can cancel at any time or just skip a month a two if you like and then resume your subscription.  The 10th of the month is the magic date to remember if you want your choice to apply for that month’s kit.

For example, subscribe by Sept. 10th, receive the September Kit.  Subscribe after Sept. 10th and receive the October Kit.  The same applies for cancelling or pausing your subscription.

Go to my Paper Pumpkin page and subscribe right now so you won’t miss out on that $10 offer!  It’s too good to be true!  Try it for two months and see how you like it!  No obligation, no commitment, just enjoy!  Just be sure to click on “Add Promo Code” and type in PUMPKINDEAL. On the next page you’ll see your Order Summary at the top and you can see that your discount was applied.

Email me at Karen@KarenStamps.com if you have any questions!

Stampin’ Up! Paper Pumpkin PUMPKINDEAL

Mine came in the mailbox yesterday!Stampin' Up! Paper Pumpkin Monthly Kit

Isn’t that the cutest box?!

Stampin' Up! Paper Pumpkin Monthly Kit Red Box

When you open the box, it just makes you feel happy!  Look at it!!

Stampin' Up! Paper Pumpkin Monthly Kit Inside

You even get a thank you note!

Thank You inside Paper Pumpkin

If you want to get Paper Pumpkin in your mailbox next month, and at a special price, subscribe now for only $10 a month for two months. Try it out and see if it is for you!

Subscribe to Paper Pumpkin today! Use the Promo Code PUMPKINDEAL to get the special price!

Click the link above to go to my page and sign up. Click the “Join” button, fill in your quantity, and click on “Add Promo Code” at the bottom.  Type in PUMPKINDEAL and click on “Continue”. At the top of the next page, you will see your Order Summary and you should see your discounted price of $10 (plus tax, if applicable).  That price INCLUDES shipping!  Yey!

The last day to take advantage of this special Paper Pumpkin offer is August 31. It’s only about a week away!   Sign up today!


Daydream Medallions Birthday Card

Daydream Medallions Birthday Card

The Daydream Medallions stamp set I have thought is a beautiful one.  And this birthday card my longtime dear friend made for me for my birthday with Daydream Medallions is certainly a beautiful card. She always makes a beautiful card in a simple elegant style.

Don’t you love the cupcake on the envelope, too?! Always stamp something on your envelope! We don’t want to send a naked envelope! If that cupcake wasn’t stamped on that envelope, wouldn’t you just toss it out right away?

My friend also sent me a funny book with quotes about old age! My favorite one I’ve found so far is one by Ann Landers, the advice columnist. Let me first state that I did NOT turn 70! Just to be clear!!  But whatever decade below that it was, this describes exactly how I feel!

“Inside every seventy-year-old is a thirty-five-year-old asking “What happened?”

Maybe the essence of ourselves doesn’t age past thirty-five and that’s why we don’t feel as old as we get!

The book is called Old Age Is Always 15 Years Older Than I Am by Randy Voorhees if you need a funny gift for a middle-aged friend!

Gold Embossing on Modern Medley Designer Series Paper

Gold Embossed Blooming with Kindness Modern Medley Thank You Card

At the Stampin’ Up! Convention this past July, Pam Morgan from the Stampin’ Up! Home Office demonstrated on stage embossing in gold stamped images on the trendy Modern Medley Designer Series Paper.  I even won that Prize Patrol, winning Gold Stampin’ Emboss Powder and a pack of the Modern Medley paper!  Pam was using a lot of the images from Gorgeous Grunge, a stamp set we got free at Convention.  On this card I stamped the beautiful flower from Blooming with Kindness and added some of the small splatters from Gorgeous Grunge off to the side. Kind of different, but I think I like it! This time I purposely chose a light colored background thinking the gold embossing would show better, but I think next time I will try a dark background.

For a greeting I punched a piece of Brushed Gold card stock with the Scallop Oval Punch and layered a piece of black card stock punched with the Large Oval Punch.  On top of that is the sentiment embossed in gold from Itty Bitty Banners and die cut with the Big Shot and the Bitty Banners Framelits.

If you would like to try your hand at the magic of heat embossing, you’ll need a Stampin’ Up! Heat Tool and your choice of embossing powder!  It’s easy and amazing!

Shop at my Stampin’ Up! Online Store or email me with your order!

A Birthday Jar of Notes!

 Birthday Jar of Notes

My daughter, last weekend, did so many things to make my $%&^th birthday the best one I ever had! I’ll just say it was one of the milestone ones!  She took all the sting out of turning this age with all her surprises, the best one being her flying in from California and surprising me! In addition there was a beautiful birthday cake and a mother-daughter cooking class at our neighbor’s house. I couldn’t have imagined anything else, but she had one more surprise up her sleeve!

I don’t even quite know the FULL story, but apparently months ahead of time she contacted friends, neighbors, and relatives and sent them packets with colored note cards and asked them to write some special memory or story or birthday wishes to me or about me.  Then they sent them back to her and she put them all in this jar she decorated with a ribbon and button.

It was SO much fun to read all of them, see who they were from, and see the old photos some people included!  Even all 8 of my brother’s children wrote notes! My one long, long, long time friend and college roommate even copied excerpts from her diary when we were in college and about when I met my husband. My other equally long-time friend sent photos of when I was a bridesmaid in her wedding and our story about how hard we’ve laughed over all my Quilt Show purchases through the years (before stamping) that I would drag out when she visited. Some neighbors talked about all our activities with our kids through the years; swim team, Cub Scouts, even college graduations! My sister-in-law mentioned her visit when our girls were little-bitty and I bought them matching outfits. Not only were the memories and nice notes great, it made clear the connections I have with all these people, built up through all these years. If you are looking for an exceptionally special gift to give someone for whatever occasion, this idea is certainly it!!

birthday jar of notes


Join My Newsletter Mailing List Today!

Join my email newsletter


Sign up and join my Stamping With Karen Newsletter list today! Keep up to date with Stampin’ Up! news and stamping projects you can make yourself. I send out a main newsletter at the beginning of every month and an extra update or reminder of any specials or stamping news mid-month. It’s not too far off from my Twelve Weeks of Christmas emails and I know you won’t want to miss those!

Just sign up in the Mailing List box in the top right of my blog or click HERE.

Here’s what will happen!

  • After you fill in the sign up form, you will receive an email with a subject line Confirm Your Stamping with Karen Subscription”. It should come almost immediately or at least in a few minutes.
  • Open that email and click on the link inside. This gives permission to send you emails. If you don’t click that link to confirm you will not receive my Welcome email and newsletters.
  • After you confirm, you will receive another email from me that says “Welcome to the Stamping With Karen Mailing List”. That email will contain the link to your FREE GIFT and you will be officially on my list!

I hope you will join us! I love feeling like I am “talking stamping” with each one of you!

If you do not receive that first email, either try signing up again or contact me. Also, check your spam folder or if you have Gmail remember that they are sorting your emails into categories and mine might be under “Promotions”.  Just let me know if you have any trouble!  I see that some people sign up but never complete the process.

Today is Tell a Joke Day!

Who knows where Tell a Joke Day came from, but a Friday is a great day for telling a joke! See if you can tell one of your favorite ones!

A little boy said to his teacher, “Mrs. Smith, I ain’t got no crayons!” His teacher said, “Young man, you mean ‘I don’t have any crayons.  You don’t have any crayons. We don’t have any crayons.’ Do you see what I am getting at?”   “I think so,” said the little boy. “What happened to all the crayons?”

And usually a family has silly jokes that mean nothing to anybody else and don’t make any sense. Here is one of ours.

My parents were here visiting when my daughter was very little. I forget if Grandpa was teaching her some jokes or if she was telling him a joke, but this is what she came up with:

“Why did the chicken cross the road?  To throw a tomato at the duck!”

For some reason, that stuck and has been a classic saying in our family ever since! This is something that should be written down at the time so you can remember the story precisely thirty years later! As busy as you young mothers are, try to take a second and write down these little moments because they will be treasures in later years!

******************

Here’s something that is NOT a joke!  Try out Paper Pumpkin from Stampin’ Up! for only $10 a month for the first two months! Speaking of having fun telling jokes, get a fun surprise in the mail once a month when your cute red box arrives with a quick and easy papercrafting project inside!  Everything you need except adhesive is included.  The first month you subscribe you will get the first kit which includes a clear block to use for all your stamps in future kits. You can pause or cancel your subscription at any time.  Just remember by the 10th of any month is when you need to subscribe or make any changes in order for it to take effect THAT month; otherwise the change will take place the following month.  Subscribe by August 31 and take advantage of the special price of $10 a month for the first two months by using the Promo Code:  PUMPKINDEAL 

Click JOIN, put in your QUANTITY, and then click on “Add Promo Code” just below.  Type in PUMPKINDEAL.Stampin' Up! Paper Pumpkin

Click Continue, and you should see your discount applied at the top of the shipping address section.

Paper Pumpkin Discount

If you subscribe between now and August 31, you will get this special price for two months with your first kit arriving mid-September! After two months, the regular price of $19.95 will apply. Both prices already include shipping!

Go now to the cute Paper Pumpkin website HERE and subscribe for only $10 using the code PUMPKINDEAL so you won’t forget and will be sure to get your kit next month!!

New Single Stampin’ Up! Holiday Stamps

Single Stamps Flyer Holiday 2013

Stampin’ Up! has just released some new holiday single stamps you can purchase! Sometimes you don’t need a whole set, you just need one stamp of a certain style or greeting. Here are some great choices you can use on your holiday cards, scrapbook pages, and projects. Click the image above to read the whole flyer.

To purchase any or all of these holiday single stamps, just go to my

Stampin’ Up! Online Store HERE.

Surprises Galore for My Milestone Birthday

What a weekend and what a birthday! I went from not having anything special planned at all for my birthday except probably my husband and I going to a nice restaurant for dinner, well not probably, for sure!!

My one son emailed and said he and his brother were coming home for the weekend (they live about 3 hours away). On Friday he emailed again that he and his girlfriend were coming that night but Steven would come on Saturday, and Eric was staying over Monday and Tuesday, but Steven and Heather would drive back on Sunday. Ok.

Everybody arrived Friday night and Saturday at the designated times.  Steven’s car needed to go in the shop for a new battery and oil. Since my back had been acting up for two weeks as well as our new refrigerator, I hadn’t done any grocery shopping and didn’t. But Steven is sticking to his food allergy diet right now which means Mom needs to cook food at home so he doesn’t get any offending substance. Since my back was doing better I made a quick trip to the grocery store and bought some very nice beef tenderloin steaks and other stuff for a nice dinner. When I got the groceries put away, Eric told me he and his girlfriend were meeting a high school friend at 6:30. I thought that was a bit early and wondered how I was going to get this expensive dinner I’d just bought prepared very quickly so they could leave and besides, Steven’s car needed to be picked up at the shop.  But I’m pretty good at that so I got dinner made fairly quickly and as soon as they were finished eating they left, ignoring my suggestion to let their friend know they were going to be a little late rather than rushing through dinner. But moms are used to being ignored with advice.

When Eric and Heather came back home, a little earlier than I expected, I looked up, and here was my daughter Amy who had flown in from California for my birthday!!  Eric had gone to get her at the airport, not visiting his friend! I haven’t had a surprise like that since my bridal shower! I was completely stunned! She usually isn’t home except at Christmas. And that was just the day before my birthday!

Fontinelle Family

On Sunday besides birthday phone calls from friends and family, I got red and white roses from my husband, large fancy chocolate bars from Eric, fancy brownies Steven had baked himself, and and a beautiful chocolate birthday cake Amy had ordered from a really good bakery here.

Birthday Roses


Chocolate Bars


Birthday Cake

Cooking class photos are still on Amy’s camera so I don’t have them yet!

This was a birthday I’ll never forget and what could be better than spending it with all three children (plus my son’s lovely girlfriend!)! I would never have dreamed this big birthday was going to be so wonderful and memorable and fun!