Tag Archives: Elegant Pine Snowflakes Designer Series Paper

Elegant Pine Snowflakes Card From Our House to Yours

Elegant Pine Snowflakes Card From Our House to Yours

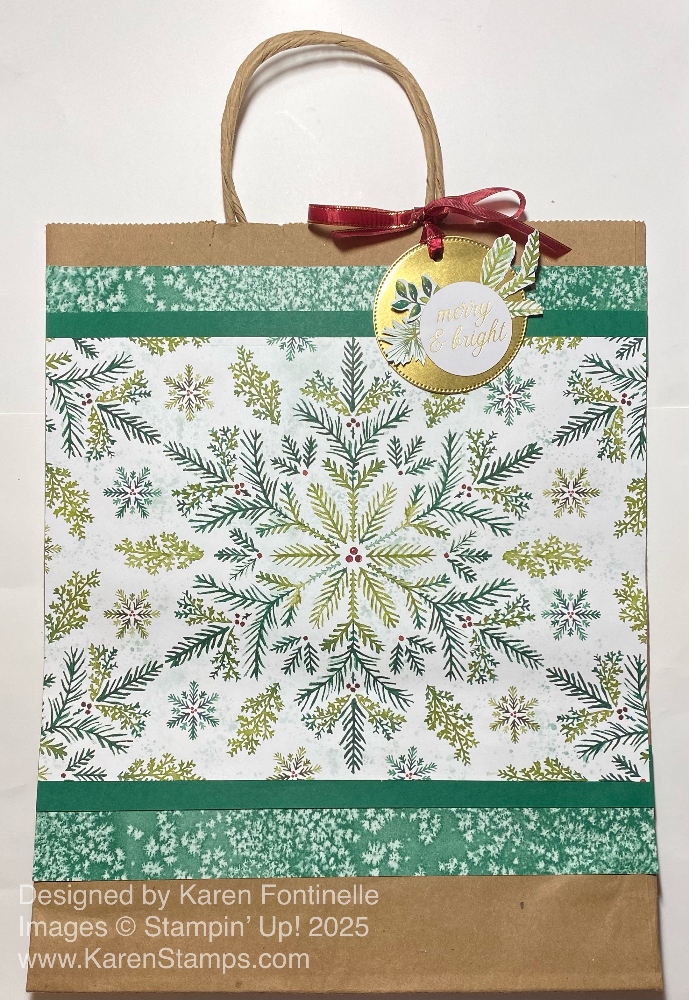
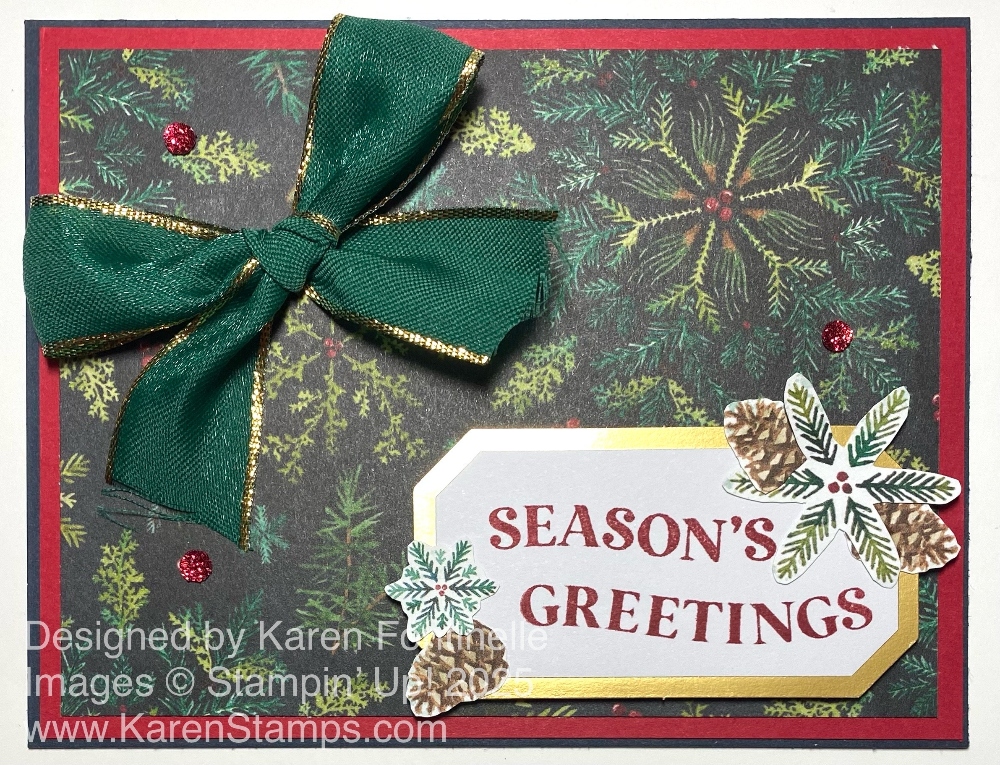
As many of my cards do, this Elegant Pine Snowflakes Card From Our House to Yours card came about from looking through the package of designer series paper! Quite often, your creativity kicks into gear once you start looking at your products and paper. I liked the background paper and thought maybe if I cut out a snowflake that would look good for the focal point of the card.

This card starts with a card base of Shaded Spruce cardstock with the fold at the side rather than the top of the card. Cut the cardstock at 4 1/4″ x 11″ and fold at 5 1/2″. You could also put the fold at the top of the card. Usually we have the fold along the long side of the card.

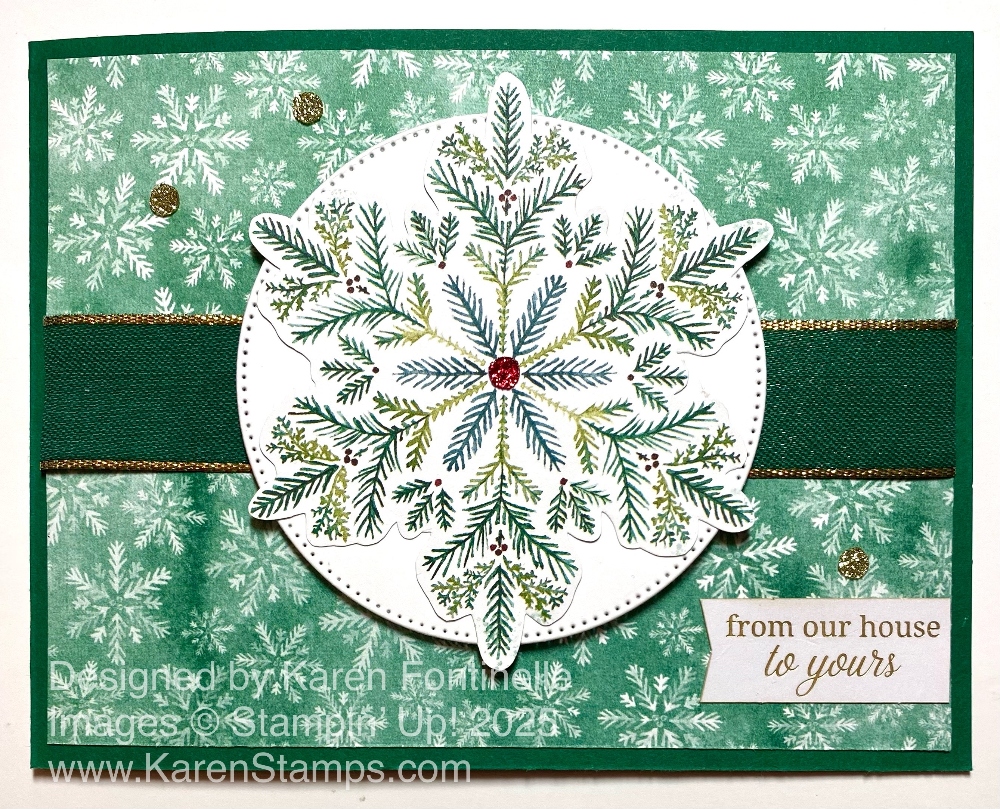
The snowflake layer of paper is in the Elegant Pine Snowflakes Designer Series Paper. I chose one of the larger snowflakes from another sheet of the same designer paper and cut it our by hand (fussy-cut) with my Paper Snips. It’s so easy to cut out things by hand if you turn and move the image you are cutting out rather than moving your scissors. It really does make it easy once you change your focus on cutting. I planned to just adhere the snowflake to the front of the card, but I thought it needed something behind it. Since there was this Basic White diecut circle from the Stylish Shapes Dies already in my package of Basic White, I tried placing that behind the snowflake and liked the look of it. I also added a piece of the Shaded Spruce & Gold Edge 7/8″ Ribbon underneath. I think just the strip of ribbon looks pretty enough. No need for a bow anywhere. The snowflake is adhered flat on the white diecut circle and then the whole thing is popped up on Stampin’ Dimensionals.

The greeting is from my favorite thing, the Greetings For You Ephemera Pack. I think the small banner size fits perfectly on the card without detracting from the big snowflake. I trimmed off the right side of the banner to be straight along the edge of the designer paper. For a little sparkle, I added a small red Traditional Sparkling Sequin to the center of the snowflake and three gold sequins on the background paper. Those sequins are on the Last Chance category now and reduced 10%. I think you should get some! They are so pretty! I’m already on my second package and haven’t even made all my Christmas cards and projects yet!

Check out the whole refreshed Last Chance Products!

Check out the Cyber Prepaid Paper Pumpkin Sale through Dec. 9th!

Check out the new Kits in the Kits Collection (even the old ones, great gifts to give!)!

Check out the newest Online Exclusives!

And check out the new Product of the Month for only $5.00 with a $75.00 purchase!

Elegant Pine Snowflakes Scrap Cards

Elegant Pine Snowflakes Scraps Cards

Do you know what today is? Today is October 25, TWO MONTHS until Christmas Day! Wow! That puts things into perspective for us crafters, right?! I wanted to post a Christmas card today to remind all of us that even though it isn’t Halloween yet, it is almost Christmastime! Here are two cards, Elegant Pine Snowflakes Scrap Cards, that you can easily make with brand new paper or the scraps that you have left after making other cards. And you can use any paper you have! In fact, you can make this same kind of card for a birthday or any occasion, just change the theme and greeting of course!

Elegant Pine Snowflakes Merry & Bright Card

This card is made with a Real Red card base. As you may have guessed, I used the Elegant Pine Snowflakes Designer Series Paper in the Online Exclusives since September. You could use Cherry Cobbler cardstock or one of the greens. The paper strips are cut at 1 3/4″ x 4″. I adhered mine directly on to the card base. However, sometimes it is easier to cut a piece of cardstock the same size as the three strips together and adhere the strips onto that layer, then the whole piece on to the card base. Or you can make a layer that is larger (if you cut your strips smaller) and have that layer show around the margins of the strips. Very versatile design. These strips are all touching, but you can also make them smaller and narrower and leave a space in between.

The greeting is one of the gold foil sentiments in the Greetings For You Ephemera Pack. It is layered on a Gold Foil diecut circle from the Stylish Shapes Dies. This eventually is layered on a larger Real Red diecut circle. First, however, I used the Real Red 1/2″ Shiny Ribbon back and forth behind the gold foil layer and held in place with Stampin’ Dimensionals. I often put some Stampin’ Seal on the paper to hold the ribbon in place until I get it just right and then add the Dimensionals.

For some pizzazz, I added five gold Traditional Sparkling Sequins for sparkle. With this design you can make hundreds of other kinds of cards. It’s a great way to use more than one pattern of our beautiful paper!

Elegant Pine Snowflakes Joy Card

Here is a second card, made with the same Elegant Pine Snowflakes Designer Series Paper, but with the strips switched around and a different greeting and ribbon. This card base is our old favorite, Old Olive. The greeting is also in the Greetings For You Ephemera Pack, but the whole word punches out. It is layered on an Old Olive Stylish Shapes circle with Gold Striped 3/8″ Mesh Ribbon, which is so pretty. Just like the first card, the greeting is popped up on Dimensionals. This time I used the Real Red Traditional Sparkling Sequins for some sparkle on the card. Just add a greeting or write a message inside the card and you are set to go!

Since today is only two months until Christmas (and that’s Christmas Day when ALL the work and preparation is over with!) let’s all try to make at least three Christmas cards today, maybe more, just to get in the mood and into gear!

SHOP STAMPIN’ UP! ONLINE HERE!

Elegant Pine Snowflakes Gift Bag

Elegant Pine Snowflakes Gift Bag

It might be a little early for Christmas gift bags, but I wanted to use this pretty paper on a gift bag to show it off, so here is the Elegant Pine Snowflakes Gift Bag. If you look through the Elegant Pine Snowflakes Designer Series Paper, you will find this one paper with this huge pine snowflake centered on the paper. How can any one cut up that sheet of paper with that design?! It would be beautiful on a scrapbook page….as long as you didn’t put any photos on it! So my best solution was to center it on a large gift bag!

You might have collected kraft or other gift bags from certain stores that you can use for gift bags. Or you can buy a bunch of them at a craft store, small or large. This bag is 10″ wide so I just trimmed an inch off each side of the designer paper. It is 7 1/4″ from top to bottom. For a border piece on the top and bottom, I was just going to have cardstock, but then I noticed the strips I had cut off from the designer paper, turned them over, and used those. To help offset all the colors and paper designs, I cut strips of Shaded Spruce. You can make these any widths you like. I made the top designer paper strip about 1 1/4″ wide, with 1″ showing and a little bit wider at the bottom. The Shaded Spruce cardstock strips are both 1/2″ wide.

Every gift bag needs a gift tag! I found an already diecut circle of Gold Foil using the Stylish Shapes Dies in my gold foil package. For the greeting, I used “merry & bright” in the Greetings For You Ephemera Pack. These are peel-and-stick greetings in golf foil so they are very easy to use. I also fussy-cut some foliage from the designer paper to decorate the tag. I used some retired Cherry Cobbler ribbon to tie the tag to the bag.

After I took the first photo of the bag, I realized the tag didn’t show up very well plus I remembered I intended to put some red berries gems on the tag to match the berries on the paper. These Cherry Cobbler & Pearl Adhesive-Backed Berries are perfect to go with this paper. You could also add some on the designer paper on the bag.

Elegant Pine Snowflakes Gift Bag Tag closeup

I love to decorate gift bags like this for any occasion and we’ll certainly need a lot of them for Christmas so it’s a good idea to start making some!

SHOP STAMPIN’ UP!

Elegant Pine Snowflakes From Our House To Yours Card

Elegant Pine Snowflakes From Our House To Yours Card

This Elegant Pine Snowflakes From Our House To Yours Card is an easy one to make. When you are making a lot of Christmas cards, you need to think of designs that make it easy to make multiples. Of course, you might also want to make some extra-special cards for extra-special people! That is what is so fun about cardmaking – you can make “easy” cards that don’t take a lot of time but still look lovely, or you can spend more time and use more products to make something “fancy”. It’s all fun and all creative!

This card came about just because I was cutting up some designer series paper to send as little thank you samples to send to customers who had ordered from me. Since I just got this Elegant Pine Snowflakes Designer Series Paper in my order the other day, it was one I knew they didn’t have yet. Sometimes when you are just flipping through a package of designer series paper, maybe one pattern in particular will just jump out at you and you’ll want to use it next time you make a card. As I was cutting samples of this paper, this pattern just “spoke to me” and I wanted to use it for the next card I made.

The card base is Shaded Spruce cardstock. It matches perfectly with the foliage in the designer paper. I liked the red berries in the paper, so I added the Real Red 1/2″ Shiny Ribbon. I just took enough ribbon to wrap across the front and around to the back a little bit on each side. This saves a couple inches of ribbon since you don’t wrap it completely around the card. After the ribbon was attached, I could adhere the designer paper to the card base.

For the greeting, I chose a greeting in the Greetings For You Ephemera Pack in the Holiday Mini on page 15 at the top. Stampin’ Up! has quite a few ephemera packs of all kinds and they are so handy and fun to use! These are peel-and-stick stickers of gold foil Christmas greetings, even multiples so you can make more than one card with each greeting. I’ve already ordered a second pack to have on hand. And you can use them on tags, gift bags, and other projects, not just cards. For a background, I diecut a label from the Unbounded Love Dies, now retired, but you can use something similar or simply cut a rectangle piece of cardstock. I used Shaded Spruce with a partial layer of Real Red. The way to “fake” another layer when you don’t have a larger die is to cut it out, then cut it in half, horizontally as I did here or vertically, if you want it to show on the sides. Then glue one half to the top just showing a little border and the other half to the bottom. On the back, there would be a space between the two halves. I do this a lot! The greeting is popped up with Stampin’ Dimensionals right over the ribbon.

To embellish the card, I tied a bow out of the ribbon and adhered it to the card with Mini Glue Dots. It is easier than trying to wrap the ribbon all around and tie a bow, but you could do that. I also added the beautiful Traditional Sparkling Sequins, the small gold ones, to the greeting and on the designer series paper. I’m telling you, these are gorgeous and I think you should order a package or two soon while they are in stock! They won’t only have to be for Christmas either. You will be able to use them on any cards and projects where you want some sparkle!

Here is another card, the first card, I made with the Elegant Pine Snowflakes Designer Series Paper. It comes in a Suite in the Online Exclusives if you would like ALL the things!

SHOP STAMPIN’ UP! ONLINE HERE!

Holiday Mini Catalog Cover SeptDec 2025

September-December 2025 Mini Catalog (Holiday Mini Catalog)

Online Exclusives

Elegant Pine Snowflakes Season’s Greetings Card

Elegant Pine Snowflakes Season's Greetings Card

I got another Stampin’ Up! order late yesterday and had to try out this new Elegant Pine Snowflakes Designer Series Paper, which you will find in the newest Online Exclusives. I was totally drawn to this darker print pattern and made this Elegant Pine Snowflakes Season’s Greetings Card, partly so I could use the new In Color, Secret Sea!

This is really just a basic design for a card so you can change it up however you like. The card base is Secret Sea cardstock with a layer of Real Red cardstock, which I couldn’t resist adding for that pop of red! The Real Red layer is cut a bit larger than usual to give that very narrow border of the Secret Sea. It measures 5 3/8″ x 4 1/8″. I did cut the designer paper layer at the usual 5 1/4″ x 4″ but I decided I wanted more of the red to show than just a narrow margin so I trimmed it down just a bit. Now it is 3 3/4″ x 5″.

I intended to wrap the new ribbon I just got that belongs in the Elegant Pine Snowflakes Suite around the left side of the designer paper and add a bow. But I was too hasty in gluing down the layers! Instead, as you can see, I just tied a bow with the new Shaded Spruce & Gold Edged 7/8″ Ribbon. It is adhered with several Mini Glue Dots. I first intended to place it on the side of the card, but when I sort of accidentally moved it into that corner I thought it looked like a bow that would be on a package so I placed it there!

The greeting is in the Traditional Labels Stamp Set. It is stamped in Real Red on one of the new Foiled Frames & Labels Ephemera Pack. You’ll find these in the Floral Impressions Suite in the Online Exclusives that came out in May. Obviously they aren’t just for Christmas but you can use them any time, even Christmas! I popped up the tag with Stampin’ Dimensionals. To embellish the tag a little bit, while I was watching TV, I cut out some pine snowflakes and pinecones. And because they are so pretty, I added some red Traditional Sparkling Sequins for some sparkle in the dark background.

While it seems crazy to be showing Christmas cards now, we know time flies and every year we wish we would have started on our cards and holiday projects earlier. Now is your chance to start thinking about what you would like to make, order your supplies, and get to work!

SHOP STAMPIN’ UP! ONLINE HERE!