Sara Douglass Shows the Season to Season Wreath and Witching Decor Kit


Sara Douglass, daughter of Shelli Gardner, Founder and CEO of Stampin’ Up!, appeared on a local Utah TV show and showed how easy the Season to Season Wreath Project Kit is to assemble and use for multiple occasions. She also shows the completed Witching Decor Project Kit (the witch hat that I love!!).  I always enjoy when Stampin’ Up! makes a TV appearance!

Listen to the cute little reporter! She sounds pretty excited with these projects, but I don’t think she has stamped before! Wouldn’t we all love to get our hands on her at a workshop and show her all about stamping and papercrafting?! It’s always fun to see a new person’s eyes light up when they discover the fun of stamping!

If you would like to watch the Stampin’ Up! videos about assembling these two project kits, here they are!


I hope you enjoyed those! The kits in the Stampin’ Up! Holiday Catalog this year are just fantastic!  I hope you will choose at least one to make!

I’m happy to mail you the current Stampin’ Up! catalogs if you do not have a Demonstrator to help you yet! Just email me your contact information at Karen@KarenStamps.com.

To shop for the Season to Season Wreath Kit and the Witching Decor Project Kit, as well as all the other wonderful Stampin’ Up! products, just visit my Stampin’ Up! Online Store HERE or let me put your order in for you if you prefer!

Witches’ Night Halloween Card Idea

Witches' Night Halloween Card

I love the look of this stamp in the Witches’ Night Photopolymer Stamp Set and used it with some leftover pieces from the Witching Decor Project Kit to make this Halloween card. The label that this is stamped on and the orange and black striped piece behind it, the “31” sticker, plus the fringe piece at the bottom are from the Witching Decor Kit. I am SO thrilled with the witch’s hat I made with that kit. You can see it HERE.

After stamping the label, I sponged some Soft Suede ink around the edges.  I wish I would have also sponged some ink on other parts of the card, but I forgot!  The paper is from the Happy Haunting Designer Series Paper. Now you can buy a pack of coordinating card stock for each pack of designer paper from Stampin’ Up! if you do not own all the card stock colors.  Be sure to look for that when you are shopping. It’s nice to know and to have that convenience. Check out the Happy Haunting Card Stock Pack.

******

Even as we think about fun things today like Halloween and the upcoming holidays, let’s also honor the day, September 11th. It’s difficult to believe that day is so long ago now for those of us who remember exactly what we were doing when we heard about it. Although most of us were actually a physical distance away from the tragedy, I remember the feeling that we wanted to connect with our loved ones who weren’t at home and friends, just to hear that they were all right, even though we knew they were. So maybe we should all take a moment today and write a quick (or long) note to someone we care about and send a card, just to let them know we are thinking about them. We should do this more often, but we are all busy all the time. Think of the joy you will bring someone when they found an actual personal envelope and card in their mailbox.

Here is the special edition stamp Stampin’ Up! created and sold to benefit the September 11th Fund.  The entire purchase price was donated by Stampin’ Up! in remembrance of the victims.

Special Edition God Bless America Stamp by Stampin' Up!

Howl-O-Ween Treat Mini Treat Bag Halloween Card

Howl-O-Ween Mini Treat Bag

You know I love the Mini Treat Bag Thinlits Diesso for Halloween I made this Howl-O-Ween Treat Mini Treat Bag Halloween card.  I just used Pumpkin Pie card stock to make the treat bag with the die and the Big Shot and then I stamped the words “Trick or Treat” all over with matching Pumpkin Pie ink. That’s how you make your own designer paper! I wrapped a little strip of Happy Haunting Designer Series Paper around the bottom of the bag just for a little something.  The owl from Howl-O-Ween Treat Stamp Set is stamped in Blackberry Bliss and die cut with the Boo to You Framelits Dies.  I also die cut the witch’s hat from the Black Glimmer Paper in the Holiday Catalog and just put a little strip of Gold Glimmer Paper on the hat.  Then I also punched a few Gold Glimmer Stars with the star punch in the Itty Bitty Accents Punch Pack.  Easy to make a deluxe Halloween card!

Here is what the inside card looks like.  I added two bits of ribbon, the Basic Black 3/8″ Stitched Satin Ribbon and the Gold 1/8″ Ribbon and stapled on with the Stampin’ Up! Handheld Stapler to help pull the card out.

Howl-O-Ween Mini Treat Bag inside

Notice the strip of Happy Haunting Designer Series Paper!  What do you see?  Just a black and white design?  Or do you see the bats?!  Cute, huh?!

Remember, this year you can buy a pack of card stock that coordinates with the designer series papers rather than buying separate colors, such as this Happy Haunting Cardstock Pack.

So the Mini Treat Bag Thinlits Dies aren’t just for bags or birthdays or treats!  They can be used to make a Howl-O-Ween Treat Mini Treat Bag Halloween Card!

Need anything?!  Shop online at Stampin’ Up! 24/7.

Join Paper Pumpkin Now! Get 50% Off First Two Months!

Paper Pumpkin Special Offer Sept. 2015

Sweep away the mundane-your creativity carriage awaits!

I’m Paper Pumpkin . . .

I come to your door each month (a fully decked-out creativity carriage). I’ll help you to escape your life with some paper fun.

I come in a sweet box, but you’ll really love what you find on the inside:

All the stamps, ink, paper, and accessories to create pinnable projects. Create stuff like cards, journals, décor, and more!

Paper Pumpkin by Stampin’ Up! is a monthly kit program that anyone (even you) can enjoy!

************

Paper Pumpkin Special Offer! Join Paper Pumpkin by September 10th!

Offer Details: Use the code HALFOFF to join Paper Pumpkin before September 10, 2015, and get 50% off the first two months! After that, keep the creativity coming for only $19.95 + tax per month (shipping included). Click HERE to join Paper Pumpkin or get more information.

The Fine Print:

  • For new subscribers only.
  • Available for month-to-month subscriptions, not prepaid subscriptions.
  • Discount applied to one kit per month for the first two months of a new subscription. After the first two months, the price for each month’s kit will go to the regular price: $19.95.
  • Visit PaperPumpkin.com to join.
  • Enter the Promo Code HALFOFF when you sign up.
  • New subscribers must join by Thursday, September 10, 2015; 11:50 PM (MT).
  • Your membership will continue at full price after the first two discounted months.

Stampin’ Up! Deals

Stampin' Up! Weekly Deal Sept 8 2015

Here are the new Stampin’ Up! Weekly Deals for September 8 – 14. I would say the highlight is the Scalloped Tag Topper Punch!  If you don’t have that already, get it! It will help make cute Christmas tags and many other tags and projects! Of course I have always loved the Glimmer Paper and this week the Silver Glimmer Paper is discounted!  Perfect for the holidays coming up! The Confetti Hearts Border Punch is good for making teeny tiny hearts – maybe to put in shaker cards or for some confetti – or to simply punch a unique border on a card or project or scrapbook page. Then we have a couple ribbons, pearls and metallic sequins to embellish with, always great to have an assortment of things to add like that. Sequins are the “in” thing right now and a great adhesive to use with them is the new Fine-Tip Glue Pen in the Holiday Catalog.

Clearance Rack Banner 2015

Stampin’ Up! has announced new items on the Clearance Rack today!  Check it out before you finalize your order!

Paper Pumpkin Special Offer Aug 2015

Click to Join!

And just a couple days remaining to take advantage of the special 50% off first two months of Paper Pumpkin, the Stampin’ Up! kit that comes to you in the mail! Take a little time to relax and craft with a kit all ready for you!  You deserve it! Use Promo Code HALFOFF. Sign up by Sept. 10th to take advantage of this great deal! Let me know if you signed up so  can make sure you are on my list!

Now that we are past Labor Day, it’s time to really start thinking about the upcoming holidays! Get an early start and keep the holidays relaxed (yeah right!). If you need a Stampin’ Up! Holiday Catalog, please contact me. Or check out the PDF HERE at this link.

Before you finish your order, be sure to check out the Stampin’ Up! Weekly Deals and the Clearance Rack!

Jingle All the Way Bundle by Stampin’ Up!

Happy Labor Day!  If you are just relaxing at home today and perusing the internet catching up on ideas for the Stampin’ Up! Holiday Catalog, here is a Stampin’ Up! video about using the Jingle All the Way Bundle. I’m sure this will be a popular set as it is unique and fun! Watch the video for cute ways to use this Jingle All the Way Stamp Set and the Sleigh Ride Edgelits Dies. You will be able to make a stack of Christmas cards with just this Bundle (and of course a Big Shot!) The Bundle saves you 15% and also comes in wood-mount, of course. Be inspired for the upcoming holidays! Get an early start!

If you want a copy of the Stampin’ Up! Holiday Catalog mailed to you, just email me at Karen@KarenStamps.com.

If you love these ideas and want to shop for any of these great Stampin’ Up! products, please visit my Stampin’ Up! Online Store HERE. If you prefer, I can place an order for you.

Witches’ Night Witching Decor Halloween Card

Witches' Night Witching Decor Halloween Card

I hope this Witches’ Night Witching Decor Halloween Card gets you in a Halloween mood! After I made the Witching Decor Project Kit witch’s hat HERE I still had some pieces left in the kit, so I made this card with some of them.  I also wanted to get more use out of my Witches’ Night Photopolymer Stamp Set that coordinates with the Witching Decor Kit. I stamped the smaller piece in the kit with the Trick or Treat stamp and sponged some Soft Suede ink around the edges. That layered on top of another piece in the kit and I added the extra little banner pieces from the kit. I also had some black rhinestones left and put three of those on the stamped banner. I changed out the background a couple of times and finally decided on Basic Black with a couple spider webs stamped in the corners with Whisper White Craft Ink.  The card base is Tangelo Twist.

For the inside you could add a layer of Very Vanilla and maybe stamp with a few spider webs or add a strip of matching designer paper.

Whether or not you usually make Halloween cards to send to friends, this Witches’ Night Witching Decor Halloween Card could also be framed for a Halloween decoration in your home!

Shop the Holiday Catalog in my Stampin’ Up! Online Store!

New Stampin’ Up! Weekly Deals, Clearance Rack, & Holiday Catalog

Here are the new Stampin’ Up! Weekly Deals, available while supplies last, until Monday September 7, 2015. Don’t miss out! Great embellishments for your cards and projects in the Candy Dots and Rhinestones, of course! Both are adhesive-backed so all you do is stick them on!  Any Washi Tape is fun to use, and the White Seam Binding Ribbon is always useful!


Clearance Rack Banner 2015

Be sure to check the Clearance Rack before you finalize any orders. You never know what you will find. Stampin’ Up! plans to add new items next week! But if you think ahead to the holidays, right now you can stock up on the pretty Cherry Cobbler Sheer Linen Ribbon (more than half off!), the Real Red Satin Ribbon, the Mossy Meadow Satin Stitched Ribbon for some green,  and the Extra Large Gift Boxes are handy to have on hand for gifts! And there are many more things, but those items jumped out at me as something you can use soon – and all the time, really!

Stampin' Up! Holiday Catalog 2015

And of course, in case you missed it, the Stampin’ Up! Holiday Catalog went live yesterday!!  If you need a catalog (USA) please email your contact information to Karen@KarenStamps.com.

Check out all the fantastic Holiday Catalog products in my Stampin’ Up! Online Store! .

Make a Witch Hat Decoration With the Witching Decor Project Kit by Stampin’ Up!

Witching Decor Project Kit Witch Hat

Today is the day that the Stampin’ Up! Holiday Catalog begins! And the Witching Decor Project Kit Witch’s Hat is the item that caught my eye as soon as I saw it! It was the first thing I wanted to get my hands on because I love Halloween and all the fun decorations! This is a kit with everything you need for the hat except for the stamp set, ink pads and adhesive. It doesn’t take very long to make (really!) and it is a good size for a table decoration or Halloween decor! I love how mine turned out! You’ll find the Witching Decor Project Kit (140969) on page 7 along with the coordinating stamp set, Witches’ Night, to make that Halloween label and to stamp the leaves.

Everyone can begin ordering from the Holiday Catalog today and right through January 4, 2016. (Okay, let’s not get ahead of ourselves!) Everyone can view the catalog and the products online today. I hope my regular customers received their catalog in the mail already. If you would like to be one of my customers, please contact  me and I can send you a catalog (in the USA).

This Holiday Catalog is the best, even if I did say that last year – and the year before!  But this one really is fantastic with lots of new products, lots of Bundles to save you 15%, and lots of Kits that take the worry out of designing something. Get together with some friends and have everyone order a kit, then get together to make the project for a fun girls’ night out, or afternoon.

Stampin' Up! Holiday Catalog 2015
Go right now and check out all the great Holiday Products from Stampin’ Up!  I think you will be dazzled! Order the Witching Decor Project Kit by Stampin’ Up! and make your own witch hat decoration!

Sprinkles of Life Blue Bell Ice Cream Cone Card

Sprinkles of Life Blue Bell Ice Cream Cone Card

Today is a red-letter day in Houston and some other places in Texas! Blue Bell Ice Cream is coming back, hence my Sprinkles of Life Blue Bell Ice Cream Cone Card to celebrate! Blue Bell had to close up shop after a listeria outbreak, but they haven’t lost the support of their customers, certainly not this one! We tried various other brands of ice cream, even some very expensive ones, but nothing compared.

When we lived in Oklahoma, my favorite ice cream flavor was Braum’s Chocolate Almond, but when we moved to Houston years and years ago and heard about Blue Bell, there’s barely been a time when we haven’t had a couple of cartons of Blue Bell Ice Cream in our freezer. One time my husband opened the freezer and and said, “I can’t believe some alarm is not going off! We are out of Blue Bell!” I’m always stocked up if out-of-town company is coming because they MUST taste my favorite flavors of Blue Bell. Only limited flavors are coming back for now, as everything must be tested first before it goes out to stores, but one of my favorites is in there – Homemade Vanilla! My other favorite is Chocolate Chip, but guess I will have to wait for that.

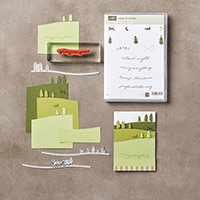
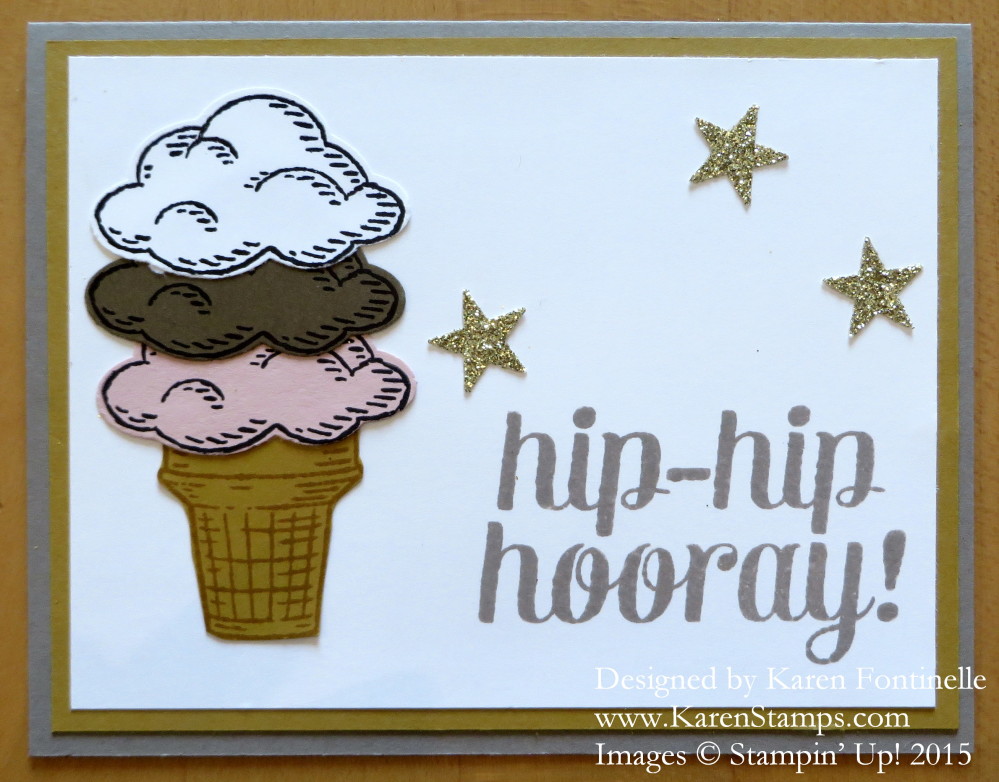
The Sprinkles of Life Stamp Set by Stampin’ Up! is perfect for today because you can make an ice cream cone with however many scoops you want on it with the images. The ice cream scoops could also be clouds. There are lots of images in the stamp set and even a coordinating punch, the Tree Builder Punch, so there are TONS of creative things you can do with these stamps. And while you are having fun stamping and creating, you are helping out the Ronald McDonald House Charities because for every stamp set sold, Stampin’ Up! donates three dollars to the charity.

The greeting on my card is from the Bravo Stamp Set. I easily could have used one of the greetings in the Sprinkles of Life Stamp Set, but I decided on something more celebratory! And how can you have a celebration without some Gold Glimmer Paper stars punched with the star punch in the Itty Bitty Accents Punch Pack?! The card base is made with Tip Top Taupe, one of the new In Colors, and the layer is another In Color, Delightful Dijon.

Hard to believe today is the last day of August! And you know what that means! Tomorrow, September 1st is the beginning of the Stampin’ Up! Holiday Catalog! So if you live where they start selling Blue Bell Ice Cream, maybe you can eat a bowl of Blue Bell while you decide on your Holiday Catalog order! So many delicious flavors of Blue Bell to come, so many delicious Stampin’ Up! holiday products to choose from in the cataog! Choose from kits if you want it simple or don’t want to do the designing. There’s fall, Halloween, Thanksgiving, and the Christmas holidays! Get an early start on your holiday cards or Thanksgiving table decorations. Tomorrow I will show you my favorite kit in the catalog! And I couldn’t be more thrilled with how it turned out in just an hour or two.

If you don’t have a Stampin’ Up! Demonstrator helping you, I’d be happy to send you a Holiday Catalog of your own. Just email me your contact information.

And if you are feeling charitable and would like to make a donation to the Ronald McDonald House Charities while you are having a good time stamping, try the Sprinkles of Life stamp set. Then you, too, can make a Sprinkles of Life Blue Bell Ice Cream Cone Card with your favorite ice cream flavors or many other card designs.

Use Your Washi Tape for Gift Wrap!

Gift Wrap Using Washi Tape

Here’s a great way to use up some of your washi tape! Use your washi tape for gift wrap! Use plain white wrapping paper, as my friend did for my birthday present, and then decorate with washi tape. You could get real creative and colorful using washi tape this way.

Some other suggestions might be:

  • Tape down a little bauble or favor on top of the package with washi tape.
  • Write out the person’s name or initials in washi tape on the package.
  • Use it instead of tape to hold the wrapping together or to adhere the gift card to the package.
  • Use washi tape to decorate a plain white or kraft gift bag.
  • Make a washi tape banner to string across the package.

Stampin’ Up! carries an assortment of washi tape to coordinate with your other Stampin’ Up! products to use for your cards and other creations and scrapbook pages. Shop HERE!

Stampin' Up! Washi Tape

And there will be more washi tape coming in the Stampin’ Up! Holiday Catalog, coming September 1, 2015!  That’s Tuesday!! Use your washi tape for gift wrap and have fun with it!

How to Label Stampin’ Up! Ink Pads

How to label Stampin' Up! Ink pads

If you are new to stamping, this is how to label Stampin’ Up! ink pads! You might not have noticed (or forgot, like me!) that there are ink color labels on the bottom of each ink pad. They come in different languages, as do most things these days, but you can use more than your country’s name! It’s very handy and useful!

Peel off the whole color label piece.  Underneath you will find the directions for opening and closing your ink pad so you want that uncovered anyway, especially if you are new to stamping. Choose the label with the ink color in your language and stick that on the front of the ink pad as shown. It fits perfectly along that top edge. (One time I thought I had to fit the label on the shorter space underneath, I don’t know why!)

Then use the extra labels in the other languages to trim off the color ends and adhere those inside the ink pad in the little well in the front. Sometimes you can’t tell one ink pad color from another when you have several open, so this way, you can look inside and see the color from the labels. Very handy at times!

Then since you still have some labels left, use another one, to adhere to the bottom of the ink pad. Maybe not likely you will be looking under there, but just in case your ink pad gets turned over, you can see at a glance what color it is! And maybe you will also learn a foreign language while you are placing all the labels on your ink pads!

Here are the features of Stampin’ Up! ink pads!

Classic Stampin’ Pads come in exclusive Stampin’ Up! colors, grouped in collections to take the guesswork out of product coordination. The innovative ink pad design has a patented flip-top lid and a firm foam pad to give you a superior stamping experience.

* Fast drying, dye-based ink
* Always Artichoke
* Acid free
* Flip top for upside-down storage: pads stay inked during storage
* Firm foam pad lasts longer than felt pads and provides exceptional ink coverage, especially with solid-image stamps
* Can be re-inked with matching Classic Stampin’ Ink Refills
* Coordinates with Stampin’ Up! cardstock, markers, and embellishments
* 3-1/2″ x 4-1/2″

Be sure to order an ink refill when you purchase an ink pad so you have one on hand. You can also use the ink refills for various techniques so they’re not just for reinking!

Now that you know how to label Stampin’ Up!  ink pads, I hope you will take the time and put the extra labels to good use!

Shop Stampin’ Up! Online 24/7


Back to School Bravo Star Card

Back to School Bravo Star Card

Here in Houston it is almost the end of the first week of school, so I thought maybe people would want to make a Back to School Bravo Star Card either for the student that has completely their first week of school or perhaps for the teacher who has completed a week (and probably more) of back to school! Use the Bravo Stamp Set and some stars cut with the Stars Framelits and Big Shot to choose an appropriate greeting. Change the greeting and make the card for someone getting ready to start school next week or after Labor Day!

For the card base I just used the new Whisper White Thick Cardstock. You will love the weight of this card stock if you would like to make a card with less layers. Then just die cut a bunch of assorted stars with the Stars Framelits and play around with the arrangement until you are happy with the placement of the stars and greeting.  Use a lot or use a few!  Place one framelit inside the other to make the stars with the center cut out.

I’ve always said everyone should have some star punches, star stamps, or in this case Star Framelits because stars can be used for just about anything. They are so good for congratulations, birthday, promotions, achievements, baby, thank you, anything special that you are making!

I loved making this simple Back to School Bravo Star Card using multiple stars and the Bravo Stamp Set! If you need any supplies, please visit my Stampin’ Up! Online Store!

Love a Dog With a Card For National Dog Day

National Dog Day 2015 CardLove a dog with a card for National Dog Day 2015! Today, August 26, is National Dog Day, a day to celebrate dogs! It’s a day to recognize our pets, dogs that need to be rescued, dogs that serve others, dogs that give comfort, dogs that are fun to play with. Whatever your reason for caring about dogs, today is the day to celebrate!  So why not make a handmade card for a friend or loved one with a dog theme!

There are lots of “punch art” designs out there to make dogs out of punches and paper so there are no shortage of ideas. All it really takes, though, is to get out some paper and punches and play. Pick your dog color, maybe a couple of colors, choose their features, whatever you like. Just play. I decided to make a dog house using the Hardwood Background Stamp.  I had no directions, I just stamped the whole stamp and then cut it down to the size that would fit nicely on my card. Then from the scraps I made the roof, as if it were nailed up there. The doghouse door is cut from part of an Oval Framelit but you could also use the  2 1/2″ Circle Punch.  The card base is Marina Mist sponged with some Whisper White Craft Ink to look like clouds. Here are the punch art pieces (I just hand cut the tail) I used to make my dog:

Punch Art Dog Pieces

I used the Extra Large Oval Punch for the dog body and also another Extra Large Oval piece to punch out a small piece for the dog face with the 1 3/8″ Circle PunchThe dog head is punched with the 1 3/8″ Circle Punch. The ears are punched with the Large Oval Punch, you might need to trim them a little bit. The black nose is from the 1/2″ Circle Punch and trimmed to look like a dog nose.  The eyes and mouth are drawn on. To make the red collar, punch into a piece of card stock with the 1 3/8″ Circle Punch, then reach in a little farther in order to cut out a piece to look like a collar. Make it wider than you want so you have space to put adhesive.

Stampin’ Up! also carries several stamp sets with dog images in them!  Check them out!

New Stampin’ Up! Weekly Deal

Stampin' Up! Weekly Deal Aug 25 2015

It’s Tuesday and that means new Stampin’ Up! Weekly Deals!  Check out two great punches, the Sweetheart Punch and the Pansy Punch, plus one of my favorite products, the Gold Glimmer Paper. Then for jazzing up your project, we have the Eclectic Paper-Piercing Pack, the Silver Stampin’ Glitter, and the pretty Very Vanilla Satin Ribbon.

These specials good through Monday, August 31 or while supplies last!

Be sure to check out the Clearance Rack as well when you order!  You might find some bargain you can use!

Shop Stampin’ Up! Here For the Weekly Deals and More!