Using Scraps to Make a Card with the Eastern Palace Suite

Using Scraps to Make a Card with the Eastern Palace Suite

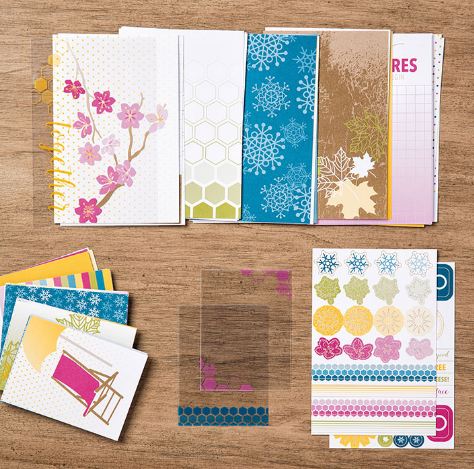
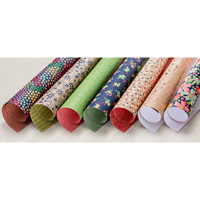
In looking for inspiration for making a card, I wanted to use the Eastern Palace Specialty Designer Series Paperso I looked in the new catalog and decided to “copy” one of the samples displayed. As it turned out, making this card shows a way of using scraps to make a card with the Eastern Palace Suite.  I made my card slightly different than the catalog sample, but this shows that the catalog is a great place to look for ideas. What you end up with might be entirely different than what you started copying.  I might add this card was difficult to photograph because of the glare of the gold foil on several different pieces.

The card base is one of the new In Colors, Tranquil Tide. I randomly stamped a few of the small images in the Eastern Beauty Photopolymer Stamp Set on. the card with Tranquil Tide ink. Then I began placing some of my Eastern Palace Paper onto the card, somewhat like the sample I was copying from the catalog.  One of the pieces of scrap paper has the gold foil design, plus I added a thin Gold Foil Sheet strip on the top edge of another Eastern Palace piece. Since I had a scrap of Lemon Lime Twist CardstockI used that piece on the card whereas the Stampin’ Up! sample used a piece of designer paper in the pack. The greeting is stamped with images from the Eastern Beauty Stamp Set.

Different from the Stampin’ Up! catalog sample, I found the urge to use the fun Eastern Gold Vinyl Stickers too strong to resist! The sample card used a piece of the new Gold Mini Sequin Trimbut since I don’t have that yet, I felt the card needed a little more pizzazz, which I had already tried to add with the gold foil pieces of paper. Since we have the gold stickers, I looked in there and chose some to use on the card. The stickers are high quality, easy to use, and fun to use!

This card was made with one half sheet of cardstock plus scraps I found mixed in with my designer paper pack, so don’t under estimate what you can do with small pieces of your precious designer paper, since I know we are all paper hoarders! Use your scraps, even as small pieces, to decorate a card or project. We can all get a lot of mileage out of our large sheets of designer paper.

Be sure to use the Stampin’ Up! catalog as a source for ideas for your projects.  It’s a gold mine!

Shop Stampin’ Up! Online HERE!

Find Out About the New Memory-Keeping System From Stampin’ Up!

Get acquainted with the new memory-keeping system by Stampin’ Up! Doesn’t that video just make you want to get your photos together and start designing your album? However, this system isn’t just for memory-keeping, as evidenced by the name, Memories & More! This system is comprised of Card Packs that you can buy to keep handy to use on regular greeting cards, to write quick notes on, or to slip in a Pocket Page along with photos and journaling for memory-keeping. These Card Packs come with extra accessories as well, plus coordinate with other Stampin’ Up! products, so you will have plenty of supplies available to you!

Besides the Card Packs, there are also Albums, two in a 6″ x 8″ size and one in a 12″ x 12″ size. There are Variety Packs of the Photo Pocket pages plus one kind that holds a full 12″ x 12″ sheet of paper or enlarged photo.

Watch Bonnie from the Stampin’ Up! Home Office share about the Memories & More products and system.

I think these Card Packs are so fun to have on hand! If you still have little children in school (or even BIG ones!) you can use these cards to hide in their lunch box or backpack for just a sweet or encouraging note from you! Keep them within reach if you want to dash off a short note to a friend. Once you get started you probably will think of other uses as well!

Just having these Card Packs, pocket pages and albums on hand will get your creative juices flowing. Keep it as simple as you want!  Simply slide photos and cards into the pockets and maybe add a bit of journaling on one card (believe me, future generations who see your albums will appreciate this!). Now if you WANT to, get really creative and have fun adding extra embellishments to some of the cards or photos, jazz it up however you like.  But at least start with the simple version so you can make some progress.  Then you have that done, at least, and can go back later to embellish more if you like.

If you received my Stamping With Karen Newsletter yesterday, you saw a traditional-looking scrapbook page I made with several of the cards in the Color Theory Card Pack, plus I added some stamping from the Colorful Seasons Stamp Set. (And if you aren’t on my mailing list, sign up today in the red box on the top right of my blog page so you won’t miss these new projects!)

Color Theory Card Pack

Images (c) Stampin’ Up! 2017

You’ll find Memories & More products in the new Stampin’ Up! Catalog on pages 190-193.

Check out the Memories & More Page in the Stampin’ Up! Online Store HERE!

Get Stampin’ Up! News and Free Project Ideas

Join Our Stamping With Karen Mailing List

Have you joined the “Stamping With Karen” mailing list yet?  If not, consider this a personal invitation!  Just add your name and best email in the red box in the upper right of this blog page!  This is the best way to keep up with the latest Stampin’ Up! news, especially during times like this with a new Stampin’ Up! catalog, new products, new project ideas! And get a FREE GIFT from me when you do that you can download!

If someone referred you to me, please let me know so I can thank them!

At holiday time, I always do an exclusive weekly email for my subscribers called “The Twelve Weeks of Christmas”. Each week will feature a different project for the holidays such as cards, gift items and gift wrap ideas that you can copy or be inspired by to create your own thing.

Every Tuesday (if not more often) Stampin’ Up! puts out the latest updates for us, so I’ve begun sending out shorter weekly emails on Tuesday to keep you up to date. Each email contains one or more projects for you or stamping tips and news. Sign up today so you won’t miss out!

Join my Stamping With Karen Mailing List Today!  Sign up in the red box!

Easy All-Occasion Daisy Cards

Easy All-Occasion Daisy Cards

This weekend I took my own advice and once I made one card that I liked, I made several of the same design and even branched out using the same Delightful Daisy Designer Series Paper on several others. This is a good way to make easy all-occasion cards. I didn’t even add greetings yet because I thought I might wait until I HAVE an occasion, whether “thank you” or “birthday” or “thinking of you” to add a greeting.  Or I might even just leave it plain and write a note inside! Remember, like in the olden days when people wrote letters and real notes inside cards and mailed them?!!!

I found that I loved this Delightful Daisy Designer Series Paper and want to order more! These cards were very easy to make, especially with the new Daisy Punch and Daisy Delight Stamp Set. Sadly, the Daisy Punch is backordered and unavailable to order right now until probably near the end of June. The good news is, that tells you it was extremely popular with Demonstrators during our preorder period so it must be good! But in the meantime, the Delightful Daisy Paper is so pretty, I’m sure you can make pretty cards without the punch. Also, the Daffodil Delight 1/4″ Double-Stitched Ribbon is just the right color to go with the Daisy paper so you can embellish with that on some cards.  I also did a  little “watermark” stamping on the cardstock with the same color ink just to add a little interest.

Sometimes just easy, basic cards are all we need to make and other times we can make the fancy cards for special occasions or special people.  Of course, anybody who gets one of our handmade cards IS special!  Make some easy all-occasion cards just to have on hand to pull out when you need them and add the greeting at that time.

Shop Stampin’ Up! Online today!


Watch Some New Stampin’ Up! Product Videos!

I’m sure with all the excitement over the new Stampin’ Up! Catalog, you would enjoy watching some new Stampin’ Up! product videos to find out more about the great things you are seeing in the catalog!


For yourself or someone who doesn’t have a lot of craft supplies and would enjoy making all these cards from one kit! You can even get a refill! The Soft Sayings Card Kit is on pages 10-11 of the new catalog.


You might recognize this Oh So Eclectic Bundle and Suite from the samples on the front of the catalog.  You will find the beautiful papers and everything in this suite on pages 132-33. One of my favorites!  It’s on my order!


While I don’t have THIS Embossing Paste, I have used a similar product as few years ago on picture frames in THIS POST and THIS POST. At that time, it didn’t occur to me to use it on cards! You can color the paste with ink refills if you want, and use the Decorative Masks (stencils) and Palette Knives to apply the paste.


Isn’t this Love Today Planner Kit the cutest thing?!!  I just love the designs on the pages and the colors! I’m just wondering, for myself, would I use a planner? If I’m not sure I would use it as a planner, though, I could use it as sort of a daily or weekly scrapbook or journal. Sara Douglass at her OnStage demonstration, used it more as a scrapbook/journal writing in what she or her family did that day or week, added a few small photos, embellishments, etc. Let me know what you think about the Planner! Planners are certainly a hot, trendy item out there in the world! The dates are not preprinted in this planner so you can start it now, not wait until January, and you can buy the Refill for another year.

If you are relaxing on the weekend or if your Saturday is a rainy day like ours might be here in Houston, enjoy watching these Stampin’ Up! videos showcasing the new products just like you are at the movies!

Everything is ready for you to order now from the new Stampin’ Up! Catalog!

Just SHOP HERE!

Stampin’ Up! Is Taking Orders From the New 2017-18 Catalog!

Stampin’ Up! is taking orders from the new Stampin’ Up! 2017-18 Annual Catalog now!

Shopping has begun!

If you click the photo of the catalog or the link, you can view the new catalog online. If you are new to Stampin’ Up! or do not currently have a Demonstrator to help you with your ordering and projects, I would be happy to be yours! If you would like a real copy of the Stampin’ Up! Catalog I can mail you  a complimentary copy if you just contact me with your information. Email me at Karen@KarenStamps.com.

Need a Shopping List??  Just click HERE!

Stampin' Up! Shopping List

Need Color Help?  Stampin’ Up! In Color Combinations Chart

Special Promotion For Hosts (or very big orders!)

During the month of June, if you hold a workshop or put some orders together from friends or have your own really big order of $350 or more, you would earn an EXTRA $35 in Stampin’ Rewards.

We Love Hosts June 2017 Promotion

Catalog Corrections:

  • Empty stamp cases are still available but were left out of the catalog. They can be used for your stamps or storing other items. Maybe you want to cut this illustration out of your OLD catalog and paste it into your new catalog. Or print out this photo below.

  • In the Regals Collection (page 4), the color swatch for Garden Green is incorrect. Click here to see the correct color.
  • The Soft Sayings Card Kit Refill (page 11) does not include a clear stamp block. The text should read as follows:
    “Includes everything from the Soft Sayings Card Kit—minus the stamp set, ink, clear stamp block, and box—so you can create 20 cards.”
  • The It’s Your Birthday sample (page 73) uses the bows from the Balloon Pop-Up Thinlits Dies (in the 2017 Occasions catalog), which retired May 31.
  • The Super Duper Stamp Set artwork (page 74) makes it appear as though the dotted line image is part of the Yay! Image. They are actually two separate images.
  • The photo for the Whole Lot of Lovely Designer Series Paper (page 188) shows the two center papers with the wrong designs on the back. The black paper with the bold flowers should be shown with the multicolor stripe design on the back, and the green paper with white leaves should be shown with the pink and white flowers on the back.
  • The Stampin’ Trimmer Replacement Mat (page 205) includes two replacement mats, instead of one as listed.
  • Some of the images in the Tranquil Tulips Stamp Set artwork (page 223) are sized incorrectly.

I hope you will find the new Stampin’ Up! Catalog exciting and inspiring!  Just think of the millions of ideas, card and projects that will come out of all those wonderful products in the catalog!

The Store is open! You can shop for anything you want in the new catalog.  There are a few things backordered.  You can figure those were extremely popular with Demonstrators during our Preorder. There are some things that we blasted through more than Stampin’ Up! could ever have imagined or predicted, but don’t worry, they are working on getting everything back in stock as soon as possible!  Let me know if you have any questions!

SHOP STAMPIN’ UP! ONLINE HERE!


The New Stampin’ Up! Catalog Begins Today!

Quick and Easy Birthday Card with Doily

Today is the day we’ve all been waiting for!  The new Stampin’ Up! Catalog begins today! At least, this afternoon! Ordering from the new catalog should begin by Noon (Mountain Time).

Here is a birthday card I made with the new Happy Birthday Gorgeous Photopolymer Stamp Set.  The card base is one of the new In Colors, Berry Burst, and the layered designer paper is from the Fresh Florals Designer Series Paper Stack.  This paper is copied from the popular Floral Boutique Designer Series Paper from the previous catalog, but in the In Colors. It’s beautiful!

The Happy Birthday greeting is stamped on a piece of Whisper White with Berry Burst ink and die cut with the Stitched Shapes Framelits Die.  The little stamped flowers are also in that stamp set. Then this circle is layered on a pretty Delicate White DoilyAfter adhering that to the front of the card, I couldn’t resist adding one of the new Glitter Enamel Dots. You for sure will want at least one package of these in your stash, although they were so popular with Demonstrators that they are backordered but more are on the way early next week! Get some while you can in case they go on backorder again.

This was just a quick and easy card to use some new products to celebrate the new Stampin’ Up! 2017-18 Annual Catalog!

Click the photo above or the other links to view the new Stampin’ Up! Catalog!

Shop Stampin’ Up! HERE at Noon (Mountain Time) TODAY!

This Is It! Last Day For the Stampin’ Up! Catalog and Occasions Catalog!

Stampin' Up! Outgoing Catalogs

Today is the last day of May and today is the last day to order the Stampin’ Up! Retiring products that you want! It’s hard to believe we are saying goodbye to these two catalogs!

Retiring Products Banner 2017

Shop the Stampin’ Up! Retiring Products!  Today is the LAST DAY until 11:50 pm Mountain Time!

Eastern Palace Suite Flyer Banner

Although you will be able to buy these early-release Eastern Palace Suite products during the new catalog year, today is the last day to get them in a special Bundle and with a FREE GIFT!

Eastern Palace Premier Bundle  (Everything plus FREE Very Vanilla THICK Cardstock & Envelopes)

Eastern Palace Starter Bundle (Just the basics with FREE Very Vanilla Notecards & Envelopes)

Here are some of my favorites or good deals or recommendations from the Retiring List!  Not that it is easy to choose!  Some of these are nearly gone so hurry! Just click on the photo for information.

Thinking of You Oval Window Card

Thinking of You Oval Window Card

This Thinking of You Oval Window Card could be used for many occasions, not just “thinking of you”. We often are looking for a masculine card, which this one could be categorized under, but it could be for anyone for any occasion.

However, since we are only two days away from the Stampin’ Up! Catalog changeover, I wanted to use a bit of old and a bit of new to make this card!  And what could be better for “old” than the classic Lovely As a Tree Stamp Set! If you are new to Stampin’ Up!, you might not realize how long Lovely As a Tree has been in the catalog! It’s been there as long as I’ve been a Demonstrator and that’s getting to be pretty long! It will be a dark stamping day if they ever retire this stamp set!  It’s not referred to as “classic” for nothing because it just is SO versatile, and that’s what we love with our stamp sets, ones that can be used for many types of cards or projects. I’ve made Christmas cards with it (one of my favorite easy cards ever!), sympathy, Father’s Day, birthday, you name it.

For the inside of this card, I stamped the trees with Chocolate Chip ink on Whisper White Cardstock and then colored in the leaves and grass with Sponge Daubers and three colors of green ink (Lemon Lime Twist, Old Olive, and Pear Pizzazz).  If you don’t have the Sponge Daubers, use a piece of a Stamping Sponge or the Aqua Painter. For the sky, I did the same with Soft Sky ink.  The coloring is not meant to be perfect as you can see, but in the end, it all looks good!  I left a bit of white at the bottom for signing the card.  If you wanted to write a note inside, I think you would have to do it on the back of the card or enclose a written letter in the envelope with the card. (Wow!  A letter!  How nice would that be to receive?!)

The card base is Crumb Cake die cut with the largest Layering Ovals Framelits Dies. For “something new” (almost like a wedding!) I used the upcoming Colorful Seasons Stamp Set and the coordinating Seasonal Layers Thinlits Dies.  When the new catalog begins June 1st, you will be able to purchase the stamp set and dies as a Bundle and save 10%.  And from the samples I have seen from Demonstrators during our preorder period here in May, I think you will WANT to have this set!  I LOVE the Andirondack chair and the other lounge chair in the set. Plus there are images and dies to make projects for all four seasons. I die cut this chair out of the new Wood Textures Designer Series Paper Stack, a new package of papers you will want to have right away! The card still needed a little something, so I die cut some leaves and stamped with the larger stamp in the set to get the leaf veins. The greeting is in the set.

In case you were wondering, here is one of my favorite and easiest Christmas cards I have ever made! Click HERE to see my card made with Lovely As a Tree and Dazzling Diamonds Glitter!  Some of my customers have also copied and sent this card at Christmas time, too!  It’s just that easy and classic!

Remember, you have today and tomorrow to shop the current Stampin’ Up! Catalog and DON’T FORGET the Occasions Catalog!!!

I hope you were inspired by my old and new mix to make this Thinking of You Oval Window Card! Lovely As a Tree is NOT retiring, so you can order it along with your new products if you like.

Coins on Military Tombstones

Memorial Day Cemetary

Fort Rosecrans National Cemetary

Today is Memorial Day, a day commemorating those men and women who gave their lives in military service to our country. It’s something we should all think about as we often go about our holiday activities on this day. It used to be called Decoration Day and used to be celebrated on the real day, May 30, until we went to the Monday holidays.

On the local news yesterday, I heard this story about leaving coins on a military tombstone. I’m not sure that I’d heard of it, or if I did, I didn’t remember what it meant. This story said that leaving a coin on a tombstone lets the family know that someone stopped by to pay respects to their soldier.  A penny shows that someone visited. A nickel means you trained with the soldier. A dime means you served with that soldier. A quarter means you were there when that soldier was killed.

You can watch the video below, it’s quite touching, or read the article HERE.

Easy Graduation Card Idea for 2017

Easy Graduation Card Idea for 2017

Now that I know my niece has received her high school graduation card, I can show it to you! I got the idea online somewhere and updated it a little bit, so it really is an easy graduation card for 2017, using the Large Numbers Framelits Dies, which thankfully are not retiring this year! There are so many good graduation cards out there it was hard to narrow down my choices. Or maybe I wish I had more graduates to send cards to this year!

The front layer of this card is Whisper White Cardstock, embossed with the Lucky Stars Embossing Folder. This folder is retiring, although it is still available. I think stars are always handy to have in your stash in whatever form because they can be used to many occasions. The numbers are die cut with the Big Shot and the numbers framelits I already mentioned.  I used Gold Foil paper as well as a layer under the Whisper White.  Some gold or silver foil or glimmer paper always adds some elegance, I think!

The graduation cap is easy to make. Either you can google some tutorials on how to cut the angles or you can just cut out somewhat of a diamond shape. Then cut a little square piece for underneath and punch or cut those two little half circles like graduation caps usually have. You can make your own tassel with embroidery floss or twine, but I used a tassel from the Eastern Palace Suite. It was easier to just stick it up underneath the cap than to deal with the ring on top of the tassel which maybe should go at the center of the top of the cap. On the top of the cap I placed a Gold Faceted Gem, coming in the new catalog.

The card is just on a Basic Black card base and you can put a piece of Whisper White on the inside so you have somewhere to stamp and write a greeting.  Maybe add a strip of the Gold Foil on the inside to carry through the design.

Which do you think a graduate will appreciate more, a graduation card you handmade for them or a store bought one? I guess as long as it has money inside, they will appreciate either, but you know what I mean!!

Shop Stampin’ Up! Online 24/7!

Current Catalog ends May 31! New Catalog begins June 1st!


What is Your Retirement Plan For This Weekend?

Retirement Plan and pen, business concept

What is your retirement plan? I don’t mean the one where you turn 65!  I mean what is your retirement plan for not missing out on Stampin’ Up!’s Retiring Products!  Can you believe this is the last weekend for the current Stampin’ Up! Catalog, and, don’t forget, the Occasions Catalog?! Both of these catalogs will come to an end on May 31 at 11:55 Mountain Time (for online orders). Select products have discounts up to 50% off!  All current Bundles are retiring as “Bundles” although some stamp sets and dies have carried over into the new catalog but will be available separately. So if the Bundle is still available now, get it for 10% off. If both stamp set and dies are on sale, check the math to see which is the better deal.

Stampin' Up! 2016-2017 Annual Catalog

Click photo to view the Annual Catalog!

Occasions Catalog 2017

Click photo to view the Occasions Catalog!

Click These Links!

Stampin’ Up! Retiring Products List PDF

(some of these products are already sold out)

Easiest thing!  Shop Stampin’ Up! Retiring Products Online!  If they come up in the store, the products are still available!

For more Bargains, add on some products in the Clearance Rack!

Don’t Forget!  The Eastern Palace Suite Bundles are only available, with a FREE GIFT, until May 31.

 Have a wonderful weekend!

Click the share buttons below if you think your friends would be interested in knowing about Stampin’ Up! and the promotions going on right now!

Embroidered Flowers on Cardstock Made Into Greeting Cards

Embroidered Cards

The other day one of my very nice customers, Phyllis, sent me the card with the yellow embroidered flowers that she made with a note and the other two papers with the pink and blue embroidered flowers. She said she’d like to see what I would do to them! My first thought was I would frame them, they were all so beautiful! Since we are into cards, though, I thought I would just make these extra embroidered flower cards into greeting cards.

The paper with the blue embroidered flowers just seemed to have an empty space where I could put a greeting so I concentrated on that.  I thought the new Stitched Shapes Framelits would go well with the actual stitching. I love the stitched look those dies give (without having to do any stitching or piercing!). First I played around with cardstock colors to see what would match and finally decided on Wisteria Wonder and Soft Sky. Her floss seems to be varigated colors so that’s why I chose two different colors.

Embroidered Cards Blue

I chose a greeting from the Floral Phrases Stamp Set which I think is a nice greeting, plus it would fit into a nice oval shape. I die cut the greeting with the Layering Ovals Framelits DiesThe greeting is layered on a piece of Wisteria Wonder cardstock die cut with the Stitched Shapes Framelits Dies and then layered on a piece of Soft Sky cardstock die cut with the scalloped oval in the same Layering Ovals Framelits Dies pack. The card is made by layering the embroidered piece on top of Wisteria Wonder and Soft Sky for the card base. I think you could also add a small pearl or rhinestone in the center of each flower and maybe some sequins adhered randomly to take up a little of the open space, but I wouldn’t want to distract from the pretty embroidery. Sometimes less is more!

For the pink embroidered flowers I went through the same process of choosing cardstock colors. As it turned out, I thought Rose Red and Pirouette Pink worked best with the thread. Then I even wondered if a pop of Basic Black would work. I think maybe it does, but I like the Rose Red and Pink the best.Embroidered Cards Pink

Embroidered Cards Pink and Black

Since I had first thought of framing these pretty embroidered flowers, I happened to remember a card I made way back in the beginning of my stamping with an oval as a frame. I used the largest oval in the Layering Ovals Framelits Dies to cut out a frame to place over her embroidered piece. I think maybe you could also emboss the oval frame if the design didn’t take away from the embroidery.

Embroidered Cards Oval Frame

It’s nice to see someone doing something different with her cards and yet you can still use Stampin’ Up! cardstock, and accessories to enhance the design.  A greeting could also be added to these cards, something smaller and simple since the pink embroidery takes up more space. But just a plain card without a greeting is always good to have on hand for those personal notes you want to write.

Stampin’ Up! actually has a Christmas kit of cards on which to do some stitching on the Clearance Rack, the Stitched with Cheer Project KitIf you would like to incorporate some stitching on your cards and get some early Christmas cards made, check out this kit! It’s quite the deal, on sale for 60% off the original price!  Watch the video below to see it!

I hope you will be inspired by Phyllis’s idea to make cards with beautiful embroidery. She says this is her “go to and easy” card to make. Although I have done all kinds of needlework in years past, needles and thread are not my thing any more so for me stamping is much easier! It’s great we can see all kinds of styles of cardmaking and crafting and creativity! Leave a comment below if you have any other ideas for Phyllis’s cards or tell us about any different kinds of cards you make.

Last weekend for Stampin’ Up! Retirement Shopping!

Don’t Delay!

Owl Punch Cats Sitting on a Wall

Owl Punch Cats Sitting on a Wall

One of my dear stamping friends sent me a picture of a card the other day with five cats sitting on a wall, all made with the famous Stampin’ Up! Owl Builder Punch!  She said “You have to make this!”  Here is my own version of Owl Punch cats sitting on a wall! It was fun to make!

In order to have a little bit of sky, I used Marina Mist for the card base. The wall is made with Smokey Slate card stock embossed with the Big Shot and the Brick Wall Embossing Folder.  I cut it down a little to fit on the card. I also sponged on some Craft Whisper White Ink Pad (retiring soon, low inventory) for a little look of clouds in the sky. For the cats, I found scraps of designer paper and punched out the owl body shape and cut off the feet! You can just cut the tail by hand, but I just kind of slid my Owl Punch over to the side and punched after I could “see” the tail inside by punch. Since I couldn’t fit all five cats on the wall, I put one on the ground.  And if you like, you can draw in some whiskers showing from the back with a black marker.

The greeting is from Teeny Tiny Wishes and punched out with the Classic Label Punch. Now that punch makes pointy ends, but somehow I decided to slide the punch over and make a small banner punch in each end.

The Owl Punch is retiring this year, so don’t miss out on getting yours!  It is one of the most creative punches we have ever had, I would say! Thanks to my friend Iska for sending me this fun idea!  She knows how much I have liked the Owl Punch over the years!

Shop Stampin’ Up! Online 24/7!

Watercolored Die Cut Medallion Card

Watercolored Die Cut Medallion Card

Did you know you can watercolor the medallion die cuts in the Eastern Palace Suite to make a pretty card? Although the Eastern Palace Suite obviously has that Eastern design look to it, I think you can use parts of the suite to make cards and projects without that Eastern look to it by changing the colors or using just certain elements of the design. I saw an example of an Artisan Design Team member, I think from Germany, who had watercolored on Watercolor Paper and then made the Eastern Medallions die cuts into that paper without cutting them out separately. If you are on my mailing list for my Stamping With Karen newsletter then you saw the card I made like that in my newsletter.  (If you are NOT on my mailing list, please join us and sign up in the red box on the top right side of my blog today!)

Yesterday when I first began the watercoloring, which I did on Shimmery White Cardstock rather than the Watercolor Paper, I didn’t care for my first try. But since there are no mistakes in stamping, I just kept that piece and die cut this medallion you see on this card.  Instead of leaving it embedded in the paper, I snipped the tiny connecting edges to release the die cut from the paper. Then today I was able to use it on a new card!

To make this card, I used two of the new In Colors for 2017-2019, Powder Pink and Lemon Lime Twist for the card base and first layer.  For the top layer of the card, I used a piece of Whisper White and stamped just a small image from the Eastern Beauty Photopolymer Stamp Set randomly with the pink and green inks.  The card needed a little something besides just the medallion. The ribbon is the 1/2″ Finely Woven Lemon Lime Twist Ribbon.  You can tie it all the way around the backside of the card, but if you would like to save a few inches, just adhere the ends to the back of the card after stretching it across the front.

The medallion was already watercolored on Shimmery White Cardstock with my Aqua Painter and three reinkers put into the lids of the ink pads:  Powder Pink, Lemon Lime Twist and Berry Burst. When dry, the paper was die cut with the Big Shot and the Eastern Medallions Thinlits Dies.

The greeting is in the Eastern Beauty Stamp Set and is one I love. What a great phrase to send to people!  I stamped it with Powder Pink and die cut with the smallest circle in the Stitched Shapes Framelits Dies. I wasn’t sure it would be big enough but I also didn’t want to cover up much of the pretty medallion.  Fortunately, if you work on the placement a bit, that die is just big enough! I didn’t think it even needed another layer behind it.

Remember, the Eastern Palace Suite is available in either the Starter Bundle or the Premier Bundle only until May 31.  And each Bundle has it’s own FREE GIFT! Check the lists carefully to see the contents so you get what you need.

There are lots of possibilities with this Eastern Palace Suite!  If you think this is something you like, I’d urge you to get it in the preorder before May 31 so you get the Very Vanilla free gift in each Bundle!

Shop Stampin’ Up! Online 24/7!