Saving Family Memories: Do It!

Saving Family Memories Tape Recordings

Today I  had to share with you a way to save family memories and the importance of it. Being in the papercrafting business, we often think we need to be making those scrapbooks, doing. something with the boxes of photos we have.  Some diligent scrapbookers actually accomplish these goals, and others of us know we will do it “someday”, “any minute now”.  I’ve known for a long time that there are companies out there that will save your old VHS tapes and home movies on digital media. Again, I thought this would be a good thing to do “someday”, but of course that’s as far as it would go.

Then one day I was talking to a dear friend on the phone whose husband was hooking up a TV and wondered if the old tape player still worked. He asked her to hand him one of those VHS tapes.  She did and found home movies of her son’s graduation and party back at their house, which her parents and in-laws had attended, plus my family! She was enthralled with the chance to look back at all the kids who were young back then, her family members, some of whom had died, what their house at the time looked like, the food we had, the decor, everything about it!  We talked about how we “should” be getting these movies and things digitalized “sometime”.

As it happened, the next morning I thought to look up the Legacybox website since it was a company I had heard of. Although I had to leave for an appointment in a few minutes, I just spontaneously went ahead and ordered a box, without doing hours of research, that they would send me in which to mail back to them a certain number of home movies, photos, whatever I had. Another friend had also told me about doing this with her family’s memories, how easy it was, and how great for her daughters to sit down with their grandfather and watch the movies back and talk about his life.

Since then I have taken advantage of coupon deals and sent in a couple other boxes of old home movies, both film and VHS tapes. They still return your originals, so no need to worry you are giving those up. They send back a flash drive or DVD or I think put it in the cloud for you to download. Different companies may do it different ways.

Awhile back I found a box with these big and small boxes of old reel-to-reel recordings, like from an old-fashioned tape recorder! Some are labeled, some aren’t.  Way back when, relatives on my grandpa’s side of the family bought one of these big old tape recorders and for some reason got a “deal” for us to purchase one also.  Then we would make a recording and mail it to those relatives and they would make a recording and send it to us!  I don’t have that old tape recorder so I couldn’t play these tapes, and would be afraid of damaging them even if I could. So I sent them in to be digitalized, not sure how they would turn out. And thinking they wouldn’t be as exciting as the home movies.

I got the box back the other day with the flash drive I had chosen, and I have to say, WHAT A TREASURE!!  The first one was from 1968!  My grandpa starts it off pretending this is a radio station and then everyone in the room talks about something on the tape….my grandma’s birthday dinner, her friend visiting from Chicago, my Homecoming football game, our new dog, etc.  I heard my grandma’s laugh in the background!  When I thought about it, everyone on that tape has died, except my brother and me.  Old home movies usually don’t have sound, so to be able to hear everyone’s voices again was such a treasure! Another tape had me playing the piano for another family gathering at our house, my brother playing the accordion, my dad playing the piano a little bit and an actual sing-a-long of sorts!! If you would have asked me if my family ever had a sing-a-long I would have said, “Absolutely not!” Yet, there it was, such a happy evening at our house. Another tape must be a recording of an old record my grandma’s brother, an opera singer, had made. I suppose the record was playing on a record player and then someone recorded the sound with the tape recorder. I hear him singing and playing the piano. I haven’t even had time to listen to all of the tapes yet but I will. I didn’t expect the quality to be so good after all these years and wasn’t even sure at all what was on these recordings.

So my message is, if you have family memories like these tucked away in boxes, don’t just ignore them or leave them there because you don’t know what to do with them.  And yes, it costs money, but what good do the old movies, tapes, cassettes, VHS tapes do for you if you can’t access what’s on them. Better to spend some money and be able to enjoy them.  Someday the current media will probably have to be upgraded to whatever technology is available in the future.  But at least you are saving what you have now before it degrades in quality any more. The company can only do as good preserving these things as the quality of the material you provide.

This is a lot quicker than making a scrapbook!  You can even just send in old photos, slides, and more and get them digitalized. For me, it was more important to do the materials that I couldn’t access myself, like home movies, audio tapes, etc.

While this isn’t meant to be a commercial for Legacybox, I will say I was satisfied with the process and they send emails all along the way to update you on the progress.  It’s a little nerve-wracking to send off your treasured items in the mail, but there is tracking so hopefully that keeps everything from getting lost. And it’s probably a good idea to order or make your own extra copies of what you get back and give to another family member to keep in case of fire or floods at your house or even just forgetting where you put it, so there will be another copy available somewhere else!

If you have movies and things you want to save, do it now.  The family memories you can actually enjoy will be worth it!

Get Craft Kits on Sale From Paper Pumpkin Up To 75% Off!

Usually past Paper Pumpkin Kits and Refills to the kits are reserved only for Paper Pumpkin subscribers.  But starting today, until May 9, or WHILE SUPPLIES LAST, everybody can stock up on great deals on these papercrafting kits! Check out the list below!

Paper Pumpkin Spring Sale 2018

Just add the Item Number to your Stampin’ Up! order.  The Refill kits do not include the ink spot nor the exclusive stamp set, but all other supplies are included.  The “Past Kit” contains the full kit.  Even if you do not get the ink spot and stamps, you would probably find ways to use the supplies inside to make similar or alternative projects using the stamps you do have!  Just play!

I believe the Something Good to Eat Kit (143593) may be sold out….and for good reason!  This is the kit that comes with 16 “test tubes” (treat tubes) that you can fill with candy or something and decorate for Halloween or Christmas or any fun occasion!  I know my Trick-or-Treaters loved getting them at my door!  So even if you just order the Refill to get the tubes, it will be a great deal and you will have fun playing with them! While they last!!!

Although the kit was made for Halloween, here is a project I made for St. Patrick’s Day! Click HERE.

Check out these Stampin’ Up! videos to get more details on these kits and more! Just click on the “Show More” after the first few videos to get to the older ones.
These “Spring Cleaning” Paper Pumpkin kits and refills will be discontinued May 9th if not sold. Everything is available while supplies last, of course!
And if you are interested in Paper Pumpkin, try it out for two months with this special offer!
Paper Pumpkin 50 off 2018

Subscribe today (or at least by May 10th) and get the May and June Kits each at 50% off! That’s quite a deal for what you get!  An exclusive stamp set, an ink spot, an acrylic block with your first kit to mount the stamps, directions, a video to watch, and all the supplies in the kit to make the project.

JOIN PAPER PUMPKIN HERE!

Take advantage of Stampin’ Up!’s spring cleaning sale and pick up a few of these craft kits on sale from Paper Pumpkin up to 75% off to add to your crafting fun!

Eclipse Technique 16th Birthday Celebrate Animals Card

Eclipse Technique 16th Birthday Celebrate Animals Card

Sometimes you can just copy yourself as I did with this card because I love this stamp set and wanted to try the Eclipse Technique for a 16th Birthday card with the We Must Celebrate Animals!  Maybe not quite your typical 16th birthday card, but it was what I was in the mood to make that day! I love this stamp set and thought I would try the Eclipse Technique with the numbers.

Sadly, the We Must Celebrate Stamp Set is retiring the end of May.  I didn’t purchase it at first when it came out in the Occasions Catalog, but then I fell in love with it when I saw a lot of samples using it online.  Isn’t that what always happens?!  I even was so daring as to cut the animals apart carefully so I could use them separately, or even put them back together side by side on the acrylic block to stamp this card.

To do the Eclipse Technique, stamp the front of the card first, the do the die cuts. This must be a separate layer so that a darker layer will go underneath to make the numbers show up.  The darker layer underneath can either be the card base itself or just hide a darker layer underneath! After being die cut with the Big Shot, the numbers are then replaced in the space and popped up on Stampin’ Dimensionals.  I used the Large Numbers Framelits Dies, which I am also sad to report are retiring!  They are so great to use for birthdays and anniversaries and other special occasions, like graduations.  The coordinating stamp set, Number of Years Photopolymer Stamp Set is also going out.

Eclipse Technique 16th Birthday Celebrate Animals Card closeup

The card base is Whisper White Cardstock with a layer of Marina Mist.  I put a small layer of Basic Black behind the die cut numbers. The front of the card is colored in with Stampin’ Blends Markers.  The grass is stamped with two stamps from the Sheltering Tree Stamp Set.  First I stamp the large swath of grass and then I go back and stamp with the blades of grass stamp.  Maybe I fill in the empty spaces with a little bit of brown for a little dirt or even another shade of green.  The die-cut “Celebrate” is in the Celebrate You Thinlits Dies that were available during Sale-A-Bration, BUT this set will also be available in the upcoming Stampin’ Up! Catalog.

If you would like to see the same card I made without the Eclipse Technique, please click HERE.

If you love this animal stamp set, be sure to check it out on the Last-Chance list and get it before it is gone!

Some retiring items are already sold out, but you can see the ones that are still available by checking the Online Store rather than depending on the written list.

Try the Eclipse Technique on a card using whatever dies you think you can use, something like my Eclipse Technique 16th Birthday Celebrate Animals Card.


Easy Birthday Memories Birthday Cards

Easy Birthday Memories Birthday Cards

Images © Stampin’ Up! 2018

Take some time to make an assortment of easy Birthday Memories Birthday Cards using the Birthday Memories Designer Series Paper.  This paper, along with the coordinating Birthday Delivery Stamp Set and the Birthday Friends Framelits Dies.  All of these products are on the Last-Chance List of retiring products so don’t delay if you are interested!  And you can buy the stamp set, paper, and dies in a Bundle and save 10%!

The card with the vintage little girl is a z-fold card. All this means is you make the card base as usual, but then score the front of the card base at 2 1/8″, which is down the middle of the 4 1/4″ card front, and fold it back.  So, in essence, you just fold the front of the card back on itself in half!  Then add a front panel of whatever size you like, mainly one that will hide the greeting that you will stamp on the inside!  You can decorate each panel with designer paper or stamp as I did on the front panel.  That little girl always reminds me of paper dolls I used to have as a kid!

The card with the cakes doesn’t need much else since the paper pattern is so bold!  It makes you hungry just to look at that paper with all the beautifully decorated cakes!  Just adhere a layer of the designer paper to the Pacific Point card base with a Real Red layer in between to help the paper stand out.  The greeting is stamped in Real Red with a greeting in the stamp set and die cut with the Stitched Shapes Framelits Dies and layered on a scalloped oval in the Layering Ovals Framelits Dies.  This is popped up on Stampin’ Dimensionals with a bit of Gold Metallic Thread would around behind the greeting in a little “nest”.

The third card uses a simpler pattern in the Birthday Memories package and the birthday fox is die cut right from another piece of the designer paper!  How handy is that?!  You don’t even have to stamp and color the image! To spotlight him and his banner, stamped with a greeting from the stamp set, I die cut a large circle with the Layering Circles Framelits Dies.

All of these cards are pretty quick and easy to make, especially if you just copy mine and don’t think about a design.

Here’s another popular card I made earlier in the z-fold style.  It’s such an easy way to make a card yet the recipient will think you are a true designer!

If you are interested in any of the products in this birthday bundle, be sure to check if out in the Stampin’ Up! Online Store!  Then you, too, can make cards like these Easy Birthday Memories Birthday Cards!

Did You Miss Out on the April Paper Pumpkin Kit From Stampin’ Up!?

If you did not subscribe to Paper Pumpkin by April 10th, this is the April Paper Pumpkin Kit from Stampin’ Up! that you missed out on!  Not to mention 50% off!  If you love nautical, you would have loved this kit!

You can still subscribe now and receive the May and June Kits and even get them at 50% off with the special Promo Code:  SAVEFIFTY0418.  Just sign up for Paper Pumpkin HERE by May 10th!

And another benefit is that once you sign up, you can go to the Stampin’ Up! Online Store and look under Paper Pumpkin.  Later each month, after all the Paper Pumpkin kits have gone out, if Stampin’ Up! still has some full kits or refills (no ink spot, no stamp set) to sell, they will add them to the store.  Once you are a Paper Pumpkin subscriber, you will be able to go in the Store and purchase those kits. We don’t know yet about any extra April 2018 kits so we’ll have to wait and see, but if you subscribe to Paper Pumpkin today, you can start checking the store and maybe in a few more days they will add the April kit (or refill) to the store and you can purchase it.  In the mean time, you can start looking forward to the May kit coming to your mailbox mid-month!

This 50% off offer is for new subscribers only.  With your first Paper Pumpkin kit, you will receive an acrylic block on which to mount (stick) the stamps that come in the kit.

No risk, no obligation!  Try Paper Pumpkin for a few months and see how you like it.  Busy??  Just skip a month!  Hate it?? (no, that couldn’t happen!), not your thing?  Just cancel your account, no problem. I’ll even take care of it for you with Stampin’ Up!

You can follow the video and instructions for that kit exactly, or you can use all the supplies to make something different!  Some people do a little bit of both!  But for a beginner crafter who doesn’t have extra supplies, everything you need is included in the red box!  If you are experienced, it’s an opportunity to open the box and start creating without having to think of an idea first and then get out your supplies.  They are all right there ready to go!

TRY PAPER PUMPKIN FOR 50% OFF the FIRST TWO MONTHS!

Use Promo Code:  SAVEFIFTY0418

Birthday Blooms Floral All-Occasion Card

Birthday Blooms Floral All-Occasion Card

One of the beautiful stamp sets that is on the Last Chance list that I hate to l see leave is the Birthday Blooms Stamp Set, with which  stamped this Birthday Blooms Floral All-Occasion Card.  I’ve always thought this stamp set was so pretty and I loved the fonts of the sentiments. This stamp set can be used various ways. The flower image could be embossed, could be stamped and cut out around the outline, or stamped in a color with no coloring in a monochromatic card. Color in the flower image many different ways. You can make beautiful cards with this stamp set!

For my card, I used a card base of Daffodil Delight. This was a card base already cut in my pack of paper, cut the “long” way that I must not have used, that would have the fold at the top of card.  I chose to put the fold on the side of the card for something different.  We don’t usually make a card with the fold on the side but there’s no reason not to!

I stamped the flower and greeting on a piece of Shimmery White Cardstock, one of my favorite papers!  It has just the tiniest bit of shimmer that you can see if you hold the paper at the right angle, but it’s also good for watercoloring. I wasn’t watercoloring on this card,  I was using the Stampin’ Blends alcohol markers, but the paper is just good and works well with these markers.  The Stampin’ Blends got caught up in the Chinese New Year factory shut down right at the time that more and more people were ordering them, causing a huge backorder situation, so Stampin’ Up! took them off the ordering list for now until they are fully resupplied, probably around the time the new Stampin’ Up! catalog comes out.  It won’t be long now, hopefully!  I LOVE using these markers!!  There is just something about them!

For a little interest I added a strip of designer paper at the bottom. This happens to be from the Delightful Daisy Designer Series Paper, which has sold out already, but you can substitute from lots of choices.  You could even add a bit of ribbon tied around the side or some small accents, like pearls or dots or sequins to the front of the card, but there’s nothing wrong with simple!

I have to add that I used the Stamparatus to make this card.  I did try to do it without but when I stamped the greeting, it didn’t stamp fully!  So I was sunk!  I turned the paper over and stamped again….but this time, the flower didn’t ink up in the center ( probably needed to reink my ink pad!) so it didn’t stamp nicely. Then I grabbed my Stamparatus and when each of the stamps didn’t stamp fully, I could just ink up the stamp again and stamp again right over the image, thanks to the magnets holding my card front down like nobody’s business!  When you get a Stamparatus in the new catalog, you will want to be very careful with the magnets!  They are very strong!

If you want to make a simple card with a beautiful flower and lovely sentiment, be sure to get this Birthday Blooms Stamp Set before it retires May 31 and try a card like my Birthday Blooms Floral All-Occasion Card.

SHOP THE LAST-CHANCE RETIREMENT PRODUCTS TODAY!


Lovely Inside and Out Multicolored Thinking of You Card

Lovely Inside and Out Multicolored Card

This Lovely Inside and Out Multicolored Thinking of You Card will certainly brighten up your day with the colors I chose! This is one of the stamp sets that is retiring, but I haven’t stamped with very much.  So sad!

What I was really interested in when I bought this Lovely Inside and Out Bundle was the Lovely Words Thinlits Dies.  You can use these dies in many ways, either like I did on the front of this card, just cutting out the word and shape out of a piece of rectangular paper. Or you can cut the word out by itself. You could have used another heart die on the outside of this die to make it an outline heart with the word inside.

Remember, Bundles in the current catalog will all retire as “Bundles”….in some cases, the stamp set and dies will continue on in the new catalog but separately (as there will be Bundles of the new products in the new catalog). In this case, with the Lovely Inside and Out Bundle, the stamp set and dies are all actually retiring, not just the Bundle configuration. So if you want to save 10% on any Bundles in the current catalog or Occasions Catalog, get them now and save 10% before May 31.

This card has a card base of Powder Pink. The Whisper White layer is stamped with two In Colors, Powder Pink and Lemon Lime Twist plus  some So Saffron thrown in for a third color.  The stamp set is called Lovely Inside and Out.  The die cut piece is layered over a piece of Lemon Lime Twist, but to add a little interest in the background, I stamped the scattered dot image in the stamp set, even stamping off first (when I remembered!!). This would make a great shaker card, too, but I was making something simple.  For a bit of bling, I used some Tutti-Fruitti Adhesive-Backed Sequins.  

You could use this card to send just as a “happy” card to send to a friend or someone you know. You never know who could really use a card on the day that it arrives in their mailbox! They won’t care if it is a simple card, just that you thought of them.

Remember, don’t wait too long on retiring products that you want, especially the ones you REALLY want!  Or ask me if something is showing as “Low Inventory” so you can get your order in right away.

Here are the products that are already sold out as of early this morning:

Make some “happy” cards today and mail them out to people!  Whether you hear back or not (and you probably will!) you will have the satisfaction of brightening someone’s day, not to mention the good therapy stamping cards will be for you! Use this Lovely Inside and Out Multicolored Thinking of You Card as your inspiration!

Shop Stampin’ Up! Online!

A Card For Barbara Bush

Rose Wonder Sympathy Card for Barbara Bush

Images © Stampin’ Up! 2018 www.KarenStamps.com

If I were going to make a card to send to the Bush family, I would probably make one like this Rose Wonder card with a few pearls in honor of Barbara Bush.  I would say almost all of Houston, Texas is just heartbroken since hearing of the death of Barbara Bush yesterday evening. I don’t think most of us considered the ages of Mr. and Mrs. Bush because they have been in everyone’s lives for so long and so vital in our city. So it was a shock the other day to hear that Mrs. Bush was in failing health, and as with our own family members, even when death is expected, it still is shocking and sad when it finally happens. I was heartened the other day when I heard her granddaughter, Jenna Bush, say on the Today Show that her grandmother told her not to believe everything she hears! I was hoping that meant things weren’t as dire as thought.

I remember when President Bush was still in office and people would ask what they were going to do when his term was over. They never wavered in saying they were going home to Houston, but I detected a bit of skepticism on those asking the question that a former president would go live in Houston. They did make their home here (I used to drive out-of-town friends past their street to say that’s where the Bushes lived, not that you could get into the neighborhood of course!). They were “regular people” in the neighborhood, often seen at their favorite restaurants, Barbara was seen at her favorite grocery store, George was seen at his favorite BBQ restaurant and returning movies to Blockbuster back in the day! Schools were named after them here in Houston.

It was thrilling one time to be at an Astros ballgame and saw, down in the best seats right behind home plate, that President and Mrs. Bush were in attendance! I think I watched from my seat way up high with my binoculars what the Bushes were doing more than I watched the ballgame!  They were frequent spectators at Houston games and often featured on the “Kiss Cam” at the ballgame!

Of course there was all their public service work for which they are admired and will be remembered.  But here in Houston people will remember the kind of neighbors they were in the Houston community all over the city in many aspects. So many stories on our local news of people who knew the Bushes and have such loving stories to tell about Barbara Bush. Houston and Texas, as well as the rest of the country will miss Barbara Bush, but what a full and  exceptional life she led and shared with others. Her whole family can take comfort in that.

Easy to Stamp All-Occasion Dahlia Card

Easy to Stamp All-Occasion Dahlia CardYou can make this Easy to Stamp All-Occasion Dahlia Card in just minutes and add whatever appropriate greeting you want! This Definitely Dahlia Stamp Set is just one large background stamp, and sadly, it is on the Last Chance List of retiring products.

If you love this big beautiful flower, it is time to order it! I also made these two cards with other products that are retiring the end of May……the 2016-2018 In Colors.  Particularly if you want these colors in cardstock, ink pads, or ink refills plus any accessories with these colors, you will want to put these on your order!  The colors I chose to use are Peekaboo Peach and Flirty Flamingo.

Now the funny thing is, with the Stampin’ Up! Color Revamp, one color that is “retiring” with the In Colors is actually coming back as one of the Brights Core Colors!  That color is Flirty Flamingo.  Read about the Color Revamp HERE in my recent blog post.

I have always particularly like these background stamps on the wood blocks. However, now with the Stamparatus, if you plan on purchasing this tool, I might recommend the Clear-mount version of Definitely Dahlia so that you can stamp with the Stamparatus. That way if you do not get a good impression the first time, you can reink the stamp, leaving it in place on the Stamparatus, and stamp again to fill in the image. But either stamp is good!  I still love the wood blocks too!

Sometimes we get wrapped up into the latest stamping idea, which is great, but sometimes we need to remember we can stamp quick and easy, simple cards like this Easy to Stamp All-Occasion Dahlia Card.

Shop Stampin’ Up! Online Today!

Check out the Stampin’ Up! Last-Chance Retiring Products!

Stampin' Up! Retiring List Logo 2018

It’s time to shop for the Stampin’ Up! Last Chance Retiring Products!  This includes products from both the Annual Catalog AND the Occasions Catalog!

If it is a lazy, rainy Saturday (or a bright, sunshiney one!) and your taxes are done, take some time to peruse your Stampin’ Up! Annual Catalog and Occasions Catalog and make up your order of retiring (and other!) products that you want before they are gone!

If you don’t have those catalogs and don’t have a Demonstrator you work with and want the hard copies in your hands, please email me at Karen@Karenstamps.com and I’ll put them in the mail to you for your last minute shopping!

Click HERE!  Check out the products in my Stampin’ Up! Online Store!

See things you want?  Don’t hesitate or they might be gone!

Click HERE for the PDF of Annual Catalog Retiring Products!

Click HERE for the PDF of Occasions Catalog Retiring Products!


Relax this weekend and check out the Stampin’ Up! Last-Chance Retiring Products!

Sweet Soiree Fancy Cake Birthday Card


Sweet Soiree Fancy Cake Birthday Card

I was actually struggling to make a card with the striped side of this designer paper and one of the cakes I’d cut out by hand, when I flipped the paper over and made this Sweet Soiree Fancy Cake Birthday Card. As soon as I turned the paper over, the cake designs layered over the pretty Powder Pink card base, looked beautiful and perfect. There was no point in trying to force a card that wasn’t working when all I had to do was flip the paper over and make a simple card out of it! The Sweet Soiree Paper is so pretty!

To embellish the card, I adhered a strip of the Powder Pink 3/8″ Shimmer Ribbon across the bottom of the card.  It’s a real shame to cover up ANY part of a paper pattern as pretty as this one! Then I tied the bow separately to adhere on top of the ribbon.  Luckily I held off until I had the greeting ready.

I finally found a pretty small “Happy Birthday” stamp in the Beautiful Bouquet Photopolymer Stamp Set. I could punch it out with the 1 3/8″ Circle Punch after I stamped the birthday greeting using Powder Pink Ink and Whisper White cardstock and layered it on a small silver foil doily in the Metallic Foil Doilies package.

I played around with where to put this greeting on the card, when finally I figured out the best place was on the ribbon with the bow on the bottom of the greeting since there was some empty space there anyway!

This Sweet Soiree Fancy Cake Birthday Card is a very easy card to make since the paper is so pretty by itself.  How can it be retiring??!

Be sure to check out the retiring Stampin’ Up! products in the Online Store.


How to Make an Easy Gift Bag With Half a Sheet of Paper

Sweet Soiree Easy to Make Gift Bag Assembled

In this blog post, I will show you how to make an easy gift bag with half a sheet of paper. I recently saw this tutorial on Splitcoaststampers, but I have made similar bags and boxes the same way many times. For this project, I chose to use the beautiful Sweet Soiree Specialty Designer Series Paper for the little gift bag. This bag is a decent size for a small gift or generous amount of chocolates!

Start with a 12″ x 12″ sheet of paper, whether card stock or designer paper.  Cut in half at 6″ x 12″.  Use the scoring blade on the Stampin’ Trimmer or use the Simply Scored scoring board. Personally, I like to use the Simply Scored when I am making a project like this as opposed to just a card.  I also think it works better when working with designer paper, especially this heavier weight specialty designer paper.

Place the paper in the scoring tool with the 12″ side at the top.  Score at 4″, 5 3/4″, 9 3/4″, and 11 1/2″. Turn the paper so the short edge is at the top and score at 1 3/4″. Now take some scissors and cut those short bottom tabs up to the 1 3/4″ score line. Cut off the little 1/2″ tab on the bottom. If you haven’t already folded on all the score lines and (I prefer) creased with a bone folder, do this now and see how the bag will go together. It’s good to figure out what will be the front of the bag so that you have the “raw edges” where pieces come together facing the back.

Place the paper with the design for the outside face up on the table.  Apply a strong adhesive as shown in the photo. I used Tear & Tape. Remove the release paper on the tape when you are ready to assemble the box. Make sure everything lines up properly.  For the bottom, fold in the sort tabs first, then the piece with the adhesive, and finally press down the last piece which will be the bottom of the bag.

Sweet Soiree Easy to Make Gift Bag Unassembled

At this point, you can leave the bag open as is, almost like a box without a lid, or you can pinch the top together and close one way or another.  Be sure to put your treat inside first! For this gift bag, I punched two holes in the top and tied with Calypso Coral 1/4″ Ombre Ribbon.

The Sweet Soiree Paper is pretty enough not to need any embellishment, but I went ahead and made a little label for the front of the gift bag. For this label I used the Pretty Label Punch to punch out a stamped piece of Calypso Coral Cardstock stamped with an image from the Label Me Pretty Stamp Set. On Whisper White I stamped a sentiment from the same set and punched out with the 1 1/4″ Circle Punch and layered on a piece of Powder Pink Cardstock punched with the 1 3/8″ Circle Punch. For a little bling, I added two dots from the Metallic Enamel Shapes.  

The Sweet Soiree Specialty Designer Series Paper is unfortunately on the Last Chance Retirement List so if this is a paper you want in your stash, be sure you put it on your next Stampin’ Up! order.  The Metallic Enamel Shapes and the 1 3/8″ Circle Punch are also on the list.

Whatever paper you use, this is an easy to make gift bag using just a half sheet of paper, so keep it in mind for when you need a last minute bag for a small gift for any occasion! It might save you a trip to the store for gift wrap and bags!

SHOP STAMPIN’ UP! ONLINE FOR LAST CHANCE PRODUCTS & MORE!

Make a Mini Treat Bag Birthday Card

Mini Treat Bag Birthday Card

Make a Mini Treat Bag Birthday Card quick and easy using the Mini Treat Bag Thinlits Dies which are retiring!!  So sad!  I have loved these Mini Treat Bag dies since they came out and have encouraged everyone to buy a set!

You can use these dies to make more than just a treat bag!  Many times I make the bag plus a card to put inside, all of which makes up the greeting card as you see above.  You can also fold the top over and hold closed with a ribbon or belly band with a small gift or candy inside. So many different options.

To make this Mini Treat Bag Birthday Card, I used the Painted With Love Specialty Designer Series Paper.  This paper is in the Occasions Catalog and is retiring. You might have thought it was only for Valentine’s Day since it was in the Occasions Catalog, but this paper can be used lots of ways. Here I did choose the paper with the little hearts because I think it is such a cute pattern. Then I could coordinate with the heart die cut in the MIni Treat Bag Thinlits Dies and also the Watercolor Words Stamp Set.  This stamp set is also on the retirement list and is one of my favorites! I’ve always loved the font, the size and the greetings and images themselves in this set.

I used our Tear & Tape Adhesive, which is staying, to adhere the bag. The die cut puts score lines on the paper so it is easy to assemble.  I used Melon Mambo cardstock for the card inside and the heart on the front, plus Gold Foil for the other heart.  Very quick and easy!  I could even embellish the front of the card more if I wanted to.

See how I made a little treat bag for Halloween in THIS POST by folding over the top of the bag!  You can use the Search box on the right side of my blog to find more examples using the Mini Treat Bag Thinlit Dies.  They are so fun!  I don’t know what will take their place for me!  But we have to give up old products to make room for the new!

Mini Treat Bag Birthday Card with Hearts

Check out the Last Chance Products in the Stampin’ Up! Online Store so you don’t miss out on any of the great retiring products!

You just might want to make a Mini Treat Bag Birthday Card like this one for someone special!


The Stampin’ Up! Color Revamp of 2018!

Stampin' Up! Color Revamp 2018 Banner

Wow!  If you checked out the retiring products list yesterday and noticed the Stampin’ Up! Color Revamp of 2018, your head was probably spinning wondering what was going on!  I know mine was!  I halfway expected some kind of color changes because it had been a few years since our last one, but we weren’t told of any ahead of time so it was a complete surprise!  I think it is a good one, although I was surprised to see Real Red switched to the Regals color family!  What?!!

This is being called a “Color Revamp” because Stampin’ Up! changed many of the core colors. They say when they change a few core colors, they will call it a color refresh. Stampin’ Up! has planned to make changes to the color selections every three to five years. What’s funny is that a few colors that we had in the past are coming back!  These colors are:

  • Poppy Parade
  • Mossy Meadow
  • Flirty Flamingo (in the outgoing In Colors now!)
  • Coastal Cabana
  • Mint Macaron
  • Blackberry Bliss

So if you have your old colors stashed in the closet, get them out!

The In Color offering will continue as it has. Stampin’ Up! will introduce five new In Colors each year that will be available for two years. And now we will have five NEW In Colors for 2018-2020.

Here are the new In Colors and the current ones from last year carrying over:

Stampin' Up! In Colors 2018

Here are the new Colors:

Stampin' Up! New Colors 2018
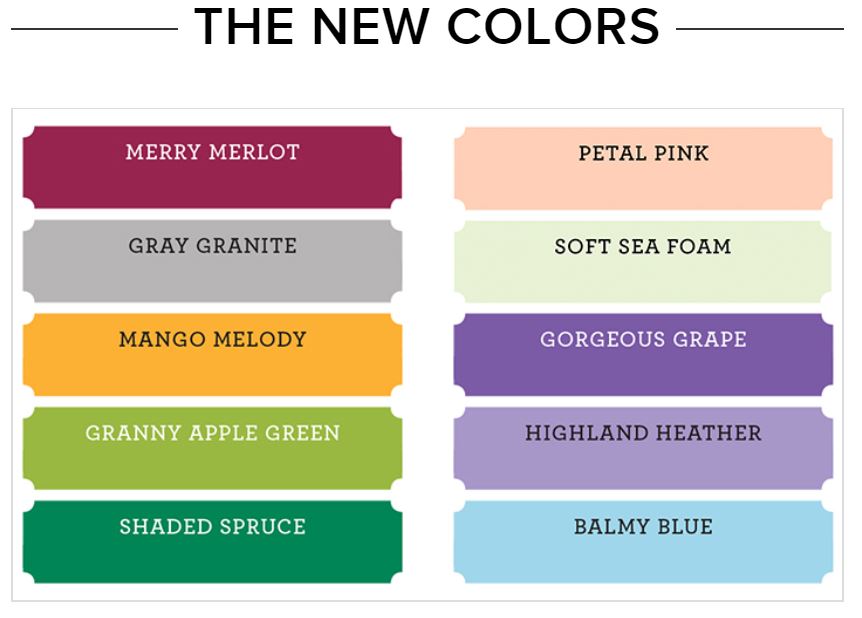
And here are all the colors and color families together! Stampin' Up! New Color Collections

So there you have it!  What do you think??  We currently have 50 colors (10 In Colors + 40 Core Colors), but in the new catalog we will have 53 colors (10 In Colors + 40 Core Colors + 3 Basics).  Basic Black, Whisper White, and Very Vanilla will be in the Basics category, leaving space to add rich colors in the Neutrals!

So Stampin’ Up! is keeping 27 of the core colors that we have, 13 colors are going away, adding 10 new core colors, and adding 6 returning In Colors that will now be core colors!

Whew!!

AND…..INK PADS!!!

Who would have known, but our ink pad cases are made in molds and because they were wearing out, rather than replace them with the same design, Stampin’ Up! decided to design new ink pad cases to improve some of the features! Plus it’s a good time with the new ink colors.

  • The new ink pad cases are simpler and easier to open. Just insert your thumb in the “lip” at the front and lift it to open. The ink pad inside is still stored upside down to keep it juicy!
  • The ink pad cases are stackable!
  • New color stickers, one to place inside the pad instead of us having to cut our own.
  • As long as they were redesigning the ink pads, yes, they did improve the ink as well. They added “defoamer” to the ink to prevent the ink bubbling like it did sometimes with new ink pads and especially the lighter colors in our old pads. This should help to get an even coating of ink on the stamp and give the stamped image a smoother, solid look.
  • The Archival Ink is going away and Basic Gray will be offered in Classic Ink. Tuxedo Black Memento ink is staying and STAZON is COMING BACK!!  Yea!!
  • The new ink pads will fit in the current Color Caddy (that’s what I use) but since they are thinner, they will fit looser.  Just don’t spin the Color Caddy fast! (not that it spins fast anyway!) Stampin’ Up! is working on something new!
  • Current and new ink refills will work in the new and the old ink pads except for Archival Basic Gray cannot be used with Classic Basic Gray. The new catalog will have the new ink refills.
  • You can see a portion of the new ink pad design in the banner at the top of the page.

Retirement Lists

Shop for Retiring Products in the Online Store!  Click HERE!

Get PDF List of Retiring Annual Catalog Products HERE!

Get PDF List of Retiring Occasions Catalog Products HERE!

  • All retiring items are only available while supplies last and will be discontinued after May 31.
  • Due to high demand for retiring stamp sets, retiring stamp sets will be guaranteed available until May 25; all other products are not guaranteed and are only available while supplies last.
  • Don’t delay in ordering things you really want lest they sell out!

That’s enough information to make your head spin for now!  Note that all Bundles in the catalogs are retiring although the individual products may not be retiring.  You just won’t be able to buy them in a Bundle at the 10% discount.  Get them now!

Stay tuned as we go through this retirement period together! It will all sink in and not feel as overwhelming as we get our heads around all of it!  AND customers will have a chance to  get some sneak peek products in May! More details later!

Remember, if you want to see what’s inside the new catalog NOW and get to pre-order some of the new products early, you will want to sign up to be a Stampin’ Up! Demonstrator!  There are some perks and this is one of the best times to be a Demonstrator as we change over to the new catalog!  Ask me if you would like some information or have questions!

Leave a comment on this blog post or let me know what you think about this Stampin’ Up! Color Revamp of 2018!

SHOP STAMPIN’ UP! ONLINE HERE!