
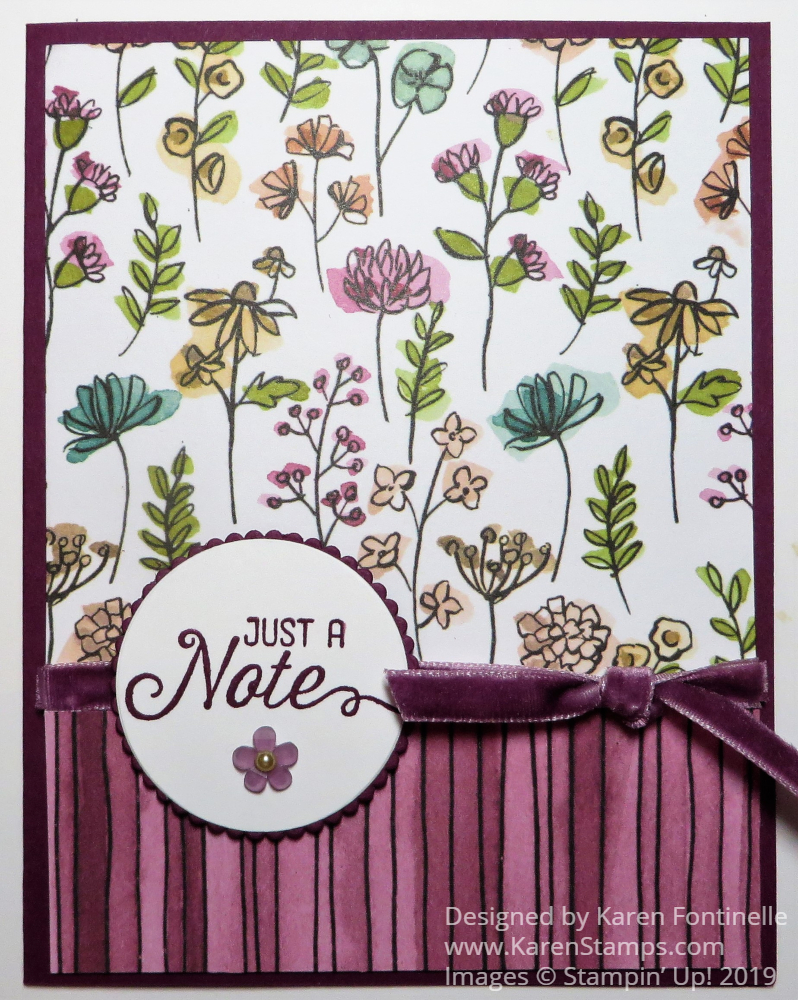
One of the Stampin’ Up! products I hate to see retire very soon is the Share What You Love Specialty Designer Series Paper that I used in this Easy Share What You Love Card. The paper is so pretty, you get a double amount of sheets than in the usual package of designer paper, the designs are handpainted, and some of the sheets have a translucent pearlized finish. It is paper that can be used for a variety of projects, especially being heavyweight designer paper.
One of my favorite patterns in this Share What You Love package of paper is this floral paper with the white background. It is so bright and fresh. The opposite side of the paper has this ombre striped design, so I chose to use both on this card!
The card base is Rich Razzleberry Cardstock. The floral paper is the full size for the layer and then I adhered the striped pattern over the bottom portion. If you really wanted to save paper, you could cut each piece to the exact size you want and then the ribbon would cover the line where they meet. Or you could add a strip of paper over it.
The ribbon is the Rich Razzleberry 1/4″ Velvet Ribbon. I just cut one strip a little longer than the width of the card and adhered it on the back of the card layer, then tied a separate little piece of the ribbon in a knot around the ribbon across the card. This saves a few inches of ribbon that wouldn’t show on the back and saves some bulk.
The greeting is stamped in Rich Razzleberry Ink and is from the Flourishing Phrases Stamp Set. I’m so glad this stamp set is carrying over to the new catalog along with the Flourish Dies. This stamp set has that pretty stem of flowers plus some great sayings to use and very pretty dies.
The greeting is die cut with the Layering Circles Dies and layered on a scalloped circle in the same die set. I popped it up on two Stampin’ Dimensionals since the ribbon is thick. I was going to just add some pearls or rhinestones to the greeting but then I saw the Frosted Flower Embellishments in my drawer. It looked like one of those flowers would be perfect and I think it is! The color is actually Fresh Fig but I think it is close enough to match. For a finishing touch, I added a tiny Artisan Pearl to the center of the flower. To mail, I will probably place a piece of paper towel or crimped computer paper over the card front in the envelope to protect it from the machines sorting the mail.
This is a very easy card to make, especially when you just use the opposite sides of one sheet of designer paper. Then just add a greeting and maybe a ribbon and you have a perfectly fine card to give someone. It only takes minutes to make.
In fact, using this basic plan, you could make an assortment of cards with one package of designer paper. Either make different greetings or save the greeting for when you need to card. This way you have a stash of cards ready to go for when you want to send a card but don’t have time to pull everything out and make a card.
Here is another card made with a full card front of one design from the Share What You Love DSP, using a greeting and the same Rich Razzleberry Velvet Ribbon.
You can make either one of these cards with any designer series paper, so be sure to check the Last-Chance products in the Stampin’ Up! Online Store to see if there are any papers you want to stock up on before they go away. And after you choose your paper, take a look at the ribbons that would coordinate or that you want to replace or stock up on. Take a few minutes to make some cards like my Easy Share What You Love Card.