It's been awhile since I have used this template…usually I think people put a tea bag or a chocolate candy in the little pocket. But since I needed a quick birthday gift for a young teenage boy, I thought it would be fine to hold cash! I thought of my Lots of Bots stamp set, a good one for boys, and stamped that image for the front. After I had it all colored in and mounted on Brushed Silver card stock, I thought it needed a little more silver…..and since I am apparently into silver glitter these days, why not a little silver glitter, Chunky Essentials, for the robot! I just applied a thin line of Tombow Multi Glue around the edge and sprinkled on the glitter. I think it looks kind of jazzy now! The Designer Paper I used is the retired Jersey Shore, a good set of colors for a boy. You could also use any color of card stock and perhaps embellish it with some designer paper. Lots of opportunity for creativity in this easy project! Email me if you want more information or ideas!
Category Archives: Cards
Fun & Fast Notes
I felt like I needed to get back to some simple, versatile stamping today and decided to pull out my Fun & Fast Notes stamp set. This set covers about every occasion and is easy and fun to use. Here is a birthday card I made, adding some brads on the side and a little Dazzling Diamonds on the cake (flames and middle layer of frosting!). After that I decided to add a little something to the background so I used the Retro Remix wheel and Versamark ink. I used our Stampin' Up! Watercolor Paper for the cake and colored in with In Color Markers and my Aquapainter. If you don't own this set, you can go to my Online Store and order it!
Lots of Bots Birthday Card
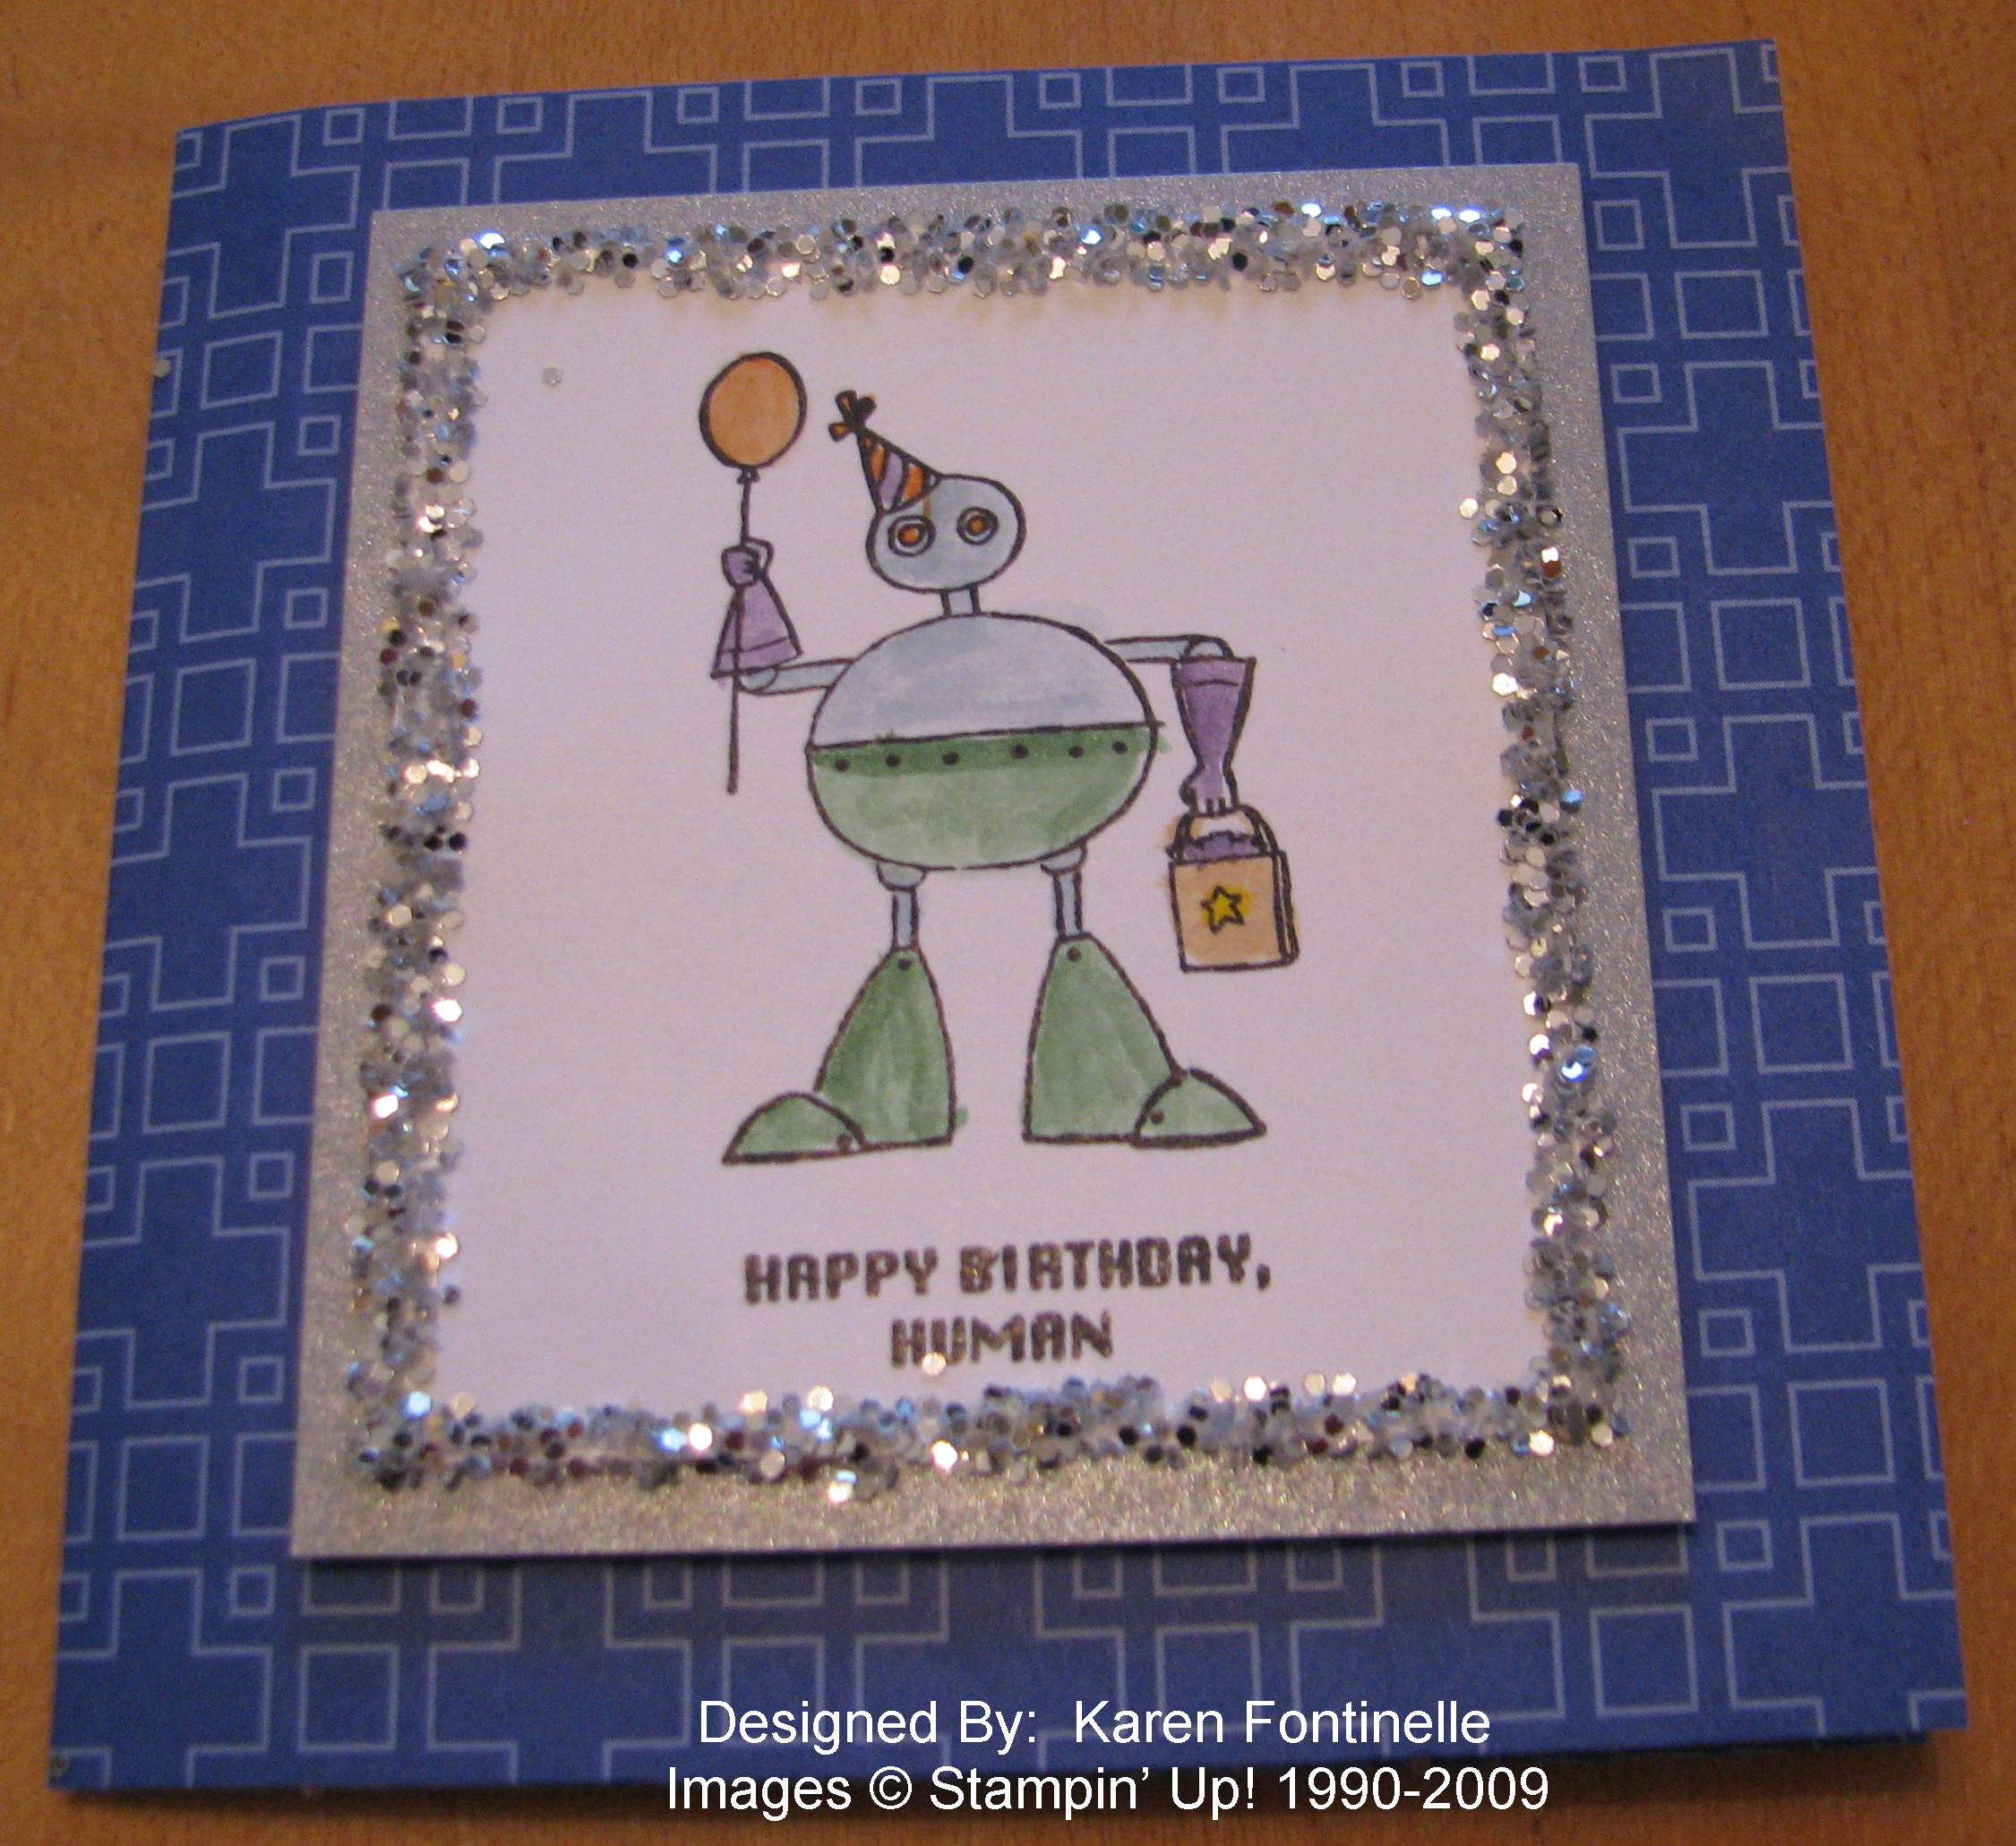
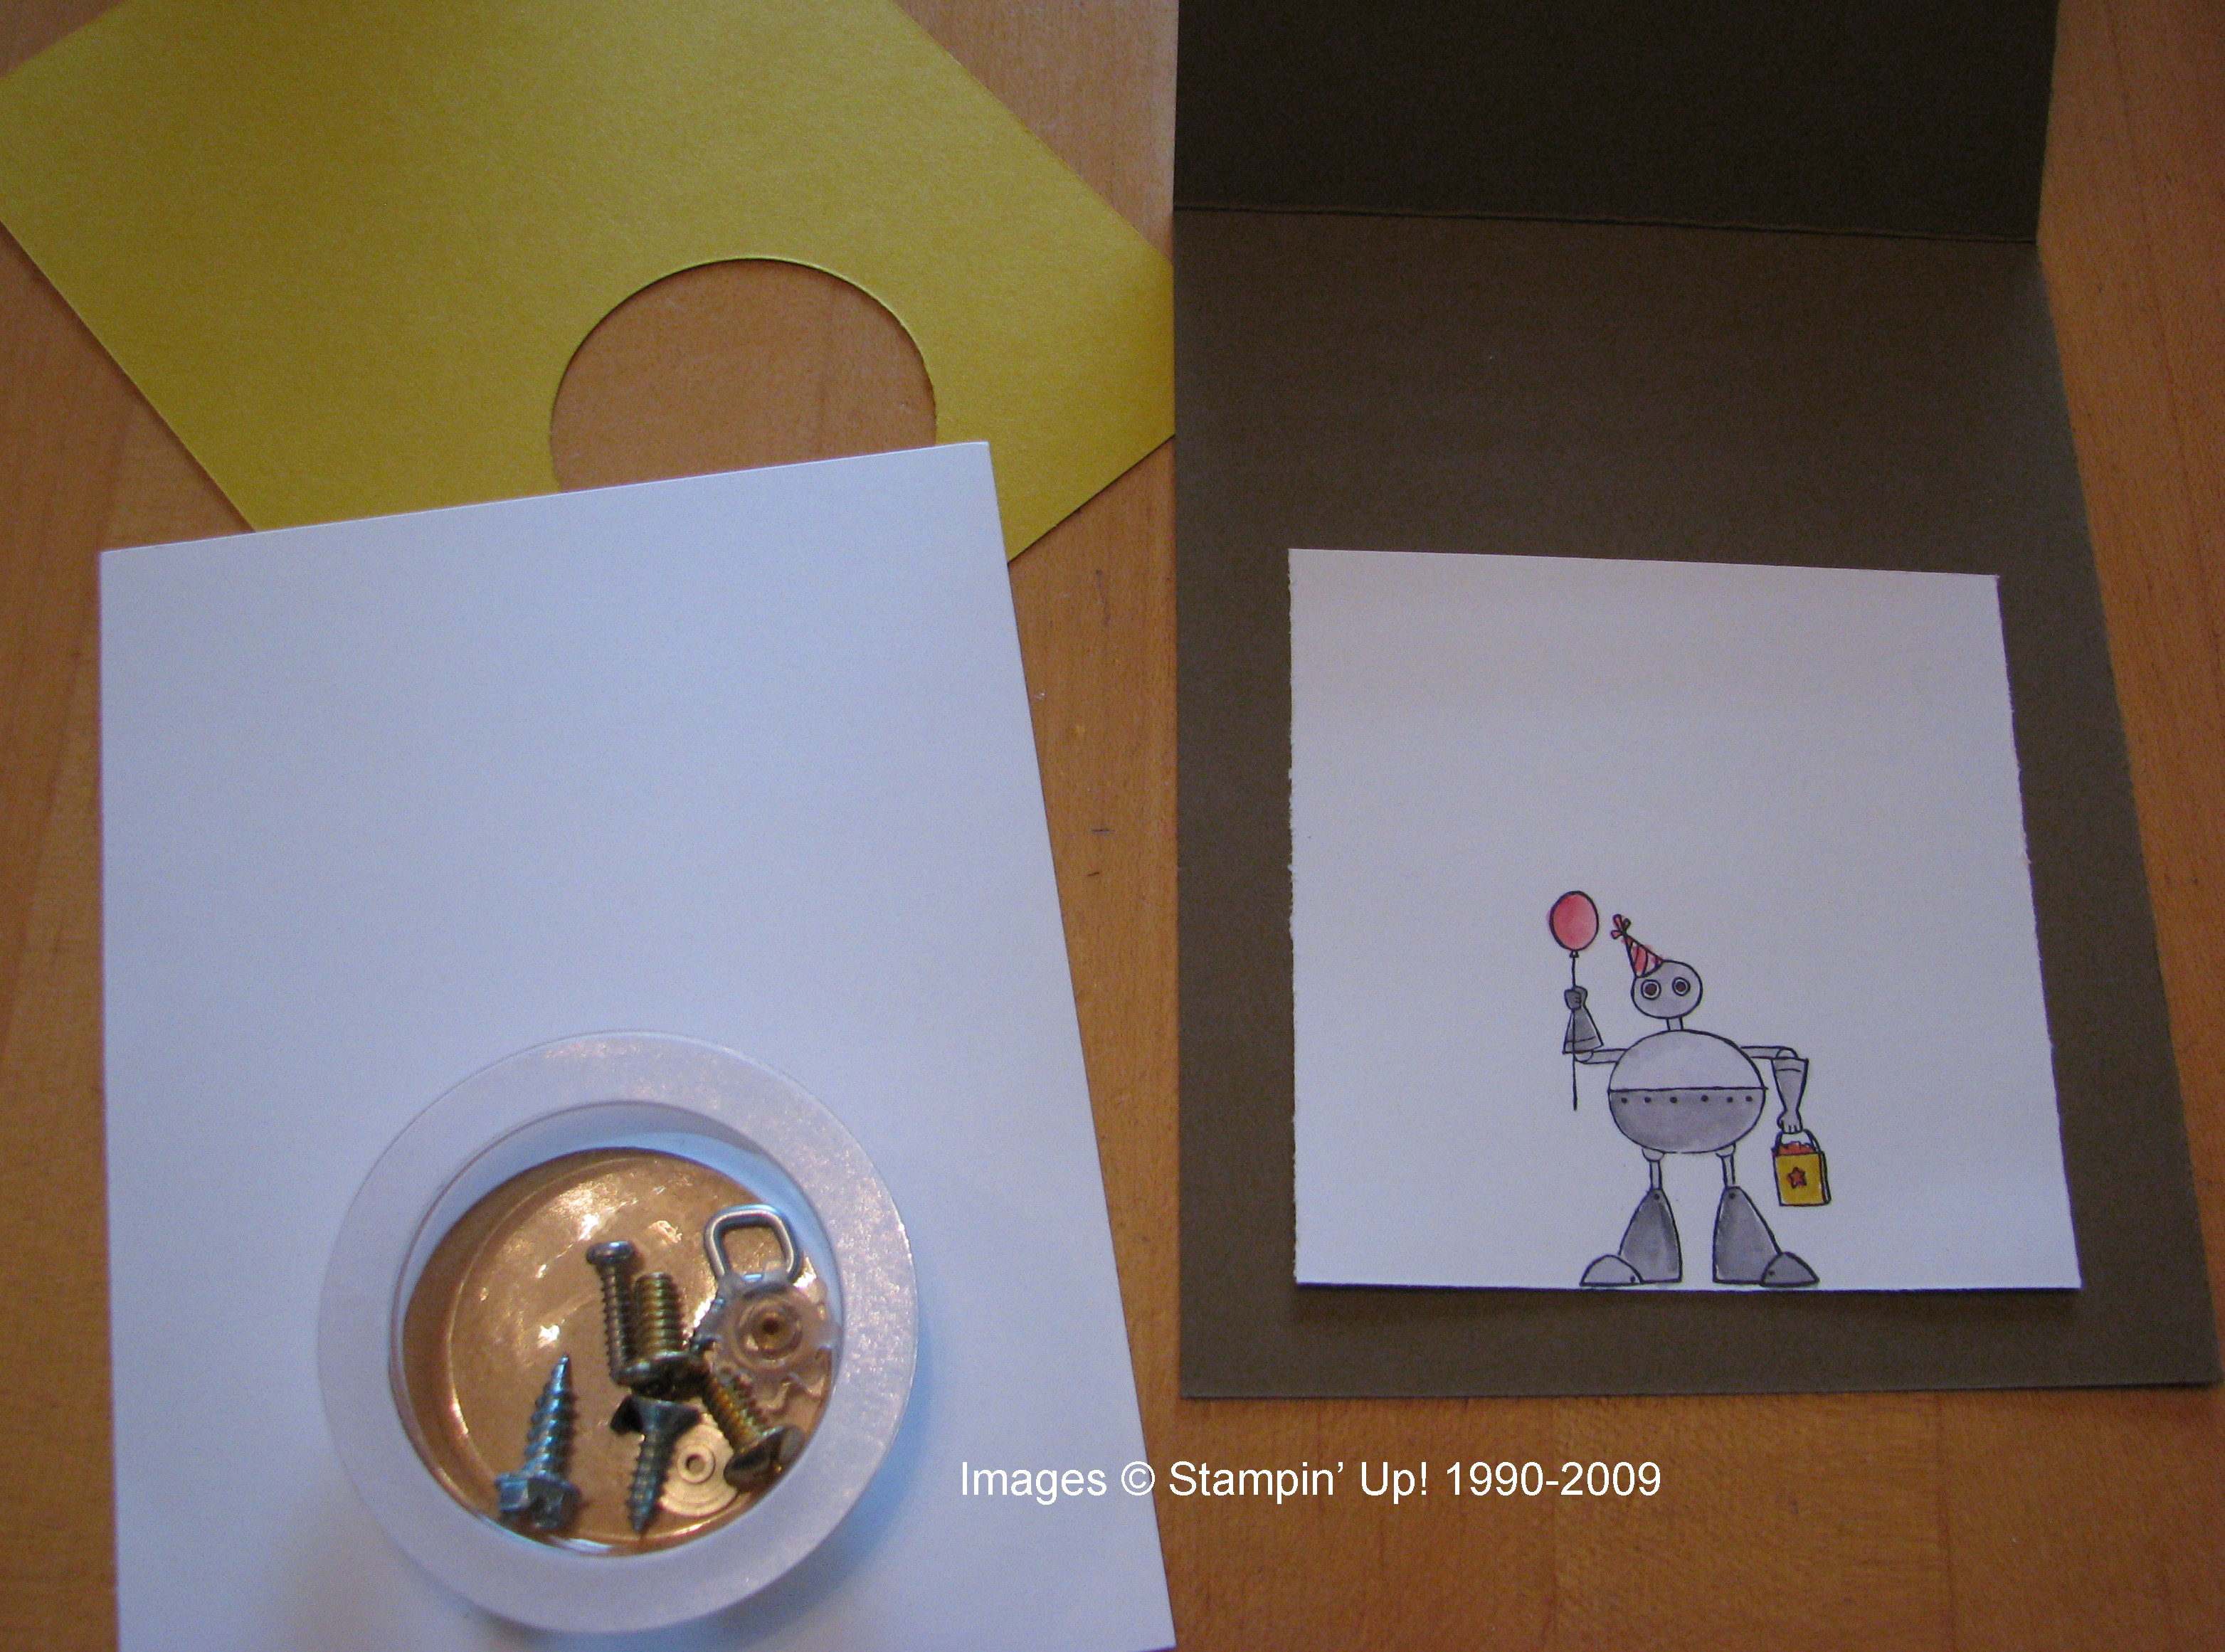
Now that my son's birthday is over I will post the card I made for him. Not that I really think he would be reading his mother's stamping blog, but it seemed better to wait! When this stamp set first came out and Stampin' Up! demonstrators had a chance to preorder it at a discount, I was going to pass on it. But then I remembered my son was going to be working on some robot project at college, so gee, it might come in handy! I've seen lots of cute cards made with it so it is a great set to own!
Here is the card for his 21st birthday…..and he LIKED the card! What more could a stamping mother want??!
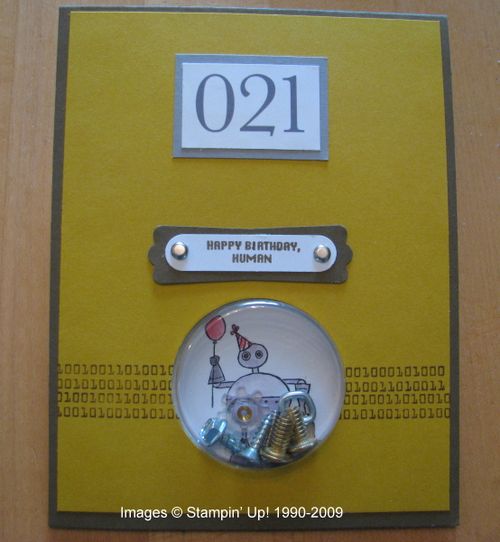
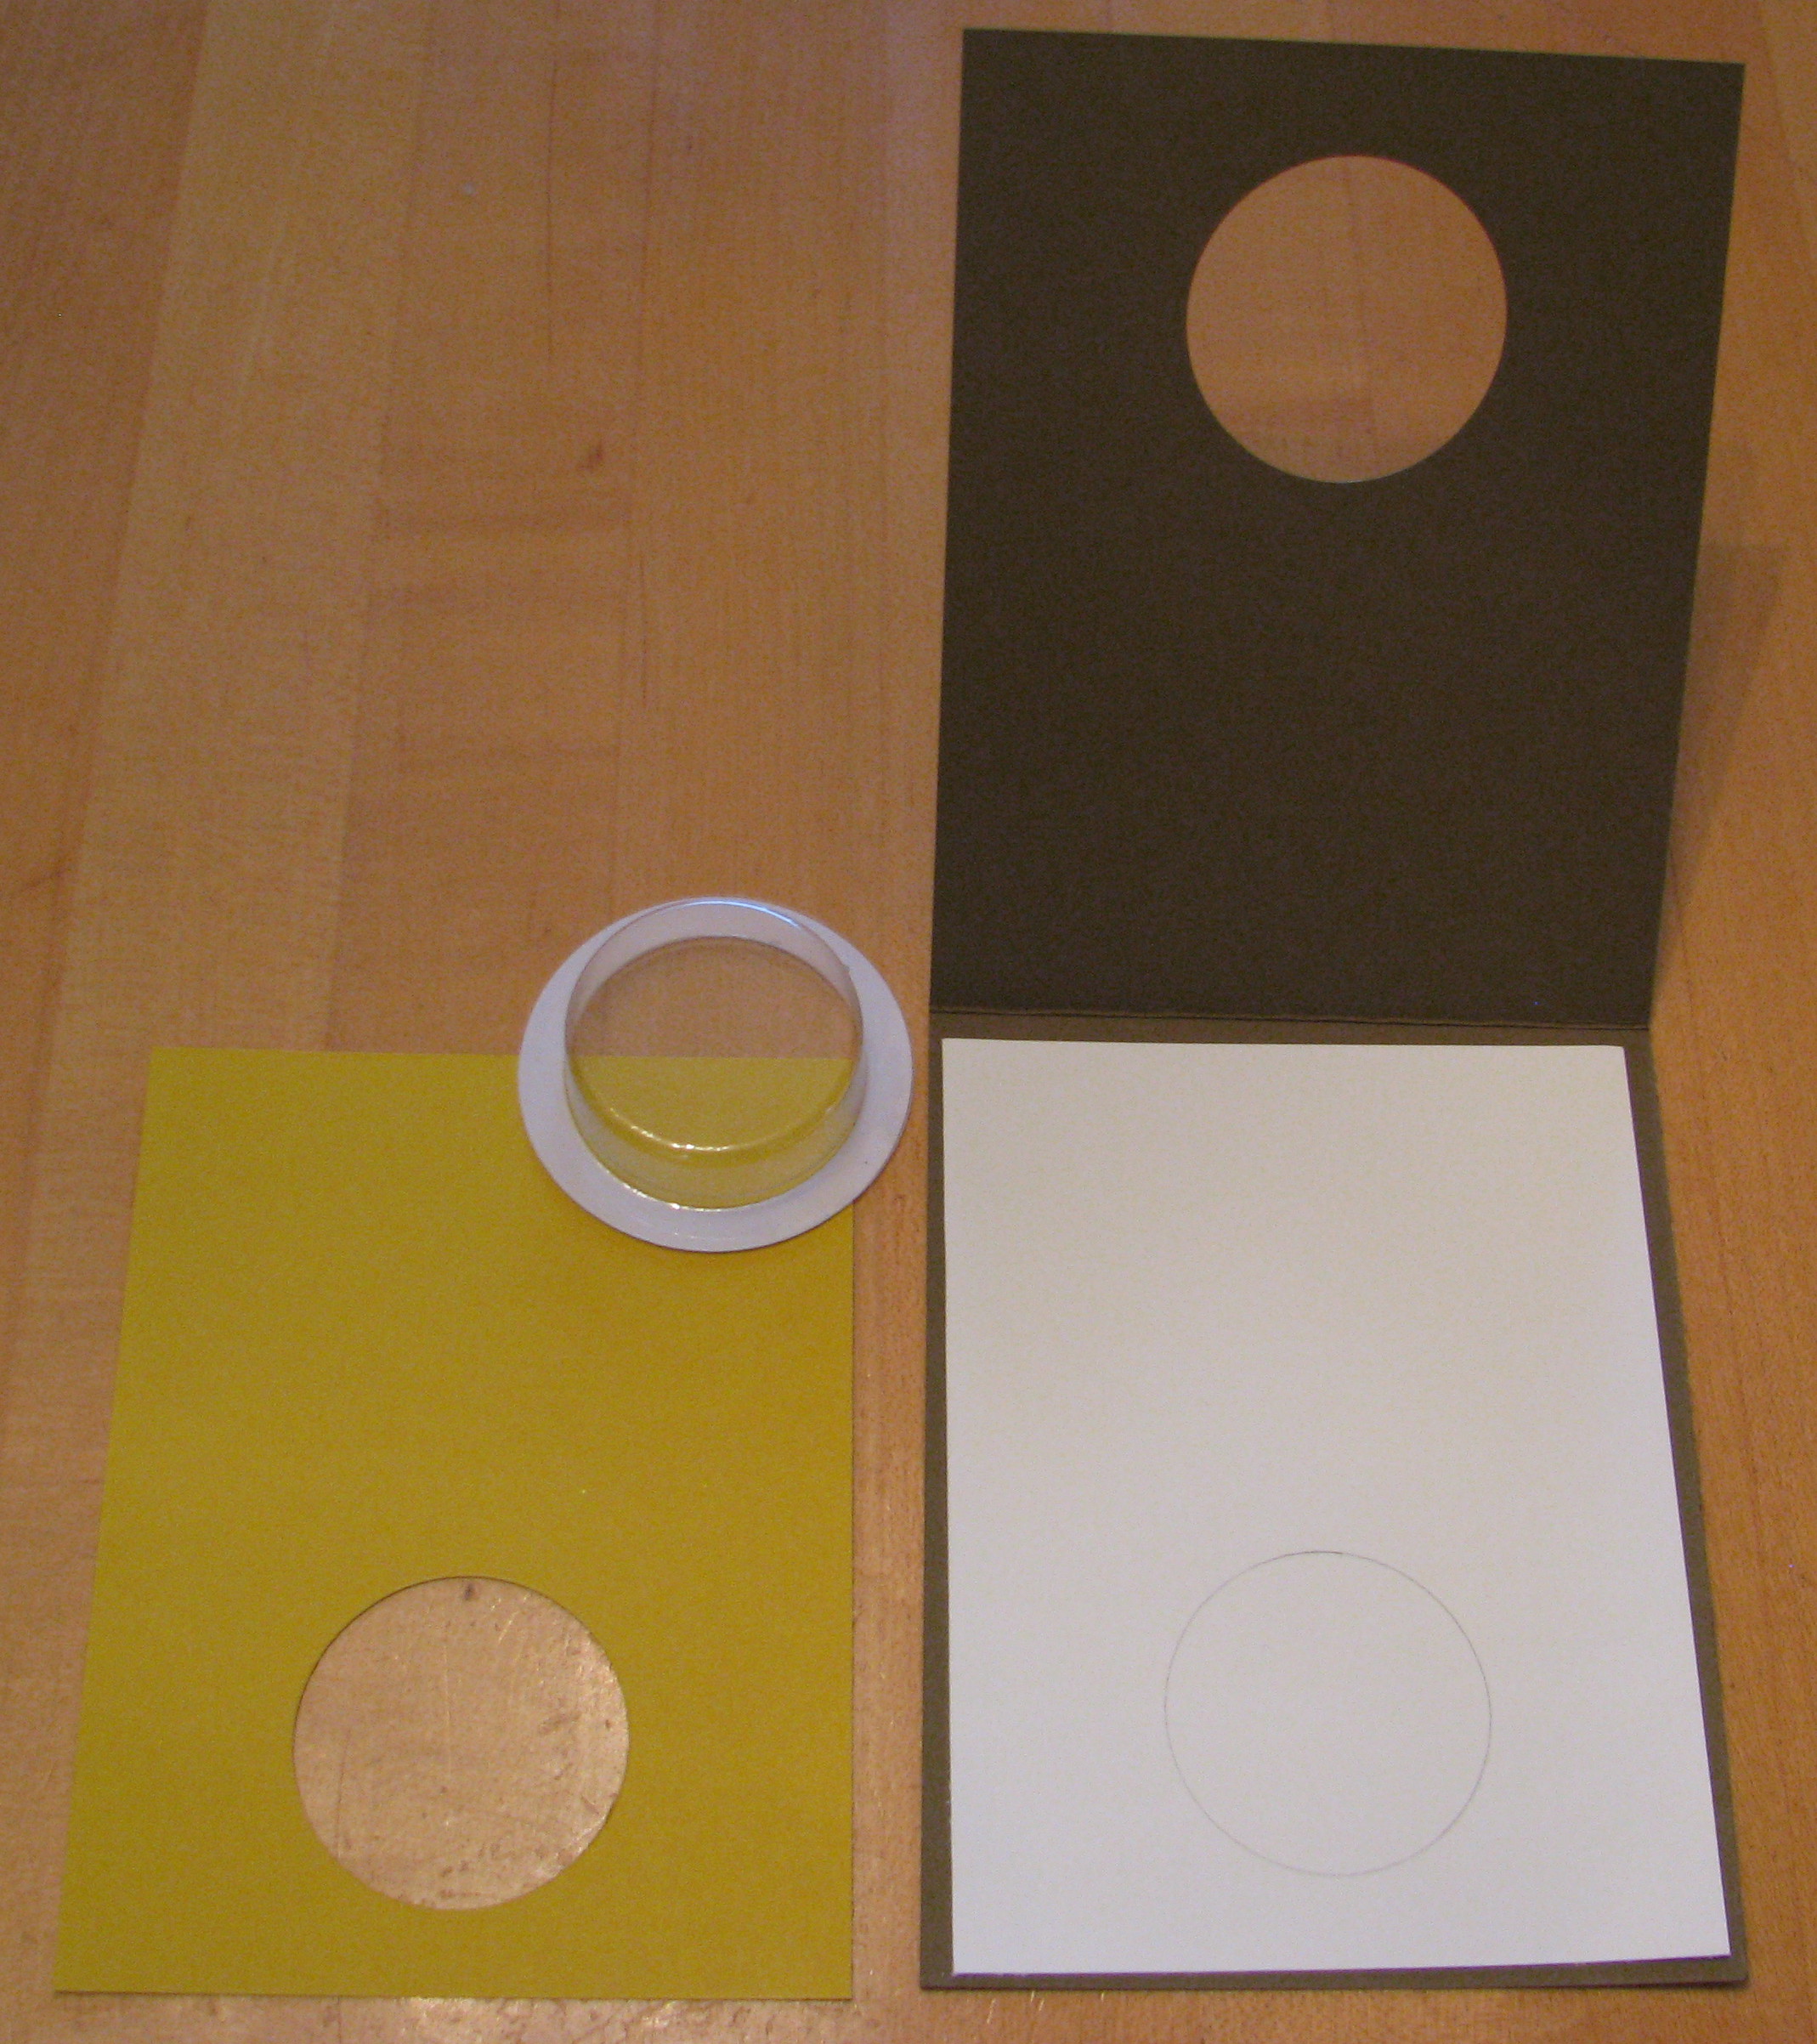
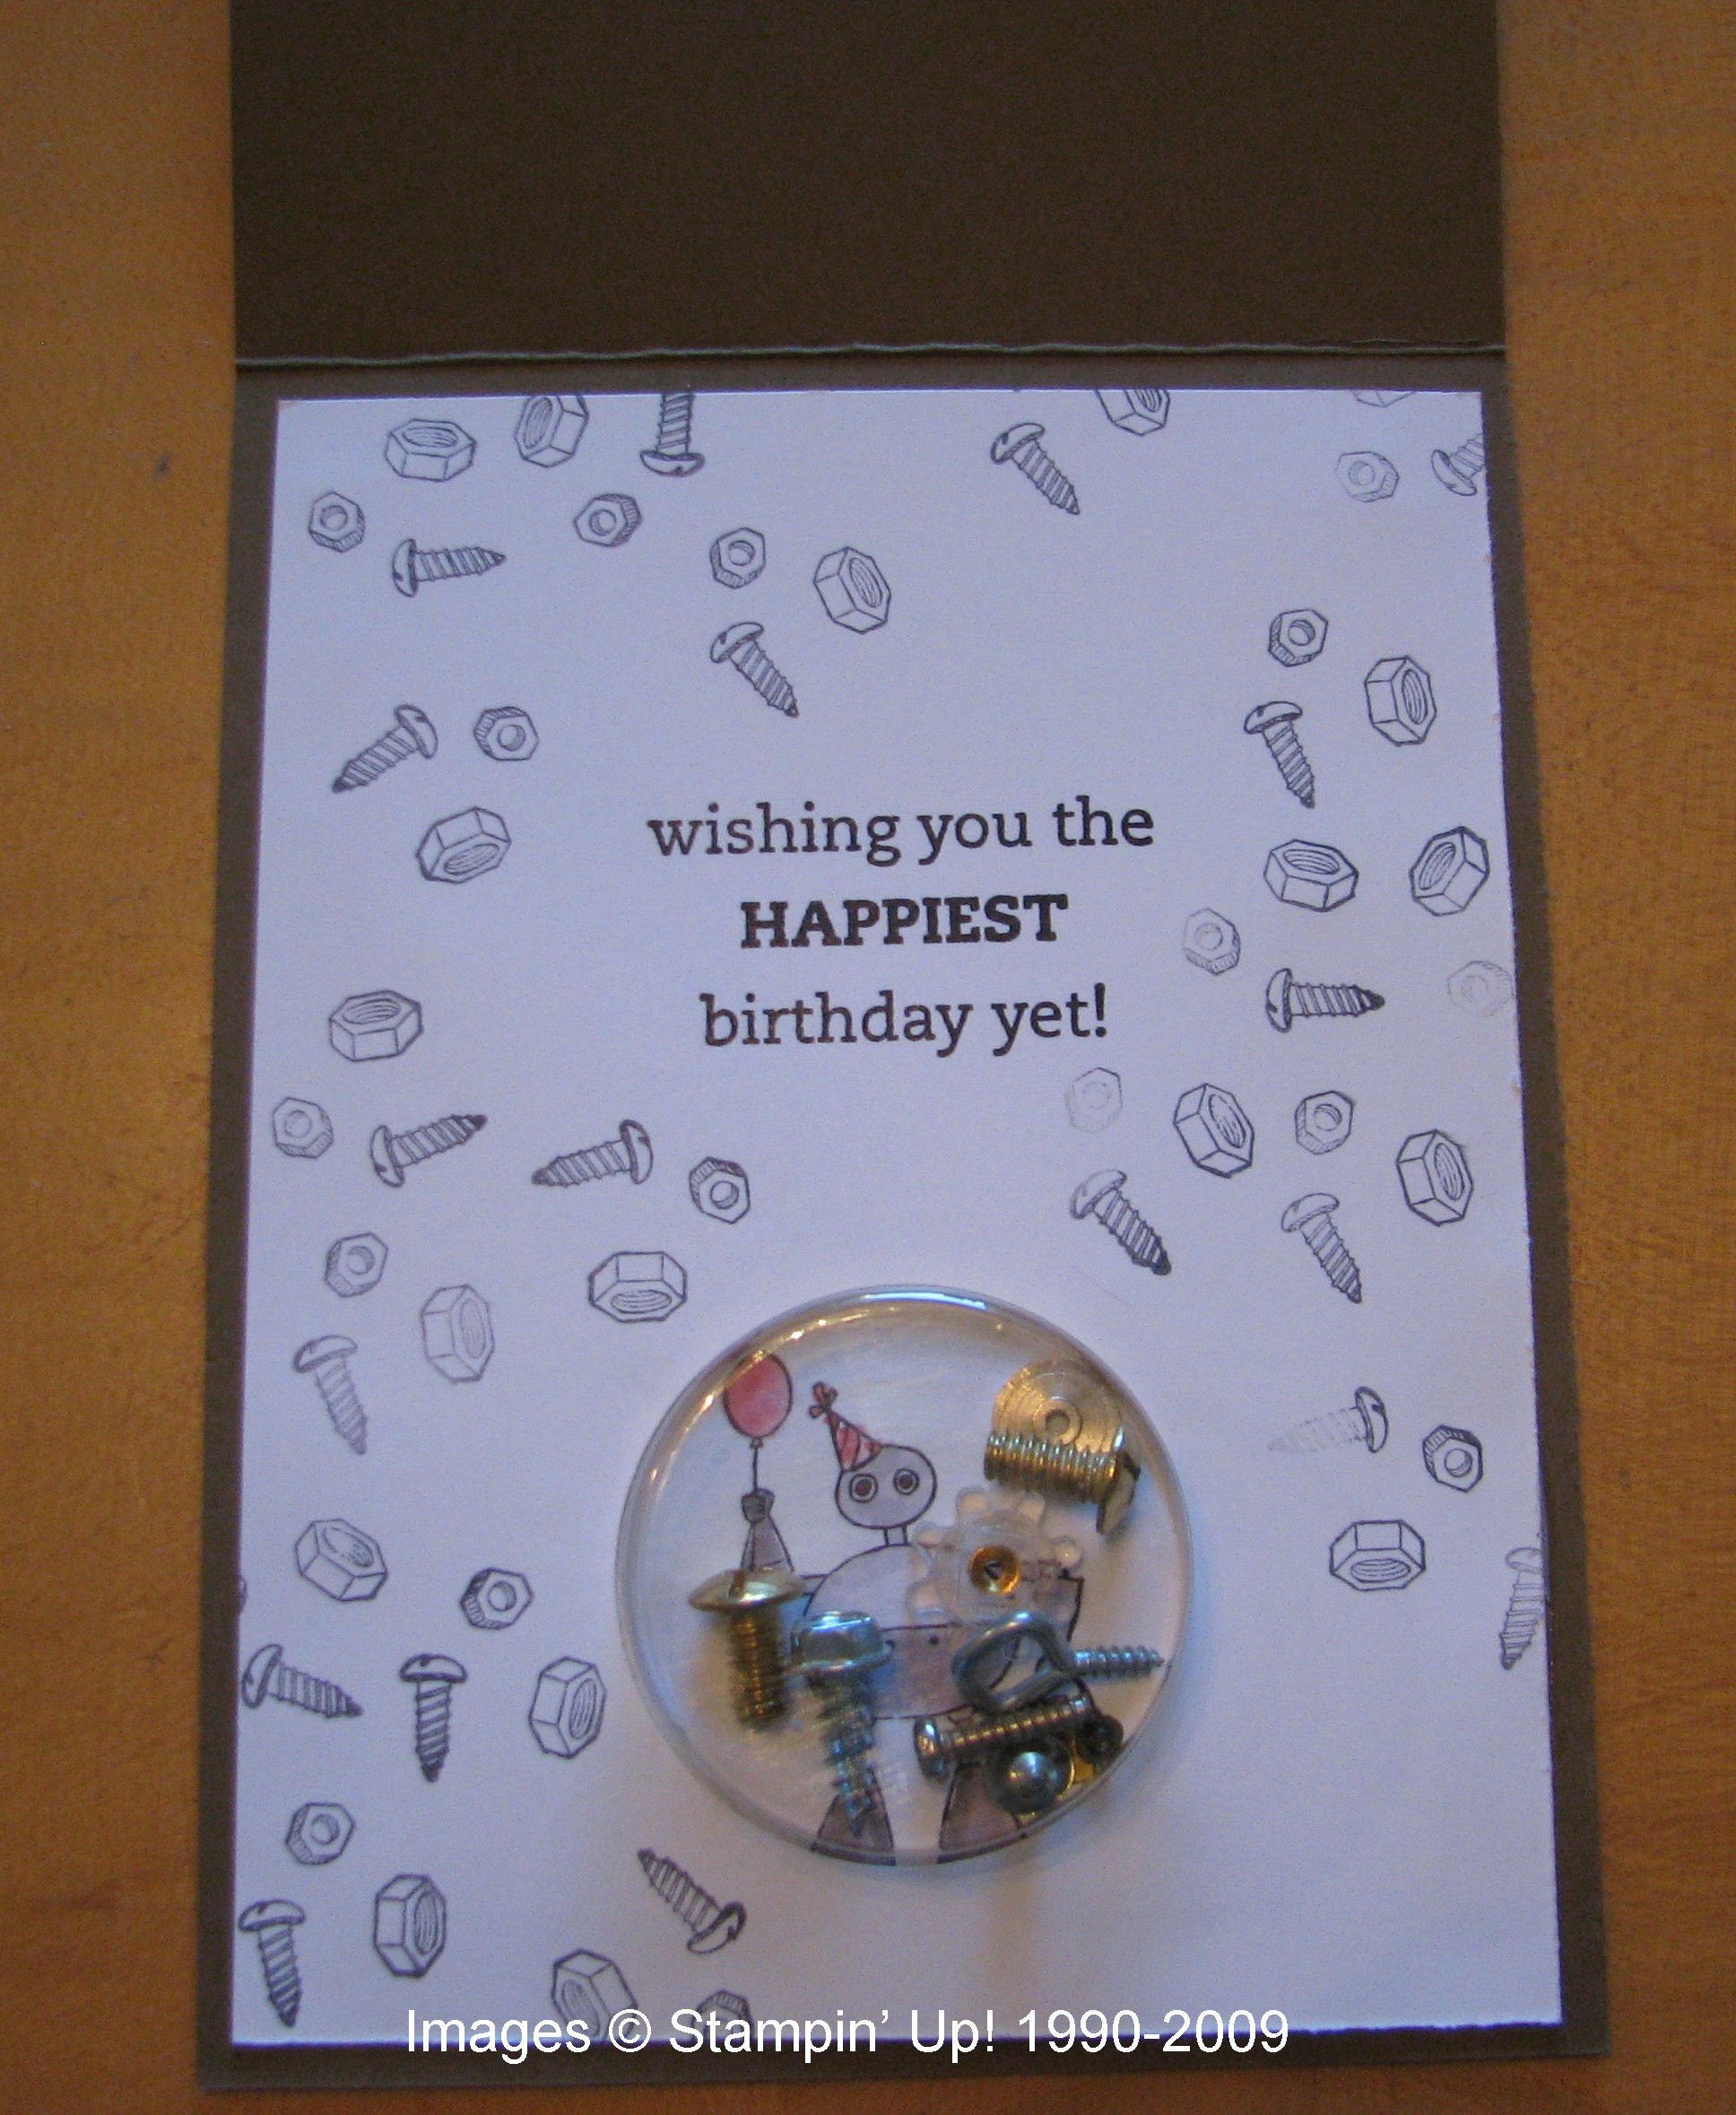
I used the In Colors Crushed Curry and Soft Suede, plus some Basic Gray under the 021, only because I couldn't find my Brushed Silver at the moment. That is one of the Sweet Treat Cups holding the screws, etc. from the Holiday Mini.….so the Sweet Treat Cups aren't just for candy! The Sweet Treat Cup is actually mounted to the inside of the card so that the front opens and you can still see the robot in the cup. You use the 1 3/4" Circle Punch to make the holes. After I made the first one, I traced with a pencil where the next one would go so I would get the placement right with the punch and everything would line up. The punches work best with one layer of card stock at a time.
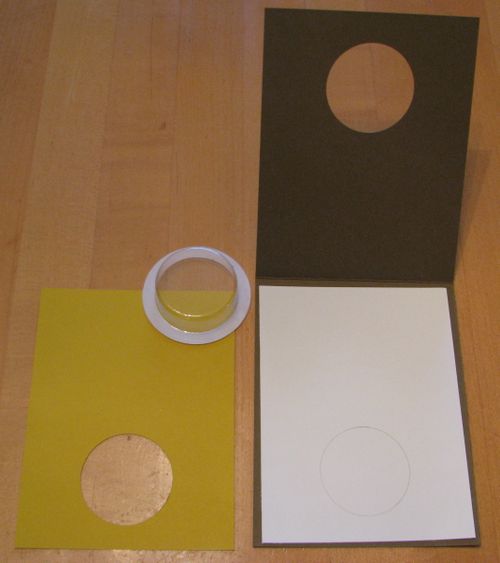
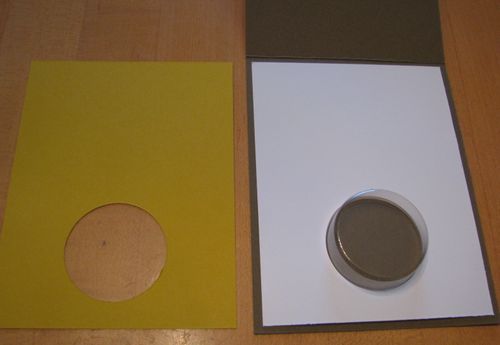
Use some Mini Glue Dots to attach the front of the Treat Cup to the layer you see here, then when you attach the stamped robot layer you will peel away the adhesive strip on the actual Treat Cup to adhere that so it looks like the robot is inside the cup.
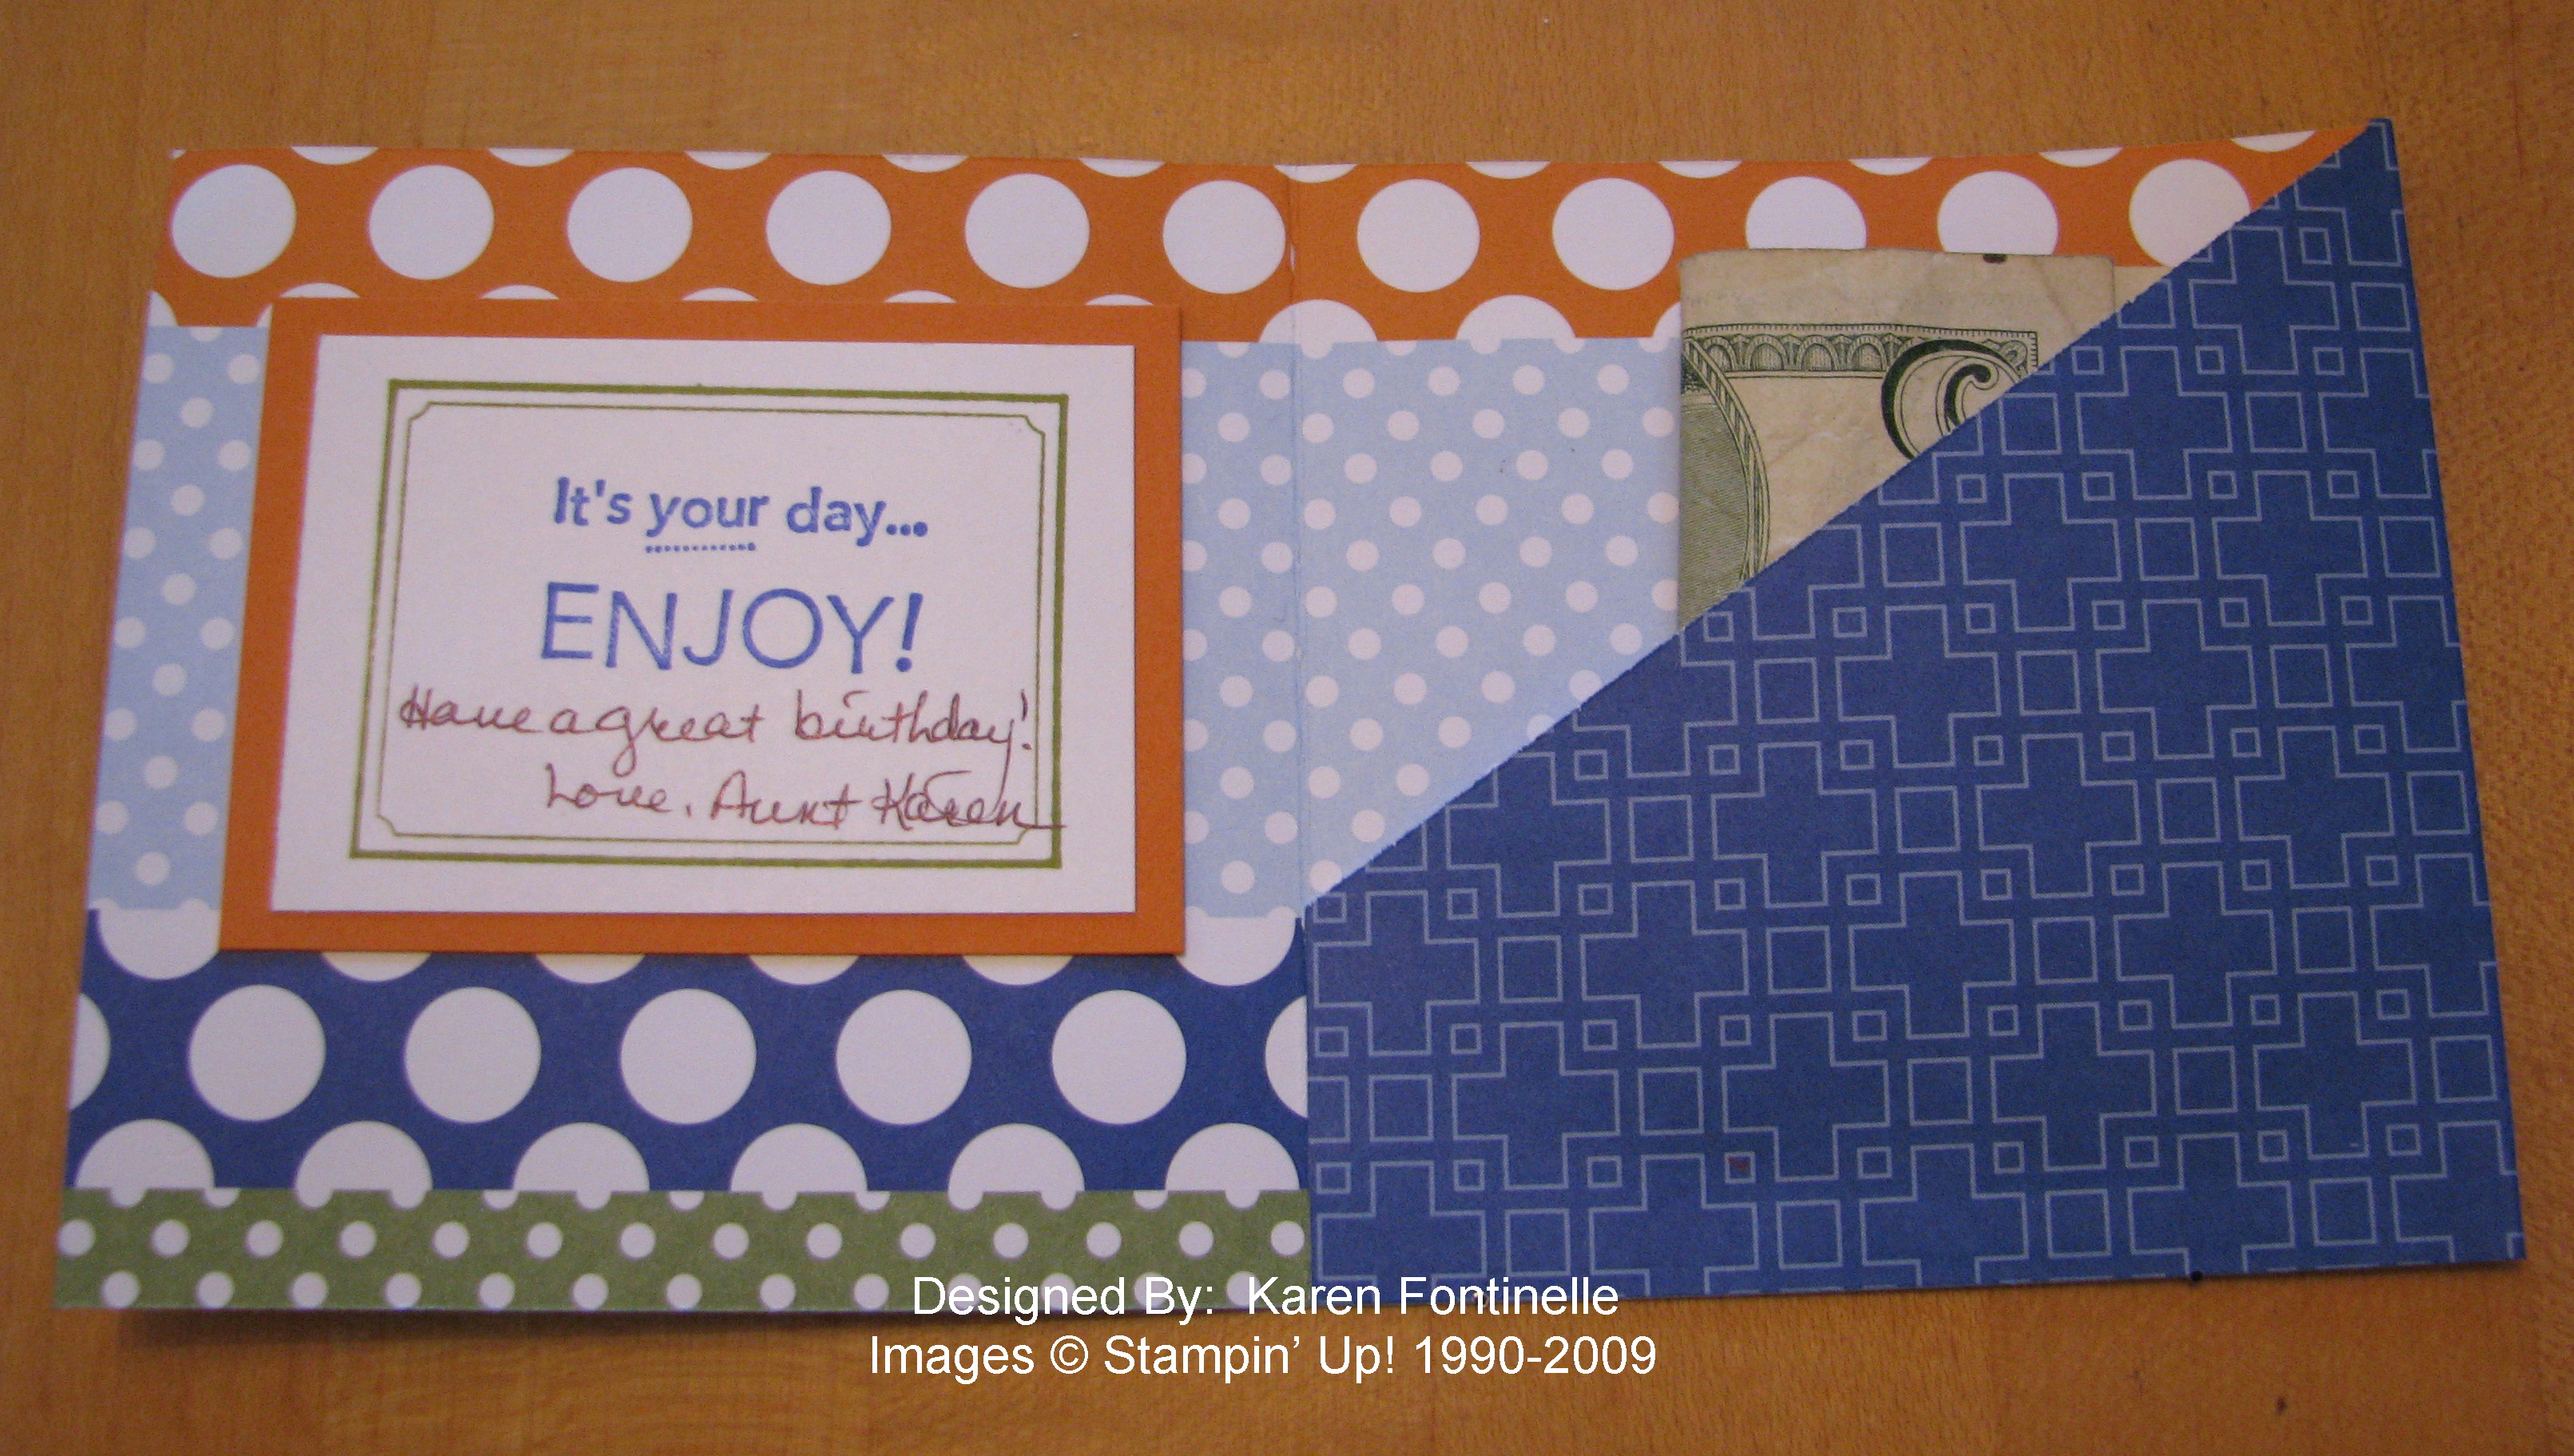
I left the right hand corner unstamped so we could sign the card there! Be sure to stamp the images before adhering over the Treat Cup……otherwise it is difficult to stamp near the cup! Duh!
And the finished card again………..
I hope these photos make the assembly process somewhat clear, but if not, email me with any questions!
PS: Since I don't own any number stamps, I used My Digital Studio to print out the numbers I wanted and then adhered them to this card!
My Digital Studio Card
While I have owned My Digital Studio since it first was available, I haven't been as quick as others to whip out projects in ten minutes! We were out of town for ten days and of course it took probably at least a week to catch up on things at home after returning. Since I'm not one to just "get in there and play" with the software, I have been listening to and watching the training webinars Stampin' Up! has been providing for demonstrators. So while I have been "playing" with My Digital Studio, I also found it valuable to follow some of the training provided. Now that our big trip to New England is long over plus another weekend trip, I've been finding more time to enjoy My Digital Studio. Click HERE for more information.
My Digital Studio provides designer templates that you can use as is, adding your own photos for a photo album or other project, or adding your own embellishments, etc.
Here is the greeting card template I started with:
(I added the black border in my blog as the card is white and it wasn't showing up!)
And now here is my own version:
As you can see, I added some digital red grosgrain ribbon and a bow and a digital layer of Real Red card stock behind the snowflakes. I'm having it printed by the Stampin' Up! professional printer.
Last night I was really going to town working on a multimedia photo album but had to stop to go to bed! It is so much fun to discover what all is included in this program….and there already are some new downloads! Let me know if you have any questions if you are considering purchasing My Digital Studio!
Medallion Halloween Card
Here are the Stampin' Up! Deals of the Week, good until Monday, Oct. 26 at 9:50 am MT! In looking at this list, I think you would enjoy any and all of these embellishments to use on your cards, scrapbook pages, or any projects.
Week 3 Deals of the Week
|
Item |
Description |
Special Price |
|
114348 |
Basic Jumbo grommets |
$4.49 |
|
109857 |
Mini Library clips |
$8.99 |
|
112571 |
Circle Designer brads |
$3.99 |
|
112581 |
1/2" Library clips |
$3.99 |
I decided to make a card showing the Basic Jumbo grommets. Since I had played around with the "Medallion" stamp this weekend, I was in the mood to use it on this card somehow. The other stamp set is "Eat, Drink & Be Scary". The little strip of designer series paper is called "Cast-A-Spell" in the Stampin' Up! Idea Book & Catalog.
Here's a close-up of the grommet….very easy to use…..just poke it through the paper and fold down the tabs on the other side. Stick a bow in the center just using some mini glue dots.
When you have an order ready to place, be sure to check the Deals of the Week during the month of October!
Autumn Splendor
I had purchased this stamp set, Autumn Splendor, in the Stampin' Up! Holiday Mini, thinking about our upcoming (at the time) New England fall foliage trip. I knew it would make beautiful cards and scrapbook pages with fall colored leaves. Here is a card I made. I stamped the leaf with Basic Brown ink so I could watercolor the leaf with my Aquapainter and Watercolor Crayons to give it the fall colors. Then I painted over the leaf with the new Shimmer Paint in the Holiday Mini (Champagne Mist). The shimmer kind of covered the colors of the leaf but I think it still turned out well and I hope you can see the shimmer in the photos. You'll love the new Shimmer Paint! If you need any suggestions or tips on using it, please email me.
The card base is made with Dusty Durango card stock and the Designer Paper layer is Autumn Meadows from the Holiday Mini. Those are actually the two sides of the paper you see in the photo! The ribbon is Dusty Durango polka dot turned around so you just see the solid side. And for a greeting I used Teeny Tiny Wishes punched out with the Oval Punch and layered on the Scallop Oval Punch. You'll notice the leaf layer is sponged on the side, which I do think adds a lot….but just so you know, I decided to do the sponging after somehow getting extra ink from my fingers on the edges of the card. See! There are no mistakes in stamping! You can probably click on the photos to see them enlarged.
Here are some more photos from our trip!
Wouldn't you love to stamp some colored leaves??!
Little Boo Ghost Halloween Card
Yesterday I told you about the Little Boo ghost stamp on the "Under $10" page in the Stampin' Up! catalog. I decided to stamp my own Halloween Designer Paper for this card using Little Boo! To make the ghost in the center of the card, I used the Wide Oval Punch and just trimmed with a scissors to make the wavy bottom of his body. The arms are made from theModern Label Punch, cut in half. The eyes are punched with the 1/4" circle punch, or you could just color them in with black marker. I drew in the mouth and sponged the edges of the ghost with More Mustard just to make him show up a little better. The "Happy Halloween", from All Holidays, is punched with the Modern Label Punch (gotta have it!). It is separate from the layering under the ghost, I just liked the way it fit right at the bottom of the layered piece.
Time to order your Halloween stamping supplies! Go to my online store HERE and click the "Show Now" button!
Little Boo
I think this is the cutest little stamp for Halloween……Little Boo! And it is only $6.95! Have you visited the "Under $10" page in the Stampin' Up! 2009-2010 Idea Book & Catalog? It is the last page (p. 208) in the catalog. I made some cute "Little Boo" cards, just 3×3 size! So fun! Take a look at those "Under $10" stamps…..you might want to get some for gifts for the holidays….and a few for yourself!
Shimmery Leaves
Made another fall card today with the leaves from Lovely As a Tree and decided to make it shimmery! I stamped the leaf with Basic Brown since it is good to use with watercoloring and colored in with my Aquapainter and some drops of reinker. To add the shimmer, I just used the new Champagne Mist Shimmer Paint. Just shake the bottle and whatever is in the cap is probably enough. I used a small paintbrush I had to apply the shimmer just like paint. You'll love playing with these new Shimmer Paints!
Celebrate Fall!
I've been so busy planning a fall trip, I haven't had time to think about today being the first day of fall!! Normally in Houston we would still be sweating to death and wearing shorts and running the a/c, but today we were blessed with a rainy day to give us just a little sense of fall!! I'm still wearing shorts and running the a/c but at least the day shows a little fall spirit!
What Would We Do Without “Lovely As a Tree”?
If you don't already own the stamp set "Lovely As a Tree" you should really add it to your collection right away! We all held our breath when Stampin' Up! retired stamp sets this last time because "Lovely As a Tree" has been around for awhile! But it just is the most versatile, necessary stamp set to have on hand! It is perfect for making cards for men, which is often a bit of challenge, but it can also be made into a beautiful Christmas card or a sympathy card or used on scrapbook pages and gifts. Since my husband and I are planning a fall foliage trip to New England, it seemed perfect to make yet another "Lovely As a Tree" card for his birthday yesterday, this time with colored leaves and the new Autumn Traditions Designer Series Paper in the catalog.
I used an old technique called "thumping" to ink up this stamp of trees. It is a little hard to describe, but you just hold your Stampin' Write Marker loosely and let it flop up and down onto the stamp! Kind of a tapping thing I guess. I used various fall colors, like More Mustard, Old Olive, Ruby Red, to make the leaves. Then I just kind of colored in the tree trunks and branches with the new Soft Suede marker, just hitting the lines as well as I could…..plus some green marker for grass lines on the stamp. When I got the trees stamped, I decided to sponge in some blue ink for the sky and some green for the grass. The card might be a little "busy" with that particular DSP, but too bad, I wanted the one with the colored leaves!
Shimmery Snowflakes
Another "copy" of a card in the Holiday Mini……..I just love the picture on page 26 of the Holiday Mini of the "Snow" scrapbook page, a "Season's Greetings" card and a little box. I wanted to try out the beautiful "Serene Snowflakes" stamp set along with the new Shimmer Paint. The Shimmer Paint (page 27 Holiday Mini) is easy to use….just shake the bottle and in most cases just use the little bit of paint inside the lid, picking up with a sponge dauber or paintbrush. You can ink up your stamp, then apply the Shimmer Paint to the stamp right over the ink and then stamp…..OR just apply the Shimmer Paint directly to the stamp and stamp. There are three colors of Shimmer Paint available and I may have tried them all out on this card! You can't detect the "shimmer" on the card but I think you can see how the look of the snowflakes change as you move the card. You should be able to click on the photos to make them larger. The Shimmer Paint is just something fun to give a subtle, elegant look to your projects!
Beary Best Friends Card
My First Bear!
And here is my first Build-A-Bear card made with the new Stampin' Up! Bigz Dies….Stampin' Up! Bear and Stampin' Up! Beary Essentials for the clothes!
What a New Stamper Can Do!
Over Labor Day weekend my son and his girlfriend came home for a visit. She ASKED me if we could stamp because she wanted to make something for her friend!! I didn't even have to FORCE her to stamp!! We stamped the first time she came to visit back in July so I guess she really did like it! (But then, who wouldn't??!)


