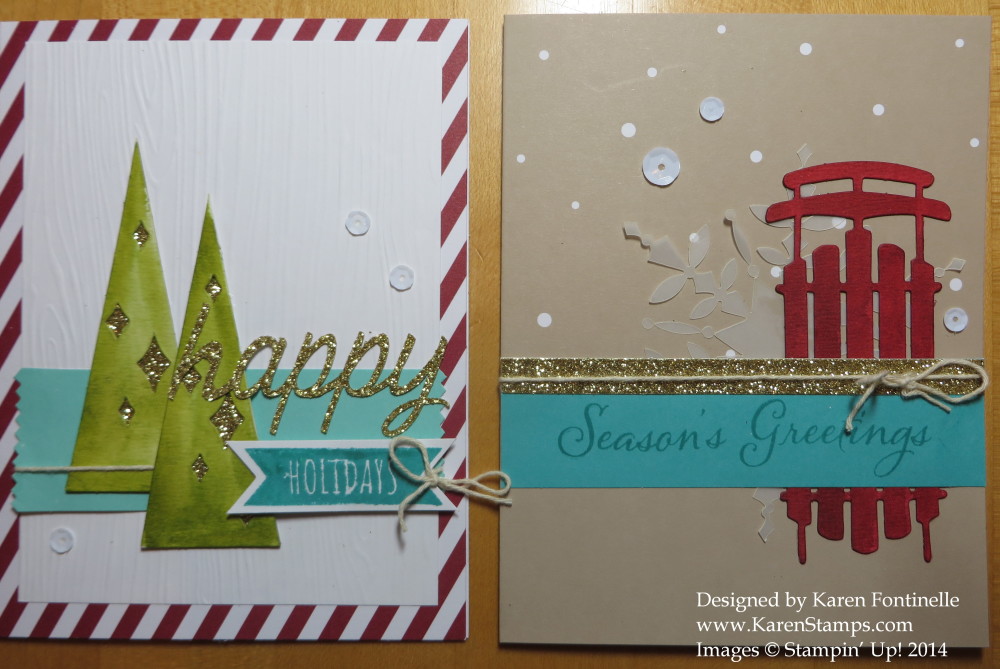
Category Archives: Cards

Calling All Heroes Superheroes Cards

Calling All Heroes Lightning Bolt CardI had some time yesterday to play with my new stamp set Calling All Heroes and made this superheroes card with the photopolymer stamp set. Photopolymer stamps are completely clear so you can see exactly where you are stamping AND they are VERY STICKY! I was pretty klutzy with that aspect of these stamps yesterday, but I got better and better dealing with them as I went along. If you saw my Facebook post yesterday you will see that first I put the stamp face down on the clear block so that when I stamped with it I got a blob of the back of the stamp and then it tore my paper when I lifted it up! Now I know to make sure that I have the stamp image up on the clear block so it will stamp the image and not the backside! I also learned that on my messy table while I am stamping to not just set the clear blocks on top of the photopolymer stamps because the blocks will stick to the stamps!  They are sticky! And that’s a good thing when you are stamping to hold the stamp on the block well, but for me yesterday it was just one thing after the other!  By evening I had it all down pretty well as I made another card!

This stamp set also comes with an alphabet so it is really a double stamp set. You can line up the letters on your block to stamp words or phrases.

Calling All Heroes Three Hero Faces Card

On this card, I just played with some of the masks and faces of the heroes (or are they villains?) and stamped the phrase, which also happens to be the name of the stamp set. I didn’t try to get it perfect (obviously) but it is nice to be able to stamp more than one letter at a time.  In cases where I needed the same letter twice, I could do one of two things. What I did do, was just place the letters C, A, and L on the block and then stamped the rest:  L, In, N, G to get “Calling”. The other thing I could have done was leave a space for the second “L” and then go back and stamp that in it’s proper place. Since you can see through the stamps, you can see pretty much where you are stamping. The stamps did stamp really well once I didn’t have them upside down on the block! They did clean up pretty well, too, although they are more prone to staining than our red rubber stamps. Even the Stazon ink cleaned off pretty well with Stampin’ Mist and a hard rub on the Stampin’ Scrub Pad.  And the ink that didn’t come off I sprayed the Stampin’ Mist right on the stamp and rubbed with a paper towel.

I think this will be a fun stamp set to play with.  I have a couple people in mind that I want to create cards for with this set!

Check out the brand new Calling All Heroes Stamp Set in my Stampin’ Up! Online Store under “New Arrivals”! You will only find it online, not in the catalog.

The Best Handmade Father’s Day Card!

Father's Day Hardwood Fence Card

It’s the day to wish all the fathers out there a very Happy Father’s Day! And especially to my husband, the father of our three children!  Since he works out in the yard a lot and tries to have a nice garden, I thought I would make a personalized card for him that somewhat matches our back fence, the view out our window. I got the idea for this card from another demonstrator, Patty Bennett, who stamped with the Hardwood Wood background stamp with Soft Suede ink on Crumb Cake card stock. To make it into a fence, she used the Stampin’ Trimmer to cut along the Hardwood lines to make separate fence posts and sponged the edges. We have this same kind of “privacy fence” in our backyard, in face they are about the only kind of backyard fences in Houston. I like it for the privacy it provides and I don’t like it for the privacy it provides because you don’t get to know your neighbors as well, especially the ones behind you. And the kids can’t just run from one yard to another.

Here is a photo of your backyard that inspired this card:

Backyard Fence and Flowers

I forget what that flowering plant on the right is called, but it is really pretty in the morning against the fence. Whatever that plant is below the rose bushes has just taken over in the last few days. That’s how it is down here in the jungle, plants don’t stay small like they are supposed to!

Here is how to cut apart the fence posts from the Hardwood Wood stamp (even if you stamp the image crooked on the paper, just follow the straight lines in cutting the posts apart.  You will need to stamp two images so you end up with six full-size fence posts. Depending on where you place them on your card, the fence posts will likely overhang the bottom of your card. This is ok, just snip off the excess when you are finished.  Be sure to play with the spacing of the posts before you glue.  It doesn’t have to be perfect, but you want to see how the spacing works on your card.

Making Hardwood Fence Posts

To get the pointy tops on the fence posts, Patty used the Border Chevron Punch. Just stick the strip into the punch as you see in the photo and punch. To match our own fence, I snipped off the pointy tip to make it flat!

Chevron Punch Making Fence Post Tops

And to make a few clouds on the Pool Party card base, I punched a Scallop Circle out of a scrap and sponged around parts of it with White Craft Ink to look like clouds! It’s very easy to do,  Just move the punched shape around on your paper.

Clouds Sponging close-upTo make the flowers, I just punched various shapes. I’m sure the scale isn’t correct, but it looks ok and it is, after all, a handmade card! I used the new Itty Bitty Accents Punch Pack flower for the rose bush, circles from the Owl Punch for the pink flowers, and the good old reliable Boho Blossoms Punch for the yellow “iris” flowers. I used the new Fringe Scissors a lot for the grass and the long flower stems. For the stems and leaves on the rose bush I used the stem from the Bird Punch. I had to add a little punched butterfly and for the center, I colored the Rhinestones with the new Blendabilities Markers (which hopefully will be available soon for everyone!).

The greeting on the front of the card is from one of my favorites Teeny Tiny Wishes.  The greeting inside the card is from a new set Fabulous Four. After I stamped it I just loved the look of it!

Fabulous Four Greeting Inside Card

I hope you got a new idea for using the Hardwood Wood Stamp today and maybe how to personalize a card for someone.

For tips on stamping with a background stamp, such as this Hardwood Wood Stamp, check out one of the recent posts on my Stamping With Karen Facebook Page.  Click the Like button there so you will receive my posts.

Have a Happy Father’s Day!!

Be Patriotic! Fly the Flag on Flag Day 2014!

Flag Day 2014

Be patriotic! Fly a flag on Flag Day today!  I love to put out my flag, although it often blows and catches on the roof or gets all wrapped up in itself. But today it looks really nice along with the blooming crepe myrtle.

Flag Day is when the flag was first issued by the Continental Congress in 1777. This day also marks the 200th anniversary of the Star-Spangled Banner, the national anthem of the USA, which Francis Scott Key was inspired to write upon seeing the flag flying over Ft. McHenry after a battle with the British.

It wasn’t long ago, but you can view my post HERE from D-Day when I made a flag card with the new Work of Art stamp set in the new Stampin’ Up! Catalog.

Work of Art Flag for Flag Day 2014


 Happy Flag Day! Celebrate by flying your flag!

Tap Into Your Modern Artist With Work of Art

Work of Art Modern Art Card

Tap into your modern artist with the Work of Art stamp set, a new one in the new Stampin’ Up! Annual Catalog! Since there’s no rhyme or reason to stamping with this set, you can just get out your paper, ink and stamps and play! Pick a few colors and go for it! I chose several ink colors from the Subtles family. The colors I used were Pink Pirouette, Wild Wasabi, Pool Party, Calypso CoraI, and So Saffron. I had no particular plan, just stamped. Very quick and very relaxing! The greeting comes in the set and I really love it! I think this stamp set is going to get a lot of use!

The heart also comes in the stamp set, and I added a little bling with a single Rhinestone Jewel on the heart.

To place your order, just go to my Stampin’ Up! Online Store.

Be sure to check the Weekly Deals, the New Arrivals, and the Clearance Rack!

For World Cup Soccer Fans!

World Cup Soccer Ball Card

Today is the beginning of the 2014 FIFA World Cup Soccer Tournament in Brazil. In spite of having sat through hundreds of little boys’ soccer games (and big boys!) through the years, I can’t say I ever learned the rules or understood the positions or anything.  I was just there to cheer on our team and my son, visit with the other parents, and bring the half-time snack and drinks for the end of the game! Sometimes I took one son to one game and my husband took the other one to the other game. Usually he was the coach of one team so that made soccer life even more interesting. All you soccer parents know what I am talking about! Sitting outside in Houston in the hot sun, sometimes no shade, was beyond miserable at times.  I still don’t know how those kids could all run around on that huge field in that heat! On some occasions it was miserably cold. I remember taking a thermos of hot chocolate and sitting in the car to watch the game until half time, then getting out to give my son a drink of hot chocolate and I was absolutely freezing just in those few minutes – but these kids were running and playing through the cold weather.

So in honor of the World Cup Soccer Tournament and my boys’ soccer games, here is a card I made to celebrate soccer! All you need is the Hexagon Punch for the black and white shapes. To add some interest, I stamped with the Six-Sided Sampler Stamp Set on Whisper White to give that little stitched look and then punched with the Hexagon Punch. Just for some color and contrast, I layered the hexagon pieces on a piece of Old Olive. Adhere the hexagons all the way to the edges of the card, letting them overhang the edge.

Making a Soccer Ball Card

This is what it looks like from the back:

Soccer Card layout back

Then just trim the excess!  Maybe you can use the scrap pieces on another card.

The greeting is from the Geometrical Stamp Set. You could also make this a Father’s Day card!

I think it is fun that you can do just about anything with stamping, even make something that looks like a soccer ball if you don’t have a stamp.

But if you want a sports stamp set, Stampin’ Up! has a new one!  It is called Simply Sports and comes in wood- or clear-mount. There are also My Digital Studio downloads you can purchase  and print out, then use on your traditional card or project – or make the whole card in My Digital Studio!

Enjoy the soccer if you are into the 2014 FIFA World Cup! Make a card or make a scrapbook page of soccer or you favorite sport!  You can shop anytime in my Stampin’ Up! Online Store!

Calling All Heroes Stamp Set! For All Super-Hero Fans!

Calling All Heroes Stamp Set

Images copyright Stampin’ Up! 2014

Calling all super-hero fans!  The new arrival today in the Stampin’ Up! Store is this photopolymer stamp set Calling All Heroes! You might think this set is mainly for little boys, but since the artist, Dave B., has a daughter who is just as interested in capes and masks, he says, as her older brother, he made sure this set could be for a girl, too!  And I contend it is also for the super-hero ADULT fans as well!  I know this will be a set to use to make cards or projects for my son-in-law who loves to go to shows such as Comic-Con and others, collects comic books, and has quite the collection of action figures. Not to mention I think my own grown up “little boys” will like cards made with this set as well! This set just solved some of your masculine card-making problems! The artist mentions (and shows) how well the Just Sayin’ phrases and Word Bubble Framelits work together.

Calling All Heroes Cupcakes and Card

Images copyright Stampin’ Up! 2014

Calling All Heroes Treat Bag

Images copyright Stampin’ Up! 2014

Calling All Heroes Card

Images copyright Stampin’ Up! 2014

Calling All Heroes Photo Card

Images copyright Stampin’ Up! 2014

You can find these brand-new stamps, Calling All Heroes, in the Stampin’ Up! Online Store HERE under New Arrivals.

And while you are in the Stampin’ Up! store, be sure to check out the new Weekly Deals for this week, June 10 – 16.

Weekly Deal June 10 2014

It sure is an exciting morning in the Stampin’ Up! Online Store! Not only is there all the new catalog merchandise, and the Tuesday Weekly Deals, but the brand-new super heroes stamp set, Calling All Heroes!  Be sure to check it all out and then place your order. Email me if you have any questions.


Lost Lagoon Work of Art Thank You Tag Card

Lost Lagoon Work of Art Thank You Tag Card

I had fun making this smaller size card using Lost Lagoon card stock, one of the new In Colors, and stamping it with the Work of Art stamp set, a set that is already very popular. Being a Stampin’ Up! Demonstrator comes with many perks, one of them being receiving a special magazine every other month called Stampin’ Success. That magazine is one of everyone’s favorite things about being a Demonstrator!  I made this card copying one of the samples in that magazine, although the sample was a little gift bag! But it could also look like a card so that is what I made.

The Stamp-a-Ma-Jig came in handy to get those chevron lines at the bottom just right. The stamp in Work of Art has three lines on it so I stamped it three times. The Stamp-a-Ma-Jig is really easy to use and certainly comes in handy now and then when you don’t want to just “eyeball” something. The greeting is also included in the Work of Art stamp set. The card actually measures 3 1/2″ across and 5 1/2″ tall, so cut the paper 7″ wide.

I cut my own tag, but a better idea would be to use the new Tag Topper Angled PunchNo measuring, getting the corners even, just punch! The ribbon is the new Lost Lagoon 3/8″ Satin Stitched RibbonThe strip of designer paper at the top is different than the sample in the magazine but I used the Lullaby Designer Series Paper rather than a strip of Lost Lagoon as in the sample.  And I added a tiny bit of bling, a sequin from the Gold Sequin Trim.

You might as well put that Work of Art stamp set on your order!  You’re going to be seeing a lot of it from me and from other stampers! It’s just a fun set! And if you don’t already have the Stamp-A-Ma-Jig, I would go ahead and order that, too! You’ll be real happy you did every now and then!

Don’t forget, today is the last day for the current Weekly Deals! Shop at my Online Store!

Stampin' Up! Weekly Deals June 3 2014

Work of Art Flag for D-Day 70th Anniversary

Work of Art Flag for D-Day 70th Anniversary

Today is the 70th anniversary of D-Day, the day that Allied troops stormed the beaches of Normandy, invading Nazi-occupied France, and proved to be the turning point of World War II. I thought a patriotic card was in order.

This isn’t an idea I would have thought of on my own, but I copied ideas others came up with using the new stamp set Work of Art to make a US flag of sorts. The “thank you” is from Itty Bitty Banners and die cut with the Bitty Banners FramelitsI just hand cut the Silver Glimmer Paper as a layer underneath the words. The little stars are punched with the star in the Itty Bitty Accents Punch Pack. There are times during the year when we want to make a patriotic card or decor item or favor and now we have another useful stamp set for this in our arsenal.

So Very Happy Flower Card

So Very Happy Flower Card

The flower on this card is stamped with the So Very Happy stamp set that we demonstrators received free at the Stampin’ Up! Leadership Conference held here in Houston last January. Now that the new catalog is out, we can use it and show it! The stamp set kind of reminds me of one we had years ago, the little bit whimsical line art drawings. I love it! The paper in the background is the new Lullaby Designer Series Paper, which, as I’ve said before, is absolutely not just for babies despite the name! The greeting is one of several in the stamp set.

I originally intended to use the other side of the designer paper which was Brown Sugar diagonal stripes. But when the piece I cut happened to be turned over to this side, I loved the look and used it instead. I also intended to cut out the flower, but laziness overtook me and I just left it on the Whisper White square layer. I would have been a little upset had I cut it out, because what I didn’t realize is that the Blossom Punch fits this flower!

Check my Stamping With Karen Facebook Page to see another version of this card using the Blossom Punch!

Shop for anything you want in the BRAND NEW Stampin’ Up! 2014-15 Annual Catalog at my Stampin’ Up! Online Store HERE!

Blended Bloom In Colors Hello Card

Blended Bloom In Colors Hello Card

The Blended Bloom single stamp is a new one in the new Stampin’ Up! Catalog and has mostly been used to color in with the new upcoming Blendabilities alcohol markers (hopefully they will be available around the end of June or early July). But I thought I would just stamp the flower in one color and not color it in at all. And as usually happens, I changed it up a little more, stamping two more blooms and cutting out a couple of layers to make the flower more dimensional. I added a strip of the Lullaby Designer Series Paper. Don’t be fooled by the “Lullaby” paper, because there is not one image on it that will make you think it is “baby paper”. I was going to tie a piece of white Organza ribbon around the designer paper, but then I changed my mind and pulled off three threads from the Burlap Ribbon and tied that around the strip of designer paper.  The greeting is stamped in Blackberry Bliss ink with a stamp from the Four You stamp set. The card stock I used is Blackberry Bliss and Hello Honey, two of the new 2014-16 In Colors.

Check out the beautiful new In Colors in the new Stampin’ Up! Catalog! Blackberry Bliss is one of the favorites, so far, but we’ll all get acquainted more and more with these new colors!

Find what you need in my Stampin’ Up! Online Store HERE!  Remember, today, June 4th, is the last day to order any retired products that are still available.

Stampin’ Up! New Catalog – Ready! Set!………….

Work of Art Just For You Card

This card is stamped with the Work of Art Stamp Set and will be available in the NEW STAMPIN’ UP! CATALOG later today!!!  You have to sit on your hands all morning, but at Noon Stampin’ Up! Time (Mountain Time) (1:00 pm Central Time) the catalog should go live! Keep your fingers crossed that all goes smoothly with technology today as thousands of Stampin’ Up! Demonstrators and customers want to get online and place their first orders as quickly as possible! Those internet wires are going to be humming and soon the UPS truck wheels will be rolling delivering those much anticipated Stampn’ Up! boxes!!

This Work of Art Stamp Set is one you will probably want to put on your list!  It has proven very popular already as demonstrators received it at the Catalog Premiere event and it was a set we were allowed to preorder.  Mine was backordered for awhile. It’s just going to be a fun stamp set to work with!

Why are there two hearts at the bottom?  Well, because “There are no mistakes in stamping!” And I had a mistake on my beautiful card – a little ink from an edge of the stamp! There were a couple of ways I could have fixed it – added more little lines like squiggles around the heart with a marker, or put a rhinestone at one end of the wayward line as if it was supposed to be there, but I decided to play with the hearts some more and cut some out to cover up the line. It worked, I think.

Get your Wish List ready and start the countdown to the new Stampin’ Up! catalog today!! And be sure the Work of Art stamp set is on it!

Shop at my Stampin’ Up! Online Store HERE starting this afternoon!  Let me know if you have any questions!

Quatrefancy Mosaic Madness Card

Quatrefancy Mosaic Madness Card

Stampin’ Up! asked on their Facebook page the other day what we thought the top-selling stamp set was in the 2013-14 Annual Catalog. It turns out, in spite of lots of guesses for Lovely As a Tree, that the top seller was Mosaic Madness! It’s an interesting set and definitely trendy, but I wouldn’t have guessed that stamp set! Of course it does have a matching punch, the Mosaic Punch and you can buy the stamp set and punch in a bundle if you prefer. It was fun making this card with the Quatrefancy Specialty Designer Series Paper and punching out the stamped images.  The greeting is from Four You, also in the new catalog!

TODAY, SUNDAY JUNE 1st: Last day to order from the Occasions Catalog (that’s my understanding now!)

June 4th:  Last day to order retiring products (while supplies last). You’ll have a couple days overlap (that’s my understanding now!)

***Important Note: Online Ordering will be down on Monday, June 2, from midnight to noon (MDT) while we transition the system to the new 2014-2015 annual catalog. During this time, no orders can be placed in Online Ordering. We look forward to taking your orders from the new catalog beginning Monday at noon (Mountain Time)!

Monday, June 2:  Weekly Deals for week of May 26 Last Day!

Be sure to order at my Stampin’ Up! Online Store or contact me and I can put it in for you.

Are you making out your Wish List for the new Stampin’ Up! Catalog??!


Get Some Watercolor Wonder Note Cards for Creative Fun!

Watercolor Wonder Petite Petals Card

Be sure to look at the Watercolor Wonder Designer Note Cards and Envelopes in the Stampin’ Up! Occasions Catalog before they are gone. You get a nice variety, plus envelopes, and you can do a little or a lot to decorate the front of the cards! They are printed on watercolor paper and coordinate with all the other items in the Watercolor Wonder Suite in the Occasions Catalog. On this card, I stamped the vine with the the flourish in the Everything Eleanor stamp set. Then the really easy and fun part – I punched the flowers out with the Petite Petals Punch from the Watercolor Wonder Designer Series Paper! If you poke the flowers in the middle on a foam pad, such as the Stampin’ Pierce Mat with the opposite end of the Paper-Piercing Toolit will make the petals of the flower pop up, making them 3-D.  It’s very cute and just adds a little something than just being glued down flat. Add a Candy Dot to the center.

Here are some of the other cards I made for fun! Just use various stamp sets with greetings or images.

Watercolor Wonder Note Card Too Kind Flowers

This card was almost a loss, I thought!  I dropped the stem stamp on the edge of the card which I thought ruined it.  But no!  I decided to stamp LOTS of stems so the wayward stems would not be obvious. It worked out well, especially stamping off and stamping the lighter stems just for them all to blend in together. The stems and flowers are from the Too Kind Stamp Set.

Watercolor Wonder Note cards Perfect Pennants Banner

Such a cute border on this card, already printed for you! I added a banner stamped from the Perfect Pennants Stamp Set as well as the heart.

Watercolor Wonder Note Card Thank You

This card was so easy to make, yet so beautiful!  The flowers are already printed on the card and I just stamped the greeting from Four You and added a small rhinestone jewel to the end of the word.

You will find the Watercolor Wonder Designer Note Cards at this link and the entire Stampin’ Up! Online Store HERE.

Quatrefancy Hello Lovely Panel Card

Quatrefancy Hello Lovely Panel Card

Time is really getting short on retired Stampin’ Up! products, so I thought I would use some of my Quatrefancy Specialty Designer Series Paper and the Hello, Lovely Stamp SetI have to admit, I haven’t been crazy about this pack of paper, but if I looked more at each paper individually, maybe it wasn’t too bad!  On this card, I just cut some 3/4″ strips of paper from scraps in the package and staggered them a little on this card front. Although I tried to center the center strip, I got it off a little bit which made the strips too far over to the right.  Since there “are no mistakes in stamping!” I decided to fix it by covering the extra wide margin on the left with some of the Whisper White 5/8″ Organza Ribbon (my favorite ribbon for a long time!). I stamped the greeting in Island Indigo ink and layered on pieces of Strawberry Slush and Pool Party card stock. Kind of a fun design to show off the papers in the Quatrefancy pack.

So much happening at Stampin’ Up!

Retiring Stampin’ Up! products available through June 4th, while supplies last!

Retired Stamps

Retired Accessories

See them all in the Stampin’ Up! Online Store (some are discounted!) Click the “View:  ALL” so you can see them easily on one page.

New Catalog begins Monday, June 2, Noon MT (Mountain Time) Be patient with computer glitches as there will undoubtedly be a lot of traffic at first.

Stampin’ Up! Weekly Deals Good things on there this week!

Don’t forget the Occasions Catalog! Ending June 1st? or 2nd? Anything not in the new catalog most likely won’t be available again unless there are any carryover items.

Clearance Rack Might as well check it before you put in your order!

The new Project Life by Stampin’ Up!    Available NOW!

Want to be a Stampin’ Up! Demonstrator? You can sign up and start your own business for only $50 ($55 product value) or the regular Starter Kit for $99.  Email me at Karen@KarenStamps.com if you would like more information!

Be sure to shop for the retiring items you want from Stampin’ Up! as soon as you can so you won’t miss out on availability.  But you will have an overlap from June 2 to June 4th to place your order out of the retiring products and the new catalog!  What a deal!!  Contact me if you have any questions!

Pop Up Box Card UT Graduation

Pop Up Box Card UT GraduationI think these pop up box cards are almost like a present in themselves so if you are looking for an idea for a special graduation card, I think a pop up box graduation card would be a good choice! It’s hard for me to believe that it is the end of the school year for most students and time for graduations.  I thought the New Year just got going! Some of the materials I used on this card are retired Stampin’ Up! products, but some are current, and the designer paper is actually from the UT bookstore, maybe several years ago, in a scrapbooking package. I’ve made quite a few UT graduation cards and announcements the last several years with a pack or two from the bookstore! So if you are looking for school colors or designs, that is the place to look.

After making the pop up box, if you plan on putting it inside a regular size envelope, just be careful as you place whatever images and things you attach to the inside braces. Make sure they don’t stick out too far to the side or too far out the top.  Sometimes if you fold it one way, they do stick out but if you fold it the other way, they are all tucked inside.  So be sure to check that.  Then just stamp whatever congratulatory, fun, or personalized greetings and images that you want to put on the card. I didn’t get a very good photo of the inside with all the things I put inside, but you can get the idea.  Every card should be different anyway when you personalize it.

Here is what the card looks like folded flat with a belly band around it to decorate it and to keep it folded.

Pop Up Box Card UT Graduation Folded

Have fun designing your own pop up box card, whether for graduation or for some other fun occasion!  The sky is the limit!

For any stamping supplies, visit my Stampin’ Up! Online Store HERE.

Check out the new Weekly Deals TODAY!  Click HERE!