Sometimes you can just copy yourself as I did with this card because I love this stamp set and wanted to try the Eclipse Technique for a 16th Birthday card with the We Must Celebrate Animals! Maybe not quite your typical 16th birthday card, but it was what I was in the mood to make that day! I love this stamp set and thought I would try the Eclipse Technique with the numbers.
Sadly, the We Must Celebrate Stamp Set is retiring the end of May. I didn’t purchase it at first when it came out in the Occasions Catalog, but then I fell in love with it when I saw a lot of samples using it online. Isn’t that what always happens?! I even was so daring as to cut the animals apart carefully so I could use them separately, or even put them back together side by side on the acrylic block to stamp this card.
To do the Eclipse Technique, stamp the front of the card first, the do the die cuts. This must be a separate layer so that a darker layer will go underneath to make the numbers show up. The darker layer underneath can either be the card base itself or just hide a darker layer underneath! After being die cut with the Big Shot, the numbers are then replaced in the space and popped up on Stampin’ Dimensionals. I used the Large Numbers Framelits Dies, which I am also sad to report are retiring! They are so great to use for birthdays and anniversaries and other special occasions, like graduations. The coordinating stamp set, Number of Years Photopolymer Stamp Set is also going out.
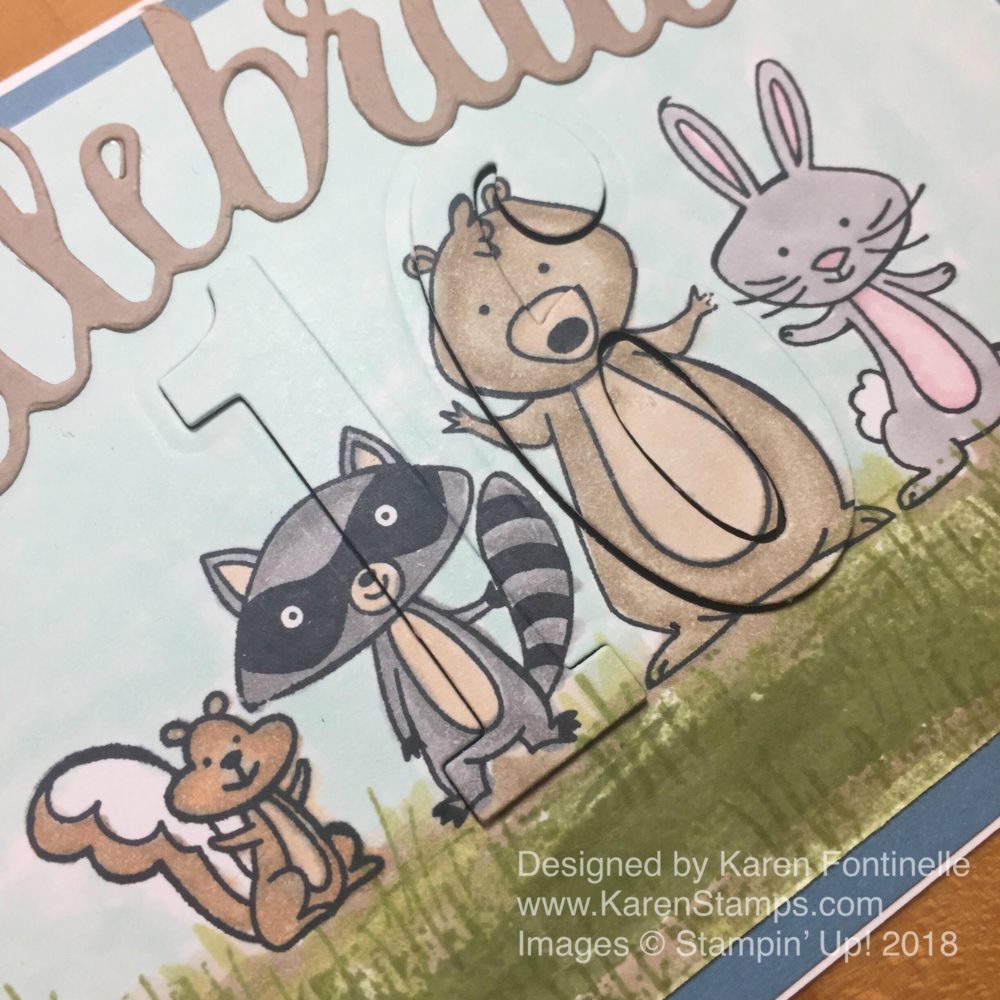
The card base is Whisper White Cardstock with a layer of Marina Mist. I put a small layer of Basic Black behind the die cut numbers. The front of the card is colored in with Stampin’ Blends Markers. The grass is stamped with two stamps from the Sheltering Tree Stamp Set. First I stamp the large swath of grass and then I go back and stamp with the blades of grass stamp. Maybe I fill in the empty spaces with a little bit of brown for a little dirt or even another shade of green. The die-cut “Celebrate” is in the Celebrate You Thinlits Dies that were available during Sale-A-Bration, BUT this set will also be available in the upcoming Stampin’ Up! Catalog.
If you would like to see the same card I made without the Eclipse Technique, please click HERE.
If you love this animal stamp set, be sure to check it out on the Last-Chance list and get it before it is gone!
Some retiring items are already sold out, but you can see the ones that are still available by checking the Online Store rather than depending on the written list.
Try the Eclipse Technique on a card using whatever dies you think you can use, something like my Eclipse Technique 16th Birthday Celebrate Animals Card.