
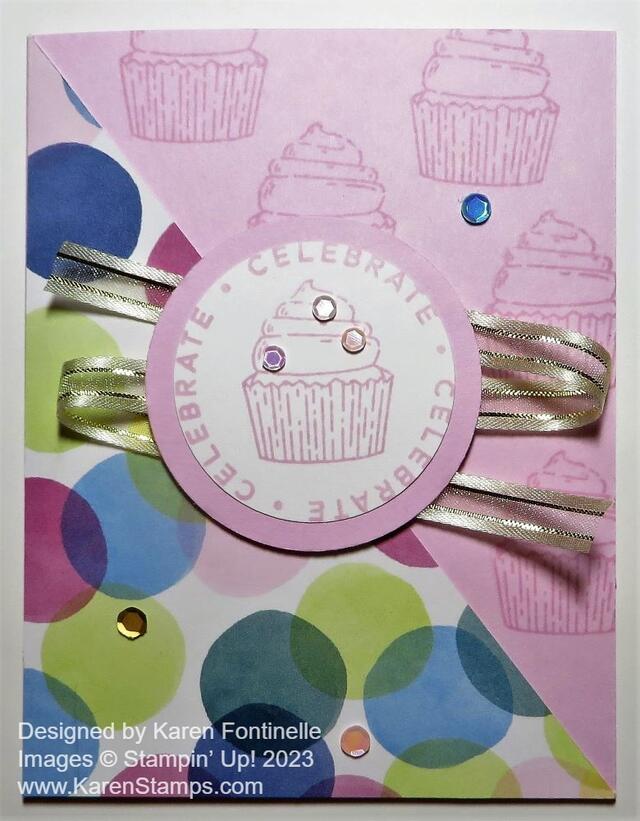
Make this Bright & Beautiful Diagonal Birthday Card for anyone’s birthday! The paper makes it festive and bright and of course, who doesn’t love a cupcake?
This Bright & Beautiful 6″ x 6″ Designer Series Paper is a great package to own. You can purchase it at a 15% discount right now through June 30th! It has bright and beautiful colors and designs, just like the name says! So many coordinating colors with this paper, also. Some papers are like ombre-dipped shades, then there are stars, dots, diagonal stripes, circles, confetti, and more. Use it for cards or scrapbooking. For sure, the papers go well for making birthday cards.
The card base is Bubble Bath cardstock. If you want to have some stamped images on the side without designer paper, be sure to do that before you add the designer paper. I just stamped the cupcake from the Circle Sayings Stamp Set in Bubble Bath ink on the Bubble Bath cardstock. That gives a watermarked look, the same as if you used Versamark ink instead. It just adds a little interest rather than the blank cardstock on that side.
To cut the designer paper on the diagonal, first decide what size you want it to be. If you want it to fit corner to corner, completely against the fold of the card and all the way to the bottom of the card, then cut a piece of designer paper 4 1/4″ x 5 1/2″, the exact size of the card. Then cut it diagonally from corner to corner with your Paper Trimmer. Put the top left corner of the designer paper even with the Paper Trimmer cutting track while also putting the lower right corner of the paper also even with the cutting track. That puts your paper on the diagonal. To avoid tearing the corners when you start cutting, place the cutting blade up into the paper, then back down to the corner, and then go up to the top, or vice versa. That takes some of the pressure off that pointy corner of the paper with the cutting blade jamming into it.
If you want the card to have the usual margin, cut the paper at 4″ x 5 1/4″, then adhere it 1/8″ off the fold and from the bottom as you would normally do. Either way is fine, or even smaller, depending on your design.
For the center greeting, I stamped the words and the cupcake from the Circle Sayings Stamp Set on Basic White with Bubble Bath ink. I punched it out, which was very close, with the 2″ Circle Punch. I wanted to use the 2 3/8″ Circle Punch for a layer of Bubble Bath so I had to use the 2″ Circle Punch. It worked fine!
I added Stampin’ Seal to the back of the greeting circle so that I could wind the Gold & Vanilla 3/8″ Satin Edged Ribbon back and forth behind it, and then I added Stampin’ Dimensionals to hold down the ribbon and to pop up the greeting in the center of the card. I liked the touch of gold on a festive birthday card!
And what birthday card would be complete without some bling? I used the Pastel Adhesive-Backed Sequins here and there on the cupcake and card to some sparkle. I have used these sequins a lot, maybe because the colors go with a lot and because they already have adhesive on them, unlike sequins we used to have that we had to glue down ourselves.
You can use this same card design with the other images in the Circle Sayings Stamp Set or even use some other greetings and dies. Here is another card I made recently using the same paper and stamp set, but with a few differences.