Author Archives: Karen Fontinelle

Need Another Graduation Card?

Graduation Card Congratulations 

This is a pretty easy graduation card to make.  I admit to using some retired paper and stamps, but the color, Cranberry Crisp, seemed to match the school colors pretty well.  The retired stamp set is "In the Stars" but I thought that words on the star were perfect for graduation.  I stamped the star on the ivory cardstock twice, cutting out one image and popping it up with dimensionals.  I had embossed the little stars on the card with gold embossing powder, but then added a couple of star punches out of Brushed Gold cardstock.  The gold-embossed "Congrats" is from the current Ronald McDonald stamp set, "Say It with Scallops", found on the inside of the back cover of the catalog.  Stampin' Up! donates $2 for every one of this set sold to RMDH…..it's a great stamp set and while you're stamping you know you're also helping out a worthy cause.

One DSP Sheet Mini Album

Have you watched this video yet on my Stampin' Up! website?  It's right there under "Featured Project" and I'm sure you will enjoy it.  Click HERE to see the Stampin' Up! video.

SBVid  

And here is a mini album I made using one of the techniques in the video. I used the Sale-A-Bration Designer Series Paper called "Delicate Dots".

MiniAlbumHearts 

MiniAlbumHearts2 

MiniAlbumHearts3 

MiniAlbumHearts4 

While you cannot still get this same paper, you can use any of our Designer Series Paper.  Choose any papers in the package to use because they all coordinate!  And during the month of May, if you purchase three packages of Designer Paper, you get one free!  Read all about this special offer for National Scrapbooking Month HERE.

A Mother’s Day Card for You

VellumRose 

HAPPY MOTHER'S DAY!


Stamp Set:  Holidays and Wishes

Cardstock:  Blush Blossom CS, Walk in the Park Designer Series Paper, Vellum Cardstock, Whisper White CS, Cameo Coral CS

Ink:  Cameo Coral

Accessories:  Stampin' Up! Manhattan Flower Textured Impressions Die (you gotta have this!), Pretty in Pink Taffeta Ribbon


Seeing Houston Astros Baseball in Style!

Last night we got to attend a Houston Astros baseball game at Minute Maid Park.  A few years ago I had a tote bag with three "windows" in it and had made baseball-themed card fronts to put in it to take to the ballgame.  Yesterday I thought of a special small tote bag from Stampin' Up! available to demonstrators that I had purchased that has a large plastic window in the front in which to insert a current mini catalog, such as the Occasions Mini, if you want.  I looked back at my larger tote bag with the baseball card fronts in it and chose one to put in this demo tote bag.  It was too small for the insert so I just adhered it to some layers of Basic Black and Real Red card stock.  The stamp sets and star punch are long-ago retired, but you could substitute something  current that fit your theme, if you had such a bag.

SuBaseballbag2  

And here are some photos of Minute Maid Park and the Friday Night Fireworks!

DSC00121 

DSC00102 

The roof is open and you can see the little train that runs when the Astros hit a home run.

DSC00106 

DSC00115


A Fun Graduation Card

A really great thing about stamping is that you don't need electricity to do it (except for embossing, of course).  The other day my power went off for the whole afternoon (only going to McDonald's to get a cold drink made it go back on, as  soon as I left, I'm sure!) so I just did some stamping.  Even the Big Shot doesn't need electricity!  What a great feature!

Here is one of the cards I made that afternoon:

Graduation Card 

The Brilliant Blue card base is 4×4.  The "grad" letters come from the stamp from "Great Grads" but I cut them apart.  Just playing around!  The wheel I used is actually retired but very similar to the Jumbo "See You Around" wheel….or you could stamp a little background of something….or leave it plain.  I used the two star punches to make gold and silver cardstock stars, the Scallop Circle punch, the Scallop Edge punch for the border and the paper piercing tool in the Crafters' Kit to make the little pokey holes in the Real Red strip.  I think it would be a great size card to use the Slit Punch to hold a gift card inside.

It’s Graduation Time

A year ago we were looking forward to our son's college graduation and now that first year post-college has really flown by.  If I can offer a few words of advice to those of you going to graduation at a large university…..Don't park in the garage!  Not that we knew that, but we happened to see a spot on the street as we were dropping him off for the ceremony and managed to parallel park there.  That saved us at least an hour of time trying to get out of the parking garage after the ceremony!  We know because we were waiting for his friends to join us at lunch and they had parked in the garage!

Another tip would be to make sure your graduate is awake and AT the ceremony before you sit there with the whole family waiting for that glorious moment of seeing your child walk across the stage, only to find out that he overslept and isn't even there!  Thankfully that isn't a personal story, but I heard other parents recounting that story while I waited to be seated at a restaurant!  Just a college thing, I'm sure!

So here's a sample graduation card made with the "Great Grads" set and a rub on from "A Perfect Day".  Gotta love those rub ons!  Of course you would want to use your school colors or favorite combination, but I used Brilliant Blue, Whisper White, Basic Black, and Brushed Gold.  The cap is stamped twice, cut out, and popped up with a Dimensional.  I colored around the white area a little just to help it stand out.

If you need supplies to make a graduation card, hurry and contact me so we can get them ordered and in your hands.  You might not think that high school or college kids would care that their card was handmade by you, but they do!

Graduation Card Congratulations

Time for Wedding Cards!

I tried to do some research on what months are the most popular for weddings, but the answer varies between sources.  One says the most popular has always been June, but now July and August are overtaking that month.  Another lists August as the second most popular, followed by May, July and September.  Yet another lists September in the third spot, followed by October and May.  So who knows?!  All I know is that we all probably need some wedding cards throughout the year!  Here is one I made for my friend recently.

WeddingCardJan 

Stamps:  Fun and Fast Notes

Cardstock:  Whisper White, Pink Pirouette (or Pretty in Pink)

Ink:  Stazon Black

Accessories:  Whisper White Organza Ribbon, Big Shot Stampin' Up! Backgrounds 1 Texturz Plate, Aquapainter and reinkers, Adhesives

Scrapbooking for the Wall

Scrapbooking isn't just for albums!  You can make what essentially is a scrapbook page and turn it into a decorative item for your home.  Here is a gift I made.  It is a 12×12 page with 2 1/2" squares of both designer paper and plain or stamped cardstock.  I opted to make room for a large photo in the bottom corner.  She can add small photos on the other squares or leave some or all of them as is for decoration.  It was framed later with a 12×12 frame from the craft store.  The designer paper I used is the beautiful "Parisian Breeze Specialty".  Some other things I used on this page are "Felt Fusion Flowers", half-pearls from the Pretties Kit, the "Friendly Words" wheel, the "Great Friend" stamp set in the Occasions Mini, Texturz Plates for the Big Shot, and the beautiful Whisper White Organza Ribbon.  You can click on the photo to hopefully get a closer look.  If you need any of these supplies, just go to my website and click on the "Shop Now" button.

SBweddingpageJan

Have You Started Scrapbooking?

"Not every page has to be a masterpiece."

This is a quote I saw somewhere, and I think it is one we should all print out and hang in our stamping area.  I think worrying about whether or not we can produce a fantastically creative masterpiece of a scrapbook page is what keeps a lot of us from even starting.  We think it has to look like a sample we saw in a magazine and if we can't produce that, well, then we shouldn't even bother.  Not everyone even likes the very busy, "cluttered" style of some scrapbook pages featured in magazines, so don't feel that yours can't be something very simple….just the photo, some journaling, maybe a little stamping along a border or a strip of designer paper.  It's even a good idea to just start with a small scrapbook page, 6×6 for example, or even a card size, and then build up from there.  That often gets you started and more ideas will come as you work.  Make it easy on yourself!

Be sure to check out the May scrapbooking specials from Stampin' Up!

Check Out These Scrapbooking Specials from Stampin’ Up!

I'm away from my own computer, so I am going to make this quick and easy!  I know you will want to check out the fabulous offers from Stampin' Up! for May:

***Buy three packs of Designer Series paper and/or 12" x 12" textured card     stock, and get one pack free!

***New "Jumble Alphabet" set at 20% off

***Start your own business for as little as $75 with the limited-time Scrapbooking Starter Kit.

To read the details about these offers, just go to my website HERE.

Also, click HERE to go to my homepage and see a new Stampin' Up! video about scrapbooking with designer paper.  It's a great video!

National Scrapbooking Month Starts Today!

May is designated "National Scrapbooking Month"….not that every month isn't good for scrapbooking!  Will you be scrapping some photos this month?  Stampin' Up! offers lots of products that can make this an easy and fun project for you.

Check my website HERE or the Stampin' Up! website HERE for more information on scrapbooking!

Here is a selection of some of our beautiful Designer Series Paper to help you get started!

DSPMay

Last Day of April: A Favorite Project

Whether you have noticed it or not, I have posted on my blog everyday this month!  It was a good exercise for me because usually I post pretty regularly and then drop off for a week or more.  There were only a few days when I thought I might not be able to meet this challenge, so in reality, it wasn't that difficult.

So for the last day of April, I decided to post a little book I made awhile back that I just LOVE, mostly because of the Designer Paper…..Bella Rose!  I just love the colors and the designs of this paper.  I got the idea (and the rectangular coasters I used) from another demo, Angie Juda.  This was really a simple project…..just cover the coasters (or you could use chipboard) with designer paper (or stamped cardstock), trim the edges, and decorate.  You could bind the book in any of several ways.  The Crop-a-Dile is good for punching the holes in chipboard.  I used the Stampin' Up! glue sticks to adhere the designer paper to the coasters.  The monogram is from the beautiful alphabet "Lovely Letters".

PWBook

Glittered Fifth Avenue Floral

Today I came across the Valentine card my husband gave me and remembered that I always wanted to use it as inspiration for a stamped card.  Here is the Valentine:

BobValCard 

Everyone lately has been playing with this gorgeous stamp set, Fifth Avenue Floral, and the coordinating Textured Impressions Die for the Big Shot.  Although it isn't how I originally thought I would "copy" the valentine card, this is what I came up with:

FifthAveFloral 

I think it was the "glitteriness" of the sequins on the card that made me think about using the new "Fine Supernova Stampin' Glitter" on page 180 of the Idea Book & Catalog.  I first embossed with the "Manhattan Flower Textured Impressions Die" on page 202 (which is pretty enough by itself on any paper!) and then used the "2-Way Glue Pen" to trace all the lines of the embossed flowers (okay, that takes a little patience and you can't do it perfectly, but you can do it!)  I sprinkled on the Pink Supernova Glitter, shook it off, and then went back in to touch up a few missed spots.  This glitter is very fine, so it is a little difficult to get it completely off your paper where you don't want it.  I found a small watercolor brush to work pretty well.  As you can see, there are still some specks of glitter.  But I think after awhile it will probably drop off.  The sentiment is from "Great Friend" in the Occasions Mini.

Here is the inside of the card since the card base is Basic Black:

FifthAveInside 

I just stamped the flower with Pink Passion ink.

The "Manhattan Flower" die was not available until March in the new Idea Book & Catalog, so you may have overlooked it.  You will really want to put it on your next order because it is a beauty!

What Happens in Houston When It Rains

Just a little attempt at stamping humor about a not-very-funny morning in Houston, TX!  We had rain last night and more during the night which meant that by morning lots of streets were flooded, mostly on my side of town.  Lots of schools are closed…..we don't have Snow Days here, we have Flood Days!  We were fine at our house, but my husband had to wait an extra hour to go into work until we could see that the buses were getting through on the HOV lanes into downtown.  Any low spots in Houston flood easily, and now we have some parts of highways or feeder roads built below ground level, which really doesn't seem very smart for an area that floods easily on rainy days.  It's kind of a joke to see cars flooded in intersections or along streets, people who thought THEY could make it through when no one else could.  But in reality they could be people new to Houston, or maybe couldn't see in the  heavy rain, or in today's case, maybe it was still dark out when the weather was so bad.  Of course there is nothing funny about being in this situation or having your car ruined.

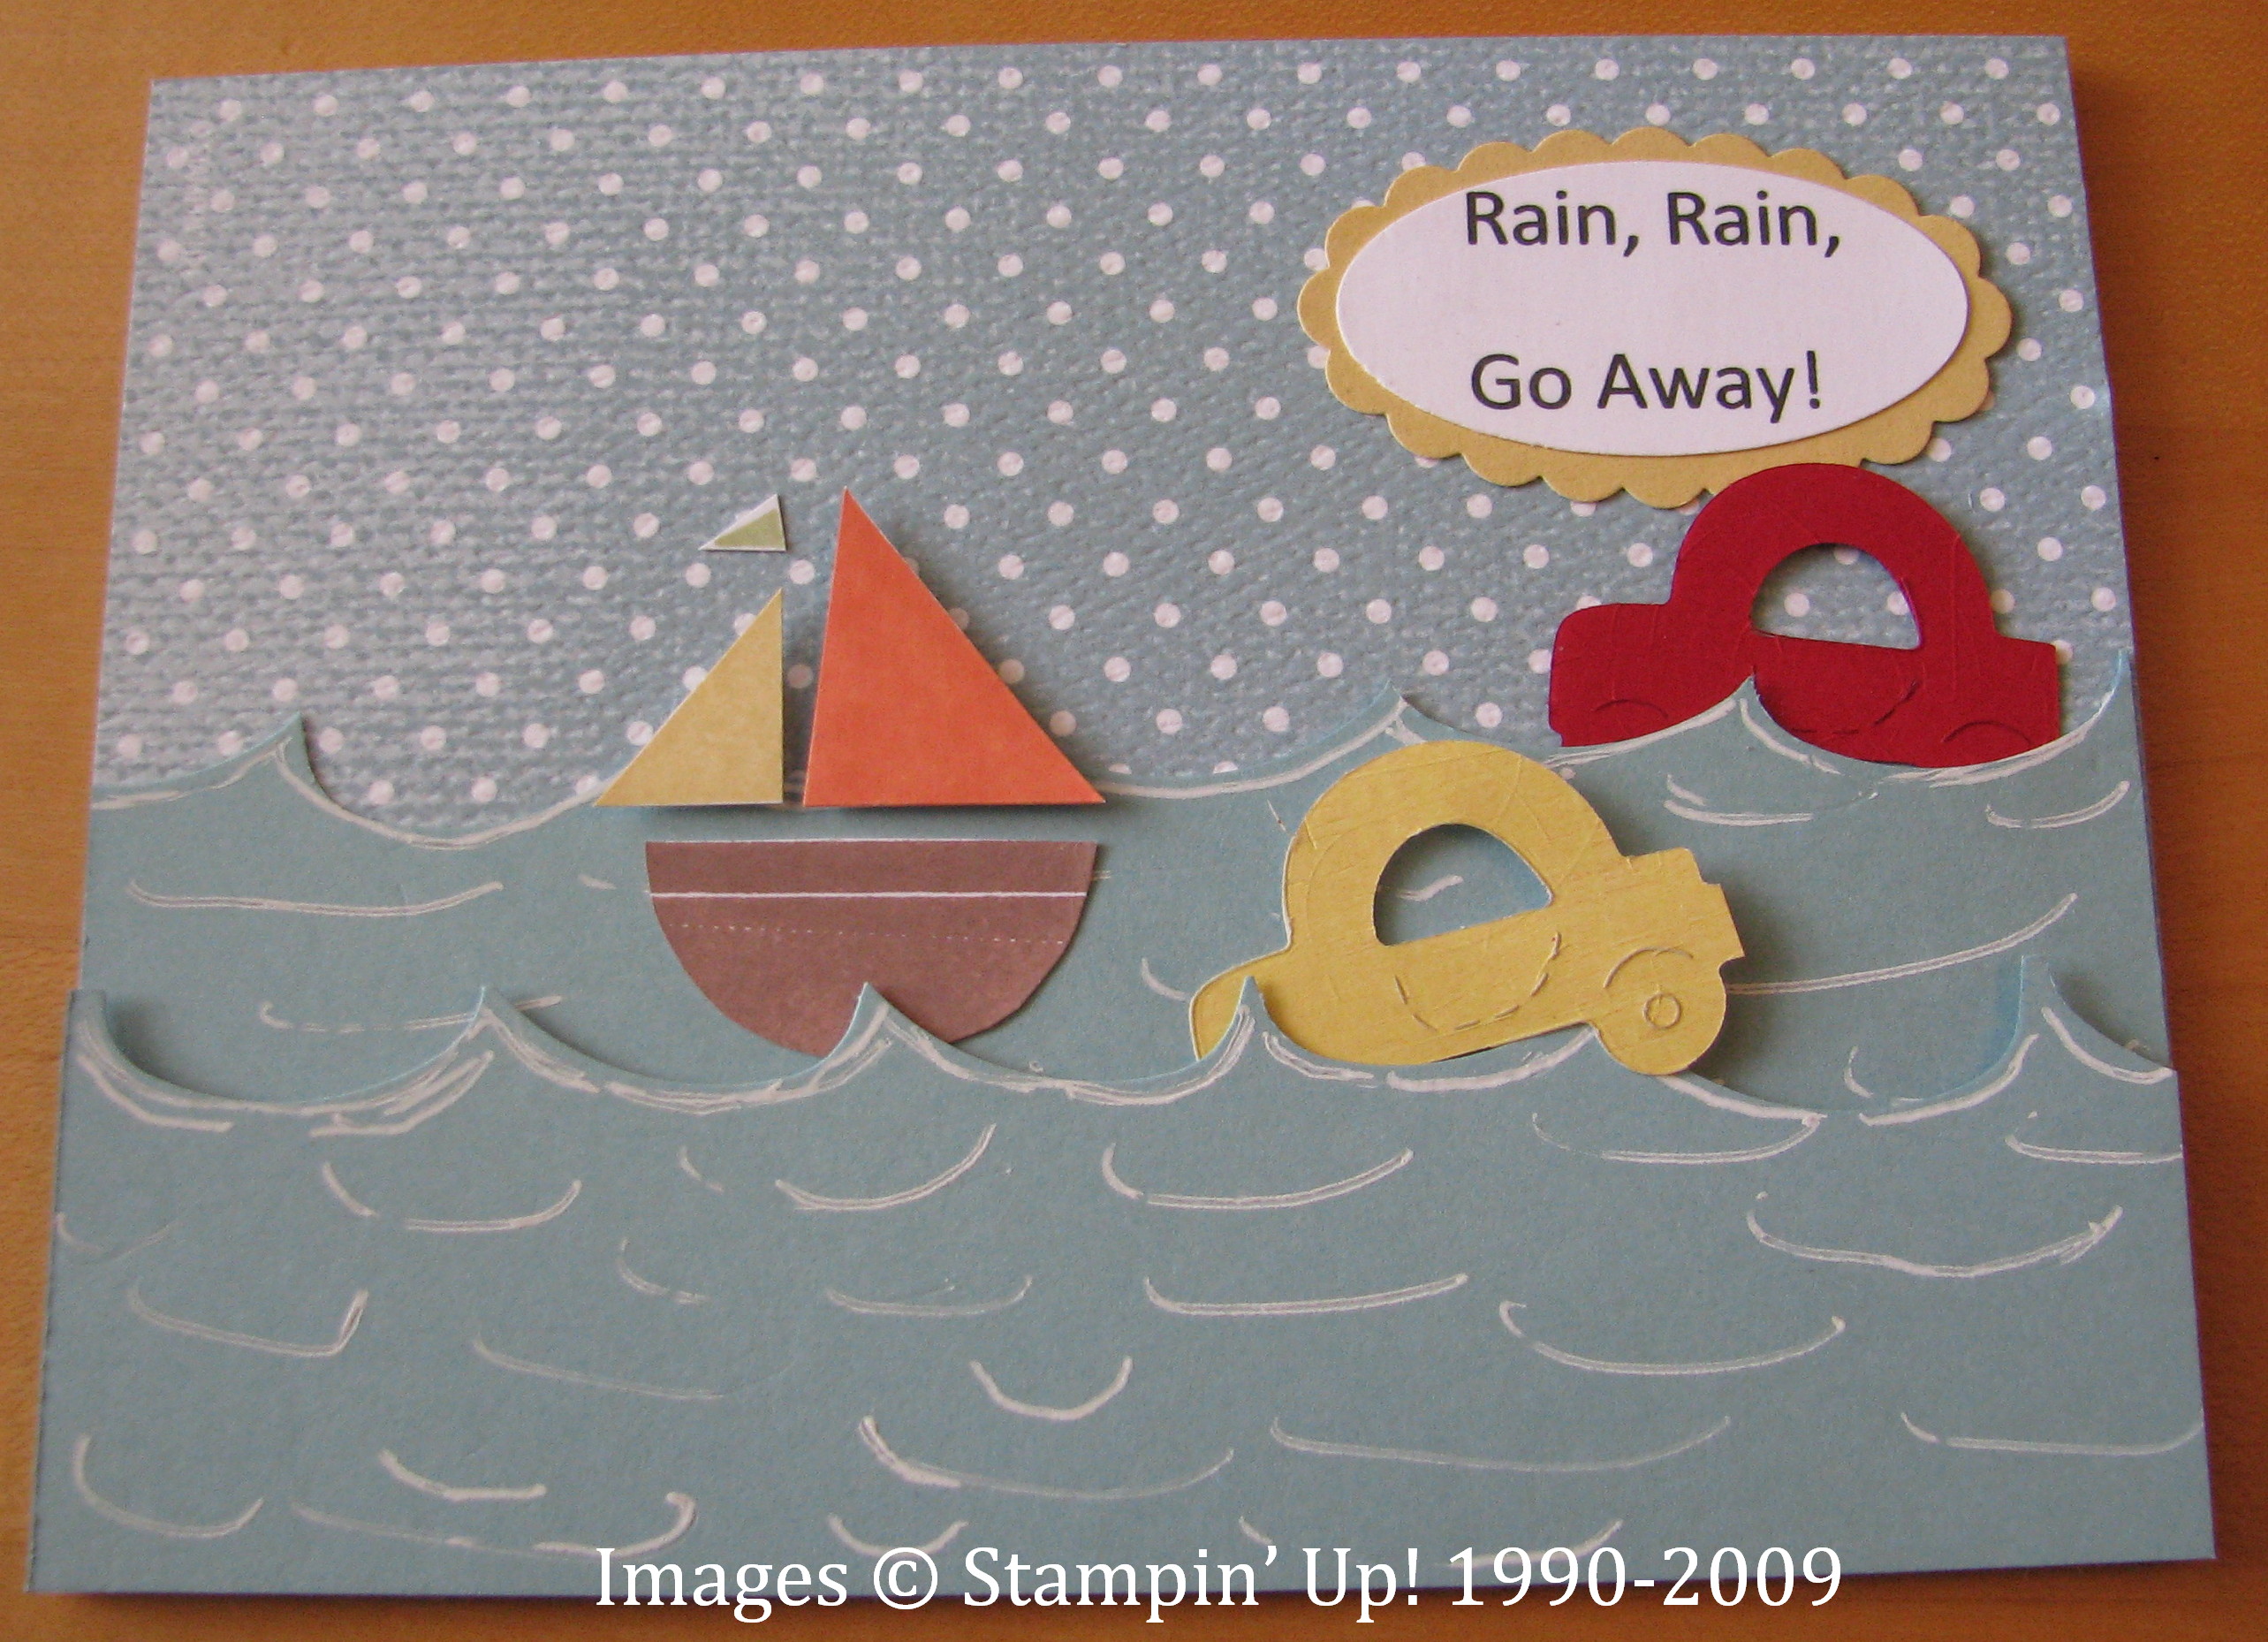
But I thought for today's post, I would make a little card representative of the day in Houston…..where the cars are caught on the flooded streets and where you should really be in a boat!

FloodDay 

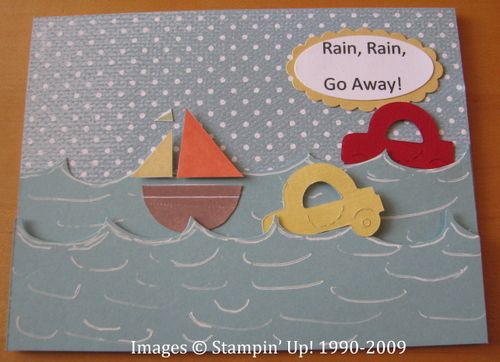
I used some dotted paper (to represent the rain drops!) from the beautiful Parisian Breeze Specialty Paper, the "water" is Baja Breeze paper with the waves punched out with the Key Tag Punch (unevenly) and the "white caps" drawn in with the Signo Gel Pen (rather sloppy, but this floodwater isn't pretty).  The boat is stamped and cut out from "Nursery Necessities".  The cars are Sizzix die cuts (not sold yet by SU) cut with the Stampin' Up! Big Shot.  The sentiment I just printed on the computer and punched with the large oval punch layered on the NEW Scallop Oval Punch (yes, you've gotta have it!) from the Occasions Mini.

The rain has stopped now and the sun is trying to come out, but the rain may come again this afternoon.  Rush hour this evening could be a repeat of the morning commute!