Happy Birthday America! Happy 4th of July!
Leave a reply


If you are looking for a fun little party favor or table decoration for your 4th of July party, you might have fun making this 4th of July Uncle Sam Scalloped Tag Topper Treat Holder. It’s just a single strip of paper, scored to hold a piece of candy inside, with the top tied together and decorated on the front! You can use this basic idea for any size or any occasion! But this one will be very cute for a 4th of July Independence Day celebration!
This treat holder is made with a 2″ x 8″ strip of Pacific Point card stock. I found the center (4″) and then measured equal distance from that to allow room for my single Ghirardelli candy, so I didn’t need it to be very wide. I probably scored it about 1/2″ off the center on each side. Then I used the Scalloped Tag Topper Punch at the top of each end. Next I measured a piece of Whisper White card stock to fit in the space on the front of the treat holder. It looked too plain so I embossed it with the Lucky Stars Embossing Folder.
The Uncle Sam is made with several punches and you could make yours larger. The hat is made with a 1 3/8″ square of Whisper White, and I just cut some narrow strips of Real Red and glued them on the hat. The hat brim is made with the Word Window Punch. The beard is made with the 1 3/4″ Scallop Circle Punch and the face is Sahara Sand punched with the 1 3/8″ Circle Punch. The Gold Glimmer Paper star is punched with the star in the Itty Bitty Accents Punch Pack. I tied the package with my favorite ribbon, the Whisper White 5/8″ Organza Ribbon and a piece of Gold Sequin Trim for a little bling!
You have time! Make a few little 4th of July decorations or treats for your guests or neighbors or kids for your celebration or fireworks viewing!
Don’t forget the Stampin’ Up! Weekly Deals (a couple sold out on the special price already) and the new items (and old) on the Clearance Rack. Also, remember the Watercolor Wishes Card Kit is now available, in the catalog on page 80). Be sure to put THAT on your list!
I hope my 4th of July Uncle Sam Scalloped Tag Topper Treat Holder will inspire you to copy this idea or come up with your own to celebrate the Independence Day holiday!

Would you believe this Flower Patch 4th of July Fireworks card is made from flower images? If you look at the Flower Patch Photopolymer Stamp Set, you will find some flower images that can be made to look like bursts of fireworks! All of these stamped images on this card are made from the Flower Patch Stamp Set and then embellished with some heat embossing. You could also use glitter or rhinestones! If you purchase the Flower Patch Photopolymer Bundle, you will also get the Flower Fair Framelits Dies at a 15% savings on the Bundle!
To make these flowers look more like fireworks, I stamped the flower centers with Versamark Ink and used the Heat Tool and Gold Stampin’ Emboss Powder. Embossing is so much fun! You could also use the 2-Way Glue Pen and Dazzling Diamonds Glitter or stick on some Rhinestone Jewels for some bling!
Look through your stamp sets and see what you could use to make a card, decoration, or treat for the 4th of July holiday! If you would like some of the supplies I used to make my Flower Patch 4th of July Fireworks card, you can order at my Stampin’ Up! Online Store HERE.
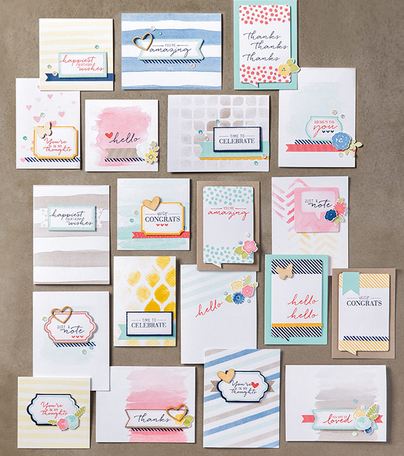
The long-awaited (well, for a month!) all-inclusive card kit, Watercolor Wishes Card Kit, is finally available from Stampin’ Up! This kit includes supplies for 20 different cards in 3 sizes and a very nice stamp set! Lots of people wished they could buy the stamp set separately while they waited for the card kit to be available. The stamp set has greetings you will use all the time when you make cards and projects in very appealing font styles. You even get a clear block in the kit to use with the stamps. The card kit comes with Stampin’ Dimensionals but you might also like to have Glue Dots and Multipurpose Liquid Glue or some other adhesives such as SNAIL or Fast Fuse (on the Stampin’ Up! Weekly Deals this week!).
Here’s what comes in the kit
* 20 cards total
* Folded card sizes: 4″ x 4″, 3-1/2″ x 5″, 4-1/4″ x 5-1/2″
* 12-piece photopolymer stamp set
* 20 card bases
* Die-cut accents
* Cardstock flag stickers
* Night of Navy and Watermelon Wonder Classic Stampin’ Spots
* Washi tape
* Giftable Kraft box
* 50 sequins
* Wood die cuts
* Stampin’ Dimensionals
*Acrylic stamp block
Coordinating colors: Crushed Curry, Night of Navy, Pool Party, Tip Top Taupe, Watermelon Wonder
This kit makes a nice gift since the stamps, ink, block and everything is included (except the extra adhesives that might be useful) and comes in a nice Kraft box.
Order yours today, and be sure to check out the Weekly Deals and the new products added to the Clearance Rack! Put the Watercolor Wishes Card Kit at the top of your list!
Watch the Stampin’ Up! video below to find out more about the card kit.


Check out these new Stampin’ Up! Weekly Deals for June 30, 2015 through Monday, July 6. Click on the photos to see the page in my Online Store. I see several products I want! For sure you want the 2″ Circle Punch to fit in with some others you might have. If you don’t have the new In Color ink pads yet, get the In Color Markers and you can “marker up” your stamps if you want to use a new In Color. Sequins, ribbon, button and twine – always good for embellishing! Sometimes it is the little bit of embellishment that makes the card. The Fast Fuse Adhesive, I admit is a little tricky to use, but now that I have the hang of it, I LOVE it. Very good adhesive. Sometimes I have to advance the tape myself a little bit in the dispenser, but otherwise it works great. (Not on the Weekly Deals, but I also love the new Tear & Tape Adhesive. You should put that on your next order for sure!)

Also check out the Stampin’ Up! Clearance Rack. There are new items on the Clearance Rack, while supplies last. Not quite what I was expecting and I don’t know what they did with the previous stuff, but there you have it. Check it out!
***Apparently Stampin’ Up! is working on some corrections to the Clearance Rack right now! We’ll see! Check back a little later on.

On your mark – Get set – but don’t “Go” yet! You have to wait until tomorrow! But this is a heads up!
Get ready, because June 30-August 3, Stampin’ Up! is adding more items to the Clearance Rack and to Weekly Deals! This is a hint that tomorrow marks the beginning of Bonus Deals. You will be able to save up to 30% on even more Weekly Deals, or up to 60% on extra items in the Clearance Rack (while supplies last), BUT REMEMBER: Weekly Deals discounts are available in limited quantities before the items return to retail prices.
What does all that mean?? I don’t know any more than that! We’ll all find out (and see!) tomorrow! But this is your early warning if you want to check the Stampin’ Up! Online Store early tomorrow to see what has been added.

Start your own stamping business and get two free stamp sets to add to your Starter Kit! Having your own stamping business can lead to all kinds of good things such as more income for your family, new friendships, being a part of Stampin’ Up! and having your own business to run the way you like. No pressure from Stampin’ Up! or from me except for the requirement to have $300 in sales per quarter to stay active. Click HERE for more information and feel free to email me at Karen@KarenStamps.com if you would like to ask me any questions. It can be a big decision and yet it doesn’t need to be because there is no obligation if you find it is not for you. Choose $125 in products from Stampin’ Up! in your Starter Kit and pay $99, plus you get some business supplies in there to get you started! The Starter Kit ships free.
These Weekly Deals are fantastic ones! I have had so much fun using the Mini Treat Bag Thinlits for make many different sizes and styles of little treat bags for cards or treats inside! Scroll through my blog to see some of my recent posts!

Watch Donna Griffith from the Stampin’ Up! Home Office make cute mini treat bags with the Mini Treat Bag Thinlits Dies! She shows some really cute ideas, plus watch for the tip about the little heart embellishment! I never heard that one before!
The Mini Treat Bag Thinlits Dies are on sale during the Stampin’ Up! Weekly Deals through Monday June 29, 2015. I also love the Silver Glimmer Paper and the embossing folders on this deal, not to mention the buttons and the ribbon! It’s all good!

One more idea for using the Mini Treat Bag Thinlits Dies, which are $10 off through Monday night on the Stampin’ Up! Weekly Deals. Make the regular mini treat bag, then fold over the top edge. Add a belly band to hold it in place and you’ve got a cute little envelope for a card and/or treat! Don’t forget all the cute embellishments that come in the set of dies, such as the strip of stars, hearts and dots, the heart and star, the words, etc. You can decorate your Altered Folded Mini Treat Bag any way you like!
For this project I just used a 6″ x 6″ piece of paper from the Cherry on Top Designer Series Paper Stack. No cutting involved. But you do need to to place the large treat bag die carefully on the paper and make sure it is properly placed as you cover it with the cutting plate before running through the Big Shot Die-Cutting Machine. The Magnetic Platform helps hold it in place but you can also use some post-it type notes or washi tape to hold the die in place. As you can see, there is very little paper waste!

Make the mini treat bag, then fold over the top. You can just do this or you can score first about 3 1/2″ from the bottom edge of the bag. Just figure out what size you want the bag/envelope to be.

Go to my Stampin’ Up! Online Store and check out all the Stampin’ Up! Weekly Deals! Then if you liked my Altered Folded Mini Treat Bag, be sure to place it on your order before 11:50 pm MT Monday June 29, 2015. All the other items on the Weekly Deals are really great too so be sure to look!

I’ve let go of Christmas today and have another way to use the Mini Treat Bag Thinlits Dies I think you will find useful! The die pieces include one large one which forms the front of the bag, and we used two of them to make the larger gusseted bags. Today we will use the smaller die piece which normally forms the back of the bag and cut two of those to make these Smaller Mini Treat Bags!
Cut two of the small bag die pieces.

Fold the score lines made by the die to form the bag. Since the bottom edges of these pieces are just straight, trim off a little bit, maybe 1/2″ from the bottom of one that will be the back piece of the bag. On the other piece, make a 1/2″ score line and fold (maybe even trimming the corners off as shown. This piece will be the front piece of the mini treat bag.

Apply adhesive of your choice as shown. I used the new Tear & Tape Adhesive.

The Mini Treat Bag on the left is made with the Cherry on Top Designer Series Paper Stack. Such a cute stack of colorful papers! As you can see the front and back top edges are the same length. The heart and words are die cuts in the Mini Treat Bag Thinlits Dies. Not only do you get the mini treat bag dies but you get extra dies that cut embellishments for your projects.
The treat bag on the right is made from the new In Color Envelope Paper. On this bag, the front piece is folded down a bit and I tied a string of the Burlap Ribbon around the top edge. The star is a die cut in the set of thinlits dies.
Remember, the Mini Treat Bag Thinlits Dies are on the Stampin’ Up! Weekly Deals through Monday night, June 29. You can save $10 when you purchase these dies! To see some other altered Mini Treat Bags I have made, check out this post and this post. To see some of the “regular” mini treat bags you can make with the Mini Treat Bag Thinlits Dies, please click HERE.

Do you realize that six months from today is Christmas Day?! That means there are less than six months to get ready for Christmas! Now that the Mini Treat Bag Thinlits Dies are on sale this week, $10 off, on the Stampin’ Up! Weekly Deals, I thought I would learn how to make an altered size bag, rather than just the flat kind of treat bag into which you would slip a card or gift card or something not very thick. Since it is only six months today until Christmas, I thought I would make a Mini Treat Bag Altered Christmas Gift Bag!
Here is a little tutorial for you:

Instead of cutting the two different pieces to make the bag like you would normally, cut two pieces with the large bag die. This one piece would normally be the front of the regular Mini Treat Bag. Then just trim off that extra little piece as shown. Just snip it off with a scissors. That side of the bag will be the gusseted side of the bag when assembled.

Now score just that right side of the large piece at 1/2″ and 1 1/4″ as shown. There will also be a score line made from the die. For the bottom of the bag, cut one or two pieces of paper 1 1/2″ x 3 5/8″. I say one or two because it depends on what kind of paper you are using and how strong and sturdy you want the bottom of the bag to be. With card stock probably just one piece is fine; with designer paper you probably want to glue two pieces together.

This is how you will fold on the score lines on both pieces to form the gusset for the side of the bag. If you just want the side flat, then just score at 1/2″ and use the score line made by the die. You won’t need the center one. Play with the two pieces and see how they will fit together so you have the folds going the correct way.

Adhere the bottom piece to the bottom tab and all the sides to form the bag. I like using the Multipurpose Liquid Glue because it gives you time and slip to be able to move the pieces to exactly the right positions. But Fast Fuse or Tear & Tape Adhesive.
Next comes the fun part of embellishing the Mini Treat Bag! I used a piece of the In Color Envelope Paper, the Cucumber Crush color, to make a banner. I stamped a Christmas greeting with a stamp in the Wondrous Wreath Photopolymer Stamp Set in Real Red ink, then punched it out with the 2 1/2″ Circle Punch. I die cut a piece of Silver Glimmer Paper with the Circles Collection Framelits Dies for a layer behind the greeting. The little bow is a die cut in the Mini Treat Bag Thinlits Dies package! So many cute and useful extra dies in that collection! I would also suggest putting a Rhinestone Jewel on the center of that bow. (I forgot!)
There you have it! Really the process is pretty easy to make a Mini Treat Bag Altered Christmas Gift Bag. Take advantage of the $10 savings on this die this week. Weekly Deals are good through Monday night, June 29 until 11:50 pm MT. Shop for these Mini Treat Bag Dies and any other stamping and art supplies you need at my Stampin’ Up! Online Store HERE. PS: That Silver Glimmer Paper is also on sale this week on the Weekly Deals!

With the Mini Treat Bag Thinlits Dies on sale for $10 off this week on the Stampin’ Up! Weekly Deals, I thought I would make an altered Mini Treat Bag so you can see some versatility with this die! By just doing a few different things, you can make a larger gusseted treat bag with the same dies! You can make a smaller one too! And this die comes with so many different pieces and coordinates with a new stamp set in the new Stampin’ Up! Catalog. That stamp set is You’re So Sweet on page 57.
The negative image of the word “Enjoy” is leftover from something else I made with the word cut out that I just happened to save and it came in handy for this bag! I had a scrap piece of the same Bohemian Designer Series Paper so I just turned it over and glued it to the front of the bag with a scrap strip of Gold Glimmer Paper across the front. I also used the star die in the package to cut out the star out of the Gold Glimmer Paper. So easy!
Tomorrow I will take a few more photos and show you have to make this altered Mini Treat Bag.
Be sure to check out the Stampin’ Up! Weekly Deals for the week of June 23, 2015. These are good through Monday night, June 29. Every item on there is worth having! But I know you’ll have fun with the Mini Treat Bag Thinlits!

Click to Shop!
I am SO excited about these Stampin’ Up! Weekly Deals for YOU! I just did a blog post yesterday about the Mini Treat Bag Thinlits Dies and now today they are on the Weekly Deals! Save $!0 on the Mini Treat Bag Thinlits! What’s really great about these thinlits is that not only do you get the ones for cutting the bag, but you get all the other fun pieces that you can use with the bags or any other cards and projects. Love both of the embossing folders, and need I say anything about the two kinds of Glimmer Paper??! Love it! And then you also have two kinds of ribbon to stock up on and the Vintage Faceted Buttons! I think you need everything on the Deals this week!
Here are a few other Mini Treat Bags I have made. You can use them as bags to hold a treat or maybe a gift card or cash or just use them as a card. And you can even alter the sizes of the bag. Some people are clever enough to figure all that out!

And a few more:


And only a week left if you would like to join Stampin’ Up! and get two stamp sets in the new catalog FREE! The Starter Kit is enough of a good deal in itself, but to get to choose two extra stamp sets as well is just icing on the cake! Join by June 30, 2015! (You can go to the link above, click the Melon Mambo “Join Now” bar, the check off the acknowledgements and THEN you can see what is involved in choosing the Starter Kit. This way you can get in there and then make up your mind if you want to go through with joining. No obligation. And there’s never any pressure from Stampin’ Up! (or me) to take your business to any certain level.
The choice is yours. When you join Stampin’ Up!, what you want is what you get! You choose what goes in your Starter Kit so you know you’ll love each product. And don’t worry about shipping and handling on your kit—it’s on us!Pick your products, pick your pack. It’s so easy: choose the catalog products you want (up to $125 worth) and one business supply pack so you can start sharing Stampin’ Up! your way with friends and family.
Stampin’ Up! has plenty of resources to help you get started in your new stamping business, at whatever level you would like to take it, plus I will be there to help you every step of the way. Email me if you have any questions about becoming a demonstrator at Karen@KarenStamps.com. I’d be happy to talk to you about it!
Let me know what questions you have!

When I broke out my new Cherry on Top Cotton Paper in the new Stampin’ Up! Catalog I decided to make a treat bag with it using the Big Shot and the Mini Treat Bag Thinlits Dies. I love the Mini Treat Bag Thinlits because you get so many pieces with it, and of course other people have figured out ways to alter the size of the treat bags and things you can make with the bag die. So it is a little pricey but you get a lot with this set.
But back to the Cotton Paper! It’s a little heavier, I would say, than tissue paper. It is lightweight but sturdy. I love my treat bag I made with the Cucumber Crush color, but I did find it a little difficult to work with in making the bag. It was a little bit difficult to fold on the score lines since the paper is lightweight. I found using SNAIL adhesive to not work with it at all – seems the paper was too slick for the SNAIL to catch on to. But the Fast Fuse worked great and I imagine the new Tear & Tape Adhesive would work great. After making the treat bag, I cut a piece of Whisper White card stock to fit inside and stamped it with Watermelon Wonder ink with a birthday greeting from the Amazing Birthday Stamp Set. (You can also buy a Bundle with the matching Banners Framelits if you like and save 15%.)
To decorate the bag, I punched ten flowers with the Pansy Punch from the Watermelon Wonder Cotton Paper. I could also have used the Floral Frames Collection Framelits Dies. Just stack the flowers together, staple in the center with the Stampin’ Up! Handheld Stapler. Then just smoosh each layer up and toward the center to make the flower! The Cotton Paper works well for this! Just smoosh and fool with it and get it to your liking. If you are mailing it, you can flatten the flower and tell the recipient to fluff up the flower when they receive it! I also stamped a banner from the Amazing Birthday stamp set to decorate and applied a piece of Cherry on Top Washi Tape over a strip of Whisper White card stock since the tape is transparent. Then I just adhered it to the bottom of the treat bag. And since I had an already stamped and die-cut leafy image from the other day, I stuck that on behind the flower. So cute!


If you need any of these supplies, you can find them at my Stampin’ Up! Online Store HERE.
Father’s Day is tomorrow, Sunday June 21, so if you haven’t already, you better find some time today to make a card for the father in your life, whether it’s your own father, husband, uncle, grandfather, whomever!
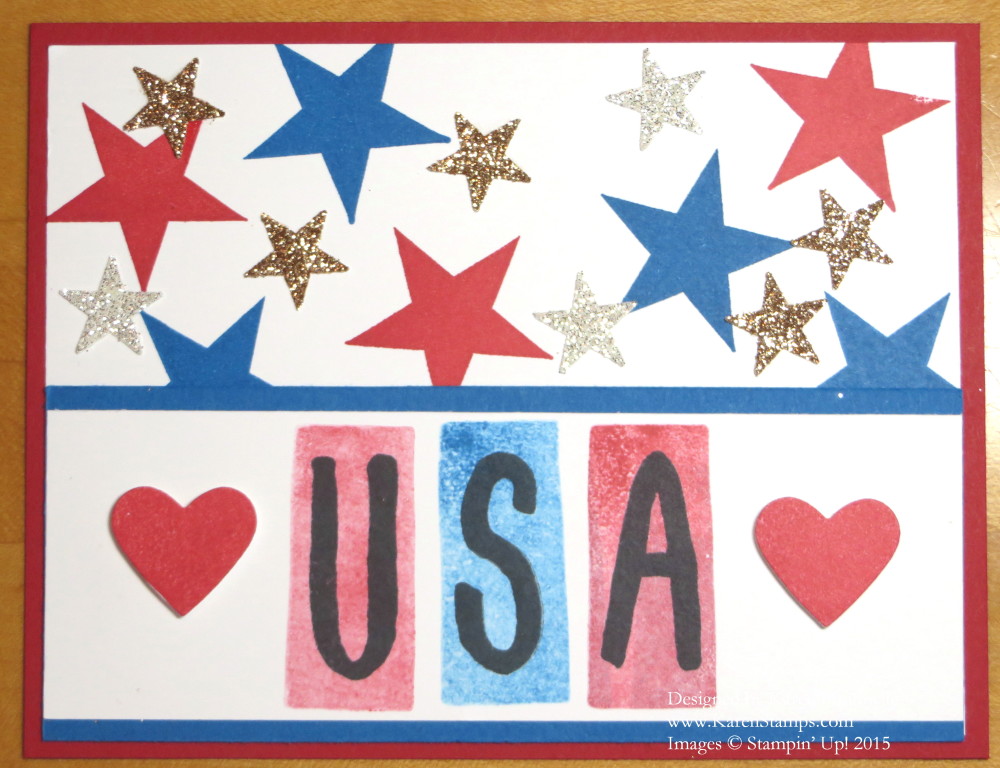
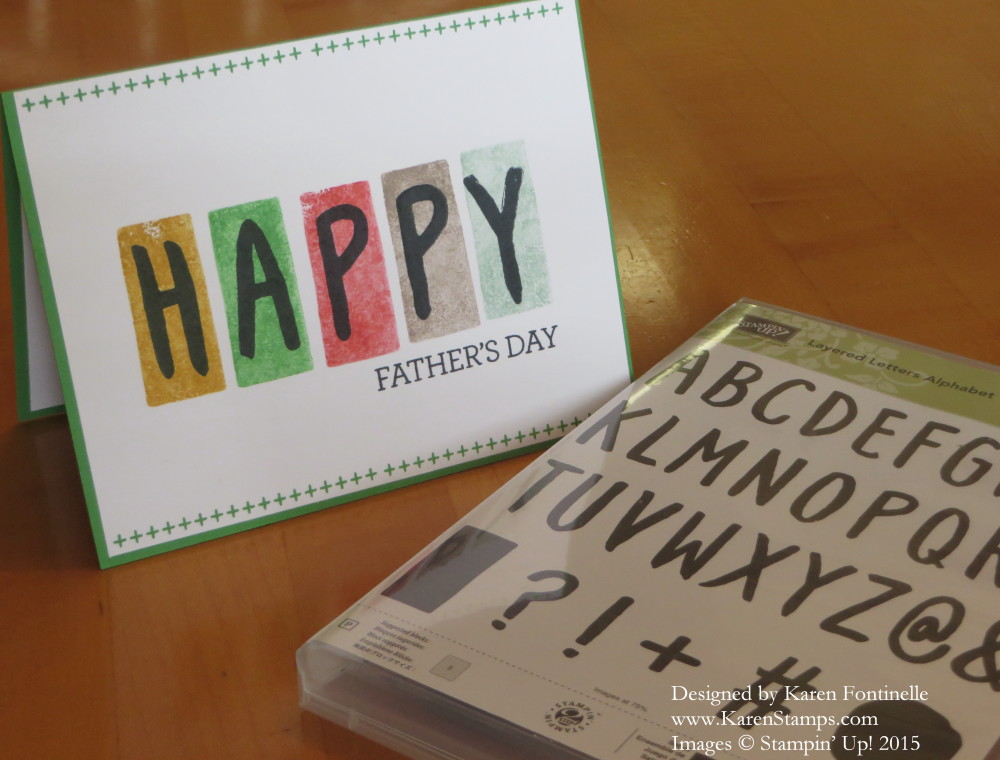
I had fun playing with the new stamp set Layered Letters Alphabet. I liked this set from the moment I saw it and I think it will be a great set to use even for cards and projects and certainly for scrapbooking. Can you have too many alphabet sets?! Probably not! One thing I like about it is the rectangle shape and the circle that you can stamp first and then put the letter inside of it! Of course you can just use the letters plain as well. I guess I just like the font. There’s something very comfortable to me about the letters.
To make this Father’s Day card, I used the new Cucumber Crush green for the card base, layered with Whisper White. I just “eyeballed” the stamping using my Grid Paper and centering the card on the grid, but you could also use the Stamp-a-Ma-Jig if you wanted to be precise. I stamped the rectangles but “stamped off” lightly one time before stamping on the card to make them lighter. Then I stamped each letter with our Tuxedo Black Memento Ink. The Father’s Day words come from the Crazy About You Stamp Set. This stamp set is a little pricey but comes with a lot of useful stamps. And if you like, there is a Bundle with some Thinlits to choose from and save 15%.
Then for just a little more somethin’-somethin’ I added the top and bottom border from the Tin of Cards Photopolymer Stamp Set. Don’t think this stamp set is only for the Tin of Cards! I have used it a lot, separately, and you will too!
So there you have it, one idea for a Father’s Day card for tomorrow!
Get your Layered Letters Alphabet Stamp Set at the Stampin’ Up! Online Store HERE!

Stampin’ Up!, as you know, has partnered with Becky Higgins and Project Life to provide us with these wonderful kits for memory-keeping! These special kits coordinate with our Stampin’ Up! colors and come with an optional accessory pack plus coordinating stamp set. When you buy the Bundle (the card collection, the accessory pack and the stamp set) you save 15%!
The Project Life by Stampin’ Up! system is easy! Just gather your photos, insert them into the pocket pages, add some of the cards to decorate or explain, write in some journaling, and you are done! Now if you like, add some stamping and add some embellishments with any of your stamping supplies or use the too cute accessory pack that coordinates with each card collection. Do as little or as much as you like.
Stampin’ Up! and Becky Higgins featured the new Moments Like These set on their blogs! Check out Becky’s post HERE.