Category Archives: Valentine

Easy to Stamp Valentine Card With Gold Vinyl Stickers

Easy to Stamp Valentine Card With Gold Vinyl Stickers

Today I thought I would make a simple, easy to stamp valentine card using the Gold Vinyl Stickers! It’s time to start making some valentines as tomorrow is the first day of February! Making valentines is something that takes us back to our childhood – the decorated shoebox or lunch sack to put on our school desks, the handmade valentines with doilies and red construction paper, the bottle of white paste!  Wow!  Does that bring back memories??! Now we can be a little more sophisticated with our wonderful Stampin’ Up! cardstock, creative stamps, and beautiful embellishments!

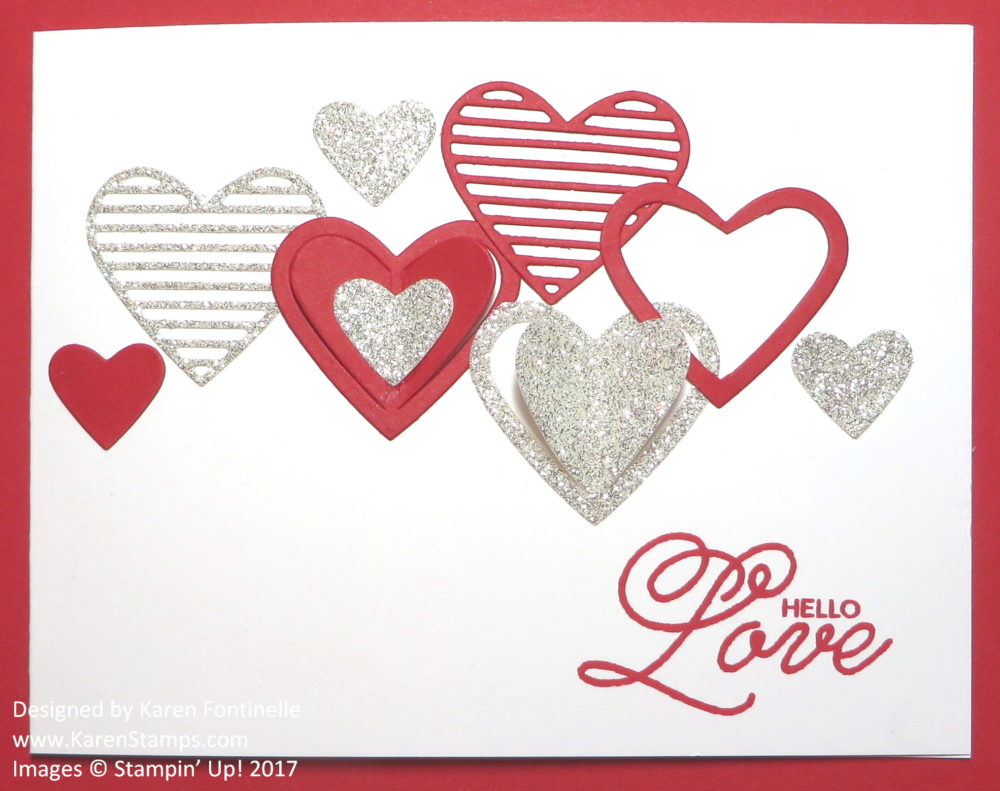
This card starts with a base of Real Red Cardstock and a layer of Whisper White Cardstock stamped in Real Red Ink!  Basic red and white for Valentine’s Day with a touch of gold! I stamped the various hearts from the Heart Happiness Photopolymer Stamp Set. Just choose whichever ones you want and stamp away!

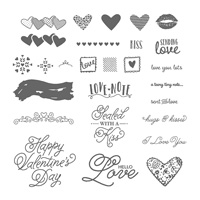
To add a little bit of pizzazz to this valentine, I used some of the Painted Love Gold Vinyl Stickers.  If you haven’t noticed these in the Occasions Catalog, it’s not your fault!  They are barely noticeable on the page. But now that you know they are there, go look on page 19 on the left edge of the page in the fold!  These are self-adhesive stickers in gold that coordinate with the stamp set Sure Do Love You.  However, they coordinate with lots of stamp sets and designs, so you can use them even without this stamp set.  The stickers are really good quality, not flimsy, and they DO stick….so make sure you know exactly where you want to put them because you aren’t likely to be able to move them once they stick on the paper! Don’t ask me how I know!

Since the stickers come on a clear sheet, you can hold the sheet over your project and see where you want to place a certain sticker and what it will look like.

How to Place Gold Vinyl Stickers

Here are the Painted Love Gold Vinyl Stickers on page 19 of the Occasions Catalog.  Be sure to check them out!  They aren’t just for Valentine’s Day either!  They will go with any pretty card or project!  You get two sheets, so you might want to order an extra package or two to have on hand!  You will want to use them!

Painted Love Gold Vinyl Stickers

If you need any of these products to stamp an easy Valentine Card with the gold vinyl stickers, please visit my Stampin’ Up! Online Store HERE!


Make a Valentine Treat Box With a Mini Pizza Box

Valentine Treat Box with a Mini Pizza Box Embellished

Here’s an easy project for Valentine’s Day or any occasion –  Make a Valentine treat box with a Mini Pizza Box from Stampin’ Up!  Use a small box to decorate with paper and embellish to put a special treat inside!

Did you know you can still purchase the Mini Pizza Boxes that were in the Stampin’ Up! Holiday Catalog?  They are on the Carryover List of products that are still available at least until the next Annual Catalog comes out.  Then we will see which products continue on in the new catalog or if they are retired. Anyway, you will still find the Mini Pizza Boxes in my Online Store! You will find all the Carryover Products listed in the Online Store under Holiday Favorites.

The Mini Pizza Boxes come flat in the package so storage is not a problem.  Then just fold on all the scored lines and assemble the pizza box. Decorate however you like for whatever occasion! For this box, I chose to use the Painted With Love Specialty Designer Series Paper.  Even though one side of each sheet has gold foil accents, today I chose to use the side without the gold foil. Just cut a square slightly smaller than the top of the lid and individual strips to adhere on the sides of the pizza box.  You can make them the same or contrasting.

For the top of the box, I chose some hearts since we are close to Valentine’s Day, but hearts can be for anything! I used the Sweet & Sassy Framelits Dies to cut out the two hearts. If you look closely at these dies, you will see there are two styles of hearts – one sweet, and one sassy, I suppose! One shapes curves inward near the bottom and the other shape just has a straight edge to the bottom point. I don’t know which shape is sweet and which shape is sassy, but you can choose! Sometimes I don’t notice these subleties so in case you are like me, I thought I would point it out. Of course you can mix and match the shapes of the hearts however you like!

I also added two kinds of doilies. One is a small gold doily in the Metallic Foil Doilies package.  The other is part of a white doily in the Delicate White Doilies package.  Always good to have embellishments like these on hand for when your project needs a little something And for some extra little embellishments, I stuck on a few of the Glitter Enamel Dots.

At the last minute I added the word “Love” in Gold Foil because I thought the top of the box still needed “something”.  How did I get the word “Love”?  From the Lovely Words Thinlit Dies!  The die cuts out a heart and the word “Lovely”, so I just trimmed off all but the “love” part!  Very easy!  I think it adds just the right thing on this box. The other two words are “hugs” and “friend”.

Do you have some Mini Pizza Boxes that you can make into a Valentine Treat Box with embellishments and designer paper or cardstock?  If not, put them on your Stampin’ Up! order!Valentine Treat Box with a Mini Pizza Box Top Closeup


Make Your Own Custom Note Cards

Custom Note Cards

Make your own easy custom note cards with the new Stampin’ Up! Narrow Note Cards & Envelopes.  We’ve always had the Whisper White Note Cards & Envelopes, but these are new in the Occasions Catalog on page 19.  They are very easy to miss at the bottom of the page! But you will find that you can do so many things with these Narrow Note Cards!

All it takes is a little bit of designer paper layered on the note card or a little bit of stamping, and you will have a quick and easy note card to enclose inside a gift or hand to someone. Moms put them in their children’s lunch box for a little encouraging note for them to find. Stick a gift card or cash inside. Having a package or two on hand will save you a trip to the store for a card or gift enclosure on short notice!  You WILL want more than one package on hand because they are fun to make once you get your supplies ready to go!  Good way to use up small scraps of cardstock or especially designer paper! Add a greeting and a few small embellishments or ribbon.

The Narrow Note Cards I made above only took minutes. I just used different patterns of the Painted with Love Specialty Designer Series PaperThis paper is so beautiful and artistic with its gold foil accents!

The top note card has a stamped greeting from the Labels to Love Stamp Set  punched out with a Circle Punch and layered on a piece of the Iridescent piece of paper in the Myths & Magic Glimmer Paper. I layered the circle pieces over a strip of Rich Razzleberry and added two light colored Glitter Enamel Dots.  Even though the greeting says “Love”, you wouldn’t have to only use it for a valentine, but if you wanted to, it could easily be for Valentine’s Day!

The bottom note card has another pattern of the Painted with Love Paper (love the little hearts!) and decorated with die cut hearts from the Sweet & Sassy Framelits Dies.  I also tied a little bit of Gold 1/8″ Ribbon around it, tying the bow first!

Get yourself a couple packages of these new Narrow Note Cards & Envelopes on your next order and then sit down and play with a package of designer paper and a few embellishments at hand.  After you make one or two you won’t want to stop!  By the way, they come with the cutest envelopes! Check out these birthday note cards I made recently HERE.  You will love making your own custom note cards!


Heart Happiness Thinking of You Card

Heart Happiness Thinking of You Card

You will find the Heart Happiness Stamp Set in the new Stampin’ Up! Occasions Catalog, and what a fun stamp set to make a valentine or any occasion card like this Heart Happiness Thinking of You card!

At this time of year, with Valentine’s Day coming up soon, you might think this stamp set is great for Valentine’s Day……and it is!  But as you can see, hearts are wonderful for lots of occasions so this stamp set can be used year-round!  I could have chosen a birthday greeting or congratulations or other fun greetings to put on this card.

I use my Big Shot most days when I am stamping, but sometimes it feels good to “just stamp” on your card, like this one! Honestly I didn’t really know what I was going to make for this card, just got out the stamp set and started with this particular heart stamp. I thought I would make a line of these hearts across the middle of the card but this is what evolved!

And sometimes when you stamp, you just love the look of a particular stamp. That’s how I felt about this heart stamp when I used it. That IS the way it is supposed to stamp – not completely solid all the way across – it’s the trendy watercolor look.  I really like it.  And I really liked choosing several colors of ink pads from the Brights Family and rather randomly stamping on the Whisper White card layer.  It seemed to maybe need a bit more, so I added the tiny hearts that are also in the stamp set to fill in the empty space.  I looked for a greeting that was a decent size to stand out, and I found this one in the Window Shopping Stamp Set.

I think you could make your own beautiful designer paper pattern by stamping these large and small hearts on a larger piece of paper, even 12″ x 12″ of Whisper White and then cutting it down for cards or using for a scrapbook page or whatever project.

If you would like this Heart Happiness Stamp Set, you will find it in the Occasions Catalog HERE.  The greeting is from the Window Shopping Stamp Set.

If you would like a copy of the Stampin’ Up! Catalog and/or the Occasions Catalog plus ME for your Demonstrator, I would be happy to mail you the catalogs if you are interested in Stampin’ Up! products!  Keep in mind that through March 31 is Sale-A-Bration, the Stampin’ Up! promotion that gives you a FREE Sale-A-Bration product for every $50 you spend!  Who doesn’t love free stuff?!  Just email me at Karen@KarenStamps.com with your contact information and any questions you have or anything you are particularly interested in. I would love to help you.

SHOP STAMPIN’ UP! ONLINE HERE!


Painted With Love All-Occasion Card

Painted With Love All-Occasion CardMy big order from the new Occasions Catalog came late last night so I finally have a multitude of new Stampin’ Up! products to play with!  This new Painted With Love Specialty Designer Series Paper is so beautiful in person and will make all kinds of fantastic cards and other projects. This Painted With Love All-Occasion Card can serve as a card for almost any occasion or a Valentine or birthday or anniversary or whatever you like.

The Heart Happiness Photopolymer Stamp Set is one that we will be able to use in many ways with all the hearts! I decided to stamp this flowery heart in Melon Mambo, one of the coordinating colors with the designer paper.  I die cut the flowery heart with one of the sizes in the Sweet & Sassy Framelits Dies and then cut a larger heart out of Gold Foil.

The card base is Melon Mambo and then the striped pattern is layered on the other pattern with a thin Gold Foil strip in between.  The heart is popped up on Stampin’ Dimensionals.

I could have added a greeting or more embellishment, but I just kind of liked it “plain and simple” like this. Now I can use the card for whatever I choose when I need it or still leave it plain and write my own message on the inside. It’s a good idea when you make a card similar to this Painted With Love All-Occasion Card to just leave it plain without a greeting, and then when you need a card, just stamp a greeting and add to the card.

Painted With Love DSP

SHOP STAMPIN’ UP! ONLINE!

Make a Valentine Card with a Die-cut Glimmer Paper Heart

Make a Valentine Card with a Die-cut Glimmer Paper Heart

Want to make a Valentine card with a die-cut glimmer paper heart? This card is a beautiful example of how to make a glittery valentine card pretty easily. And not only are hearts for Valentine’s Day, but this same card could be for a wedding or engagement or simply a nice card to send to someone special.

I was that someone special who received this card for Valentine’s Day from my dear friend – my friend I met on the first day of junior high in Mrs. Gordon’s math class in 7th grade/my college roommate/my Stampin’ Up! upline. It’s special to have a friend who has been with you through so many facets of your life.  From the minute she introduced me to Stampin’ Up! I became fascinated with stamping and making cards and especially all the creativity.

The photo doesn’t do this card justice, if you could see the sparkle in person you would really be impressed! It’s difficult to photograph glitter and glimmer!  The card base is Crumb Cake with a piece of designer paper for a layer behind the heart.  The heart is die-cut with the Big Shot and the Bloomin’ Heart Thinlit Die out of the Blushing Bride Glimmer Paper. So that the designer paper in the background doesn’t show through, she put a Whisper White die cut heart, made with the Sweet & Sassy Framelits Dies behind the glimmer heart.  The little pink die cut flowers are touched up with the Clear Wink of Stella Glitter Brush to give them some shine as well. And to top them off, my friend added a Rhinestone Jewel on each flower. For a final touch she stamped and cut a banner for a greeting out of Shimmery White card stock.

I hope you can see how this same design can be used as other types of cards, specifically a wedding or an engagement card, besides the beautiful Valentine card it is! Even using the Bloomin’ Heart Thinlit Die to make a heart out of any pretty paper will produce a beautiful card, but making a Valentine card with a heart die-cut from pretty glimmer paper really steps it up.

You can get any of these supplies at my Stampin’ Up! Online store.

Shop Stampin’ Up! Online 24/7!


Quick and Easy Last Minute Punched Hearts Valentine Card

Quick and Easy Last Minute Punched Hearts Valentine Card

As I write this blog post on Valentine’s Day, we are having a very stormy morning here in Houston! There are tornado watches and warnings out and I have my hall bathroom ready for shelter if necessary, but I hope not! Under the circumstances and because if you are looking for Valentine ideas today, you need something quick and easy at the last minute! So here is my Quick and Easy Last Minute Punched Hearts Valentine Card!

To make this card, I simply made a card base of Whisper White and stamped the Valentine greeting from the Sealed with Love Photopolymer Stamp Set. Then for quick and easy hearts, I grabbed the cute Sweetheart Punch and punched out several hearts from the Sending Love Designer Series Paper Stack.  The only hard part of this card was trying to decide which way to lay out the hearts!

I always say just keep playing when you are designing a card.  If you don’t feel you’ve got it right, just keep moving, adding, taking away, starting over.  You will know when you get it!  I first started laying these hearts out across the top of the card, more or less, but it just wasn’t right. Then I decided to concentrate a little more on the empty left side of the card and that seemed to work better.  Then I wanted to pop up a couple of hearts on Stampin’ Dimensionals.  Now I could add some Rhinestone Jewels or Enamel Shapes or some other glitz, but since I was going for a super simple quick and easy Valentine card, I wanted to just stop before I went past that! Sometimes you have to know when to stop when you are doing crafty things!

If you need additional ideas, just put Valentine in the search box on the right side of my blog and some past posts will come up!

And now I think I will concentrate a little more on the weather reports! Once the storm passes, we should have a nice day! Right now it is just thundering a little, not even raining, but it is coming.

If you don’t get roses and chocolates for Valentine’s Day today, you might want to treat yourself to a Stampin’ Up! order!  But I hope your loved one(s) make your day a very happy one!

Happy Valentine’s Day!


Last Minute Class Valentines For Kids

Foxy Friends Kitty Valentine

In case you are in need of some last minute class valentine ideas for your kids, here are some ideas I came up with. For several years now, two moms have asked me to come up with ideas for class valentines for their three kids and then we all get together and make all 75 of them for 3 classes! This year they were headed to a scrapbook retreat so I just came up with the ideas and gave them the materials and they made the valentines at the retreat the first night!

This year I decided on just 3″ x 3″ cards that were the card fronts only!  No folding required to save them time!  Just like the little valentines that you buy at the store and the kids sign on the back! I knew Elsie liked cats, so I came up with this kitty that can be made with the cute Foxy Friends Stamp Set.  This stamp set has SO many possibilities with all the animals you can make with so many stamps in the set. The kitty just fit in this Circle Punch and layered on a Scalloped Circle. Some of the punches and paper on this card are retired. You can adjust for what you own.

Foxy Friends Valentine

Here’s another class valentine designed for Carl using the Foxy Friends Stamp Set. This one has a fox instead of a kitty, and I printed out the greeting on my computer and printed it out on Whisper White cardstock.

There is also a coordinating punch, the Fox Builder Punchthat goes with this stamp set. If these moms had wanted to, they could have stamped and punched out the animals or maybe just part, like the head or tail.  However, this is something to consider when you are making multiples of something, like 25 valentines! You want to keep it as simple as possible! So just stamping worked out just fine!

You're A Hit Baseball Valentine

And for Wyatt, a baseball player, a baseball valentine card was perfect for him.  I dug out an old sports stamp set for the bat and a retired set with these cute stars. The baseball is a punched circle, sponged a little and the stitched lines are stamped with a set that came in a Paper Pumpkin Kit!  Again, I printed out the greeting on the computer and printed on Whisper White cardstock and punched out with a circle punch.

These class valentines really show that you don’t have to have official “valentine” stamp sets or paper to make valentines! Just look through your stash and see what you have and use that!

You can see the valentines we made last year if you need more ideas in this post HERE.  Again, nothing that would be labeled as a valentine stamp set! Just think of your child’s interests of things they like and go from there!

If you are helping your child make some valentines for their class, enjoy!  These years pass by much too fast!

For your own valentine pleasure, shop at Stampin’ Up! Online (after you get those valentines made!)


Easy Valentine Treats to Give

Easy Valentine Treats to Give

If you are looking for easy Valentine treats to make to give to people, here are a couple of ideas! Candy, of course, is always a good idea for friends or family or maybe your office co-workers or the staff at your doctor’s office or whatever places you go to regularly.

The candy treat on the left is very simple, just a strip of paper, really, wrapped around a Ghirardelli chocolate, Aren’t these some of the best chocolates for using for a special treat?! I just cut a strip of Melon Mambo cardstock 7 1/4″ x 2 3/4″ and scored it at 3″, 3 1/4″ and 6 1/4″. Fold all the score lines with a good crease with the Bone Folder.  The little 1/4″ space gives just a little room for the chocolate square. You probably want to adhere the chocolate lightly to the paper with a Glue Dot or bit of Snail Adhesive just to hold that candy inside. Then fold the paper strip around the candy on the scored lines and fold the flap over the top.

Now that you have the basic instructions, you could decorate or embellish this ANY way you like! I punched two small holes in the top and tied with a 12″ piece of ribbon.  On this one I used the Silver 1/8″ RibbonSince I already had the Silver Glimmer Paper hearts die cut from the Love Notes Framelits Dies I just used those.  You could punch hearts with any heart punch you had or die cuts or add a Whisper White layer to the front and stamp some pretty hearts. For a little greeting I just pulled out my old standby, Teeny Tiny Wishes. Still love that stamp set! Just stamp on a small scrap of paper, curve it a little with the Bone Folder and adhere to the front with a couple Glue Dots.  The possibilities are endless with this project!

And the candies to the right in the photo above are always my favorites for special occasions. Simply take a 1″ x 3″ piece of designer paper (preferably) or cardstock and adhere the ends on the back around a chocolate nugget candy. You could even tie a little ribbon around some of them.  Put them in a small cello bag or small box or whatever you have.  SO easy!  I love this idea!  On these candies I used scraps of the Sending Love Designer Series Paper Stack.  This paper won’t be just for Valentine’s Day, there are plenty of generic patterns that you can use for many projects and cards.

If you are looking for some quick and easy Valentine treats to give, try these ideas and make them as creative as you like!

Paper Pumpkin January 2017 Valentine Treat Bags

Paper Pumpkin January 2017 Valentine Treat Bags

I finally got around to making my Paper Pumpkin January 2017 Kit which was Valentine Treat Bags.  I was waiting to see if I would actually make the treat bags or if I would make some alternative ideas, like valentine cards. Of course these wouldn’t have to be just for Valentine’s Day. I saw online where someone used these for party favors for a wedding.

What is Paper Pumpkin?  It’s a crafting kit from Stampin’ Up! that comes in your mailbox once a month with a surprise project inside.  Might be cards, might be a treat bag, might be an album, might be a decor item – you never know!  I’ve heard some people don’t like surprises, but why not live dangerously??  It’s only stamps, ink and paper!  And you do get an exclusive photopolymer stamp set inside every kit plus a small ink spot and all the supplies plus directions for making your kit.  And every month there is a video from Stampin’ Up! to watch as well if you want a little more direction. (It does help!)  You can follow the directions exactly or come up with your own project.  There are no Paper Pumpkin Police checking if you made the project they sent!  Surely you deserve a few minutes of crafting time for yourself!

I actually made my treat bags a little differently than the directions.  I’d read that the top flap was difficult to fold over and keep closed because of the layers of paper and because of the arrow that was supposed to be in the fold. Since I was short on time (of course!) I just cut off that plain foldover part of the bag and stapled the top of the bag shut.  Just be sure to put your treat inside first!  I put 3 pieces of chocolate candy inside.  Maybe you could put one more, depending on your candy.  Of course it wouldn’t have to be just for candy – a small gift or gift card would be very nice inside as well! I didn’t make the arrows and I didn’t put the gold fine thread bunched up behind the stamped heart.  I needed the quick and easy version!  I’ll save the other supplies for another time.  Even glue dots and dimensionals were included in this kit!

Join Paper Pumpkin HERE today or tomorrow and receive the February Kit around the middle of the month.  The 10th of the month is the magic date to sign up to get that month’s kit, or if you are already a subscriber, to skip a month or cancel your subscription.  Otherwise, your choice will go to the next month. There is no obligation, so sign up and try Paper Pumpkin!

If you are putting in a Stampin’ Up! order, you can purchase a subscription to add to your order and possibly earn a free Sale-A-Bration item or maybe reach Hostess benefits. Just click HERE to see the choices in the Stampin’ Up! Online Store.

JOIN PAPER PUMPKIN TODAY!

Easy Valentines to Make with Sending Love Paper Stack

Easy Valentines to Make with Sending Love Paper Stack

Time is getting short, so you might want ideas for quick valentines such as these easy valentines to make with the Sending Love Paper Stack.  These valentines are quick to make because I just used a 4″ x 4″ Whisper White card base (4″ x 8″ folded in half) and added a pattern from the Sending Love Designer Series Paper Stack, each piece cut 3 7/8″ x 3 7/8″.

The greeting is stamped in Real Red Ink with a stamp in the Sealed With Love Stamp Set. If you don’t own this stamp set, you probably have another “Happy Valentine’s Day” stamp somewhere in your stash or something you can use. On three of these greetings I used the Stitched Shapes Framelits Dies which I love! And then on two of them I added a layer behind the Stitched Shape. The other one, the circle on the top card, I left plain. The die cut heart is made with the Sweet & Sassy Framelits Dies with a larger heart layer out of Silver Glimmer Paper underneath. On the other card, the squares are made with the Layering Squares Framelits Dies.

If you need to make a bunch of valentines, it’s easiest to pick one design and make it assembly-line fashion. Assembly-line fashion means you cut all the card bases – then you score all the card bases – then you fold all the card-bases-then you cut all the paper layers then you stamp all the greetings- and so on. Do not make one whole card and then start on the second one, if they are all the same design.  It’s almost like you get muscle-memory when you are cutting or stamping or folding and it goes really quickly.

For a little extra embellishments, on the heart card I added three little Rhinestone Jewels just for a little extra pop.  On the square, I tied a little bow with the new Sending Love Ribbon Combo Pack in the Occasions Catalog and stuck on the top of the greeting with a Glue Dot.

If you set up your little stamping station, you can make a bunch of valentines similar to these easy valentines pretty quickly. Don’t just rush though, enjoy the moment! Enjoy doing your stamping!

If you need any of these supplies, please visit Stampin’ Up! Online. Let me know if you have any questions!  And don’t forget about Sale-A-Bration!  Spend $50 and get a free Sale-A-Bration product!

Stamp An Easy Valentine Card with Sealed With Love

Easy Stamped Valentine Card

If you haven’t started already, it’s time to get busy making valentines. Valentine’s Day is a week away so you might want to make some easy valentines with the Sealed With Love Stamp Set like this valentine. Essentially I made my own designer paper by stamped two different hearts all over the Whisper White layer on my card. The hearts are from the Sealed With Love Photopolymer Stamp Set in the Occasions Catalog. This set has a great selection of stamps from which to choose, and its use doesn’t have to stop at Valentine’s Day.

When you stamp like this, start with your largest image and stamp randomly on the paper. Years ago I heard a tip to stamp kind of in a triangle. I don’t know that I always follow that, but you can try it. In the end, although the stamping will be random, you want to try to have it look somewhat balanced.  You will know if it looks right or not! After you have stamped the large image, then go to the smaller ones. This makes it easiest to fill in the empty space.

This monochromatic card was easy to make because I just used a Real Red card base and stamped with Real Red ink. You could also do an assortment of colors and have it be very pretty as well.

For the greeting, I chose the one in the photo above from the Sealed With Love Stamp Set, stamped it on Whisper White and then die cut with the Stitched Shapes Framelits Dies. They are available again after being so popular when they were first released! And for a layer underneath the greeting I chose the proper Layering Ovals Framelits Dies to put a scalloped layer underneath.

And a little ribbon was in order, so I chose the Real Red 3/8″ Stitched Satin Ribbon.  There is a narrow red ribbon in the Occasions Catalog but it didn’t show up as well with this background so I chose the wider ribbon.

How simple is this valentine?  Go stamp a few in whatever colors or combinations you like and choose your own greeting! Valentine’s Day is February 14th as you know!  Make some valentines and send them to your friends and loved ones!

Shop Stampin’ Up!

Valentine Sending Love Small Treat Bag

Valentine Sending Love Small Treat BagIf you are looking for ideas for Valentine treats, this Valentine Sending Love Small Treat Bag might be the perfect idea for you! It is the perfect size for just a few treats and easy to make! You can use cardstock or designer paper and make this treat bag for any occasion.  Decorate it however you like with die cuts or greetings or just leave plain if you use cute paper.

Start with a piece of paper 4″ x 6″. The Sending Love Designer Series Paper Stack is 6″ x 6″ so it is perfect to just cut off 2″ and you are ready to go! It’s easiest if the paper doesn’t have a pattern that must go a certain way, but if it does, just be careful to have the pattern running the correct way.

Treat Box diagram

This is the inside of what will be my treat bag but I drew on the score lines so you could see.  The “x” marks the area that you will cut off entirely.  You can see how the score line going across lengthwise indicates where the bottom of the bag will be, so watch your pattern.

Place the paper lengthwise on the Simply Scored board and score at 1″ (portrait). The bottom of the bag should be along the left side of the board.  Then turn the paper and score at 1″, 2 3/4″, 3 3/4″ and 5 1/2″. (Obviously if you have the paper turned the wrong way you wouldn’t be able to score at 5 1/2″ if the paper is only 4″ wide.) After scoring, cut up on all those bottom score lines up to that 1″ score line. Then cut off the little area marked with an X on my diagram. Fold and crease all the score lines.  I like to use a Bone Folder to get a good crease!

Treat Bag Folded

After the bag is creased, add some adhesive to the narrow flap on one side.  I like to use Tear & Tape because I’m sure it will hold the bag closed. You can see it in the photo above. If you just fold the other side of the box over it is easier to adhere flat than to have the box 3D. Just match up the top of the bag so the edges are even.Treat Bag open box

When the box is all assembled, this is what it looks like.  You could leave it like this! But if you want the top closed, be sure to put your treat inside and then punch a hole or two holes in the top and add a ribbon or bow. Just push in on the sides in order to pull the top edges together. When you have the treat bag assembled, add on whatever you like to decorate.

Just think, if you use birthday paper or the colors of your themed party, then you have something for another occasion!  Once you make some of these, you would probably be able to design your own treat bag according to whatever size you want.  Just draw a little sketch showing how wide and how tall you want the front and back and then how wide you want the sides. You could use this same idea and make a smaller or larger bag or box.

No matter what, this little Valentine Sending Love Small Treat Bag is easy to make and fun to give!

Shop Stampin’ Up! Online for all the best in stamping in papercrafting supplies!


A Valentine Mini Treat Bag With Glassine Sheet

A Valentine Mini Treat Bag For a Valentine Treat

Time to make those valentines, and here is a Valentine Mini Treat Bag made with the Sending Love Glassine Sheets.  You can see on the photo that the glassine sheets have a small pattern on them! I used the Mini Treat Bag Thinlits Dies to make the treat bag. I absolutely love that die, but it was a little difficult to use on the slippery glassine sheets.  However, I also need to use new cutting pads with my Big Shot so that made for a difficult situation. But I did it, and assembled the bag and inserted a card.

The card is stamped with stamps from the Sealed with Love Photopolymer Stamp Set.  So many stamps to choose from in that set! And you’ll be able to use them long past Valentine’s Day.

To decorate the Mini Treat Bag, I added a Red Glimmer Paper banner, stapled at the top with the Stampin’ Up! Handheld Stapler.  Stampin’ Up! is going to stop carrying this stapler when the inventory is depleted, which is a shame since I love mine. It is just a nice size.  If you need this stapler, don’t delay, order it while you still can!  The hearts are die cuts from the Love Notes Framelits Dies. I cut extras the other day so I was all set to add some hearts to decorate my bag!

A Valentine Mini Treat Bag

If you don’t have the Mini Treat Bag Thinlits Dies to make this project, you still use the ideas on a regular card with a banner and hearts or stamping like the inside of the card! Once you start stamping, the ideas will flow!

Have fun making some Valentines! Doesn’t it always take us back to our childhood?!

Shop Stampin’ Up! Online for your Valentine-making supplies!

Die Cut Hearts Easy Valentine Card

Die Cut Hearts Easy Valentine Card

In playing with my new Love Notes Framelits Dies, I decided to cut a lot of hearts and make a die cut hearts easy Valentine card.  I just chose some Real Red card stock and Silver Glimmer Paper for the hearts. Then I just played with arranging the hearts until I came up with a pleasing layout.  You can see that one of the dies makes the hearts pop up on a center fold! On one of the them I snipped the inside heart off so that I had just the thin outline heart. The card base is just Whisper White Thick Cardstock although I have it laying on a piece of red cardstock for the photo. But as you can see, it would be a pretty card with a Real Red card base and a Whisper White layer with the hearts adhered. In fact, you could use pink or many colors of hearts! Makes me want to play some more with this same idea!

The greeting is a stamp in the Sealed with Love Photopolymer Stamp Set.  There are so many great stamps in this set and they don’t all have to only be used on Valentine’s Day. We can use hearts in lots of ways for lots of occasions. And along with the Love Notes Framelits Dies, you will really be in business!  One of the dies even makes cute little bitty envelopes! If you would like to save 10%, just purchase the Sealed with Love Bundle to get the stamp set and framelits!

Valentine’s Day is coming, but you do still have time to order Stampin’ Up! supplies to make your cards and projects! And remember, you can use them for more than Valentine’s Day!  You will be making wedding cards, baby cards, birthday cards, love notes, all-occasion cards!

Shop Stampin’ Up! Online HERE!

Do you need the current catalogs and Sale-A-Bration Brochure? If you are interested in Stampin’ Up! products, email me at Karen@KarenStamps.com and I’d be happy to mail you complimentary catalogs! More fun than looking at them online, I say!