I’ve had this stamp set for a while now but finally made a card with it, the Planted Paradise Just For You Card. I got this stamp set FREE when I “attended” a virtual Stampin’ Up! Event for Demonstrators called OnStage@Home. It’s been a while since that event so I’ve finally tried it! It might not have been a stamp set that I would order from the Spring Mini Catalog on page 47, but as it turned out, I really enjoyed playing with it and making this card!
This Planted Paradise stamp set would be perfect for a plant lover! It is a stamp set with SO many different leaves, foliage, and pots. It’s one of those stamp sets that you can just play with and see what you come up with!
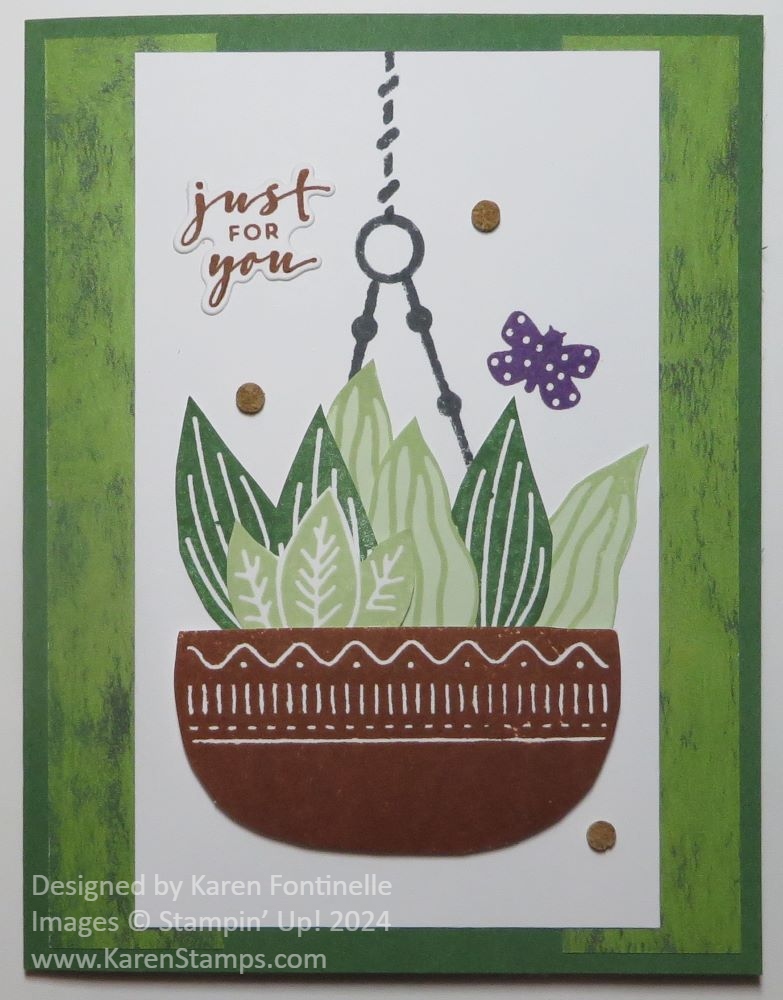
For this card, my first card, I used a sample card in the Spring Mini as my inspiration. It doesn’t match exactly but the focal point is similar to the hanging potted plants. The card base is Garden Green cardstock. The designer paper on each side is the “backside” of one of the very scenic papers in the Meandering Meadows 6″ x 6″ Designer Series Paper. I just looked at some of the designer papers I have for one with a green background. At this point, I wasn’t even sure what card design I was going to make. I had a 2″ wide strip of this green background paper, but got the idea to put it on each side of the card so I cut it in half at 1″ x 5 1/4″ Then I adhered each strip to each side of the card front.
For the center, I used Basic White cardstock. When I was all finished with it, I noticed it was cut shorter than I intended! It was supposed to be the same length as the green strips on the sides! What to do? Maybe add a layer underneath? Well, when I placed it centered on the card, even though it was shorter than I planned, I thought it looked fine! A little different! Maybe a little modern! So I kept it that way and used it the length it was cut!
The large pot is stamped with Cajun Craze ink and cut out by hand with Paper Snips. The leaves were stamped in Garden Green ink and others in Soft Sea Foam ink. Some were stamped on Soft Sea Foam cardstock with Soft Sea Foam ink. I cut these out by hand, even some extras so I could play around with them in the pot. I wanted a variety of leaves. I popped up the pot with Stampin’ Dimensionals but I only placed them at the bottom of the pot so I had room to stick in the leaves at the top wherever I wanted them. Then I could add more Dimensionals under the top after the leaves were in place.
Before adhering the plants and pot, I stamped the chain holding the pot. I didn’t have to be really precise because I knew the plants and pot were going to cover the “chain”.
For some finishing touches, I stamped a butterfly in the stamp set in Gorgeous Grape ink and a greeting in Cajun Craze. The greeting is in the Charming Sentiments Stamp Set. Then I remembered that the stamp set had dies so I cut out the greeting with the appropriate Sentiment Silhouettes Die. I also decided to use the new little Adhesive-Backed Cork Rounds on the card front. Not sure I like them on this card but they seemed like something that would go with plants. I like sparkle better I think!
Although I wasn’t all that thrilled with this stamp set, when I looked back at this card the next day I found that I liked it a lot! I think the Gorgeous Grape butterfly really adds a pop of interest. You could even make the leafy plants look more 3D by folding them lengthwise a little bit or curling the tips a little bit or stamping the butterfly and cutting it out with the wings bent a little bit.
I’m ready to make some more cards with this Planted Paradise Stamp Set! Check it out in the January-April 2024 Mini Catalog!