Tag Archives: Friend card

Subtles Painted Patterns Friend Card

Subtles Painted Patterns Friend Card

This Subtles Painted Patterns Friend Card is a very easy card to make! Yesterday in my stamping newsletter, I showed a card that I planned on illustrating how you could make a quick & easy card using one of the ephemera packs at Stampin’ Up! Well, the card I made would be easy for anyone to copy, but it was one of those cards that I could not get the design to come together to my satisfaction! Many cards can be like that, but since I was trying to make a super-simple card, I was easily frustrated not getting it right in my eye!

However, THIS card came out how I expected that card for my newsletter to come out! For this card, I just chose the designer paper, the color cardstock for the card base, adhered pieces of paper and slapped on an ephemera greeting! Done! And it still looks cute!

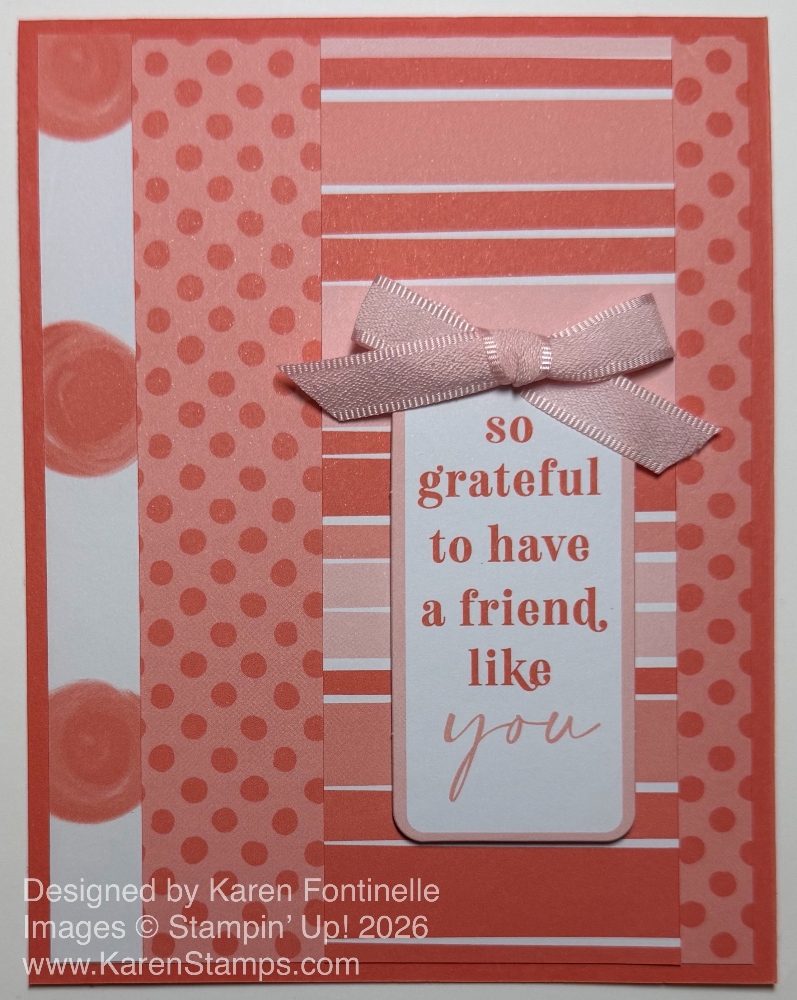
Every year Stampin’ Up! has a 6″ x 6″ pack of designer paper with all the colors in each color family. With this catalog, those packs are all 12″ x 12″, and I love the patterns they chose! I’d like to have all the colors, but I only bought the Subtles. It’s the Subtles Painted Patterns Designer Series Paper. I really like these patterns of polka dots, little dots, lines, stripes all in a watercolored look.

For this card, I chose this pattern of Calypso Coral small dots and therefore, a Calypso Coral card base. I chose this greeting in the Sincerely Noted Ephemera Pack in the new May-August Stampin’ Up! Catalog. You get lots of different greetings in many different shapes in muted colors so you can use them in lots of ways. It is so great if you are making a card, especially a quick & easy one, if you can just grab an appropriate greeting in an ephemera pack and finish off your card with it.

After I had the dotted designer paper adhered to the card front, I pulled out the paper with the wide and narrow stripes, thinking I would put it on the left side. But on impulse, I placed it on the right side of the card and liked it. This strip is 2″ x 5 1/4″. You can choose your own measurement. Since I loved the big polka dots also, I wondered if I could use a strip of that on the card, too. I meant to adhere is a little off the left edge of the card, but forgot, and glued it in it’s “normal” place, along the left edge of the card, which was fine. I really like the three different patterns of paper on this card, and yet it was so quick and easy to do. The polka dot strip is only about 1/2″ wide.

The ephemera greeting is a lovely sentiment and is popped up on Stampin’ Dimensionals. I also added a bow, which happens to be the new Barely Blush 3/8″ Bordered Ribbon. I think it really looks good on this card with the other colors, even though it is not officially a coordinating color. I think you could easily add some iridescent gems, something clear but sparkly, to add a little bling to the card, but it isn’t necessary.

You could make several cards in this design with either the same pack of designer series paper and different patterns, or use different DSPs, then just add an ephemera greeting or quickly stamp your own, and in not much time, you’ll have a good stack of cards to keep on hand for when you need one!

SHOP STAMPIN’ UP! ONLINE HERE!

Full of Life Friend Card

Full of Life Friend Card

I almost forgot I had this paper so I thought it was time to use it and make this Full of Life Friend Card. It’s just a colorful, easy card with the very cool diecut word “friend” for the greeting on the front. You can do so many creative things with all the paper patterns in this pack. In case you haven’t used yours in awhile either, it’s the Full of Life 6″ x 6″ Designer Series Paper. It is part of the Full of Life Suite Collection and comes with a stamp set, dies, ribbon, and gems. Besides all the colors, the patterns may be squares, circles, color wheels, and brushstrokes. Lots of choices for cardmaking or scrapbooking!

This card starts with a card base of Boho Blue, although there are so many colors you could choose from, just from this patterned paper alone! The designer paper is cut at 3 1/2″ x 4 3/4″ because I wanted to have some margins around the edge. The layer underneath is “the other side” of this circles paper which is also pretty so I wanted that to show a little bit of it. It is cut at the usual size of 4″ x 5 1/4″. If you wanted to add one more layer, you could put another color, even with a very narrow margin, under the circles paper, maybe even black.

With the Friends For Life Dies, I cut out the word “friend”. One die cuts out the narrow image of the word, as you see on top in Melon Mambo, and the other die cuts out the little wider and more solid image that can go underneath as sort of a shadow or just a layer. I tried it with black and with white, and I liked the Basic White background better. Much to my surprise I placed the diecut word at a slight angle, on purpose, and I thought it looked fun! I liked it, even though I intended to adhere it straight across.

For a little sparkle, I couldn’t resist adding some Shiny Sequins in various colors! I guess those are retired now but I still had them in my stash. You can use whatever you have if you want that extra embellishment.

If you think of it, it would be a good idea to use Adhesive Sheets on the back of the cardstock before cutting out at least the narrow diecut “friend” so that you end up with a sticker with adhesive on the back rather than having to put very tiny dots of Multipurpose Liquid Glue on the back! I never think of it until I go to adhere it to the card, of course!

Look through your designer papers! You just might find one you haven’t used in awhile and fall in love with it again!

SHOP STAMPIN’ UP! ONLINE HERE!

Full of Life Friend Card

Full of Life Friend Card

If you love bright and pretty colors you will love the paper I made this Full of Life Friend Card with! This designer paper has watercolor designs colored by in-house Stampin’ Up! artists. I’d love to see the behind-the-scenes of how they created all the designs. One of my friends would call this a “happy” card because of its colors and design. How could anyone not feel happy to receive this card?!

This colorful paper is the Full of Life 6″ x 6″ Design Series Paper. Besides the colorful graphic designs on one side of the papers, the other sides don’t have designs but still have beautiful colors in a plainer style. You can use those for backgrounds. But if you want something bold, use the squares, circles, and color wheels for your project.

This card base is Melon Mambo, but as you can imagine I could have chosen from any number of colors. I love this pattern on the designer paper. It makes a great layer on this card.

I was trying to keep the card simple but I wanted to use the cut-out word “friend” on the front of the card. It is diecut from Melon Mambo cardstock using the Friends For Life Dies. If you would like the stamp set and the dies, you can purchase the Friends For Life Bundle. If you can wait until June 5th, you can save an extra 10% on all Bundles (which are already discounted 10%) and even 10% off the Cut & Emboss Machine. This will be the special at Stampin’ Up! from June 5 – 30.

Before cutting out the word “friend” I added Adhesive Sheets to the cardstock. After the word is diecut, then it is like a sticker and you don’t have to try to put glue on the back of the skinny word! The trick is to remember to use the Adhesive Sheets before you do the diecutting! I usually don’t think of it! But it’s very handy to do!

I diecut a Basic White piece with the Everyday Details Dies so the word would show up better against the background. I also added a rectangle of Melon Mambo cardstock underneath the diecut piece. I just cut it with my Paper Trimmer. I like how it shows through the holes around the border of the Basic White diecut to make it more colorful. In the die set were two different sizes of small hearts so I cut those out also to use up more of the Adhesive Sheet space. Instead of putting a dot over the i in “friend” I put one of the hearts instead.

To make the colorful card even more festive, I thought, I added several (more than 3) Iridescent Adhesive-Backed Discs in various colors. I love these because they are shiny but flat so they aren’t a problem when you mail the card.

Check out the Full of Life Designer Paper in the new Stampin’ Up! Annual Catalog on page 43 in the Suites section. It’s really something different and I love the colors!

SHOP STAMPIN’ UP! ONLINE HERE!