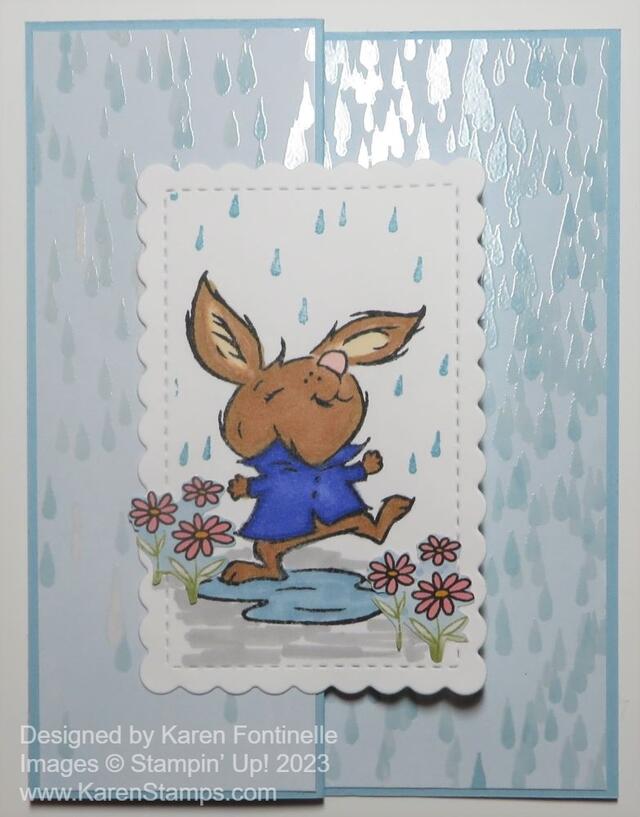
Everything in the Rain Or Shine Suite in the Spring Mini Catalog is so cute that you can’t make just one card! I’ve used this stamp set, dies, and designer paper to make quite a few cards but it’s always fun to make another one, like this Playing in the Rain Z-Fold Card.
I decided to make a Z-Fold card with the cute bunny in the Playing in the Rain Stamp Set. I think Z-Fold cards look like an extra-special design but it’s really ridiculously simple! To make a Z-fold card, make a card base as you normally would. Then score the card front in half, at 2 1/8″, and fold the right front half of the card back on itself. When you look at the card standing up, from the top, it looks like a zigzag or a Z.
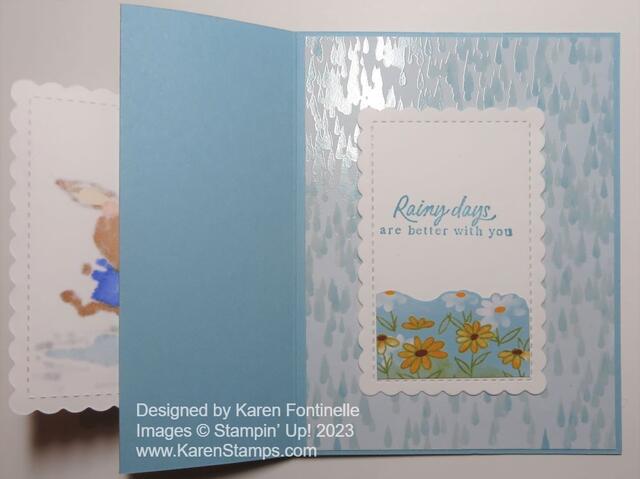
This card base is Balmy Blue cardstock. I used layers of the Rain Or Shine Specialty Designer Series Paper, the raindrop pattern for the front panel of the card, and also on the inside. The narrow front panel is 5 3/8″ x 2″. The inside is 5 3/8″ x 4 1/8″.
I diecut two of the scalloped rectangles, the same size, from the Scalloped Contours Dies, in Basic White cardstock. One rectangle is stamped with the bunny using Memento ink and colored in with Stampin’ Blends. For his fur, I used #500 and #600 of the Natural Tones with Pale Papaya in his ears. His jacket is Orchid Oasis. The puddle is colored in with Balmy Blue and I added a little Light Smoky Slate just scribbled in to ground the bunny and the puddle. The raindrops are stamped in Balmy Blue ink. I covered the scalloped edges with a piece of scrap paper so I wouldn’t get raindrops on those edges and I just tried not to get raindrops on the bunny. For a little embellishment, I cut out some flowers from the designer paper and adhered them near the bunny.
When you adhere the front panel onto the Z-fold card, be sure you only put glue on half of the panel so it only adheres to that folded panel, not the inside of the card!
With a Z-Fold card you have to be careful about what you put on the inside. You would like it to not show from the front. So if you write a message all the way across the inside, it will show from the front of the card. I cut another scalloped rectangle die that was the same size as the one on the front (or you could do something smaller) and I stamped the greeting on that plus added some designer paper flowers to the bottom. To adhere it to the inside, I lined it up with the front of the greeting against the back of the front rectangle which is already adhered to the front of the card. Keep that in place while you apply adhesive (I like the Liquid Glue so you have that “wiggle room” in case you need to move it a tiny bit to get it placed perfectly.) and then fold over the back of the card to adhere to the greeting which will then be on the inside of the card and placed perfectly behind the front panel so that you don’t see what is in the inside until you open the card.
Writing this out is a lot more complicated than actually making the card! If you don’t put a panel on the inside of the card but you just stamp a greeting, just lightly mark with a pencil where the front panel hits the inside, and then you will know the area where you can safely stamp or write your greeting or message.
Here is another good example of what a z-fold card that I made looks like.
Try your hand at a Z-fold card like my Playing in the Rain Z-Fold Card and it will look extra special for your recipient. With different designer paper and a bunny on the front, this would make a really cute Easter card!


