Christmas Tile Magnet

Here's an oldie but goodie, although I don't think I'd ever done it this way before.  It's a tile magnet, one of the little 2"x 2" tiles that come all attached to each other in a sheet.  I'm sure I bought them at one of the home improvement stores a long time ago.  I would assume they still sell them but I don't know for sure.  They're not the super-slick ceramic ones.  To separate the tiles from the others I just used a good household scissors and then kept slicing away at the little stubs of adhesive until they weren't visible from the front.  Maybe you could use a hobby knife.

Now you could just stamp on the tile with Stazon ink, but somehow I had stamping on tissue paper in my head.

  • Cut a piece of tissue paper 1 3/4" x 1 3/4".
  • Stamp on tissue paper with Black Stazon and color in however you want.  I used a blender pen and Stampin' Write markers.  This Christmas tree is from Fun & Fast Notes.
  • Apply Versamark ink directly to the front of the time generously and then sprinkle with Glassy Glaze Enamel (#100477), dumping off excess, just like glitter.  Heat with the Heat Tool (#100005) to melt Glassy Glaze.  This seemed to take awhile for the Heat Tool to get hot enough and probably because the tile is a little cool but you will see when the Glassy Glaze really melts completely.
  • Very carefully apply your stamped tissue paper piece to the top of the tile. Don't burn your fingers!  I pressed it down a little harder with a wadded up paper napkin.
  • Apply Versamark ink directly to the tile again and repeat with Glassy Glaze and heat.
  • Do that one more time!
  • Attach a strong little magnet to the back of the time.

Xmastreetilemagnet 

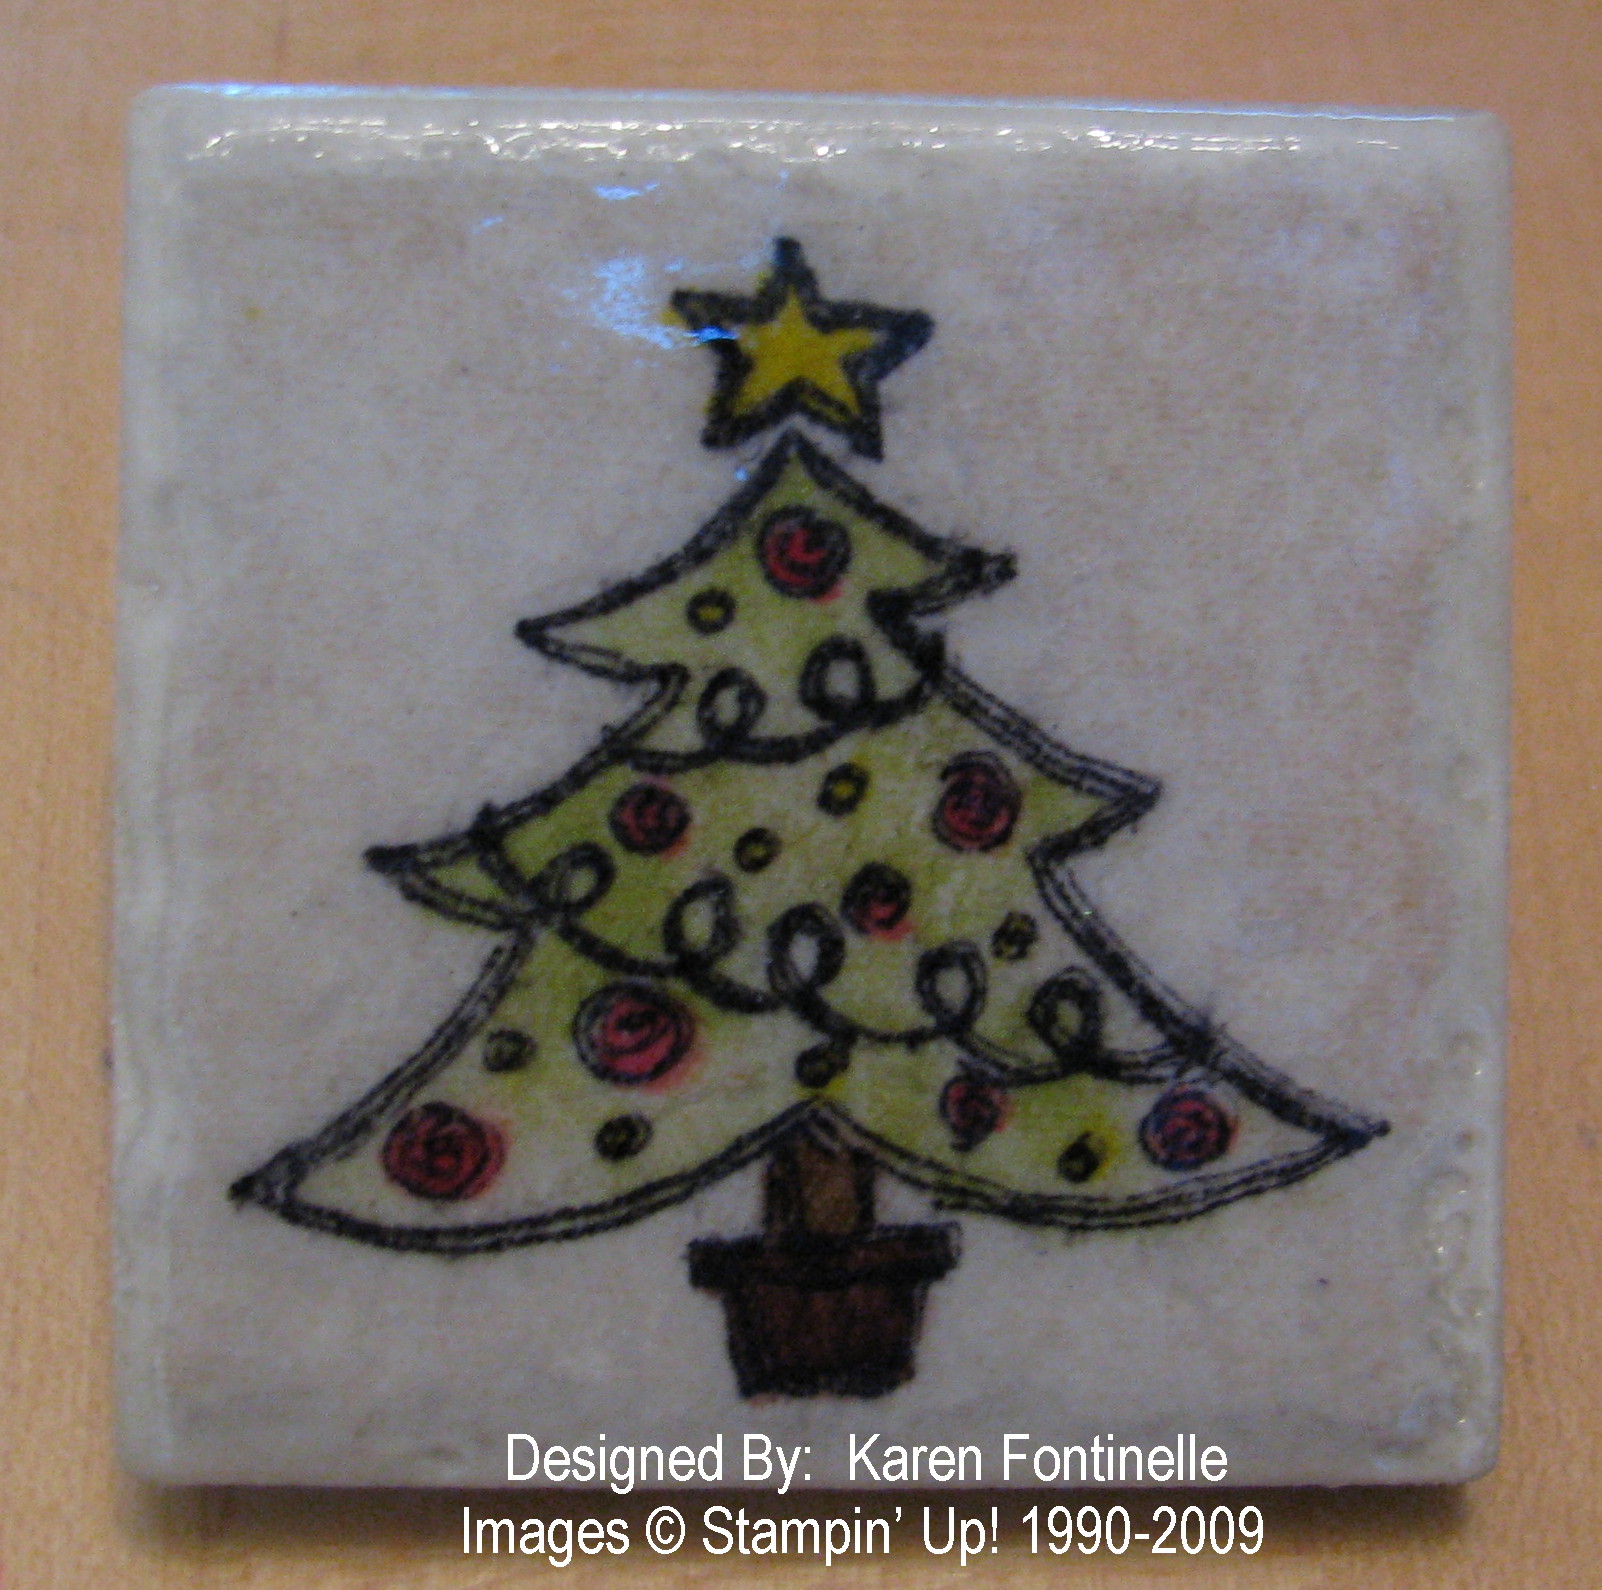
You can barely see the bit of shine from the glaze on the top of the tile, but it is there.  You could even wrap a piece of grosgrain ribbon all around the sides of the tile if you wanted.

Have fun stamping, and if you have any questions about this project just contact me!


Holiday Christmas Ornament

I've been wanting to try using the Icicle Rub-Ons (#116804) in the Holiday Mini on a clear glass Christmas ornament.  Then as I was reading the December 2009 issue of Good Housekeeping Magazine I saw this cute idea!  Just stick some greenery and berries into a clear ornament and add a ribbon and greeting!  I also added the Icicle Rub-Ons and just cut off some greenery and berries I already had in my Christmas decorations.  I decided to sprinkle a little White Chunky Essentials Glitter (#108797) in the bottom for a snowy look!  The greeting is from Berry Christmas (#116509)  Fun and easy project for your Christmas decorating!

SnowflakeRubOn 

SnowflakeOn 

SnowflakeGHMag 

SnowflakeOrnament

Turkey Thanksgiving Card

With the Christmas holidays fast approaching, I fear we almost forget to think about Thanksgiving.  So today I got my creative mind back on Thanksgiving and wanted to use this cute little turkey, "Gobble Gobble" available now in the Holiday Mini (page 31) #116535.  You'll be pleased to know it is one of the "Under $10" stamps!  Here is the card I made!

GobbleGobble 

My card base is Soft Suede, 4 1/4" x 4 1/4".

Autumn Traditions DSP layered on Ruby Red card stock.

Gobble Gobble Turkey stamped on Very Vanilla and layered on More Mustard and Always Artichoke.

Ribbon Very Vanilla Taffeta.


Coloring Chipboard Letters

Sometimes the chipboard letters are good to use the natural way they come, but sometimes you want to color them.  One way to do that is to use a Craft Ink Stampin' Spot.  You could use a sponge dauber, but I like to just use the direct method where I apply the ink directly from the Stampin' Spot to the chipboard.  Just turn the spot upside down and pounce it on the chipboard piece.  You could also use the Classic  Ink Stampin' Spot but it might be a little lighter in color.

ChipLetters 

ChipLetters2 

You can order a set of 12 Stampin' Spots in each of the color families in either the Classic or Craft ink (see catalog pages 156-7).  Stampin' Spots are about 1" x 1" in size and are handy for carrying to crops or stamping events or a less expensive way to own all the colors in a family.  The majority of the time I think anyone would prefer the full-size ink pads, but the spots have their uses!  Let me know if you have any questions about the Stampin' Spots!

Don't forget about the Stampin' Up! Holiday Gift Guide!  So many ideas for the people in your life:  Kids, Teens, Card Makers, Scrapbookers, Neighbors!  There are stocking stuffers and products to use for presenting your gifts or personalizing them.  Be sure to check out the Holiday Gift-Giving Guide today!  You can contact me with your order or order online at your convenience RIGHT HERE.  Just click on the "Shop Now" button in the upper-right corner of that page.

And for every $50 you spend from the Holiday Gift Guide, you can choose a FREE Decor Element (up to a $16.95 value) from THIS BROCHURE.  Then you have an extra gift to give away…..or keep it for yourself!  I won't tell!

Christmas Scrapbook Pages

I loved the look of the projects in the Holiday Mini for the stamp set Yuletide Christmas. Here are some scrapbook pages you can create using this stamp set as well as the beautiful Medallion stamp.

The first one is a 6×6 page, which, in a workshop, I like to have people make as a card from a 6" x 12" card base.  Then they can add photos and send or give to someone as a card, or it can be cut apart and you have two 6×6 layouts.  Or they can even be framed!

Xmas6x6SB                                  Xmas6x6SBinside

Inside

Then if you wanted to add one of these pages to make an 8.5" x 11" page, it could look like this:

Xmas8x11SB 

And of course if you wanted to make a 12" x 12" page, you could design it like this:

Xmas12x12SB 

It's not too early to start designing some scrapbook pages for your Christmas album now and then after the holidays, all you have to do is add the photos!

If you're ready to order some of the many scrapbook supplies Stampin' Up! offers, just click my Shop Online button or click HERE.

Christmas Top Note Card

Here's a fun card we made at a recent workshop.  The card base is Real Red and I'm sure you recognize the Top Note Die made with the Big Shot.  I stamped the Top Note layer with Old Olive little images in the Delightful Decorations set and  stamped and punched out the ornaments with the fabulous new Ornament Punch in the Holiday Mini.  I just used a little bit of Gold Cord on the ornaments for a hook and popped them up with Dimensionals.

XmasTopNote 

Don't think that after Christmas you will have to put away the Ornament Punch because it is out of season either!!  Some creative gals have used it to make vases or fish (sideways) and other things!  Amazing!

If you would like to purchase any of the product used in this card, please email me or use the Shop Online button!

Veterans Day 2009

Soldier 

This is a swap card I received at the Stampin' Up! Convention this summer, made by Julia G. from California.  I thought it would be perfect to showcase today on Veterans Day, a day set aside to honor military veterans.

This card uses the stamp set Courage for the main image, the set Service & Sacrifice for the sentiment, and in the background on the Brilliant Blue the wheel Hero.  You can find all of these stamps on page 67 of the Idea Book & Catalog.

You can read all about Veterans Day by clicking HERE.

Robot Gift Card

It's been awhile since I have used this template…usually I think people put a tea bag or a chocolate candy in the little pocket.  But since I needed a quick birthday gift for a young teenage boy, I thought it would be fine to hold cash!  I thought of my Lots of Bots stamp set, a good one for boys, and stamped that image for the front.  After I had it all colored in and mounted on Brushed Silver card stock, I thought it needed a little more silver…..and since I am apparently into silver glitter these days, why not a little silver glitter, Chunky Essentials, for the robot!  I just applied a thin line of Tombow Multi Glue around the edge and sprinkled on the glitter.  I think it looks kind of jazzy now!  The Designer Paper I used is the retired Jersey Shore, a good set of colors for a boy.  You could also use any color of card stock and perhaps embellish it with some designer paper.  Lots of opportunity for creativity in this easy project!  Email me if you want more information or ideas!

RobotMichael 

Robotinside

A Pottery Barn Look-a-Like

While shopping at Pottery Barn, I saw some monogram ornaments with silver glitter and I thought…"I could make that!"  So I went home, found a round coaster (or I could have used chipboard), covered the back of the coaster (that was printed) with Stampin' Up! Specialty Night and Day Designer Paper.  The Pottery Barn monogram was larger, but I stamped my initial with the Lovely Letters Alphabet, an alphabet I just love.  After applying the Tombow Multi Glue around the edge of the front (and then the back later) I adhered the Silver Chunky Essentials Glitter.  Wouldn't this be a quick and easy gift or tag on a gift for someone?!

PotteryBarnKOrnament 

PotteryBarnBack

Serene Snowflakes Peppermint Patty

Always love these quick and easy Peppermint Patties made with the 1 3/8" Circle Punch and the ever-popular Scallop Circle Punch!  Stamp a Serene Snowflake (in the Holiday Mini) on Whisper White with Bashful Blue ink.  Punch out with the Circle Punch.  Punch two Bashful Blue Scallop Circles for the top and bottom of the Peppermint Patty.  Adhere the snowflake to one Scallop Circle.  Attach to the candy with Mini Glue Dots.  Cute!!

SnowflakePepPatties 

A Nugget Purse

It's been awhile since I have made one of these, but they sure are fun little things to make for party favors or little gifts.  You can use card stock or stamped card stock or designer series paper.  You might want to use the heavier weight designer series paper, but I think this one will be fine.  I used the Thoroughly Modern DSP, but of course you could use anything.  A Hershey's Nugget is what I used for the candy on the inside, hence the name, Nugget Purse!

Cut a 1 1/4" x 3" piece of Designer Series Paper (DSP) to wrap around the nugget. Just put adhesive on both ends of the "wrong side" of the DSP, sticking one end to the bottom of the nugget and wrapping the other around.

For the purse:  DSP  1 3/8" x 4 1/4"

Score at 3/4", 1", 2 1/4", 3 1/4"  Put a piece of Sticky Strip in between the 3/4 and 1" score lines.  Fold on all the score lines and see how the purse will go together.  If you want, use your Tag Corner Punch or your Corner Rounder Punch on what will be the front flap of the purse to cut off the corners.  Take a 4 1/4" piece of grosgrain ribbon to match or just a strip of card stock for the purse handle.  Remove the red liner of the Sticky Strip and attach the ends of the ribbon (or card stock) together over the Sticky Strip, forming the handle of the purse.  

For the little decoration on the purse flap, in a coordinating color of card stock, use the 1/16" punch to punch a hole and then punch out with the Trio Flower Punch (or the 1/2" Circle Punch).  (It is pretty hard to punch the flower first and then add the hole, unless you use your paper piercer….so punch the little hole first, then center in your flower punch).  Hold your purse together (without the flower decoration) as if it were assembled and use the 1/16" punch to punch through both the flap and the purse.  Now insert a brad into your punched flower and then into the purse to hold together.  Reach inside to spread the legs of the brad.  You could always use a little piece of velcro or even just glue the flap down with a mini glue dot.  Now insert your wrapped Nugget into the purse, perhaps using a bit of SNAIL or a mini glue dot on the bottom to hold it in the purse.

All of these supplies can be purchased at my Stampin' Up! Online Store of course!

NuggetPurse 

NuggetPurse2 

I wish I had more Hershey's Nuggets!  I'm in a Nugget Purse kind of mood!

Papercrafting Ideas from Stampin’ Up!

Image copyright Stampin' Up!

Don't forget about the wonderful resources for papercrafting ideas right on the Stampin' Up! website!  Just click HERE to see many projects which by changing card stock color or different designer series paper you can change into Christmas or holiday gifts if you want.  Click on each project picture to see a list of supplies.  Go to my website HERE and click the Shop Now button and you'll be able to place your order!


Learning New Things with My Digital Studio

When we got to watch our son's wushu demonstration at college a couple weekends ago, I took a few photos but mostly I took video.  With My Digital Studio I can (and I did!) incorporate that video into an "interactive photo album" so that he will be able to see the pages I designed plus watch short videos of the demonstration.  I was surprised how easily I was able to do that with my limited computer skills!  But I also wanted more photos for the pages.  Luckily, I was able to figure out on my computer how to capture individual frames from the videos and save them individually as photos.  Not sure how clearly they will print out, but for now, it suited the purpose…..and I learned a new computer skill!  Here is one of the scrapbook pages I made with My Digital Studio using all these extra photos I was able to extract.  If you click on the link above, you can watch a short video from Stampin' Up! about My Digital Studio.

Wushu-004