Happy Thanksgiving Day!
2 Replies


If you are taking a bottle of wine or another beverage to your Thanksgiving dinner for the host or even if you just want to fancy up your own wine bottle, make a tag to decorate the bottle, something like this Wondrous Wreath Wine Bottle Tag for Thanksgiving. It is so easy and won’t take you more than a few minutes to make a simple one. Of course you can embellish it to your delight, but if you are short on time, just make the tag and stamp something simple on it. That’s it! Your host or hostess will be thrilled!
To make the bottle tag, cut a piece of cardstock 9″ x 3″ and score at 2 1/2″. Punch a hole in the small portion using the 1 3/8″ Circle Punch. Add a Very Vanilla layer to the tag base of 8 3/4″ x 2 3/4″ and stamp or decorate. I used the Wondrous Wreath Stamp Set and die cut with the Wonderful Wreath Framelits Dies. To get the multi-colored fall colors, I first stamped the wreath in Crushed Curry and then took Stampin’ Write Markers to color in various leaves randomly with Old Olive, Pumpkin Pie and a little Cherry Cobbler, I added a bow of Peekaboo Peach and popped the wreath up with Stampin’ Dimensionals, The greeting is stamped from the Suite of Seasons Stamp Set (on sale now, 25% off!). I’m so glad I purchases that stamp set for myself on the sale because I have used it many times already!
If you aren’t taking a bottle of wine, perhaps your hostess would enjoy a few cards that you made and are hoarding in your craft room! Put them in a cello bag and tie on a ribbon or make some easy pretty presentation!

A few weeks ago I came up with this Star Wars Inspiration BB8 Punch Art Handmade Birthday Card for my son-in-law’s birthday and I liked it so much I made another one for my son’s birthday a few days later. By now they both have received their cards in the mail so it’s safe to show it on my blog!
When you have a Star Wars fan in the family (who even appreciates your handmade cards), you just have to come up with a new idea for each birthday or occasion. After searching the internet of course, I came up with this card of BB8, one of the characters in the Star Wars movie that came out last year. The background paper is the foil embossed paper in the Halloween Night Specialty Designer Series Paper. I think it is perfect for this card. To make BB8 I used several circle punches. I probably used the 1 3/4″ Circle Punch for the lower body, maybe the 1 3/8″ Circle Punch for the upper body, and then smaller punches for all the details. I’m sure you can try the punches you have and see what fits on your card the way you want it! Of course the birthday balloons are punched with the Balloon Bouquet Punch and punched out of Silver Glimmer Paper. The greeting piece is punched with the Classic Label Punch and I added a silver star from the Metallic Enamel Shapes.
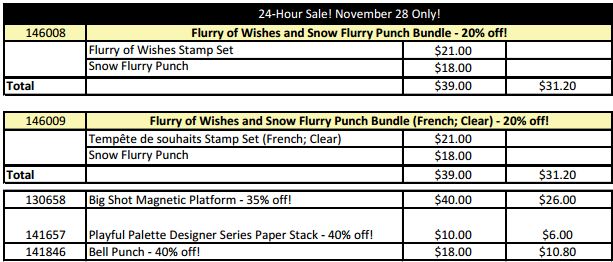
I love these Enamel Shapes and ordered the Bundle of all of them yesterday on the 24-Hour Flash Sale on the Online Extravaganza. You missed that but you can still add them (not discounted) to your Online Extravaganza order any day this week until November 28! Don’t miss out on anything else! And be ready for the Flash Sale on the last day, Monday November 28!

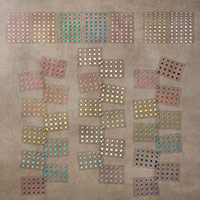
Some of these are Bundles that will only be offered during this sale. Sale prices are shown. You can click on the photos to go to the item in the store for more information.


On the last day, Nov. 28, there will be another Flash Sale!


Shop Stampin’ Up! Online today so you don’t miss out on a product you really want! Just because it says “online” doesn’t mean I can’t help you with your order, so contact me if you’d like me to put it in for you.

If you want a quick and easy favor for your Thanksgiving dinner, try this Thanksgiving Punch Art Turkey Candy Bar Wrapper. Just get some chocolate bars and wrap them in designer paper. I used this generic sheet from the Halloween Night Specialty Designer Series Paper.
To make the punch art turkey to fit on the candy bar, I used the 1 3/8″ Circle Punch for the body and the 1″ Circle Punch for the turkey head. The feathers were cut out with the Layering Ovals Framelits Dies and Big Shot, but you could also use an oval punch. The turkey feet are punched with the feet of the Owl Punch! What would we do without the Owl Punch?! The eyes are also punched with the Owl Punch but I just colored in the pupil with a black marker. The red waddle on the turkey is the little heart from the …..Owl Punch! Just cut the beak freehand.
The Thanksgiving greeting is from the ever-useful stamp set, Teeny Tiny Wishes and punched with the Classic Label Punch. I still love and use the Teeny Tiny Wishes Stamp Set a lot. It has almost every greeting in it that you could possibly need.
Just a fun punch art turkey to make for a Thanksgiving candy bar wrapper or you could make the same one on a Thanksgiving card. Play with the idea and make something fun!

This Thanksgiving Candy Turkey Cookie Favor is not made with stamps, ink, or paper but it still is one of my favorite things at Thanksgiving! I think I found the idea in a family magazine way back when my kids were little and I made lots of them for preschool parties and elementary school or Scouts or whatever at Thanksgiving. There are similar ideas out there, usually involving Oreos, candy corn and frosting as glue. Those are cute, too, but I always thought these were the easiest to make and so cute!!
You will need Keebler Fudge Stripe Cookies, Hershey Kisses, candy corn and Kraft Caramels (or whatever similar brands you find at your store).
Unwrap several Hershey Kisses and have them sitting on a plate or napkin so they are ready, with a cookie and candy corn handy also. Put a caramel on a plate nad microwave it just a few seconds until it is slightly soft, but not melted or too soft. When the caramel comes out of the microwave, plop it on top of the Hershey’s Kiss. Immediately “smoosh” the cookie against the backside of the caramel until it sticks. Take the candy corn on edge and stick it into the caramel! There you have a turkey!
These turkeys are so fun to make for Thanksgiving! To make multiples, just have your ingredients ready to go. You can soften several caramels at a time on a paper plate in the microwave, maybe about six. You want to be able to work quickly when the caramels come out of the microwave so you can stick everything together. Have extras on hand because there will be some broken cookies! And you will need to kind of test your microwave and caramel softening factor to get the timing right. So just have extra ingredients on hand. And of course you can eat any malfunctions or leftover ingredients!
You can place these at each setting at your Thanksgiving table. If you want to add a placecard with someone’s name, can probably do that one way or another. My, how I used to like making placecards for family dinners when I was little!!
Pick up these ingredients at the store and try your hand at these Thanksgiving Candy Turkey Cookie Favors! Something different for Thanksgiving!

Don’t forget the Stampin’ Up! Online Extravaganza starting Monday, November 21! Lots of products and special bundles on sale up to 40% off all week plus a Flash Sale on Monday ONLY, plus another Flash Sale on the last day, November 28. Get your wish list ready this weekend so you don’t waste time on Monday! You may be cleaning and cooking, but you deserve a break and some shopping!
(On Monday when you click the store link you will undoubtedly see a banner about the Online Extravaganza but it’s not there today yet.)


Details
• Promotion period: November 21-28, 2016
• Discounted items/bundles available on all order types (customer, demonstrator, workshop, starter kit, and online).
• You must use the bundle item codes provided. Discounts will not be applied if individual item numbers are entered separately.
• Some bundles have been created exclusively for Online Extravaganza and will not be available after the promotion ends.
• There is no minimum purchase required in order to receive the discounted price.
• Additional products from current catalogs may be purchased on the same order.
• Discounts range from 10-40 percent and may vary per market. Note: While some retiring holiday products may be discounted during the retiring list promotion in December, no discounts will be greater than the discounts being offered during Online Extravaganza.
• During Online Extravaganza, a selection of past Paper Pumpkin kits and refill kits will be available to both subscribers and non-subscribers.
• Online Extravaganza includes two 24-hour sales.
• The first 24-hour sale begins at 12:01 AM (MT) on November 21 and runs
through 11:50 PM (MT) that same day.
• The second 24-hour sale begins at 12:01 AM (MT) on November 28 and
runs through 11:50 PM (MT) that same day.
Paper Pumpkin kits and products on the future holiday catalog retiring list, except stamp sets, are only available while supplies last.
• All products that are while supplies last have been noted in the Online Extravaganza deals list.
Remember, these stamps are on sale and available through the end of November. You can add them to your Online Extravaganza order! Remember, too, that the very popular Stitched Shapes Framelits Dies will be unorderable starting Monday, right now are backordered. I think that if you ordered those before Monday you would receive them sooner than if you wait until they are orderable again. Either way, you won’t be able to combine the dies with an Online Extravaganza order.

Would you guess you could take a Christmas stamp set and make a baby card with it? Take a good look at your holiday stamp sets and see if you can get some other uses out of the stamps during the year before you put them away! For example, these Cookie Cutter Christmas bear baby cards are made with the bear in a Christmas stamp set and even with holiday or wintery designer paper. But if you don’t use the holiday patterns in the Warmth & Cheer Designer Series Paper Stack, there are plenty of generic patterns you can use at other times. While the Cookie Cutter Christmas Stamp Set is obviously for the holidays, once you notice the cute bear stamp, face, and ears, you can see that you can use that stamped image for other occasions!
These cards are square, 4 1/4″ x 4 1/4″, with a Whisper White Thick Cardstock base. The designer papers are from the Warmth & Cheer Paper Stack. The bear is stamped on Whisper White and then the circle is cut out with the Stitched Shapes Framelits Dies. Love these!! If you put them on your order now, even though they are backordered, you will be in line to get them sent to you as soon as they are available again. They have been so popular that Stampin’ Up! will have to turn the number off until they have sufficient supply again.
On the card on the left, I added a Flirty Flamingo scalloped circle layer die cut with the Layering Circles Framelits Dies. I also added a strip of Flirty Flamingo 3/8″ Ruched Ribbon across the middle of the card. The greeting is from the Flourishing Phrases Stamp Set. I added two In Color Enamel Dots because I LOVE these little dots!
The baby card on the right is very similar. I added a strip of 1/8″ Gold Ribbon underneath the banner greeting. That greeting is from the Better Together Stamp Set. Once I looked at these two cards side by side I noticed the word “Congratulations” looks exactly the same even though they are two separate greetings from two different stamp sets! Hmmm!
So look at your stamp sets a little diffferently and see if you can get even more use out of them that they seem intended! This is very difficult for me until I see someone else’s idea!
If you want to make a Cookie Cutter Christmas Bear Baby Card and need some supplies, please click this link below to order your Stampin’ Up! products!

I will say the photograph of this Petals & Paisleys Copper Foil Thanksgiving Card does not do it justice! I think it is one of the prettiest cards I have ever made, not because I made it because it is a very simple design, but because of the materials! Just get the Petals & Paisleys Specialty Designer Series Paper and you will see why! Inside that package is this gorgeous Night of Navy paper with copper foil embossing on it! So pretty!!
I made the card base with Night of Navy Cardstock. When you are not sure what color to use with Stampin’ Up! designer paper, just look on the back of the package to see the list of coordinating colors (you might need your reading glasses though!)! It’s a great resource right at hand!
The greeting is from the Suite Seasons Stamp Set and is perfect for Thanksgiving. I wiped a piece of Very Vanilla Cardstock with my Embossing Buddy, which lessens the static on the paper and prevents the stray specks of embossing powder, for the most part. I stamped with Versamark Ink, sprinkled on the Copper Stampin’ Emboss Powder, and heated with the Heat Tool. I can guarantee that each time you do heat embossing you will be amazed like the first time you ever saw it! It is just magical!
After looking through my framelits, I decided on the Stitched Shapes Framelits Dies to cut the stitched oval shape around the greeting. Then I die cut a layer from Copper Foil with the Layering Ovals Framelits Dies. I choose the scalloped edge die. Love it! Then I decided to use my Copper Metallic Thread to wrap around the designer paper. It’s very thin so I had to wrap it around many times! It barely shows on the photo but it’s there and very pretty.
I like this card so much I think I will make more cards with the rest of that foil designer paper to send out at Thanksgiving! I often forget my own piece of advice – I used to always say “when you make one card, make three” because as long as you have the supplies out and the design in mind, make extras to have on hand!
Remember, the Stitched Shapes Framelits Dies are or will go on backorder this week and by next week they will not be able to be ordered until Stampin’ Up! receives sufficient supply to fill orders. If you want them, I would add them to an order and hope that you still get one of the thousands of sets coming in to the warehouse by the end of the month. Otherwise it might be a longer wait.
The stamp sets on the November sale are still available so be sure to check those out!
I hope you will make a few Thanksgiving cards to mail out to special people. Just think how happy that will make their holiday!

The other day I mentioned taking inspiration from the Stampin’ Up! catalogs, which I did with these two Cookie Cutter Christmas Bear square Christmas cards. Even if you have paged through the catalogs hundreds of times, on any one particular day something new might jump out at you. Today it was a sample card for the Cookie Cutter Christmas Stamp Set that I noticed and realized I had never thought about the bear image being in that stamp set!
I made the card base with the Whisper White Thick Cardstock and layered on a pattern from the Warmth & Cheer Designer Series Paper Stack. Don’t think that this paper is only for Christmas or the holiday season because as you can see from these patterns, you could use them almost any time. There are some Christmas patterns in the stack but remember there is always another side to the paper!
The circles are cut with the Big Shot and the newly introduced Stitched Shapes Framelit Dies. Stampin’ Up! announced this morning that these Stitched Shapes Framelits have been SO popular they are going on backorder and the number will be turned off in a week so they can replenish the supply. If you want these sooner rather than later I would order them right away, even if they say “backordered”. This will put you in line to get the ones that do come in, probably the end of the month. The entire supply they thought would last until the end of the year sold out in two weeks! These dies are great and I highly recommend them, but it’s too bad there will be a delay. But try to order them as soon as possible if you want them without waiting too long, hopefully!
The bear is stamped on the circle and then you do have to stamp his face and his ears! It took me a minute to realize what was wrong with the bear just stamped! In fact I was going to punch out the bear with the Cookie Cutter Punch and then I realized the ears were separate and I would have to stamp, cut out and glue on to the bear. That is doable, I just decided on the stamping for today! The bow tie is stamped on Whisper White cardstock with Real Red ink and punched out. The greeting comes in the stamp set. Just imagine how you could change the greeting and have a cute baby card or birthday card for a child! The catalog sample has a piece of Linen Thread tied around the card, but I did change it to the Candy Cane Lane Baker’s Twine. This twine is white with a red metallic thread. So pretty!
Save some money by purchasing the Cookie Cutter Christmas Photopolymer Bundle which comes with the Cookie Cutter Builder Punch and the Cookie Cutter Christmas Stamp Set.
Remember, put those Stitched Shapes Framelit Dies on your order today or tomorrow, if possible!
Also, if you are reading this blog post and are not on my Mailing List, please sign up so that you will receive the remaining issues of my 12 Weeks of Christmas emails with a new project and directions each week! Next issue comes out tomorrow, November 16 at 1:00 pm! Be on the list and check your Inbox! Sign up in the red box on the right side of my blog or in the pop up box.

Can you believe it is the middle of November, the month that just started, and that Thanksgiving is on its way?! I realized I should probably make a card with fall colors and ended up with this Flourish Thinlits Dies Thanksgiving Card. I really just kind of grabbed some scrap pieces of card stock in fall colors and I ended up with a 4 1/4″ x 4 1/4″ square card, Crumb Cake cardstock as the base. Later I decided to put the Very Vanilla front layer of the card over a piece of Pumpkin Pie cardstock for a thin border.
I just used my Big Shot and Flourish Thinlits Dies to cut as many pieces as I could fit on the cardstock scraps I had to make a bunch of pieces and then I could play with them and come up with something! The greeting is stamped from the Suite Seasons Stamp Set, one of the stamp sets on sale during November. I ordered it, along with the new Stitched Shapes Framelits Dies, and I’m so glad I did. I’ve already used it several times on cards and projects! You can never have too many greeting stamp sets. As a side note, this stamp set has a greeting you can use for a sympathy card or some other kind of serious caring type card, and we often do not have a good saying to use for a card like that.
Be sure to check out the Stitched From the Heart collection of the new framelits and all the stamp sets on sale until November 31.
If you are new to stamping or do not have a Demonstrator, I’d be happy to mail you the current Stampin’ Up! catalogs! I have some extras right now and can send them out pronto! They make the best reading material!!
Time to be making some Thanksgiving cards if you plan to mail some out or Thanksgiving favors or decorations, so let me know if you need any ideas or help.
 While we are on the subject of chocolate (from yesterday!), here are two more versions of Ghirardelli Chocolate Candy Treat Holders. Honestly, once you get started on these, you hate to stop! So many possibilities!
The first candy treat holder on the left is a folded over piece of Candy Cane Lane Designer Series Paper, cut 9 3/4″ x 3 1/2″. It is scored at 3 1/4″ from each end so that the paper is scored in thirds. That gives a flap to fold on the inside to hold the candy (you could also do this for tea bags) that is trimmed at a diagonal so you can see the candy. Use an adhesive to hold the bottom of the triangle shut to hold the candy like Fast Fuse. Then just decorate the front of the candy holder however you like. I used the new Stitched Shapes Framelit Dies to cut out the greeting from the Oh What Fun Photopolymer Stamp Set. This stamp set is one that is on sale during the month of November. You will be able to get lots of use out of this stamp set making your holiday cards and projects.

The smaller chocolate candy treat holder is cut 5 1/2″ x 2″ with each end punched with the Scalloped Tag Topper Punch. Then it is scored at 2 5/8″ and 2 7/8″. Fold, put the candy inside, perhaps with a Glue Dot to hold it inside, and tie with a ribbon at the top. I used the Gold 1/8″ Ribbon. I chose a piece of the Candy Cane Lane Designer Series Paper for the small piece on the front of the candy holder. The little greeting is from the Oh What Fun Stamp Set, die cut with the new Stitched Shapes Framelit Dies. You DO want these dies in your collection!
Go stock up on some candies you can use in your holiday crafting, then have fun making all kinds of cute things like these Ghirardelli Chocolate Candy Treat Holders.

Here is an easy Ghirardelli Candy Holder for you to make, perhaps as a little table favor for your Thanksgiving guests or really for any occasion. All you need are the basics on how to make this and you can decorate and embellish for any occasion. The other day I came across one of these I had made a long time ago for Valentine’s Day and I thought it was time for an update!
I cut my Delightful Dijon Cardstock 3″ x 9 5/8″. Actually, once you have the idea, you can modify the measurements to whatever you like. Then I scored this strip at 2 3/4″, 3″, 6 1/4″ and 6 1/2″. We used to use the Word Window Punch (retired) for the candy slot so today I tried the Classic Label Punch. Before you punch, fold on all the score lines and see how the packet will go together. I made the area that was a bit shorter to be the top flap. Therefore the longer area went inside and was punched to make the candy slot. From the bottom of the strip then I inserted it into the punch all the way, being careful on the sides to make sure it was centered. In this case, the punch was as wide as the paper, but you still need to make sure where the punch is in relation to the paper. After punching, I adhered the punched flap just about 1/4″ below the inside score line and used Fast Fuse Adhesive to hold it. If you are using SNAIL Adhesive, I would probably put the SNAIL on both areas that I was adhering. I think that makes it hold better and stronger if you need that.

Now once you have the basic candy holder made, you can decorate it however you like! If you don’t find the exact greeting you want, just look through your stamps and surely you will find something generic you can use. I opted for this “For You” greeting from the Birthday Blooms Stamp Set. I’ve used that greeting over and over because I love the font and it suits almost any occasion.
I stamped the greeting on Whisper White and die cut with the Big Shot and the wonderful new Stitched Shapes Framelit Dies. Yes, you are going to love these new dies when you order them! These dies put just a little bit of a stitched look around the shape. Many times it is just a little something that you need to make your card or project “pop” and these dies will do that! I could have put an oval layer behind the greeting, but for one thing, there wasn’t much space and for another, it looked good the way it was! I stamped it in Mint Macaron ink because that is one of the coordinating colors of the designer paper. Cut some designer paper for the front flap, leaving either a 1/4″ or 1/8″ border around the outside. Since my outside flap was 2 3/4″ x 3″, I cut the designer paper, a pattern from Petals & Paisleys, to 2 1/2″ x 2 3/4″. I think this paper is beautiful for all your fall and Thanksgiving projects!
To finish my candy holder project, I used a piece of Delightful Dijon ribbon in the Ribbon 3/8″ Trio Pack, just tied around to hold the flap down, in the Stampin’ Up! Holiday Catalog. You can view the catalog online or if you would like your own hard copy, please email me at Karen@KarenStamps. com. I’ll be happy to mail one to you. It’s not too late to enjoy the Holiday Catalog and enjoy you will!
So go hit the “craft supply” section in the candy department and pick up some candies you know you can use during the holiday season, starting now! These square chocolates are good for a lot of projects!
 My new Stitched Shapes Framelits Dies arrived and I had to try them out on this quick Stitched Shapes Framelits Easy Christmas Card. Just making this quick card, I can tell you I love the Stitched Shapes Framelits! As you can see the stitched look just adds a little something, just a little accent. I think these framelits are going to be very popular!
I made the card base with Soft Suede. (I actually meant to grab Crumb Cake Cardstock, but decided that Soft Suede would be fine, too!) For the Real Red layer, I embossed it with the Sparkle Embossing Folder. The greeting is stamped from the Suite Seasons Clear-Mount Stamp Set. You can get this set ON SALE during November for 25% off! Don’t miss it!

The greeting was stamped in Real Red ink, but then I wiped off the pine needle image and colored it with an Old Olive Stampin’ Write Marker. Then it is backed with a layer from the Layering Circle Framelits Dies, one with a scalloped edge. So pretty!

Here are 5 ways to relieve the election stress the day after! Whether you are celebrating or disappointed today, take some time for yourself, and of course, Stampin’ Up! has all the perfect things! We all know stamping is therapy!