Want to Receive my 12 Weeks of Christmas Emails??


The "12 Weeks of Christmas" is Coming!

Want to receive an exclusive holiday projects each week in your email?

It’s just over 24 hours until the first email will go out! The only people who will get these amazing projects from me are the people on my mailing list. In order for you to get them, you must be on my mailing list by October 4 at 1:00 pm. You will see holiday cards, gifts and wrapping ideas! It’s really fun and is my annual gift to my subscribers!  I hope you will join us!  It’s FREE. And you get a separate free gift just for signing up to my mailing list.  Just complete the form below with your name and email and you will be ready to go!


Subscribe to My Mailing List! 

Exclusive Projects

Stampin’ Up! News & Updates

FREE Welcome Gift!

We respect your email privacy

Painted Harvest Note Cards

Painted Harvest Note cardsOnce you get started making a Painted Harvest Note Card, I bet you can’t make just one!  The Painted Harvest Stamp Set has such potential to make beautiful cards. And so many ink combinations to try!  Once you get stamping, you don’t want to stop!

The flower stamps are actually two-step stamping and some people have tried real hard to line up the stamps exactly and stamp the center perfectly. Don’t even try! With these stamps, it really doesn’t matter. They are meant to have that imperfect watercolor look to the stamped image.

This is what Stampin’ Up! said about these stamps recently that will perhaps help you with your stamping!

“With the seasons changing, we thought it would be the perfect time to talk about one of our most popular products: the Painted Harvest Stamp Set. If you’ve ever used this autumn-themed set, you know one of its most endearing attributes is that it gives you the look and feel of painting with watercolors. And, like any work of art, there are many factors that influence your final product. We wanted to take a moment to let you know that we designed this set to help give your stamps a one-of-a-kind feel. Because this stamp set is meant to mimic the nature of watercolor, it’s particularly tricky to produce and can create varying results.

For the perfectionists among you (or those simply looking to master your craft), we thought we’d give you some tips and tricks for stampin’ like a pro!

  • Stamp all layers of the image.
  • Make sure your ink pads are well inked.
  • Use nice, even pressure when stamping.
  • Use the Stampin’ Pierce Mat.
  • Keep in mind that lighter colors won’t show up as deeply as darker colors.
  • Play around with saturation levels (e.g., stamping full strength vs. stamping off) to get your desired look.
  • The stamp is not supposed to match the flowers on the Painted Autumn Designer Series Paper.”

I’ve found that it is fun to use the Clear Wink of Stella Glitter Brush either just in the flower centers or maybe a little on the flowers themselves also. This also helps if you just want to smooth out the ink a little, particularly if you have a bit of white space around the flower center. But again, it’s not supposed to be perfect, it’s the watercolored look!  And the handmade look!  Not perfect!

Take advantage of the Designer Series Paper Sale in October and purchase the Painted Autumn Designer Series Paper as one of your three choices…..and then choose a paper for your free one! Now is the time to get any and all of the designer papers that you like!

Painted Autumn Designer Series Paper

Also, the Whisper White and Very Vanilla Note Cards are on sale 15% off during the 10 days of the World Cardmaking Day Sale!  Check out those stamp sets on the sale plus a great buy on Fast Fuse!  Buy a Fast Fuse and get two refills FREE!

This is a fun time to shop at Stampin’ Up!  Remember, the Designer Paper Sale Buy 3 Get 1 Free is the whole month of October, but the World Cardmaking Day Sale is only Oct. 1-10!  Don’t delay!

SHOP STAMPIN’ UP! HERE! CHECK OUT THE SALES!


You Won’t Want to Miss These Stampin’ Up! Specials!

Designer Paper Sale 2017

October is a great month at Stampin’ Up! with some special sales going on!  If you love our designer series papers, guess what?  You get to look at the list of papers on sale and choose which three from the list you purchase and which one is free!  That means you can pay for three $10 paper stacks, and get a $13 Specialty paper for free if you like!  And you can order as many (and get as many free) as you would like!

The Details:

  • Sale period: October 1–31, 2017
  • All order types qualify for this promotion.
  • There is no limit to how many times participants can buy three packages of Designer Series Paper and get one free during this sale.
  • Participants can choose which three packages of Designer Series Paper they will order from the sale items and which package to receive for free.
  • Designer Series Paper purchased as part of a Starter Kit does not qualify for this sale.
  • Designer Series Paper ordered with Stampin’ Rewards does not qualify for this sale.

Designer Series Paper Sale Items

AND THAT’S NOT ALL!!

World Cardmaking Day page1
World Cardmaking Day page2

Only for ten days, October 1-10, you can choose these stamp sets and Note Cards for 15% off!

Also, purchase a Fast Fuse and receive two refills FREE!

Click on the images above for a more readable copy!

Check out these specials at my Stampin’ Up! Online Store!  They all begin today, Sunday October 1, 2017.  The World Cardmaking Day specials are only good for ten days, Oct. 1-10.

SHOP STAMPIN’ UP! ONLINE HERE!

New Paper Pumpkin Season of Style Coordinating Kits!

Paper Pumpkin Season of Style Banner

Since holiday kits are so popular, Stampin’ Up! created a simple and fun holiday crafting experience with the Paper Pumpkin Kits! This is the perfect way to streamline Christmas prep.

During October and November, Stampin’ Up! is offering two straight months of perfectly coordinated Christmas cardmaking and gifting projects! It’s the Season of Style!

Two coordinating kits means that you will have everything you need to complete unique holiday cards and gifts, more creative options, and get that handmade holiday touch without the fuss!

Fine Details

  • Remember, the October and November kits coordinate but they also stand alone. You DO NOT need both kits to create a complete project.
  • To receive October’s kit, customers must subscribe at paperpumpkin.com by 11:50 PM (MT) on October 10.
  • To receive November’s kit, customers must subscribe at paperpumpkin.com by 11:50 PM (MT) on November 10.

Click: JOIN PAPER PUMPKIN HERE AT MY PERSONAL LINK FOR YOU!

  • If you are already a Paper Pumpkin subscriber, you don’t have to do anything!  You will get these two kits in October and November like usual!
  • If you join Paper Pumpkin now you will receive the October kit and continue receiving kits every month unless you skip a month or cancel your subscription by the 10th of any month.
  • If you tried Paper Pumpkin before, back in the beginning, but were disappointed in the early kits, I strongly urge you to give it another try!  Paper Pumpkin has done nothing but improve greatly over the years! They’ve got it going on now!!

Watch Carrie from the Home Office talk about these special holiday coordinating kits!

Here is an example of a Paper Pumpkin Kit!  This is the current kit for September 2017!  Very pretty!

JOIN PAPER PUMPKIN TODAY TO RECEIVE YOUR SEASON OF STYLE KITS IN OCTOBER & NOVEMBER!

Quick and Easy Way to Decorate a Gift Box

Quick and Easy Way to Decorate a Gift Box

They say “presentation is everything” and that was true yesterday when I opened a box of skincare products I had ordered! I was probably more excited about the packaging than the products! Within the mailing box was a blue gift box and inside lots of that “shred” with my products plus a very nice kraft box (like you get jewelry in) filled with samples with the company name embossed in gold on the top. I knew I was going to save it in case i needed it for a gift, especially at Christmas.

Today, I looked at that box and thought, I might as well decorate it in a quick and easy way and it will be ready to go for the holidays and really won’t need any other giftwrapping. Consider looking for gift boxes like these I know you have around your house and get some ready for Christmas or a birthday or any occasion!

Even though I made this into a Christmas box, I used the fallish paper, Painted Autumn Designer Series Paper, but I used a side that just has green stripes and could be used for any project.  Nothing seasonal about it.  I layered it on a piece of coordinating Garden Green Cardstock. I used the Gold 3/8″ Metallic-Edge Ribbonwhich is a beautiful ribbon with that gold edge. I tied that around, laid on pieces of the Mini Tinsel Trim in Red and the Gold Mini Sequin Trimmade a knot, and then tied a bow. Actually, it looked pretty enough with just the knot and the trim pieces. So if you feel you are not good at bows, just tie a nice knot!

The tag is stamped in Real Red Ink from the Merry Little Labels Bundle.  With the Bundle, you get the stamp set and the coordinating Everyday Label Punch. You’ll want this punch to make this nicely shaped tag.  Might as well save 10% on the Bundle if you like the stamp set!  To layer the tag on a piece of Real Red Cardstock punched with the Everyday Label Punch, I just trimmed down the Very Vanilla stamped piece, even though I cut off the cut little design at the top and bottom of the tag.  That makes it fit on the layer, and then I added two round gold Metallic Enamel Shapes.

All in all, it took just a few minutes to make this quick and easy decorated gift box!

(Don’t order any designer paper until Sunday!  Just sayin’!)

But when you are ready to order some stamping and papercrafting supplies, just go to my Stampin’ Up! Online Store and shop! It’s easy to set up an account and then you are ready to go any time you want to order! It’s time to get started on those holiday craft projects and cards!

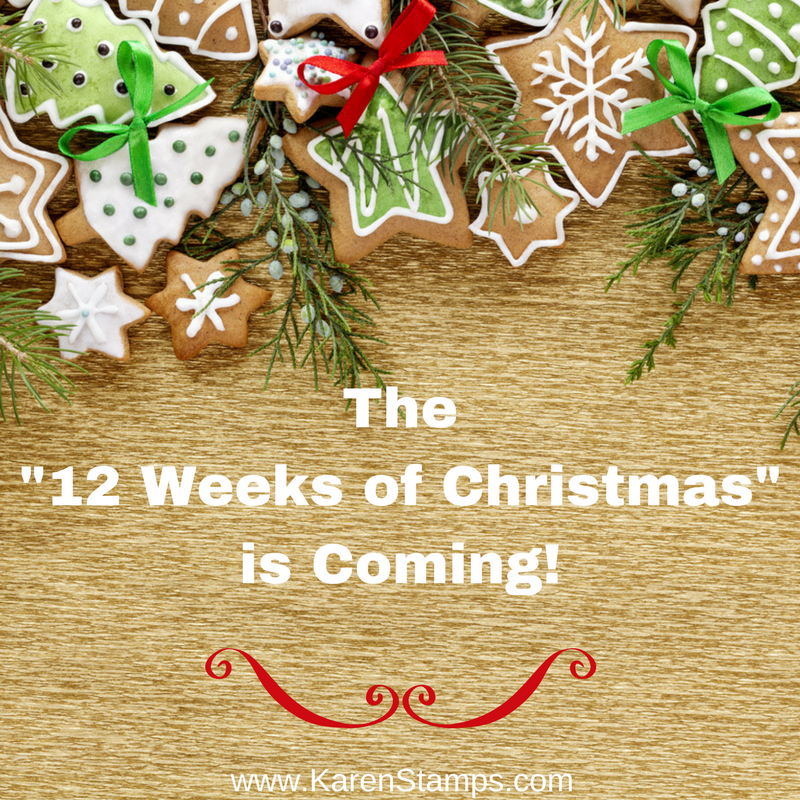
And if you need ideas, you will want to sign up for my Stamping With Karen Mailing List! Beginning next week, I will be sending out a special email every week with a new holiday project and tutorial and the only way you will be able to receive this is to be on my mailing list!  This is a special gift to my wonderful subscribers that I love doing every year!  (If you are already on my mailing list, no need to do anything, you will receive the holiday emails, too!)

Sign up for my Mailing LIst HERE to receive the “12 Weeks of Christmas” Emails!  Sign up before Wednesday, October 4 at 1:00 pm in order to receive the first issue.  You don’t want to miss out!  I have that email and project ready to go! It’s just waiting for your name and email to be included!!


Subscribe to My Mailing List! 

Exclusive Projects

Stampin’ Up! News & Updates

FREE Welcome Gift!

We respect your email privacy

Halloween Card Made with Scraps

Halloween Card Made with ScrapsThis is an easy and fun way to make a Halloween card using scraps of Halloween designer paper!  You can do this type of card for any occasion using any paper, even just plain cardstock in different colors. This card could even be embellished more but I chose to leave it simple.

The card base is Basic Black with a slight Very Vanilla layer. The paper strips are actually glued on to a piece of Pumpkin Pie cardstock. It’s easier to glue strips on to a piece of cardstock, trim the ends, and then layer that on the card than to try to get everything straight directly on the card. This is a great way to use up some scraps you have leftover from other projects. The strips can be the same size or they can be different widths. Just play around until you make them fit on the card. If you are layering on a piece of cardstock, you don’t have to worry about the length of the strips.  Just glue them down and then trim the ends from the back of that cardstock before adhering to the card front.

On this card I just tied on a piece of Basic Black 3/8″ Shimmery Ribbon.  I could have punched out a cat or cut out a pumpkin or added a greeting, but since the Halloween words were part of the paper, I just let that be the greeting.

The Spooky Night Designer Series Paper is a fun package to use for Halloween, and not all the sheets are exclusively for Halloween.  They can be used for other fall cards and projects.

Be sure to check out the Spooky Night Suite of products in the Holiday Catalog!

The “12 Weeks of Christmas” is Coming!

The "12 Weeks of Christmas" is Coming!

You have just one week before we start our annual “12 Weeks of Christmas” campaign! Can you believe it??!

During this campaign, each week you are going to receive a different free project tutorial via email for the holidays!  You’re going to receive ideas for cards, gifts, bags & tags over the twelve weeks leading up to Christmas. We’ll start with card ideas.  It’s going to be so much fun!

The only people, however, who will get these amazing gifts from me are people on my Mailing LIst. So in order for YOU to get these holiday emails, you must be on my mailing list by Wednesday, October 4th at 1:00 PM Central Time. If you’re not, you’ll miss out!

Don’t miss out! We want you to be a part of this! To sign up for my Stamping With Karen Mailing List, here’s how to do it………..

You should see a red sign up box at the bottom of this post. Sign up there!

OR Look for the red box in the upper right corner of my blog and sign up with your name and email!  That’s it!

Remember, you have to be on my Mailing List in order to receive these special “12 Weeks of Christmas” emails each Wednesday, beginning next week October 4th. These are a special gift for my mailing list subscribers who already receive my weekly emails with Stampin’ Up! news and project ideas. We’d love to have you join us!


Subscribe to My Mailing List! 

Exclusive Projects

Stampin’ Up! News & Updates

FREE Welcome Gift!

We respect your email privacy

The “12 Weeks of Christmas” is Coming!

The "12 Weeks of Christmas" is Coming!

Our annual “12 Weeks of Christmas” campaign begins October 4, 2017!

 Can you believe it??!

During this campaign, each week you are going to receive a different free project tutorial via email for the holidays!  You’re going to receive ideas for cards, gifts, bags & tags over the twelve weeks leading up to Christmas. We’ll start with card ideas.  It’s going to be so much fun!

The only people, however, who will get these amazing gifts from me are people on my Mailing LIst. So in order for YOU to get these holiday emails, you must be on my mailing list by Wednesday, October 4th at 1:00 PM Central Time. If you’re not, you’ll miss out!

Don’t miss out! We want you to be a part of this! To sign up for my Stamping With Karen Mailing List, here’s how to do it………..

You should see a sign up box at the bottom of this post. Sign up there!

OR Look for the red box in the upper right corner of my blog and sign up with your name and email!  That’s it!

Remember, you have to be on my Mailing List in order to receive these special “12 Weeks of Christmas” emails each Wednesday, beginning next week October 4th. These are a special gift for my mailing list subscribers who already receive my weekly emails with Stampin’ Up! news and project ideas. We’d love to have you join us!


Subscribe to My Mailing List! 

Exclusive Projects

Stampin’ Up! News & Updates

FREE Welcome Gift!

We respect your email privacy

Make Christmas Crafting Easy With TWO Season of Style Paper Pumpkin Kits

Paper Pumpkin Season of Style Banner New

Can you believe TWO exciting, holiday-themed kits in a row?! That will be the October and November Paper Pumpkin Kits! The way to receive BOTH of them is to subscribe to Paper Pumpkin by October 10th! Each kit stands alone, but I’m sure you will want to have both!

These Season of Style Paper Pumpkin Kits are designed for EVERYONE so you don’t have to worry if you are not already a crafter or if you think you are not artistic!  This is the perfect, fun time to try Paper Pumpkin when we all need as many holiday cards and gifting items as possible!  Order more than one kit and give one as a gift or invite several friends to order, and you can all get together and work on your kits!

Are you someone who always plans to make time for Christmas crafting but somehow you never get it done?   Stampin’ Up! makes it easy for those happy holiday dreams to come true with October and November’s back-to-back coordinating kits. They include everything you will need to quickly and easily make two full kits of merry and bright Christmas projects—without having to set aside a huge block of time.

Subscribe to Paper Pumpkin TODAY so you don’t miss out!  Just do it and it’s off your “to-do” list!

Halloween Witch Trick or Treat Candy Treat Box

Halloween Witch Trick or Treat Candy Treat BoxHere’s a fun Halloween Witch “Trick or Treat” Candy Treat Box to make for Halloween! I think it is the witch on this project that makes it interesting (although I could have made her face better I think!).

Remember the little Fall Treat Bag I made the other day on THIS blog post?  This treat box is made the exact same way, except it is not as tall and I left it open instead of closing the top! This box is about 3 1/4″ tall. I made it with the witch’s hat pattern in the Spooky Night Designer Series Paper.  For the treat inside, I used a Cello Bag to hold some chocolate candy (of course!) and tied with the Basic Black 3/8″ Shimmer Ribbon.  You can make your own “shred” to put in a gift bag or a treat box like this one by just cutting very narrow strips of cardstock and then crumbling it up in your hands as tight as you like!  The greeting is stamped from the Spooky Cat Photopolymer Stamp Set. I even sponged it a little with Pumpkin Pie ink.

Let’s talk about the witch!  I took out a scrap of Lemon Lime Twist Cardstock to possibly punch with a Circle Punch for the witch’s face.  This particular scrap already had a piece punched out with the Pretty Label Punch.  I saw that and thought that, at least, the bottom portion, lengthwise, could look like a witch’s face with a chin! Do you see it??

Lemon Lime Twist Punch outThat’s how I came up with the witch’s face using the Pretty Label Punch!  Then I just cut a triangle and an oval for her witch’s hat and added a small strip of the Pumpkin Pie 1/4″ Stitched Ribbon on her hat band. For her black hair, I just cut a scrap of Basic Black Cardstock and snipped it to look like hair for each side.  No special directions, just play it by ear!  I could have drawn on her face better but I didn’t give it much thought!  I was excited to make her face out of the Pretty Label Punch!

Box Diagram

Remember, check out my blog post HERE to see all the directions for making this box, but above you see the diagram.  For this box, since I wanted it to be shorter than the fall treat bag, I made it shorter than the 6″ width, about 5 1/4″.  The paper is 12″ long.  Score for the bottom flaps with the paper lengthwise at 2″.  Then turn the paper sideways, like the diagram, and score at 1″, 3 3/4″, 6 1/2″ and 9 1/4″. Cut out that little section I have marked with light blue. Fold and crease all the scored lines and assemble the box.

Don’t forget to subscribe to Paper Pumpkin so you get your October and November holiday kits in the mail!  Join Paper Pumpkin HERE!

Shop Paper Pumpkin Today!

Be Sure You Get the “12 Weeks of Christmas” Emails! Coming Soon!

Christmas MailboxWhether we want to believe it or not, Christmas is coming soon! We always want stamping and papercrafting ideas for the holidays, the more the better! Every year I send out a weekly email leading up to Christmas with one project idea and complete instructions and supply list to my mailing list subscribers. This is an “extra” for my subscribers and only they will receive these projects.  They won’t be on my blog or social media. I love doing this for them!

We usually begin with card ideas for the first several weeks, then move on to gift ideas and closer to the “last minute”,  gift bag ideas, tags and wrapping ideas! Copy them exactly or use them for inspiration to come up with your own ideas….or if you’re like me, just enjoy seeing more ideas! I’m all about the ideas, even if I can’t make everything!

If you would like to receive my upcoming “12 Weeks of Christmas” emails beginning SOON, please join us! Sign up for my Mailing List today! It’s the red box in the upper right corner of my blog!  You also get a FREE GIFT available to all subscribers any time, when you sign up.

(If you are on mobile, you might need to scroll down near the end of the blog posts.)

If you are already one of my subscribers, you don’t need to do anything!  You will automatically receive my 12 Weeks of Christmas emails when I begin sending them out!

JOIN MY STAMPING WITH KAREN MAILING LIST TODAY!

 Keep up with Stampin’ Up! news and offers, get stamping ideas on a regular basis PLUS the 12 Weeks of Christmas special emails! We’d love to have you!

Pumpkins Halloween Card

Pumpkins Halloween CardThat’s a lot of pumpkins on this Halloween card!  They are actually from the Spooky Night Designer Series Paper in the Stampin’ Up! Holiday Catalog.  I got the idea for this card from one on Pinterest from several years ago, so I used the basic format and changed my design a little bit.

Pumpkins Halloween Card

As you can see, the card base is a little different.  The fold is on the side for one thing.  I cut the Very Vanilla Cardstock in half lengthwise on the 8 1/2″ x 11″ paper instead of horizontally.  Cut the cardstock in half at 4 1/4″ x 11″, score at 5 1/2″ and fold. Now cut off the top half of the front of the card. You can make this measurement whatever size you want, but I just cut mine in half. Make sure you know which side is the front of your card and which way it opens, then cut on the fold line down to wherever you want and then across the front. My bottom piece (and same as the piece I cut out) is 5 1/2″ x 2 1/8″.  You can save the cut out piece for some other use.

When I had the basic card formed, I adhered a more neutral piece of the Spooky Night Paper to that front portion.  You could also layer with other colors.  I added a different pattern to the inside front of the car. See the photo below.

Pumpkins on a Halloween Card InsideFor the pumpkins, there is a sheet of paper in the Spooky Night Paper that is all pumpkins! Some of the Patterned Pumpkins Thinlits Dies fit some, but not all, of these printed pumpkins. You can use your Big Shot and dies to cut out the pumpkins that fit.  Since I was watching TV, I decided it was just as easy for me to hand cut the pumpkins with Paper Snips scissors. If you like cutting with a scissors, it’s very relaxing to cut mindlessly while watching TV! If you hate cutting, then use the Big Shot! I cut enough pumpkins to fit totally across the front of the card and some for in front of that row along the edge.  I wanted LOTS of pumpkins!

Some of the pumpkins I glued with Mulitpurpose Liquid Glue and some I popped up on Stampin’ Dimensionals. Just be careful with the glue that you know the exact pumpkin placement so that you don’t get glue on the back part that shows.  You don’t want the pumpkin glued to the inside of the card!  I didn’t worry about the backside of that paper showing when the card was opened, and fortunately it was an okay pattern to show.

For the background, I sponged with ink and Stamping Sponges.  I always cut my sponges into pieces.  Some people like to make a portion of a sponge for each color and label them. I already had a cloud template cut out from the Tree Builder Punch.  I just save it and then sponge around the edges to make a cloud…..make a cloud by sponging blue around what will show up to be the white cloud! So it’s really a “mask” to keep from getting ink in a space.  I sponged on some sky with Dapper Denim ink and some gray floating clouds with Smoky Slate ink.  That makes it look a little spooky!

The greeting is from the Spooky Cat Photopolymer Stamp Set, punched out with the Classic Label Punchand layered on a piece of Gold Glimmer Paper, a scrap I had laying around!

This was really an easy card to make!  And I love the end result, if I do say so myself!  Try something like it and see what you come up with! You can copy exactly or you might have a different idea! Get yourself some pumpkins and make a Halloween card today!

SHOP STAMPIN’ UP FOR ALL YOUR HALLOWEEN PAPERCRAFTING NEEDS!


Fall Leaves Card For the First Day of Autumn

Fall Leaves Card For the First Day of Autumn

If you like fall colors, here is an easy fall leaves card for the first day of autumn.  If you have a Big Shot and the Seasonal Layers Thinlits Dies, you can easily make the beautifully die cut leaves for a card.  I love the delicate look of the leaves! The rest of the card is super simple, of course, except for maybe delicately gluing the leaves! But tiny dots of Multipurpose Liquid Glue and a Silicone Craft Sheet make that easier.

Yes, today is the first day of fall, not that there is ANY hint of it here in Houston, Texas where the heat and humidity is miserable!  So I have to make my own fall by using fall colors and thinking ahead to Halloween! And making the air conditioner cool the house down more! The weatherman promises(?) fall weather in a week from now.  We’ll see.  Even if we have it, no telling if it will last, and it most likely will not!  We had some lovely cooler weather after Hurricane Harvey, a blessing for those who had damaged homes and no power or air-conditioning. But now it is hot again….and worse, very humid.

This card is made with Early Espresso Cardstock for the card base and layered with a piece of paper from the Wood Textures Designer Series Paper Stack.  I wanted the colored leaves against the wood-look background.  The greeting is stamped with a stamp in the Wood Words Stamp Set. On the inside, I will probably put a piece of Very Vanilla Cardstock and adhere a small leaf or a strip of the Wood Textures paper along the side or at the bottom. When you have a dark card base like this one, you need to put a light layer of cardstock inside so you can write or stamp your message.

If you want to be precise, the 2017 Autumn Equinox today will be at 3:02 PM Central Time. Celebrate this afternoon by making your own fall cards or projects!  If you have the September Paper Pumpkin kit, this afternoon would be a good time to sit down and make the projects inside to celebrate autumn arriving.

Watch this video for extra inspiration, even if you don’t have the kit!  And if you don’t own the kit, subscribe to Paper Pumpkin today, and if any extra kits are available, you will be able to purchase one on your regular Stampin’ Up! order after you are officially a Paper Pumpkin subscriber. Besides, you won’t want to miss the coordinating holiday crafting kits coming in October and November!  Join Paper Pumpkin today!

Enjoy the first day of fall and look forward to the upcoming holidays!  Do some fall stamping today, on the first day of fall, whether just for a “Thinking of You” card or a card you will send over Thanksgiving.

Quick and Easy Fall Treat Bag For Candy or a Gift

Quick and Easy Fall Treat Bag For Candy or a GiftIf you need a quick and easy fall treat bag for some candy or a gift, making this little bag out of some pretty designer paper or cardstock is about as easy as it gets!  It uses half a sheet of 12″ x 12″ paper and then is scored and cut, folded and glued.  Leave it open at the top or tie shut with a ribbon or something else and you’ve got a cute little treat bag. Make it for any occasion by changing the paper and the greeting or decoration.

Start with a 12″ x 6″ piece of designer paper or cardstock to make this bag. I used a piece of the beautiful Painted Autumn Designer Series Paper  (I love this paper!!). Place the paper lengthwise in the Stampin’  Trimmer or Simply Scored board.  Score at 2″.  This will make the bottom of the bag. Next turn the paper the other way to score four times:  at 1″, 3 3/4″, 6 1/2″ and 9 1/4″. Fold and crease all the score lines with the Bone Folder. It really helps to get a good crease.

Now starting at what will be the bottom flaps of the box, the 2″ scored section, cut those four score lines up to the original 2″ score line. So you will have one little section that is 1″ wide and the rest are 2 3/4″ wide. Cut off the little 1″ section. This diagram isn’t drawn to scale but it gives you the idea! (And I learned a new skill!)  Cut out the light blue portion and cut up on the short score lines at the bottom to the horizontal score line to make the bottom flaps.Box Diagram

Put adhesive, something strong like Fast Fuse, Multipurpose Liquid Glue or Tear & Tape on that remaining 1″ strip. If you have the paper flat on the table, you can just fold over the opposite end and adhere it to that 1″ portion. Do this instead of fumbling with it in a box shape in your hands.

Punch two holes in the top, if you like and tie with a ribbon.  I used the Lemon Lime Twist 1/4″ Ombre Ribbon.  The greeting is stamped from the Labels to Love Stamp Set, stamped on Whisper White in Lemon Lime Twist Ink. Then it is punched out with the 1 3/8″ Circle Punch. The background is a piece of Lemon Lime Twist Cardstock punched with the Pretty Label Punch. I adhered the greeting on to this label, popped it up on Stampin’ Dimensionals on to the bag, and added some Gold Faceted Gems for some bling!

This is a very quick and easy treat bag you can make for fall or Thanksgiving or any occasion for a small gift or a candy treat!  Leave it open or close it up.  It will only take you a few minutes to make and the recipient will think it is fantastic!  If you think your friends would be interested in this blog post, you can share by clicking the buttons below!

Shop Stampin’ Up! for all your papercrafting needs!


Learn New Embossing Techniques

You will enjoy this video from the Stampin’ Up! Home Office about embossing techniques and learn new things!  Embossing with the Heat Tool is one of the things that really amazes new people to our craft when they see it demonstrated! I think heat embossing remains magical even to us experienced stampers every time we do it, especially with the metallic embossing powders!

After stamping and applying the embossing powder, the Heat Tool melts the powder and leaves a raised, stamped image that really adds some pizzazz to your stamping repertoire.

You do need the Stampin’ Up! Heat Tool in order to do this kind of heat embossing. Ours has the metal tip that gets hot while in use that is protected by a plastic cover. This makes it safer to use. I recommend always unplugging the heat tool when not in use, just so it doesn’t fall off the shelf or get bumped and accidentally turn on. I also generally recommend letting the tool heat up for a moment or two before aiming it at the embossing powder.

Be sure to use the Embossing Buddy by rubbing across your paper before stamping.  This eliminates some of the static and keeps the embossing powder from sticking outside the area you are going to emboss.  After applying the embossing powder and dumping off the excess, be sure to look over your piece and try to wipe off any stray specks of embossing powder.  I like to keep a small watercolor brush handy to wipe off any stray powder.

We used to have separate Craft Ink pads that were good to use when embossing.  However, as you see in this video, if you work quickly, you can use our current ink pads before the ink dries. It is worth your while for many other reasons to own the Versamark Ink Pad and surely every stamper has one!  This works great for embossing and is mostly what everyone uses.  Be sure to have the Versamark Refill because you will definitely need it.

I love this gold embossed Definitely Dahlia card I made that you can see HERE.

If you haven’t already tried heat embossing, you might want to after watching this Stampin’ Up! video!  Try it, I think you will like it!  It certainly is impressive on cards and projects and will stun the recipients!  They will think you are a highly talented professional (which, of course, you are!). You can choose various embossing powders to use.  I recommend gold or silver to begin with just for their stunning beauty!

SHOP STAMPIN’ UP! FOR EMBOSSING SUPPLIES!