Stampin' Up! has just announced that the quality issues with the 2 1/2" Circle Punch and the Fancy Flower Punch have been resolved and will be available for order beginning December 1, 2010. That's good news!
Punches Available!
Leave a reply

Stampin' Up! has just announced that the quality issues with the 2 1/2" Circle Punch and the Fancy Flower Punch have been resolved and will be available for order beginning December 1, 2010. That's good news!

Images copyright Stampin' Up! 2010
This card made with My Digital Studio.
Our new son-in-law's birthday came upon us pretty quickly, along with the realization that he is now a member of the family and should get a card and gift! Since he is a big movie-lover, I came up with this card, even though I had to dig around in some retired sets to find "Treat Yourself".

For the "filmstrip technique" I just took a strip of black card stock and punched along the edges with the Spiral Border Punch #119872. Then you stamp on some squares that fit on the strip to make it look like a movie! I have always loved that idea!
Sometimes it is harder to come up with a "male birthday card" but with a little thought it's really not that difficult. Stampin' Up! provides so many kinds of stamp sets that you can find something appropriate for everyone!
While cleaning up some of my samples and cards, I found three packets of card stock, with a sample card, obviously left over from a stamp camp, maybe from last year or the year before. I decidcd I would make something with it!
Here's the "old" card. The stamp set is still current, "Season of Joy" #110384, page 33 of the IB&C, so really just the designer paper is retired.

Here's the new card. I flipped the designer paper to the other side, substituted the tree from Paisley Prints, in the Holiday Mini, clipped the corners, and instead of ribbon I punched a strip with the Dotted Scallop Ribbon Border Punch #119275. I used a greeting from Jolly Old Saint Nick in the Holiday Mini, as well as a little Basic Rhinestone #119246 to top the tree!

If you need any supplies to make your Christmas cards, you can contact me or just go straight to my Online Store HERE.
This is a beautiful stamp set, Scenic Season #115354, from the Stampin' Up! 2010-2011 Idea Book & Catalog, page 36, that allows you to make an easy and elegant Christmas card. Just stamp the trees and a greeting, add a little Dazzling Diamonds Glitter and maybe a snowflake from the die cut Northern Frost #120901 in the corner. Layer on whatever cardstock colors you select. I used Night of Navy and Cherry Cobbler.

Just a quick little 3" x 3" card in honor of Election Day today. Stampin' Up! makes it so easy to make a cute little card for any occasion. You can express yourself with just colors or punches and generic stamps sometimes….you don't always have to have exactly the right occasion stamp.

Here I used Whisper White, Real Red, and Marina Mist card stock, plus the Decorative Label Punch #120907 and the Sizzix Naturally Serif Alphabet #113453 die cut with the Big Shot #113439. For a little pizzazz, I put down a strip of Sticky Strip #104294 and sprinkled with Chunky Essentials Glitter #108797
If you need any stamping supplies, visit my Online Store!
The bride was beautiful, the groom handsome, the wedding a whirlwind! It is an amazing experience to see your child get married and to welcome the new spouse as a real part of the family. And to see all the months of planning actually come together in the decor, the flowers, the food, the music….everything! It was all wonderful!
Of course stamping played a part in all of this! I was honored that my daughter asked me to make her wedding invitations. We were able to partially design the invitation while I was visiting in June, although it was right at catalog change-over time so would we use retiring paper and could we get enough or would we prefer a new color and accessories from the demonstrator preorder? Concord Crush seemed to be the right color, and she loved the new "Vintage Wallpaper" embossing folder and Scallop Trim Border Punch so I had to incorporate all of those. She liked the inside of the Vintage Wallpaper embossing showing so that really dictated the size and design of the whole invitation. It was a paper-engineering and computer feat, but with tips from my cyber-stamping friends with more computer skills than I had I eventually got it ready to go!


One of the insert cards…..my favorite! The bride is from the Spanish set in Celebrando Creatividad, Para la novia. A lot of guests were coming from out of town.

The fan was purchased, of course, but I made the menu, the table number/name, the favor tin and the escort cards. As you can see, it had a bit of a Spanish (as in Spain) theme! It was all fun!

And now back to real life! I don't know where to begin to catch up! But I know Stampin' Up! has some specials going on and new My Digital Studio downloads, and the holidays are upon us! Whew! I better get busy!
More wedding preparations and finally I got to use a color besides Concord Crush! Certainly Celery is a welcome change! And what a great opportunity to use the fabulous Medallion stamp #115223, the best-selling stamp last year, I believe. This stamp is so versatile, whether you want a background, something elegant, something large….stamp it with ink, emboss it, do Poppin' Pastels on it (really pretty!)….so many choices! And it is so much fun to play with the new bling in this year's catalog…..rhinestones and pearls!

After seeing these cards around, I finally tried making one! Just use your Big Shot and Scallop Circle Die #113468! Use a piece of card stock or designer paper (I used a retired paper). Actually I used Whisper White for the card base and also the designer paper so I would have a white inside. Cut your paper twice as large as the scallop on the die and fold in half. Place the fold just inside the scallop edge, omitting about 4 scallops. When you do it, you'll see. After the scallop is cut, you will need to make your own template, but basically you are just going to cut into the middle of the scallop from the open edge and cut out a section to make it look like a baby carriage. Then decorate away!

I've been absent from posting for a few days because I have been busy shopping for shoes for the wedding…mainly so that I can go get my dress hemmed, if necessary. It's not an easy task and one I have always hated. Even though I might like new shoes just fine, my foot is a lousy fit. It's rare that I try on a pair of shoes and think, "Wow! These feel great!" And now, to be shopping for dress shoes, especially FANCY dress shoes, well, it has just been miserable!!
So in honor of the endless shoe shopping, here is a card with shoes on it!

This stamp set, Things I Love, was one we received a year ago at the Stampin' Up! Convention. There is also a stamp of a piece of chocolate in the set, but I didn't think a black piece of chocolate would look that good…even though I probably love chocolate more than I love shoes!
The lighting isn't very good, but there is some bling on this card! I added some black glitter to the shopping bag with Tombow Multipurpose Glue (just push the teeny sprinkles back in to the image with your fingernail to make sharper edges) and the shoes each have a Rhinestone on them as well as the heart. And it is so fun to punch out a little heart with the Small Heart Punch!
Here are some of the supplies I used:
Stamps: Things I Love #115229
Paper: Daffodil Delight, Whisper White, Basic Black, Regal Rose
Ink: Black Stazon
Accessories: Small Heart Punch #117193, Backgrounds 1 Texturz Plates #114512, Scallop Trim Border Punch #118402, Black Chunky Essentials Glitter #108797, 1/8" Black Taffeta Ribbon #119261, Basic Rhinestones #119246
Yes, I did buy a pair of silver shoes that look lovely and hopefully I can wear them long enough to get through the ceremony and get photos taken….now if I can just convince my feet of that!
Finally got photos of some of my swaps I got at the Stampin' Up! Convention! You can click on any of the photos to enlarge them and get a closer view. If you have a question about something you like, just contact me and I'll try to answer it. Enjoy!

This tote looks even prettier in person! The buttons really pop out! So pretty!


If these great swaps stir your creativity and you need some stamps and supplies, you can order online anytime at my Online Store!
Believe it or not, I finally made my Make & Takes from the Stampin' Up! Convention just last night! The day at Convention that I was scheduled to do them I was EXHAUSTED for one thing, plus it was my last opportunity to take pictures of all the displays….AND I really turn into a mess when I stamp in a big group like that! Fortunately, I'm not the only demonstrator that I have heard of that suffers from that same condition! When I sit down, I feel like everyone else knows what to do but me and they are all doing it faster! So I have come to the conclusion that, if I know I have the materials at home, I should just wait and then enjoy solitary stamping! Brings back the memories of fun times at Convention, too!
Thanks So Much Card Pocket

This is a Small Open-End Envelope #107286 with the long side slit open so that small cards and envelopes can be inserted. I would show you the inside but I made a "slight" boo-boo with the circle punch (not reading the directions!). I can fix that later, but haven't yet! You can always fix things in papercrafting! The stamp is the single stamp, "So Many Thanks" #120173.

Some Things Have to Be Believed Card

They gave us a mask to use…the negative paper from cutting Circles #2 with the Big Shot….so we could sponge three colors of ink for the background and then stamp with the beautiful new set "Just Believe", page 109 in the catalog. This is a 3×3 card and Mini Square Whisper White envelope.
Thank You Watercolor Card

I loved making this card, the watercolor effect is so pretty, especially on the Watercolor Paper #105019. I think we don't use this watercolor paper often enough. I inked up the stamp from "Just Believe" using Stampin' Write Markers, spritzed it with water in a spray bottle (very lightly), then stamped it on the watercolor paper. Of course the Small Open-End Envelope got stamped, too!
Paisley Prints Heart Card
Putting the little Basic Pearl #119247 on the tiny flower punched with the flower in the Itty Bitty Shapes Punch Pack #118309 just makes this card, I think! Love the new pearls and rhinestones in the catalog!! The stamp set is Paisley Prints, which you will find in the upcoming Holiday Mini Catalog and the Paisley Party Stampin' Around wheel #120875 on the envelope.

Paisley Prints Pumpkin Card

I really loved making this pumpkin with the new set coming in the Holiday Mini Sept. 1st, Paisley Prints. The ribbon is just folded over with Mini Glue Dots to hold it and the wheel Paisley Party is used on the card and the bottom of the envelope.
Just for You Pouch
This pouch was real easy and so cute! Just punch a slot with the Word Window Punch and cut the flap to fit. Stamp the images from the Just Believe set and make the tiny cute cards to fit inside!


I know I have been MIA for a few days, but I have been a busy bee working on these wedding invitations. Even though it was a lot of work, I enjoyed just taking the time instead of worrying about how many I had to do. My printing came out fine in the end.

And here's a handy use for the Aqua Painter #103954! I love this tool anyway for coloring in stamped images with either ink from the pad, ink from the refill bottle, pastels, etc. It's almost like a watercolor brush with the water right in the barrel. Stampin' Up! has a quality Aqua Painter…..I just leave the water in mine and it doesn't leak or anything. But when faced with licking stacks of envelopes, I happened to think of my Aqua Painter! Just swish the brush along the gummed seal of the envelope (not getting it too wet, of course!) and seal! I couldn't help but think of the old Seinfeld episode where George's fiance dies from licking poisoned envelopes for her wedding invitations!

If you need an Aqua Painter for coloring or sealing envelopes, just check out my Online Store!
This has been a long process and it has barely started. Of course the invitations should be going out soon, which just adds to the pressure. I didn't realize how long it would take to write everything up to fit my idea and get agreement from the bride (long distance). It has been an engineering and computing feat for sure. Apparently I did not really know how to compose wedding invitations on a computer, or at least our printer wanted me to think I didn't. Thanks to my online group of Stampin' Up! demonstrator friends on SUDSOL, who are always standing by to help with any question, I was able to (hopefully) get my computer skills up to par and everything (hopefully) sized correctly…..but we shall see in a little while when I go to the printer. If you are a Stampin' Up! demonstrator and not a member of SUDSOL, you should really consider membership. You can get a trial offer to see how it works and if it suits you.

Will I come home in tears because I did everything wrong or it won't print out right, or will I be jumping for joy?? Will there be a wedding if no one gets an invitation? Stay tuned!
This one I actually copied from the anniversary card my husband gave me! I made a smaller version, but a similar idea. This card is 4" x 4", with the front flap cut a little shorter so that I could add a strip of green designer series paper on the inside layer that would look like grass from the front. And then it adds a little design on the inside of the card as well.
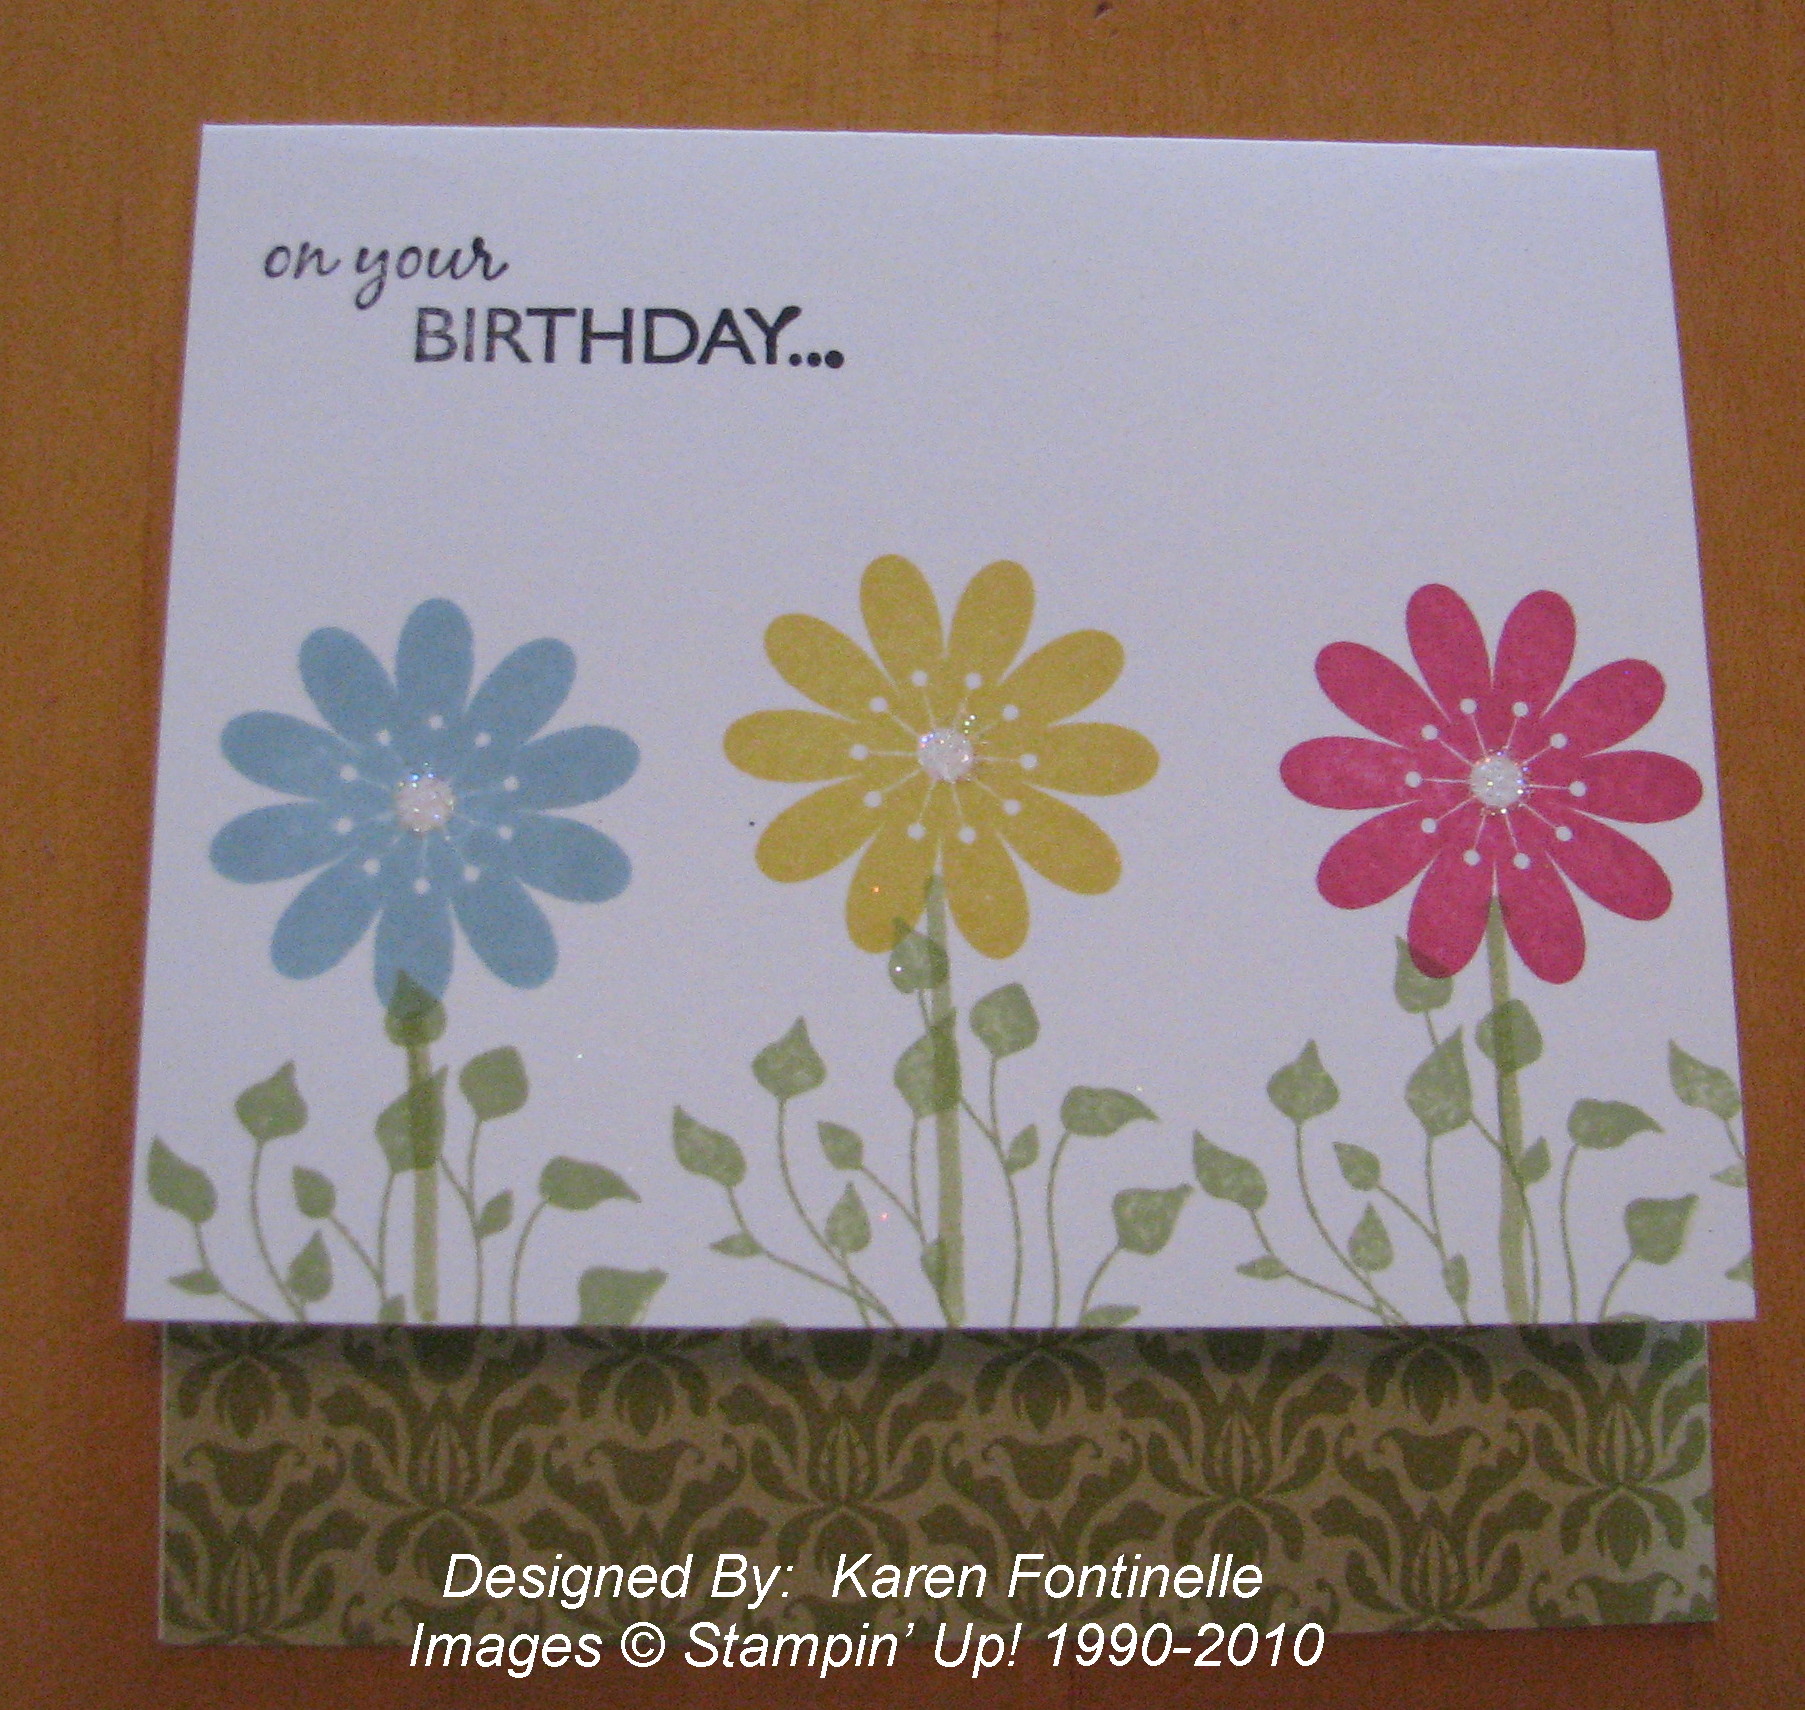
The flowers are stamped with Petal Pizzazz. I drew in the stem and the little leaves are Pocket Silhouettes. Hard to see in the photo but there is a little bling on the flowers from Dazzling Diamonds Glitter!
This was a fun, simple card to make! If you'd like to make one, you can look at the stamping supplies HERE.