If you are celebrating St. Patrick’s Day today, maybe you would like to make this St. Patrick’s Day Pot of Gold Rainbow card! It just takes some watercoloring and some punching! To make this card, I used Shimmery White Card Stock, although Stampin’ Up! Watercolor Paper would be better and easier to work with. But Shimmery White is the next best thing! To make the rainbow, I just used my Aqua Painter (like a paint brush with water in the barrel) and picked up some ink from various colors. Above and below the rainbow I colored in with Soft Sky. I even spritzed the card with a little bit of water and kind of smoothed everything out again with my Aqua Painter.
For the Pot of Gold, I punched a circle with the 1 3/4″ Circle Punch and also the top rim of the pot with the Word Window Punch. I just laid the “rim” on top of the circle where it would stick out a little on the sides, then trimmed off the excess of the circle above that. For the pot feet, I used the 1/2″ Circle Punch.
For the gold coins, I punched both 1/2″ circle coins and 1/4″ circles (1/4″ circle in the Itty Bitty Punch Pack) with those size punches out of the Gold Foil Sheets. I thought the 1/2″ circles were too big but they could at least fill up the background better and then I glued down the 1/4″ circles over them. Worked great!
I wondered what I would use for the greeting, but one of my favorite stamp sets, Teeny Tiny Wishes, had exactly the right words! I just made a little banner out of it and layered it over another piece of Gumball Green, same as the card base. And for a little more pizzazz and gold, I used the Gold Baker’s Twine.
For any of these supplies, you can shop at your convenience online at my Stampin’ Up! Store. Remember, it all counts toward a free Sale-A-Bration product when you spend $50 or more!
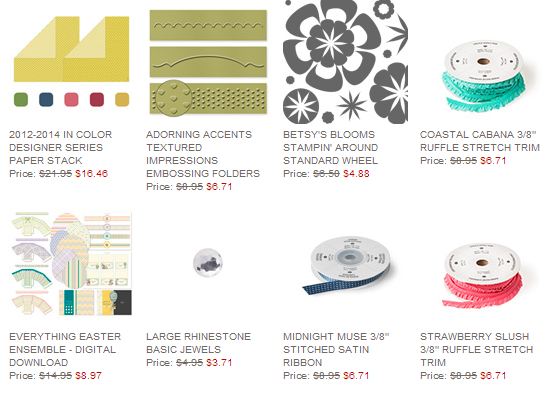
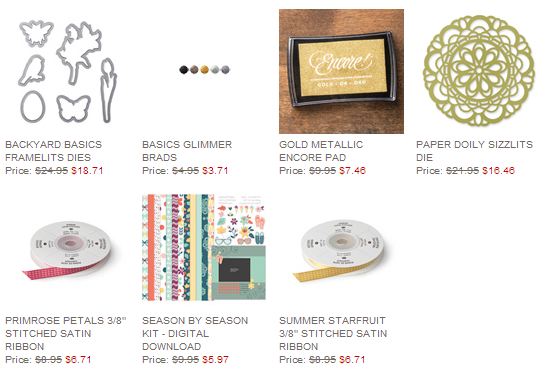
Be sure to check the Stampin’ Up! Weekly Deals that will end tonight!
Have a Happy St. Patrick’s Day and I hope you find your pot of gold at the end of the rainbow! If not, just make your own on a card or scrapbook page!