I wanted to make a special little note card of some kind for a little girl, and this Hearts Treat Bag Envelope is what I happened to come up with! As usual, it wasn’t at all what I planned to make! I was looking in my “stash” for some 3″ x 3″ envelopes that I already had, and I spied this retired package of Sweetheart Treat Bags and that inspired me. It probably was out for Valentine’s Day in a past Stampin’ Up! catalog, but really, when you look at it, there is no reason not to use it for other occasions. Hearts are good any time! To fit inside, I cut a little 3 1/4″ square piece of Whisper White card stock and trimmed it with a Real Red border punched with the Hearts Border Punch.
This retired kit contained the treat bag, little die cut banners and the baker’s twine. I wrote my note and put it inside, then folded the top of the treat bag over. I thought it would be cute to staple the banner piece on to the bag, but I was afraid it would make it difficult for a little girl to open or would cause her to rip open the envelope. So the trick was to put a staple with the Handheld Stapler in the banner but not attached to anything! Then I adhered the banner to the top of the bag with a few Glue Dots.
For a little more decoration, I stamped the heart in Perfect Pennants and cut it out with Paper Snips. I also stamped the “Hello” banner and cut that out. I used Dimensionals to pop up the heart on the banner and wrapped the Baker’s Twine around.
So easy and I used something in my stash! Even if you do not have this kit, all you have to do is copy the idea! Use any little bag you have! Stampin’ Up! sells two kinds you could use: The Kraft Tag a Bag Gift Bags and the Sketched Dots Tag a Bag Gift Bags or even make your own with the Mini Treat Bag Thinlits Dies (as you know, one of my favorite products!). Use them as treat bags or gift card holders or envelopes! It’s all fun!
Today is the last day for the current Weekly Deals:

And while the Paper Pumpkin special offer does not expire for another month, if you would like to receive the August Kit (which I have heard is very cute from people who saw it at Convention), you do need to subscribe today. The 10th of any month is the magic date for anything concerning that current month’s kit. If you subscribe later on, you will receive the September Kit as your first kit, followed by the October Kit.
So what is this special offer?? It’s a good one! For new subscribers, join Paper Pumpkin at 50% off your first two months! Paper Pumpkin is the papercrafting kit that comes in your mailbox once a month from Stampin’ Up! with a creative opportunity inside! It’s a creative project in a box, all supplies included except for maybe some extra adhesive. Your very first kit comes with a clear block to use with your stamps. New stamps and ink spot inside every kit. It’s win-win for non-crafters, new crafters and stampers, experienced stampers and crafters. You can always order extra kits if you want to share them with someone. And once you are a Paper Pumpkin subscriber, you can order any past kits or refills as they are available. Use the Promo Code HALFOFF.
JOIN Paper Pumpkin TODAY!
For all your other Stampin’ Up! shopping, just visit my Online Store HERE or contact me!

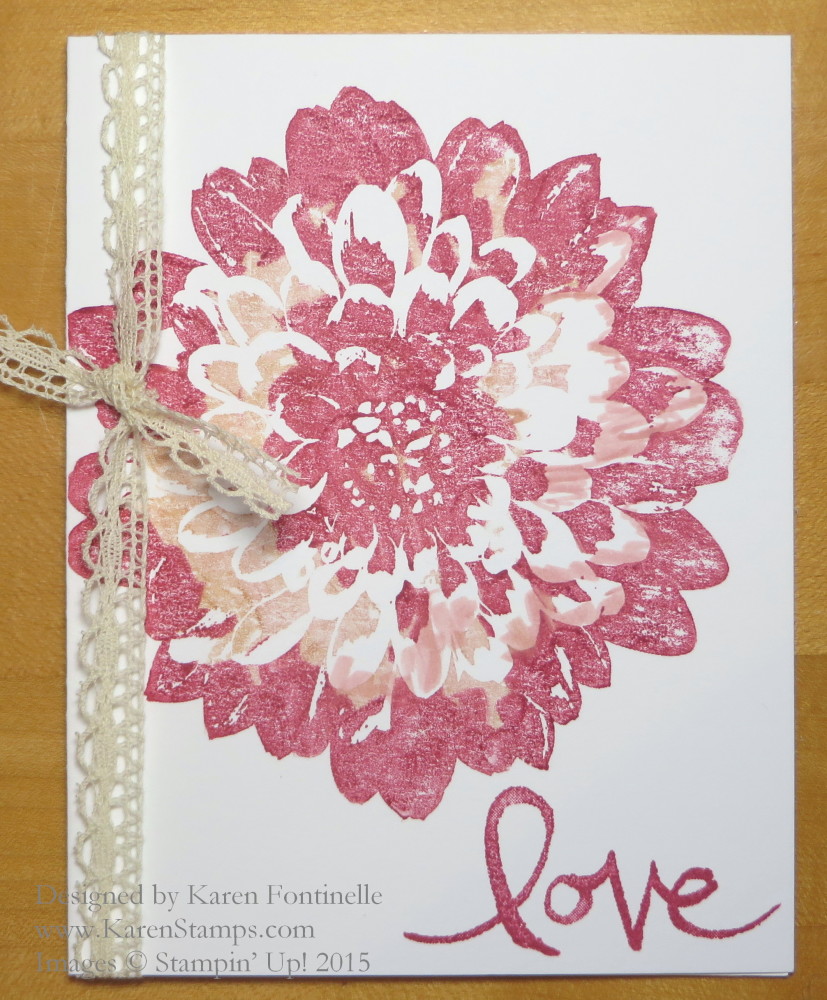
 It was a dark and stormy morning, lots of lightning and thunder here in Houston, so I decided to make an easy, bright card with the Vivid Vases stamp in contrast to the rainy weather! With our recent history of power going off pretty easily, I wanted to stamp something very quick with all the lightning and thunder before the electricity could possibly go off. (So far it has stayed on!) I also wanted something happy and bright. The Vivid Vases Wood-Mount Stamp jumped out at me from my shelf!