Author Archives: Karen Fontinelle

Join Paper Pumpkin!

Paper Pumpkin Escape

Click to get your Paper Pumpkin Escape!

This is the perfect time to join Paper Pumpkin, the delightful papercrafting kit that comes to you in your mailbox once a month! It is almost November 10th, and if you sign up by November 10th, you will receive the November Kit.  Not long to wait!  (After the 10th of any month and you will receive the following month’s kit.) We all look forward to seeing that red box arrive! It’s all in the presentation, as they say, and when you open the box, you will find all of the supplies you need (except adhesive) perfectly wrapped as a gift for YOU! And if you would like to gift others, you can order kits for them as well! There is no obligation, no risk.  Cancel or pause your subscription as you see fit.  And an additional perk, once you subscribe, you are eligible to order any available past kits or refills, in case you missed something you really liked.

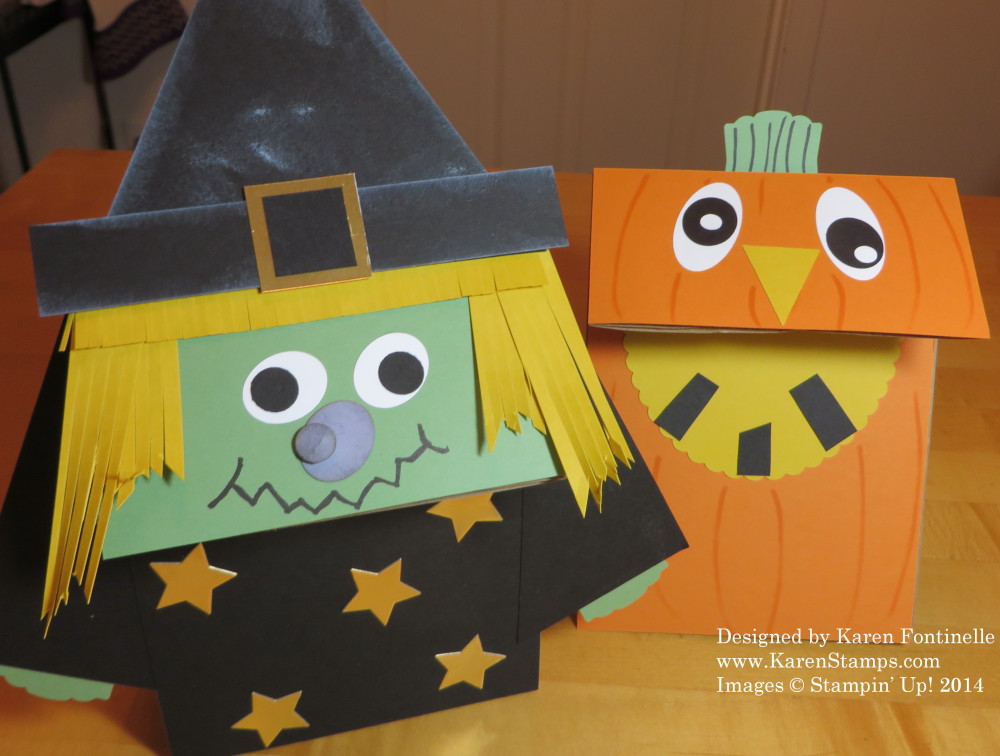
Directions are included to make the project as designed, but with a little googling after the kids arrive, you will find plenty of alternate ideas you might like. The are plenty of creative people out there! Sometimes I make part of the kit as designed and then make some alternate things, just to play! It’s not just cards, it’s a mixture of projects through the months, and I can say, as time has gone on, Stampin’ Up! has only improved the kits with more supplies and better ideas!  With your first kit you will receive a special clear block to use with your included stamps. Usually you need to provide some adhesive, but often there are glue dots or some kind of adhesive included in the kit. So it can hardly get any easier for you to enjoy a little while of crafting time just for you. Yes, each month is a surprise! Some people like surprises, some people would prefer knowing. On occasion there is a sneak peek, but otherwise just step out of the box and take a chance on a surprise. Like I said, if you don’t like the project that comes, use your imagination and creativity (or internet search skills!) and make something to your liking! Or send that kit to your college student or your mother or aunt or nephew or birthday gift to a friend!

Cost is just $19.95 per month, which INCLUDES shipping! Sign up by the 10th of any month to receive your Paper Pumpkin Kit THAT month! So sign up by November 10 or sooner, and mid-month, when Paper Pumpkin Kits ship, your kit will be on its way.  You will not be billed until your kit ships.

To find out more and to sign up, please visit my Paper Pumpkin site HERE!

Here is a video from Stampin’ Up! showcasing the October Paper Pumpkin Kit!


Christmas Snowy House Tag

Christmas Snowy House Tag

This Christmas Snowy House Tag came about after browsing the internet for some inspiration for a Christmas card or tag! There were some scrap pieces in the bag of Kraft 12″ x 12″ Card Stock (which is a little heavier than regular card stock) so I decided on a tag.  This one is a little wide at 3″, but it is fine and I just cut off the top corners. Once I did that, it looked like a house, so I decided to take my White Signo Gel Pen and draw in the house features! I felt like a little kid drawing a picture with not a care in the world for how perfect or imperfect it was! Oh, you couldn’t tell it was hand-drawn because it is so meticulous??!!! I don’t think so!!  Anyway, it was fun and we’ll see if it ends up on somebody’s Christmas package this year!

After drawing in my house with my White Gel Pen, I just tore two scraps of Whisper White irregularly for the snow on the ground and adhered with the Liquid Multipurpose Glue. The little tree happened to be stuck on my end table (I don’t know why) so after seeing it laying there, I thought it would look perfect as an accent with this snowy house!  Then I took my trusty 2-Way Glue Pen and Dazzling Diamonds Glitter to apply “snow” around on the house! Finally I punched a 1/8″ hole in the top of the tag and tied on the Real Red 3/8″ Satin Woven Ribbon.  This ribbon is beautiful! Of course I love that it is red but it is a beatiful RED! I thought my tag was finished, but then I thought it needed a little greeting in the bottom corner.  The greeting is from Good Greetings and is stamped with Crumb Cake ink.

Make a few Christmas tags today. Just get out some stamp sets, ink and paper scraps and see what you come up with! If you need any supplies, just go to my Stampin’ Up! Online Store!

Are You Receiving My 12 Weeks of Christmas Emails Every Week?

Join My Mailing List!

My “12 Weeks of Christmas” emails in the weeks leading up to Christmas are a gift to my mailing list subscribers. Each week I send out an idea, such as a card, a gift idea or some kind of wrapping idea using Stampin’ Up! supplies. They are meant to give the subscriber an exact idea or to inspire them to make their own design, or to just enjoy. Although you have already missed five weeks of the emails, if you are reading this and aren’t on my mailing list, please sign up so you will begin receiving the “12 Weeks of Christmas” this very afternoon at 1:00 pm! There are many more weeks and ideas to go!  After filling out the short form, please watch for the Confirmation email that should come within a few minutes that requires a “click” to make sure you really want to be on my mailing list. You won’t truly be signed up until you do “confirm” your subscription. You will also receive a free gift that you can download as soon as you confirm! Please sign up in the red box at the top on the right side of this page or in the popover if you get it!

Calling All Heroes Birthday Card

Calling All Heroes Birthday Card

This was a pretty easy birthday card to make for my son with the Circle Card Thinlits Die and the Calling All Heroes Photopolymer Stamp Set. I love that stamp set. You might think I didn’t get the buildings stamped very well on the front of the card and you might possibly be right – except for the fact that I read where another demo didn’t get her stamp on the block right and stamped something similar to what I did here.  But instead of calling it a mistake, she thought it made the buildings look rather hazy so she just called it a new technique! My “new technique” goes even farther, as you can see almost all of the buildings look as if they are in a haze or mist, which often happens around here in Houston. It almost gives a romantic look to the city skyscrapers! So I just have another look to my city skyline stamping!  Ha!

And with the Calling All Heroes Stamp Set, you can customize your characters!  You can stamp different heads and disguises to make them heroes or villains! I think it is a fun stamp set to play with! Great for girls or boys, children or adults!

Here is the inside of the card, stamped with a greeting from the Hey You Stamp Set. The stars are punched with the star punch in the Itty Bitty Accents Punch Pack.

Calling All Heroes Birthday Card Inside

Today is the last day for these Stampin’ Up! Weekly Deals!

Stampin' Up! Weekly Deal Oct 28 2014

Click to Shop!

One More Halloween Thing!

There’s an app for the iPhone (maybe other stuff) called Flipagram.  You can select your photos and make a video out of them to post on social media, especially Instagram. Except on Instagram I think it has to be cut to only 15 seconds.

You might have to be signed up for Flipagram (it’s free) to see this, I’m not sure, but here is the link of my first Flipagram I made of my Halloween decorations!

http://flipagram.com/f/LBg5c89ioj

Halloween Flipagram

Click to watch.

Motley Monsters Photo Halloween Card

Motley Monsters Photo Halloween Card

This is an easy Halloween Card to make with the Motley Monsters Designer Series Paper and the On Film Framelits Die, which makes it look like the Motley Monsters are posing in a photo! I cut them out of the designer paper! The job is pretty easy with a pair of Paper Snips. The woodgrain paper behind the monsters is just the opposite side of the monster paper! I had an extra speech bubble cut out with the Word Bubbles Framelits Die so I just used that for the greeting coming from the monster characters!  The words are from the Good Greetings Stamp Set.. The bow is tied with the White-Tangerine Tango Two-Tone Trim A fun Halloween card, I think!

Have a Happy and Safe Halloween Night!  

Don’t let the Motley Monsters get you!!

Triangle Box Witch’s Hat Treat Box

Triangle Box Witch's Hat Treat Box


Here’s another Halloween Treat Box for you.  These triangle boxes are SO easy to make.  Just cut some card stock 4 1/4 x 8 1/2″.  Then find the middle of the top and bottom and mark it.  Place in your Paper Trimmer and score in half at 5 1/2″.  Then score from the middle mark top and bottom on both sides to that 5 1/2″ score line.  Check the diagram below.  Then crease the lines and fold up. Punch holes through the top point and after putting treats inside, tie shut with ribbon. I decorated this to look like a hat with some designer paper and a hat brim piece.  The decoration is a leftover piece from my Paper Pumpkin Kit.

Triangle Box Score Lines

Triangle Box

Triangle Box Witch's Hat Treat Box side

One more day until Halloween! And today is my youngest son’s birthday!  If he had been born 45 minutes later, he would have been a Halloween baby!  My husband was always grateful that Steven waited until halftime of the football game to let us know it was time to go to the hospital! It was a lonely night at the hospital for me on Halloween night as everyone was out trick-or-treating and nobody was visiting me and my new baby at the hospital! But his birthday parties were always fun as they had a Halloween theme! Hard to believe that was 26 years ago tonight!  Time flies, all you young mommies! Treasure every moment!!

Motley Monsters Halloween Treat Bags

Motley Monsters Halloween Treat Bags

Here’s how to make two easy Halloween Treat Bags using the Motley Monsters Designer Series Paper. You just need paper, a Simply Scored Tool or Stampin’ Trimmerand some strong adhesive, like Fuse Fast.

Start with a piece of card stock or designer paper cut to 8 1/2″ x 5 1/2″. Score the paper lengthwise (portrait) at 1 1/2″ on one side. Turn the paper to landscape position (sideways) and score at 1 1/2″, 4″, 5 1/2″, and 8″. Fold and crease all the score lines, preferably with a Bone Folder. The short little 1/2″ wide section on the very end needs to be cut off. Along that same 1 1/2″ wide section, cut on all the score lines up to the score line going across.  This will make the flaps for the bottom of the bag. If you want, just trim those on an angle a little bit to keep the flaps a little less bulky.  Use adhesive on that narrow little 1/2″ flap that is left and fold the bag over to adhere. Then fold the flaps at the bottom and apply a little adhesive.

Motley Monsters Halloween Treat Bag Paper

The opposite side of this Motley Monsters paper is the little bird pattern. The first bag I made, I actually scored 1 1/2″ on each side, which meant that after I formed the bag and folded up the bottom flaps, I had a score line running across the middle of the bag where it wasn’t supposed to be! Rather than waste the paper or add additional paper to hide it (remember, there are NO mistakes in stamping!), I trimmed off a little bit of the top and just folded that top edge down on that wayward score line. That’s the bag on the right with the birds and a top edge of the candy corn pattern! Turned out cute anyway, if not a little smaller!

The bag on the left I did correctly, using the candy corn side of the paper instead of the birds.Once you have the basic bag made, you can leave it like that or you can push the sides in a little and pinch the top closed, punch a hole for ribbon and tie it shut.

It’s very cute and easy to make and can be used for any occasion. Try one! The candy corn bag uses a Halloween greeting from the Merry Everything Bundle and punched with the included Tag Punch. I used the White and Tangerine Tango Trim to tie it shut.  The other bag has a couple of tickets to adorn it from the That’s The Ticket stamp set.  Sometimes we get so carried away with the “new” stuff in the newest catalog that we forget about what other stamp sets we own that might work, too!

You better get to work on your Halloween treat bags!

Shop at my Stampin’ Up! Online Store when you need some supplies!

Stampin’ Up! Weekly Deal Oct 28 2014

Stampin' Up! Weekly Deal Oct 28 2014

Here are the new Stampin’ Up! Weekly Deals for October 28 – November 3. (Is next week really November??!) Punches are always good – and handy! I’ve seen lots of cute cards made with the Blue Ribbon Stamp Set so you might want to consider that! I think the Word Bubbles Framelits are really fun to use on projects.

Click the link above or the photo to see all the discounted Stampin’ Up! products in my Stampin’ Up! Online Store!  Be sure to check the Clearance Rack, too if you are looking for Stampin’ Up! bargains!

Motley Monsters Halloween Framed Picture

Motley Monsters Framed Halloween Picture

If there was one idea in the Stampin’ Up! Holiday Catalog I really wanted to make, it was the Halloween picture frame on page 44. At first I thought the background was stamped with the Freaky Friends stamp set, but then I realized it was a sheet in the Motley Monsters Designer Paper.  I love the cute White and Tangerine Tango Trim across the top as a “clothesline” from which to hang a photo with a Mini Metallic Clothespin holding the photo and tag. The little “Fright Night” tag is stamped with the Project Life Holiday Cheer Photopolymer Stamp Set. I found this frame in my “stash”. It would be nice to have one longer in length as a couple of my Motley Monsters are covered up by the photo, which I trimmed. But the frame is a good neutral for this and lately I added a little Fall Fest stamped pumpkin to the outside of the frame. I think maybe a Halloween greeting banner going across the bottom of the frame in the empty space might be cute, too.

My old photos are somewhat organized, and I found “some” Halloween photos but none of all three kids together. At least I got two of them together! (And it was SO fun coming across some old photos of my boys’ friends and texting them to their moms for some nostalgic memories!! We just wanted to squeeze their sweet little faces!!  Were they ever really that little and cute??!)

Here is a close-up:

Motley Monsters Framed Halloween Picture Closeup

And here is what the whole sheet in the Motley Monsters Designer Paper looks like! This would really be cute in a 12″ x 12″ frame with a number of Halloween photos hanging across the top or maybe even two rows of photos.  I just LOVE it!!

Motley Monsters Page

Don’t discount the Project Life stamp sets and Card Collections because they can be used for so many things even if you are not into scrapbooking or memory-keeping.

Here are some of the main products I used.  Click on any photo to see it in my Stampin’ Up! Online Store!

Freaky Friends Halloween Card

Freaky Friends Circles CardWow!  Is this really the week of Halloween?!! To start off a Freaky Halloween Week, here is a Freaky Friends Halloween card! This is a 6″ x 6″ card base in Basic Black folded in half so that the card itself is 3″ x 6″. I thought that size would work the best for the idea I had. I punched out three different size circles – 1 3/4″, 1 3/8″, 1″. Then I took a pencil and lightly marked on the Whisper White underneath so I knew where the circles were going to be and found a Freaky Friend who would fit in that space nicely. This is when the clear blocks with the clear-mount stamps came in handy to see what I was doing! After stamping the monsters, I sponged a little Daffodil Delight ink around them for a little color. The Whisper White layer on top with the punched out circles, looked a little blah, so I stamped some Gorgeous Grunge dots on the card. I mean, what goes better with Halloween than “Gorgeous Grunge”! I still couldn’t leave it alone so I added some eyeballs from Freaky Friends. I popped up the top layer with Stampin’ Dimensionals and tied on a piece of Tangelo Twist ribbon.  The greeting on the inside and outside are both from the stamp set Good Greetings.

Freaky Friends Card Inside

Here are the parts of the card:

Freaky Friends Card Parts

Good Greetings Free Stamp Set

Time is getting short!  Get your Halloween stamps out and make some cards and treats for your friends and family!

Visit my Stampin’ Up! Online Store any time for all your holiday stamping needs! And we know they ARE “NEEDS”!

Make Some Halloween Monsters with Lunch Sacks

Lunch Sack Halloween Monsters

You and your children (or just you!) can have fun with plain brown lunch sacks made into Halloween monsters! Just trim off about an inch of the top of the bag to get a smooth edge.  The go to town letting your Halloween imagination run wild!

Besides brown lunch sacks, this is what you will need:

Halloween Bag Paper

A bunch of paper!

Halloween Bag Punches

A bunch of punches!

Maybe a paper trimmer and some adhesive too!

Halloween Bag Witch

Lunch Sack Halloween Witch and Pumpkin

Lunch Sack Halloween Pumpkin

Lunch Sack Halloween Monster

Halloween Lunch Sack Monster and PumpkinHalloween Bag open

Here you can see how the lunch sack looks open.  Just fold a flap over from the top.  Or reverse the whole thing and make paper bag puppets for Halloween.

For any paper, punches and other fun supplies, please visit my Stampin’ Up! Online Store!

Make a Halloween Treat With the Tiny Treat Boxes

Halloween Tiny Treat Box

Make an easy Halloween treat or favor using the Tiny Treat Boxes and some stamping and paper! Don’t forget a cello bag of Halloween candy!  You could use this idea for any occasion, actually. The Tiny Treat Boxes are shown in the 2014 Holiday Catalog on page 12 as boxes to make into an Advent or count-down calendar. As you can imagine, you can use them for lots of other things – gift boxes for small gifts, a favor or treat for a birthday or holiday, anything you can imagine.

For this Halloween treat box, I cut a strip of the Confetti Celebration Designer Series Paper almost as wide as the box (about 2″).  I just wrapped it on to each side of the box, scoring with my fingers over each corner and then trimming off the excess paper in the back.  That way it would be sure to fit that box rather than scoring ahead of time. I glued it on with the Multipurpose Liquid Glue in case I needed to wiggle the paper a little to make sure it was fitting on correctly. I’m not even sure how I pulled out that paper!  I must have seen the orange and thought it was Halloween paper! But it worked great! Forgot to mention, I tucked in the side flaps of the box and adhered them to the inside (you wouldn’t have to do that because the bag of candy or gift would keep them inside). Or you could cut them off. The lid of the box I never folded on the score lines and just let it stand up as a background.  I put a piece of the Confetti paper on that background and trimmed off the top around the curved corners.

The ghost and pumpkins were stamped with the Fall Fest Photopolymer Stamp Set and cut out with the Big Shot and the Fun Fall Framelits Dies.  You can buy both the stamp set and framelits together in a Bundle and save 15%! For some reason, all I could think of was that I had to stamp the ghost and didn’t want to take the time to emboss him in white, so I inked him up in Smokey Slate, stamped off once lightly and then stamped him on Whisper White. It worked, and I added Rhinestone Jewels colored with an Old Olive Blendability Marker for the ghost eyes.  I should have just cut him out of Whisper White with the framelit, but then I guess he wouldn’t have the face! So do whatever you like!

The Happy Halloween greeting on the front is from the And Many More Stamp Setpunched out with the Word Window Punch. It seemed fine without a layer behind it! The bag is tied with the Tangelo Twist 3/8″ Satin Stitched Ribbon.

This was a quick and fun project!  Try the Tiny Treat Boxes and see how many ways you can use them!

Gift Box Punch Board Christmas Box

Gift Box Punch Board Box Chevron Ribbon

Images copyright Stampin’ Up! 2014

I hadn’t played with my Stampin’ Up! Gift Box Punch Board in a little while so I thought it was time to make a Christmas gift box! Then when holiday gift wrapping time rolls around, I’ll have an assortment of boxes ready to go!

Make an easy tag with the Merry Everything Bundle which includes the stamp set and the Note Tag Punch. Tie on with a little bit of Linen Thread, always good to have on hand. Do you recognize the ribbon?  It is the Natural 5/8″ Chevron Ribbon turned on the opposite side!

There are several steps to learn (or refresh your memory!) with the Gift Box Punch Board, but the directions are printed right on the board, and it is plenty easy once you do the first one! There’s something about it that I really like!  This box is made with the heavy-weight Under the Tree Specialty Designer Series Paper. This paper is great because one side is a design with the kraft color and the other side is colored. So whichever side you use, the inside and outside of the box both look good! Also, you do not need to use any adhesive with this gift box! It just folds together. Here is a photo of the inside. Those little folded-in flaps will push out of the way when you put a gift inside. You can glue them to the inside of the box if you really want to be neat about it, but it is not necessary.

Gift Box Punch Board Box Inside

Here the plain outside of the box, just assembled! Decorate to your heart’s content with ribbon, tags and whatever you choose!

Gift Box Punch Board Box Plain

The Gift Box Punch Board even punches those little slits on each corner of the lid so you can close it up with just those. Easy to make box, easy to assemble box! Handy to have the Gift Box Punch Board on hand for when you need it!

Don’t forget the new 2014 Holiday Supplement! Check it out and get your order in soon!