Author Archives: Karen Fontinelle

Sheltering Tree First Day of Fall Card

Sheltering Tree First Day of Fall Card

Here is a card made with the Sheltering Tree Stamp Set for the first day of fall.  Can you believe today is the first day of autumn? It’s still plenty hot where I live with no signs of fall at all unless you look at the calendar.  I would love it if I thought we were getting colored leaves soon and jacket weather!  But I doubt that is in the cards until about November here in Houston!

I thought I would pull out a stamp set NOT in the Holiday Catalog for a change. This stamp set can be changed for any season of the year by just coloring the leaves different colors.  To color the leaves stamp, I just took several Stampin’ Write Markers and colored randomly on the stamp.  I think I chose Pumpkin Pie, Real Red, Crushed Curry, and Old Olive. If you start with the lightest color and get darker, you won’t get a dark color on your light markers.  The grass is made up of two different stamps.  One makes the hilly area and the smaller grass blade stamp can be stamped over for more detail.

I decided to change things up a bit and make a 4 1/4″ square card for a change! It’s okay to make different sizes of cards away from the standard size!

Don’t forget to look back at the Stampin’ Up! Annual Catalog because there are still great new things in there!

I hope this Sheltering Tree First Day of Fall Card will get you in the mood for fall, if autumn is coming soon to your part of the country!

Stampin’ Up! Deals

Stampin' Up! Weekly Deal Sept 22 2015

Here are the new Stampin’ Up! Weekly Deals for September 22 – 28, 2015. All great items on the deals this week, whether you want some embellishments or framelits (everybody needs stars in their arsenal!) or a flower stamp set. Sequins are “hot” now.  Be sure to order the new Fine-Tip Glue Pen for adhering the sequins easily.

Stamp Out Breast Cancer with Paper Pumpkin

Stampin’ Up! is supporting the fight against breast cancer by donating $1 for every Paper Pumpkin subscriber and $1 for every NEW Paper Pumpkin subscriber to the Breast Cancer Research Foundation if you subscribe by October 10th! Subscribers will receive their papercrafting kit in a limited-edition pink box!

  • Mini spoiler alert! The October project inside the pink box is just as awesome as always, but we should probably let you know that it is not a pink project. That’s all we’re saying. 😉

Paper Pumpkin is a papercrafting kit from Stampin’ Up! that comes to you  in the mail once a month! All stamps, ink, and supplies are included except possibly adhesive and scissors.  You will be excited for your kit to show up in your mailbox each month and see what project is inside!  No risk, no obligation – you can “pause” or cancel your subscription at any time, just do it before the 10th of any month before the kits ship out.  You will not be billed until your kit ships.  And then you get a cute email from Paper Pumpkin telling you your kit is on its way!

JOIN Paper Pumpkin HERE, especially now, to help people while you have fun stamping!

Sign up before October 10th! The cost of each kit is $19.95 which INCLUDES shipping!  And once you are a subscriber, you can purchase any available full kits or refills from the past.

Paper Pumpkin is FUN!  Just sign up and try it out!  Give yourself a treat!  You deserve it!

Witching Decor Project Kit Witch Hat

If you are interested in this Witching Decor Project Kit, order it right away! Stampin’ Up! says demand is growing the closer we get to fall and Halloween and once they run out there will not be time to order more.  I LOVE this kit and made my witch’s hat in probably about two hours, if that.  It is not difficult.  The most time-consuming part is punching out the die-cut leaves, stamping a little texture (nothing exact) on them, crumpling and stringing. You will also need the Witches’ Night Stamp Set if you want to stamp the Halloween label on the front. But if you want, you can make up something with whatever stamps you have.  But I do love that label as is!

If you like Halloween like I do, you DO want this kit!  But I strongly suggest you order it as soon as possible so you can get one!  I think it is one of the best kits Stampin’ Up! has done.

Shop Stampin’ UP! Online HERE!

A Punch Art Fire Truck

A Punch Art Fire Truck

I made this punch art fire truck card awhile back for a fireman I knew who got a promotion. Of course I never would come up with an idea like this myself, but I found samples on Pinterest and on the internet. I’m not sure who the original creator of this example is, but you’ll find lots of ideas. It seems like fire trucks are quite popular themes for birthday parties – for invitations, favors or decorations.

There were no directions for this fire truck so I had to make it up as I went along. I no longer have the card and the measurements or anything but I can give you the basics and you will make what works with your creative idea.

For the body of the fire truck, I just cut a rectangle that would fit on my card with the upper piece for the cab of the truck. Cut the “windshield” at  a slight angle.  The bottom edge of the truck I cut from the retired Brushed Silver Cardstock, but you could use Silver Foil Sheets or Basic Gray card stock and the I rounded the ends.  Use a punch you have or scissors. The tires, of course, are circle punches as are the headlight and tail light. The ladder is just strips cut and glued before adhering to the truck. There is an orange light at the top. Depending on your window size you might be able to use an old square punch or just cut squares the right size.  I sponged a tiny bit of Smoky Slate ink on the “windows” and sponged a few clouds in the sky with White Craft Ink. The greeting comes from the And Many More Stamp Set.

Just experiment and play and you will come up with your own version of a punch art fire truck!

For any stamping and papercrafting supplies, please visit my Stampin’ Up! Online Store HERE.

Howl-O-Ween Candy Treat Bag Topper

Howl-O-Ween Candy Treat Bag Topper

Make a Howl-O-Ween Candy Treat Bag Topper for an easy way to package a treat of some kind for Halloween. Maybe you will need some favors for a Halloween party or class parties at school or maybe just some special treat bags for your family.

Stampin’ Up! has 4″ x 6″ Cello Bags (102757) that are just the right size for a little treat. Not too small but not too big!  Make a topper of any size you like.  Mine is 4 1/4″ wide  x 3 1/2″ and then folded in half.  The designer paper from Happy Haunting Designer Series Paper  makes a great background on the topper and you will probably have scraps just the right size once you start using it.

I stamped the owl from the Howl-O-Ween Stamp Set in Blackberry Bliss and cut him out with the Boo To You Framelits Dies. The pumpkin is stamped in Tangelo Twist, the coordinating color with the Happy Haunting DSP.  The “Boo” is one of the framelits die. I saw a tip recently saying to use parchment paper in between an intricate die and the card stock and it sure worked well cutting out the Boo word!  Try it if you have some Parchment paper.

Just make a topper for any little treat bag and then decorate it for the occasion!  It’s really fun!

If you want to get an early start on Halloween, shop around in the Stampin’ Up! Holiday Catalog.

When you are ready to order, just go to my Stampin’ Up! Online Store!  If you are new, you will see “Create Your Account”.  Get all that set up and you’re ready to shop! Plan to make a Howl-O-Ween Candy Treat Bag Topper this weekend and be ready to give someone a treat!

Don’t forget the Stampin’ Up! Weekly Deals!  Last day for these is Monday, September 21.

Stampin' Up! Weekly Deal Sept 15 2015


Embellished Ornaments Christmas Card with Gold Glitter

Embellished Ornaments Christmas Card with Gold Glitter

Yesterday I made a super simple, easy Christmas card for my stamping newsletter with this same stamp set, and today I made this more elegant Embellished Ornaments Christmas card with gold glitterI was actually copying a sample card in the Stampin’ Up! Holiday Catalog on page 15. I used the Embellished Ornaments Stamp Set for the whole card.  It also has a nice sentiment to stamp inside the card.

I stamped the holly leaves on the Whisper White card front layer overlapping in the center , which I knew would be underneath the ornament and not show. I inked up the leaves in Old Olive and then used a Blender Pen to remove the green ink from the berries and colored the berries with Real Red marker. Then I went back with the Blender Pen and colored the holly leaves in lightly with Old Olive ink.

The ornament is stamped with Real Red ink and cut out with the Delicate Ornament Thinlits Dies and the Big Shot Die-Cutting Machine.  The little ornament hanger/topper piece is also die cut after being stamped with Smoky Slate ink. You could also stamp this piece with Versamark ink and emboss with Silver Embossing powder. The sample in the catalog used the very thin, fine Gold Metallic Thread behind the ornament. I own it, but have lost it! So instead, I used the Gold Cording TrimI’d prefer the Gold Metallic Thread for a lighter look. The cording is just gathered haphazardly behind the ornament and stuck down with Stampin’ Dimensionals which then adhere the ornament to the card.

For a finishing touch, I used the splatter technique with the Multipurpose Liquid Glue diluted with water from my Aqua Painter as I did in THIS POST.   Since I didn’t look very closely to see my splatters, I kept splattering and got a little carried away!! If I had it to do over, I wouldn’t do quite so much splattering; but oh well, a lot of glitter on a festive Christmas card never hurt anybody! Once you have splattered with the watered down glue, shake on Gold Glitter to cover, then dump off the excess.  Voila!  You have a glittered splattered card!

Use your Holiday Catalog to shop but also to get ideas!  Copy the projects exactly or just take part of the idea for inspiration and make up your own creative idea! That’s why lots of samples are provided in the Holiday Catalog as well as the Annual Stampin’ Up! Catalog.  Enjoy!

Here is a close-up so you can see the glitter better.

Embellished Ornaments Christmas Card close up

If you need any supplies to make my Embellished Ornaments Christmas card,  please click this link to shop online at Stampin’ Up!

Stampin’ Up! Weekly Deals and Paper Pumpkin Breast Cancer Support

Stampin' Up! Weekly Deal Sept 15 2015

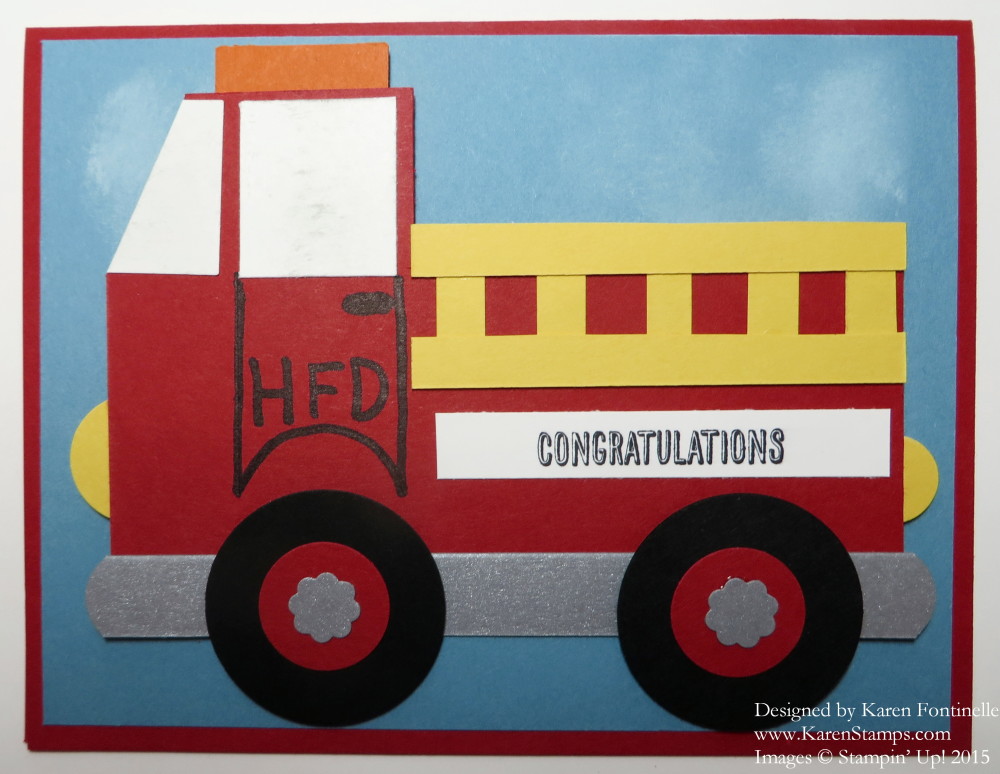
Here are the new Stampin’ Up! Weekly Deals for September 15-21, 2015. In my opinion, there are a couple of GREAT deals on here:  the Mini Treat Bag Thinlits Dies (one of my favorites!) and the beautiful Butterflies Thinlits Dies. If you don’t own these already, I really think you will like them and get a lot of use out of them. You can use the Mini Treat Bag Thinlits for Halloween coming up for treats, even for Christmas for candy treats, small gifts or gift cards. The sizes of the treat bags can even be varied.  Also, you get so many other pieces to use with the basic treat bag die. And of course I’m sure you’ve seen beautiful cards and projects made with the die cut butterflies. The other items are the buttons, ribbons and Fringe Scissors, all things you can use to enhance the look of your creations! Get the discount while it is available!

Don’t forget to check the Clearance Rack, too, for more bargains!

SHOP STAMPIN’ UP!

Stamp Out Breast Cancer with Paper Pumpkin

To show our support for Breast Cancer Awareness Month, we’re going PINK . . . or at least our October boxes are! And because we know our subscribers want to share the love too, we will be making a donation on their behalf to the Breast Cancer Research Foundation (BCRF).

To find out about Paper Pumpkin, the Stampin’ Up! papercrafting monthly kit that comes in the mail, click HERE.

Stampin’ Up! will donate:
$1 for every active Paper Pumpkin subscriber.
Plus, an additional $1 for every new subscriber.

Together, we will make a difference!

Here’s how you can help:

Subscribe! If you’re new to Paper Pumpkin, click here to get started. Your first kit will arrive in a limited-edition pink box that you’ll want to hold onto forever-and we’ll donate $2 because you’re new!
Stay active if you’re a subscriber so we can donate $1 for you. Only those who receive the October shipment will be counted for the donation.
Spread the word! Help us get as many new subscribers as possible. Every current subscriber adds $1 and for new subscribers it’s doubled, so let’s get the word out and raise as much as possible.
Remember, those who get the October kit will not only be donating to a good cause, but they will also get a one-time only, pretty pink Paper Pumpkin box! No one will want to miss it. Promise.

More About BCRF

The Breast Cancer Research Foundation (BCRF) advances the world’s most promising research to eradicate breast cancer. Founded by Evelyn H. Lauder in 1993, BCRF has raised more than $550 million to fuel discoveries in tumor biology, genetics, prevention, treatment, survivorship and metastasis, making it one of the largest non-governmental funders of breast cancer research in the world. This year BCRF has invested $58.6 million in research, to support over 235 researchers at leading medical institutions across six continents, including $11.6 million to the international Evelyn H. Lauder Founder’s Fund focused on metastasis. By spending 91 cents of every dollar on research and public awareness programs, BCRF remains one of the nation’s most fiscally responsible nonprofits. BCRF is the only breast cancer organization with an “A+” from CharityWatch, and has been awarded Charity Navigator’s highest rating of four stars 13 times since 2002. For more information, please visit: www.bcrfcure.org.

Additional Details:

New subscribers are those who signed up between September 11 and October 10, 2015 and have not been a Paper Pumpkin subscriber at any time in the past.
All funds will be donated in US dollars.
Mini spoiler alert! The October project inside the pink box is just as awesome as always, but we should probably let you know that it is not a pink project. That’s all we’re saying. 😉
Funds will be donated based on number of subscribers instead of boxes shipped. But, if you want more than one pink box, you can always increase your subscription quantity by logging into your account at PaperPumpkin.com before October 10.

JOIN PAPER PUMPKIN TODAY AND HELP OTHERS!

Writing Notes Thank You Card

Writing Notes Thank You card

To make this Writing Notes Thank You card, I used the stamp that looks like a piece of notebook paper! It might be one you have completely overlooked in the new Annual Stampin’ Up! Catalog, Writing Notes. It is one I ordered yet barely used. I recommend purchasing the wood-mount since this stamp is a background stamp, and I think they are easier to use with a wood block. I didn’t think of that when I ordered it so I have the clear-mount.

After stamping with Writing Notes on Whisper White with Soft Sky ink, I trimmed it down and adhered it to a Soft Sky card base.  I also stamped with flowers and leaves from the Crazy about You Stamp Set. This stamp set mostly has words, but there are a few flowers to use, too! And you can even get this stamp set in a Bundle with the Hello You Thinlits Dies.

The sentiment on the card is from the stamp set One Big Meaning, a useful stamp set when you are looking for the perfect “Thank You” wording.

With all the excitement over the Stampin’ Up! Holiday Catalog, take a look through the Annual Stampin’ Up! Catalog and see if you have overlooked something in there!

A Way to Use Photopolymer Stamps

Photopolymer Stamping Tip

Here’s a way to use photopolymer stamps, certainly not my original idea, but one that I have heard yet never think about using! Put more than one photopolymer stamp on a block! Make your design with the stamp and then place the acrylic clear block on top. Your stamps will be placed exactly where you want them. Depending on your design, you might be able to stamp over and over with the combination of stamps on one block.

In the card above, I have stamped the colored blocks with the rectangle piece in the Layered Letters Alphabet Photopolymer Stamp Set. Next I laid out the letters I wanted to use exactly where I wanted them placed on the colored rectangles, stamping side down. (The stamps are stained, they don’t have ink on them yet!)

Photopolymer Stamping Tip with Block

After you have your photopolymer stamps laid out how you want them, place the correct size acrylic block right over them to attach to the block for stamping.

Photopolymer Stamping Tip with Stamps on Block

Now with the card I was making with the colored areas I was stamping on, since those area would be differently placed on each card I handstamped, I couldn’t use this same “thanks” stamp set up over and over again.  But if I wanted to stamp just the word “Thanks” over and over, I could place all the letters on the block and stamp over and over for the same look.

Don’t forget, tomorrow, Monday, September 14 is the last day for the current Weekly Deals! Be sure to check them out and see if you want anything!

I hope this way to use photopolymer stamps will stick in your head so if you come upon a stamping situation where it would be handy, you will remember it (better than I do!).

Stampin’ Up! Online Store Open 24/7

Sara Douglass Shows the Season to Season Wreath and Witching Decor Kit


Sara Douglass, daughter of Shelli Gardner, Founder and CEO of Stampin’ Up!, appeared on a local Utah TV show and showed how easy the Season to Season Wreath Project Kit is to assemble and use for multiple occasions. She also shows the completed Witching Decor Project Kit (the witch hat that I love!!).  I always enjoy when Stampin’ Up! makes a TV appearance!

Listen to the cute little reporter! She sounds pretty excited with these projects, but I don’t think she has stamped before! Wouldn’t we all love to get our hands on her at a workshop and show her all about stamping and papercrafting?! It’s always fun to see a new person’s eyes light up when they discover the fun of stamping!

If you would like to watch the Stampin’ Up! videos about assembling these two project kits, here they are!


I hope you enjoyed those! The kits in the Stampin’ Up! Holiday Catalog this year are just fantastic!  I hope you will choose at least one to make!

I’m happy to mail you the current Stampin’ Up! catalogs if you do not have a Demonstrator to help you yet! Just email me your contact information at Karen@KarenStamps.com.

To shop for the Season to Season Wreath Kit and the Witching Decor Project Kit, as well as all the other wonderful Stampin’ Up! products, just visit my Stampin’ Up! Online Store HERE or let me put your order in for you if you prefer!

Witches’ Night Halloween Card Idea

Witches' Night Halloween Card

I love the look of this stamp in the Witches’ Night Photopolymer Stamp Set and used it with some leftover pieces from the Witching Decor Project Kit to make this Halloween card. The label that this is stamped on and the orange and black striped piece behind it, the “31” sticker, plus the fringe piece at the bottom are from the Witching Decor Kit. I am SO thrilled with the witch’s hat I made with that kit. You can see it HERE.

After stamping the label, I sponged some Soft Suede ink around the edges.  I wish I would have also sponged some ink on other parts of the card, but I forgot!  The paper is from the Happy Haunting Designer Series Paper. Now you can buy a pack of coordinating card stock for each pack of designer paper from Stampin’ Up! if you do not own all the card stock colors.  Be sure to look for that when you are shopping. It’s nice to know and to have that convenience. Check out the Happy Haunting Card Stock Pack.

******

Even as we think about fun things today like Halloween and the upcoming holidays, let’s also honor the day, September 11th. It’s difficult to believe that day is so long ago now for those of us who remember exactly what we were doing when we heard about it. Although most of us were actually a physical distance away from the tragedy, I remember the feeling that we wanted to connect with our loved ones who weren’t at home and friends, just to hear that they were all right, even though we knew they were. So maybe we should all take a moment today and write a quick (or long) note to someone we care about and send a card, just to let them know we are thinking about them. We should do this more often, but we are all busy all the time. Think of the joy you will bring someone when they found an actual personal envelope and card in their mailbox.

Here is the special edition stamp Stampin’ Up! created and sold to benefit the September 11th Fund.  The entire purchase price was donated by Stampin’ Up! in remembrance of the victims.

Special Edition God Bless America Stamp by Stampin' Up!

Howl-O-Ween Treat Mini Treat Bag Halloween Card

Howl-O-Ween Mini Treat Bag

You know I love the Mini Treat Bag Thinlits Diesso for Halloween I made this Howl-O-Ween Treat Mini Treat Bag Halloween card.  I just used Pumpkin Pie card stock to make the treat bag with the die and the Big Shot and then I stamped the words “Trick or Treat” all over with matching Pumpkin Pie ink. That’s how you make your own designer paper! I wrapped a little strip of Happy Haunting Designer Series Paper around the bottom of the bag just for a little something.  The owl from Howl-O-Ween Treat Stamp Set is stamped in Blackberry Bliss and die cut with the Boo to You Framelits Dies.  I also die cut the witch’s hat from the Black Glimmer Paper in the Holiday Catalog and just put a little strip of Gold Glimmer Paper on the hat.  Then I also punched a few Gold Glimmer Stars with the star punch in the Itty Bitty Accents Punch Pack.  Easy to make a deluxe Halloween card!

Here is what the inside card looks like.  I added two bits of ribbon, the Basic Black 3/8″ Stitched Satin Ribbon and the Gold 1/8″ Ribbon and stapled on with the Stampin’ Up! Handheld Stapler to help pull the card out.

Howl-O-Ween Mini Treat Bag inside

Notice the strip of Happy Haunting Designer Series Paper!  What do you see?  Just a black and white design?  Or do you see the bats?!  Cute, huh?!

Remember, this year you can buy a pack of card stock that coordinates with the designer series papers rather than buying separate colors, such as this Happy Haunting Cardstock Pack.

So the Mini Treat Bag Thinlits Dies aren’t just for bags or birthdays or treats!  They can be used to make a Howl-O-Ween Treat Mini Treat Bag Halloween Card!

Need anything?!  Shop online at Stampin’ Up! 24/7.

Join Paper Pumpkin Now! Get 50% Off First Two Months!

Paper Pumpkin Special Offer Sept. 2015

Sweep away the mundane-your creativity carriage awaits!

I’m Paper Pumpkin . . .

I come to your door each month (a fully decked-out creativity carriage). I’ll help you to escape your life with some paper fun.

I come in a sweet box, but you’ll really love what you find on the inside:

All the stamps, ink, paper, and accessories to create pinnable projects. Create stuff like cards, journals, décor, and more!

Paper Pumpkin by Stampin’ Up! is a monthly kit program that anyone (even you) can enjoy!

************

Paper Pumpkin Special Offer! Join Paper Pumpkin by September 10th!

Offer Details: Use the code HALFOFF to join Paper Pumpkin before September 10, 2015, and get 50% off the first two months! After that, keep the creativity coming for only $19.95 + tax per month (shipping included). Click HERE to join Paper Pumpkin or get more information.

The Fine Print:

  • For new subscribers only.
  • Available for month-to-month subscriptions, not prepaid subscriptions.
  • Discount applied to one kit per month for the first two months of a new subscription. After the first two months, the price for each month’s kit will go to the regular price: $19.95.
  • Visit PaperPumpkin.com to join.
  • Enter the Promo Code HALFOFF when you sign up.
  • New subscribers must join by Thursday, September 10, 2015; 11:50 PM (MT).
  • Your membership will continue at full price after the first two discounted months.

Stampin’ Up! Deals

Stampin' Up! Weekly Deal Sept 8 2015

Here are the new Stampin’ Up! Weekly Deals for September 8 – 14. I would say the highlight is the Scalloped Tag Topper Punch!  If you don’t have that already, get it! It will help make cute Christmas tags and many other tags and projects! Of course I have always loved the Glimmer Paper and this week the Silver Glimmer Paper is discounted!  Perfect for the holidays coming up! The Confetti Hearts Border Punch is good for making teeny tiny hearts – maybe to put in shaker cards or for some confetti – or to simply punch a unique border on a card or project or scrapbook page. Then we have a couple ribbons, pearls and metallic sequins to embellish with, always great to have an assortment of things to add like that. Sequins are the “in” thing right now and a great adhesive to use with them is the new Fine-Tip Glue Pen in the Holiday Catalog.

Clearance Rack Banner 2015

Stampin’ Up! has announced new items on the Clearance Rack today!  Check it out before you finalize your order!

Paper Pumpkin Special Offer Aug 2015

Click to Join!

And just a couple days remaining to take advantage of the special 50% off first two months of Paper Pumpkin, the Stampin’ Up! kit that comes to you in the mail! Take a little time to relax and craft with a kit all ready for you!  You deserve it! Use Promo Code HALFOFF. Sign up by Sept. 10th to take advantage of this great deal! Let me know if you signed up so  can make sure you are on my list!

Now that we are past Labor Day, it’s time to really start thinking about the upcoming holidays! Get an early start and keep the holidays relaxed (yeah right!). If you need a Stampin’ Up! Holiday Catalog, please contact me. Or check out the PDF HERE at this link.

Before you finish your order, be sure to check out the Stampin’ Up! Weekly Deals and the Clearance Rack!

Jingle All the Way Bundle by Stampin’ Up!

Happy Labor Day!  If you are just relaxing at home today and perusing the internet catching up on ideas for the Stampin’ Up! Holiday Catalog, here is a Stampin’ Up! video about using the Jingle All the Way Bundle. I’m sure this will be a popular set as it is unique and fun! Watch the video for cute ways to use this Jingle All the Way Stamp Set and the Sleigh Ride Edgelits Dies. You will be able to make a stack of Christmas cards with just this Bundle (and of course a Big Shot!) The Bundle saves you 15% and also comes in wood-mount, of course. Be inspired for the upcoming holidays! Get an early start!

If you want a copy of the Stampin’ Up! Holiday Catalog mailed to you, just email me at Karen@KarenStamps.com.

If you love these ideas and want to shop for any of these great Stampin’ Up! products, please visit my Stampin’ Up! Online Store HERE. If you prefer, I can place an order for you.

Witches’ Night Witching Decor Halloween Card

Witches' Night Witching Decor Halloween Card

I hope this Witches’ Night Witching Decor Halloween Card gets you in a Halloween mood! After I made the Witching Decor Project Kit witch’s hat HERE I still had some pieces left in the kit, so I made this card with some of them.  I also wanted to get more use out of my Witches’ Night Photopolymer Stamp Set that coordinates with the Witching Decor Kit. I stamped the smaller piece in the kit with the Trick or Treat stamp and sponged some Soft Suede ink around the edges. That layered on top of another piece in the kit and I added the extra little banner pieces from the kit. I also had some black rhinestones left and put three of those on the stamped banner. I changed out the background a couple of times and finally decided on Basic Black with a couple spider webs stamped in the corners with Whisper White Craft Ink.  The card base is Tangelo Twist.

For the inside you could add a layer of Very Vanilla and maybe stamp with a few spider webs or add a strip of matching designer paper.

Whether or not you usually make Halloween cards to send to friends, this Witches’ Night Witching Decor Halloween Card could also be framed for a Halloween decoration in your home!

Shop the Holiday Catalog in my Stampin’ Up! Online Store!