Author Archives: Karen Fontinelle

Foxy Friends Fox Punch Card

Foxy Friends Fox Punch Card

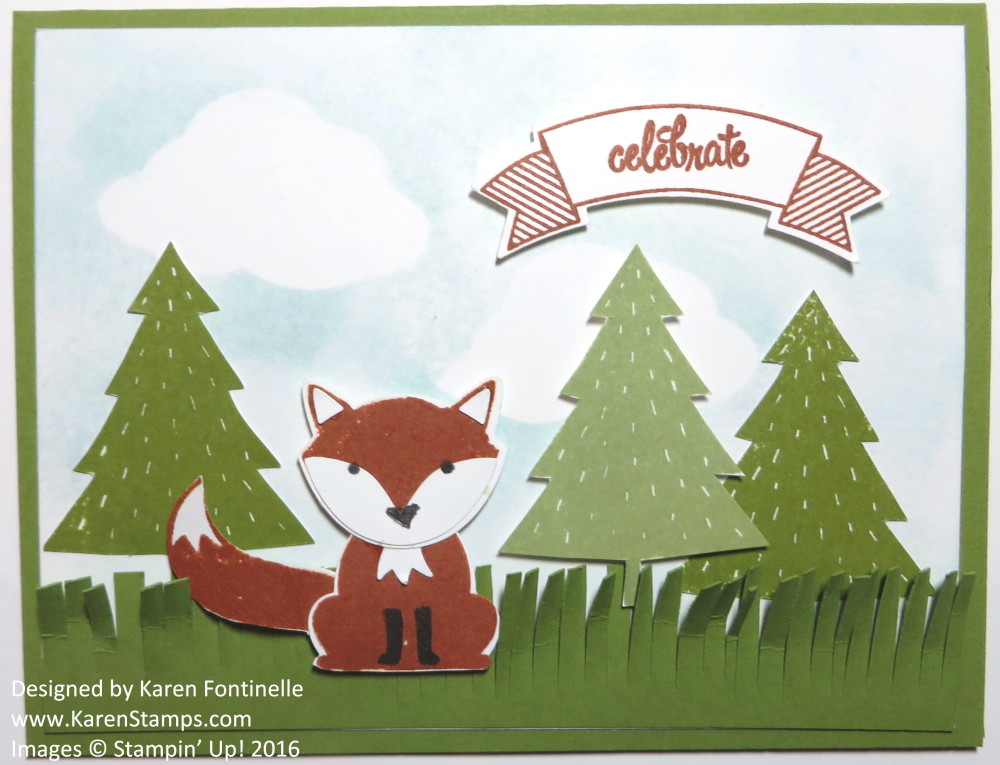
Today I played with the Fox Builder Punch to make this Foxy Friends Fox Punch card. On the Stampin’ Up! video, they show a tip of punching a piece of paper and then stamping through the spaces to have everything lined up so that you can punch all the pieces at one time. I thought that worked pretty well. The punch leaves a bit of a margin around the punched pieces but you can always trim those if you like.  Easier than cutting out all the pieces!

The card base is Old Olive cardstock as well as the grass cut with the Fringe ScissorsThe trees are stamped from the Foxy Friends Stamp Set and I just cut those out by hand, although there are coordinating framelits, Perfect Pines, if you already have those. After assembling the pieces from the Fox Punch to make my fox, I popped him up on Stampin’ Dimensionals as well as one tree. The sky in the background is just sponged in Soft Sky ink using a punched cloud from the Tree Builder Punch that coordinates with the Sprinkles of Life Stamp Set (last year’s Ronald McDonald House Charities Stamp Set, and so popular it is still available THIS year!).  Just put down the cloud and sponge around the edges of it.  So easy!

The banner is stamped with the Thoughtful Banners Stamp Set and punched out with the Duet Banner Punch.  You can purchase these in a Bundle and save 10%.

You can also purchase the Foxy Friends Stamp Set and Fox Builder Punch in a Bundle!

Shop Stampin’ Up! for all these fun products in the new Stampin’ Up! Catalog!

Remember:  With every $50 purchase you will receive via Email a $5 coupon to use in August! This Bonus Days offer ends July 31 – in 4 days!!
Foxy Friends Happy Day Card

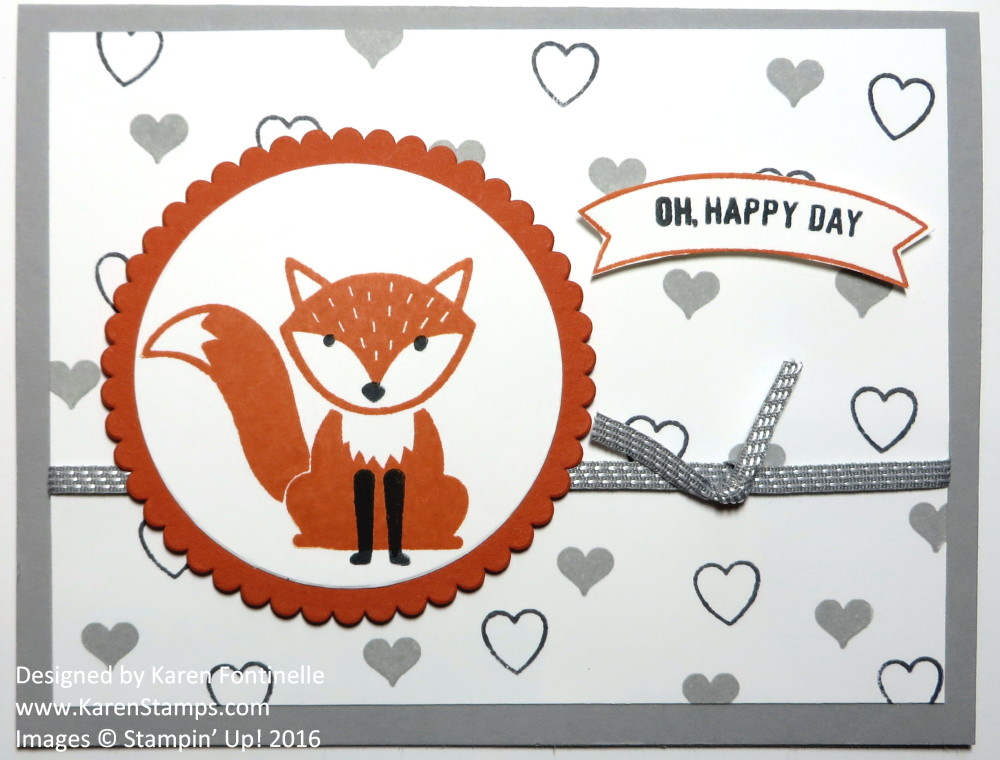
Foxy Friends Happy Day Card

As cute as many of the cards and projects I was seeing using the Foxy Friends Stamp SetI have to admit, looking at the many stamps in the set and the Fox Builder PunchI felt a little intimidated and wondered how to use the punch and all these stamps! Finally I had to stop and watch the Stampin’ Up! video and look at some samples online, and now I have taken the leap! I can’t wait to make some more cards and projects with all these cute critters!

To make this card, I started out kind of copying a sample in the Stampin’ Up! Catalog. As usual, it didn’t come out to be an exact duplicate. The A Little Foxy Designer Series Paper Stack is going on my next order, so I made my own designer paper for this card!  I found two different sized hearts in other stamp sets to stamp for background paper on Whisper White for this card. The card base is made of Smoky Slate Cardstock. The fox is stamped in Tangerine Tango Ink. Then I stamped his eyes and nose and also his front legs. These are some little details that you add with this stamp set. I didn’t use the Fox Builder Punch today on this card!

I tied on some of the Smoky Slate  1/8″ Stitched Ribbon for an embellishment. The fox is die cut with one of the circles in the Layering Circle Framelits Dies and layered on a scalloped circle die. The greeting is made with the Thoughtful Banners Stamp Set and punched out with the Duet Banner Punch. Did you know you can bend the photopolymer stamps a bit if you want them to be curved, like in a greeting?

Check out the A Little Foxy Suite  on pages 56-57 in the new Stampin’ Up! catalog!  So many cute samples and see all the stamps you get in the Foxy Friends Photopolymer Stamp Set. If you are also interested in the Fox Builder Punch, be sure to get the Bundle and save 10%!

Shop Stampin’ Up! for all your cardmaking supplies!

A Birthday Card with Sweet Cupcake

Birthday Card with Sweet Cupcake Stamp Set

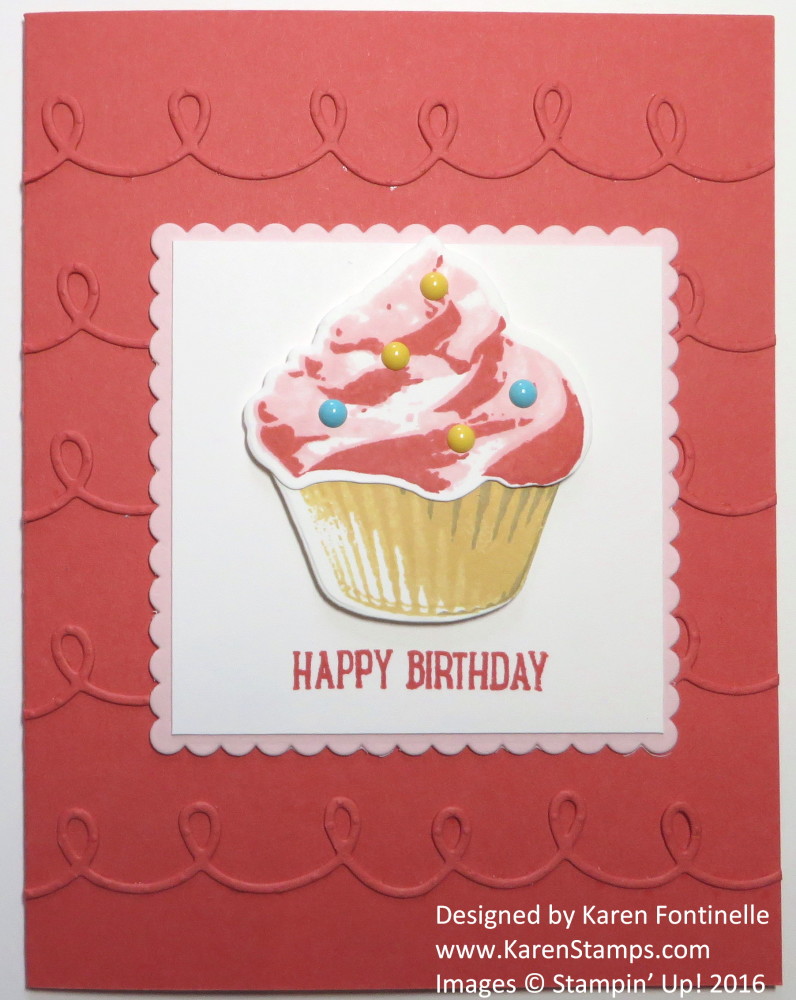
Once you start playing with the Sweet Cupcake Stamp Set you will find so many possibilities with this stamp set and even more with the coordinating Cupcake Cutouts Framelits Dies. Buy these two products together in the Sweet Cupcake Photopolymer Bundle and save 10%, but most importantly, you will have all these tools to make great cards and other projects!

For this card, like yesterday’s card, I used Watermelon Wonder Cardstock for the card base. Then I die cut five squiggles with the Big Shot from the Cupcake Cutouts dies, also out of Watermelon Wonder, just to add a little texture to the background.  I love those squiggles! They are probably the reason I bought the framelits! To adhere them, I just used tiny dots of Multipurpose Liquid Glue. I like to use the Silicone Craft Sheet underneath any narrow pieces like the squiggles so that I don’t get glue on my Grid Paper where I am working on the whole card, and the glue can be wiped off the Silicone Craft Sheet.

I stamped the cupcake the same way I did in yesterday’s post using Pink Pirouette and Watermelon Wonder ink for the frosting and So Saffron and Crumb Cake for the cupcake bottom (or wrapper). I die cut this cupcake and popped it up with Stampin’ Dimensionals.  For some extra pizzazz on the cupcake, I used a few of the Brights Enamel ShapesThis is a product that you might overlook in the catalog, but once you have them you know that they are SO CUTE! Really a fun embellishment!

If you have them, use the Layering Squares Framelits Dies for the background for the cupcake and the little scalloped edge. The Sweet Cupcake Stamp Set comes with lots of great greetings for both the front of the card and the inside so you will get lots of use from this set!

If you are new to my blog or Stampin’ Up! and would like a copy of the new Stampin’ Up! catalog, please contact me at Karen@KarenStamps.com   I would be happy to send you the fantastic new catalog if you are interested in Stampin’ Up! products or would like to get started in the fun hobby (or even BUSINESS!) of stamping, memory-keeping, and papercrafting! Or if you prefer, check out the catalog online HERE.

Shop Stampin’ Up! Online 24/7 HERE!

Sweet Cupcake Birthday Card

Sweet Cupcake Birthday Card

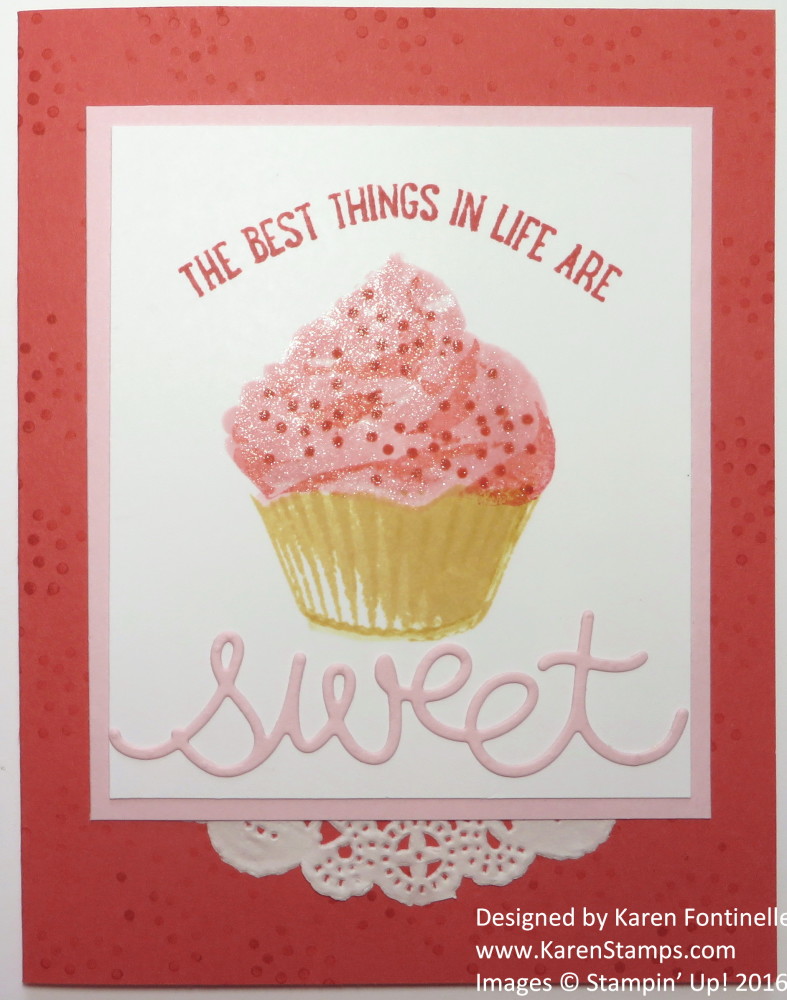
It was finally time to play around with the Sweet Cupcake stamp set and make this Sweet Cupcake Birthday Card!  I think you can even see the glimmer on the frosting from the Clear Wink of Stella Glitter Brush. (Once you start painting on that glitter, you don’t want to stop!)  I didn’t realize that these cupcake stamps are actually 3-step stamping.  You can experiment with them with ink choices and whether to stamp them 1-2-3 or 3-2-1. The stamps are numbered inside on the plastic so you can use that for a guide.  That may sound crazy but the choice will be yours.  You can stamp this cupcake and cut it out with the Cupcake Cutouts Framelits Dies and the Big Shot and pop it up with Stampin’ Dimensionals to give it a 3D look. Get the Sweet Cupcake Photopolymer Bundle with both the stamp set and framelits and save 10% plus be all set to make some cute cards and projects!!

To stamp the cupcake frosting, I used Pink PIrouette Ink and Watermelon Wonder.  I meant to use the new Watermelon Wonder 5/8″ Mini Striped Ribbon on the card but I completely forgot! Maybe the next one!  The cupcake itself (or the cupcake wrapper) is stamped with So Saffron Ink and Crumb Cake. There are lots of combinations or single inks that you can experiment with.

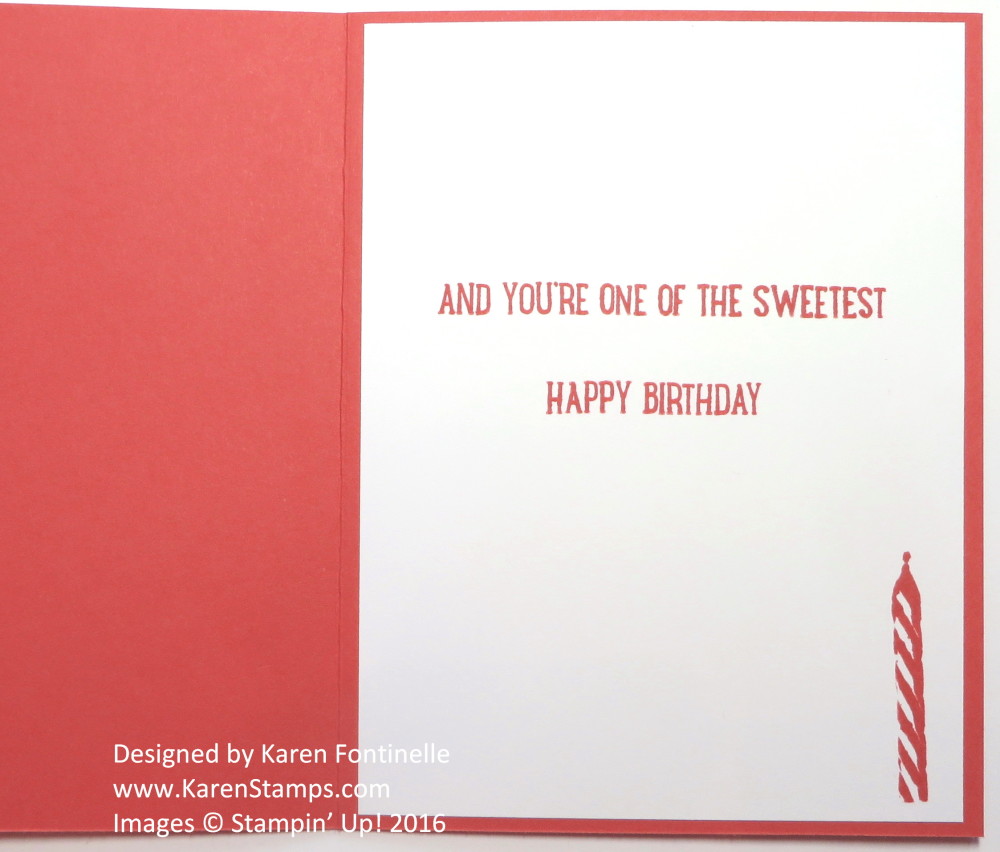
And I love the sayings in this stamp set. I even took a picture of the inside of the card because we seldom show that.  Since the Watermelon Wonder card stock base is rather dark for writing a greeting, I added a Whisper White layer and stamped my greeting. Also, if you noticed on the front, since the stamps are photopolymer, you can actually bend them a little as I did for the greeting above the cupcake.  I also love all the die cuts you can make with the framelits, like the word “Sweet”. At the bottom I added a piece of doily, it’s not one of the new Delicate White Doiliesbut I wanted to use up the ones that I already had. If you don’t own any doilies, they are great to have on hand for just a little bit of texture or embellishment sometimes.

Sweet Cupcake Birthday Card Inside

Don’t forget Stampin’ Up! Bonus Days are going on!  When you spend $50 or more, or any number of increments of $50, you will receive (by email) a $5 coupon to spend in August! Spend $100 in July, get 2 $5 coupons to spend in August, etc. You must have an email address and keep track of your coupons yourself to take advantage of this offer.  Bonus Days end July 31. You can redeem coupons August 2-31.

Can’t you just imagine all the birthday cards you can make with this cute stamp set?! Remember how important it is to send real birthday cards in the mail to our friends, not just take one second to write a greeting on social media! If you want to join the movement started by Shannon West of the Stampin’ Up! Home Office, you might like to invest in this #IMBRINGINGBIRTHDAYSBACK stamp to use maybe on the back of envelopes!

#imbringingbirthdaysback stamp

Shop Stampin’ Up! for all your birthday needs!!


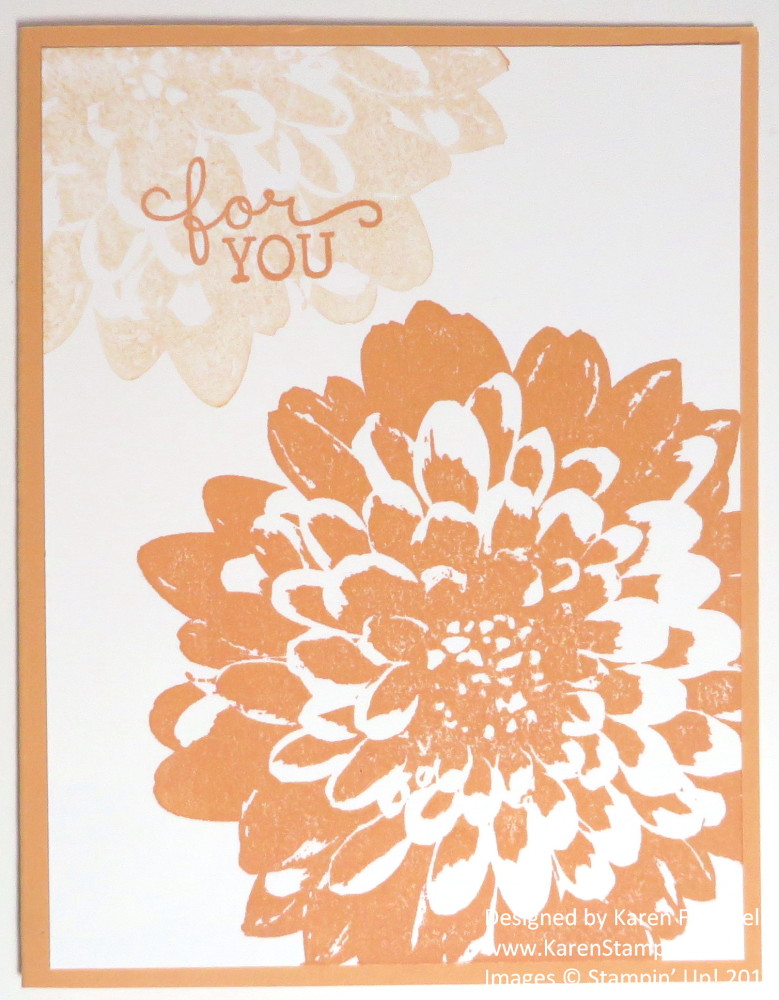
Easy Definitely Dahlia All Occasion Card

Easy Definitely Dahlia All Occasion Card

Here’s how to make this Easy Definitely Dahlia All Occasion Card. The Definitely Dahlia Stamp is one large stamp! Personally, I recommend the wood-mount version for such a large stamp. I just think it is easier than trying to mount the clear-mount on a block each time. The wood-mount is only $5 more than the clear-mount.

To make this card, I just used Peekaboo Peach Card Stock for the card base.  You could use most any color. Then a layer of Whisper White Card Stock.  My intention was to just stamp the large dahlia, but when I did, I wondered if the color was too bright and bold. So I stamped again in the upper portion of the Whisper White without reinking and I loved the look of the light version of the dahlia! You never know what you might come up with in the end when you start stamping!  The greeting is from the Birthday Blooms Stamp Set.  That’s really all you need for this card. It is dramatic as it is, so you don’t have to do any more.

Try your hand at an easy card with big impact like this Easy Definitely Dahlia All Occasion Card, and change the greeting for any occasion you need. Pure stamping at its best on this card!

Shop Stampin’ Up! Online During Bonus Days!

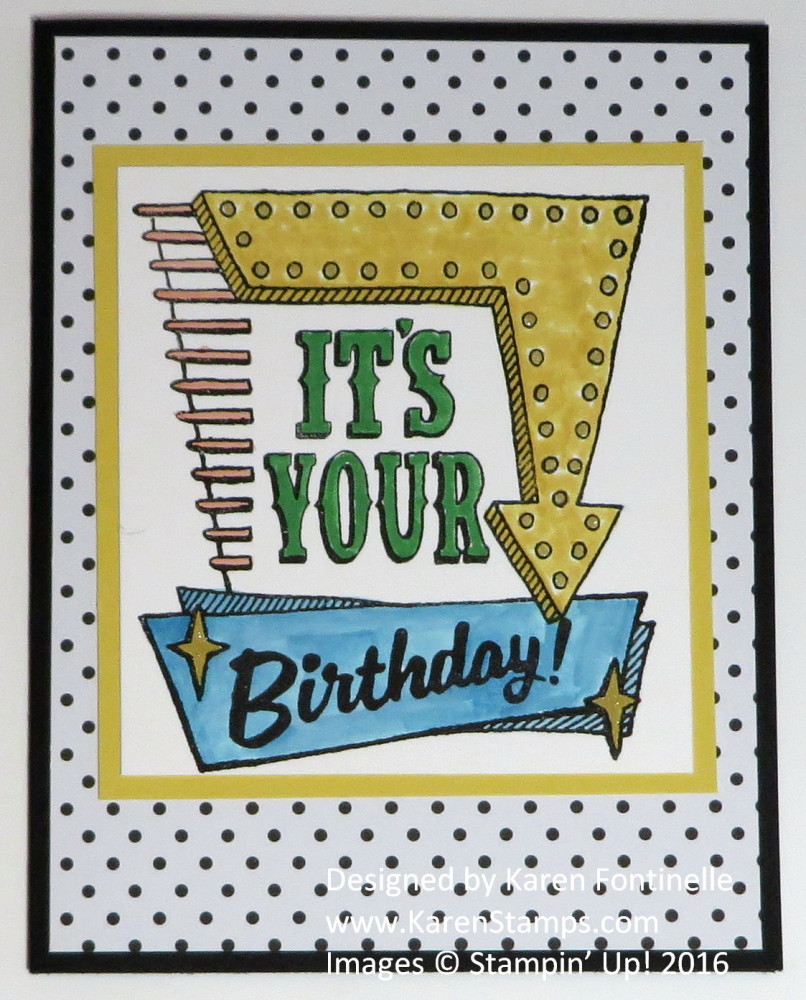
Marquee Messages Birthday Card

Marquee Messages Birthday Card

I played around some more with the Marquee Messages Stamp Set in the new Stampin’ Up! Catalog and made this Marquee Messages Birthday Card!  This is a fun stamp set to play with. It comes with smaller messages that you can add to the front of the card or use for the inside greeting, plus extra little stars and sparkles you can stamp inside or outside to jazz up the card. Use your markers or whatever coloring method you prefer to color in the marquee.  I also used the Gold Wink of Stella Glitter Brush to a little sparkle on the marquee lights and the stars.

On this card I used Basic Black for the card base and added a layer of Pop of Pink Specialty Designer Series PaperAfter stamping the marquee and message, I cut that out and fit on top of a Daffodil Delight card stock layer for the front of the card. If the card base is black, then you need to add a layer of Whisper White to the inside so you can write your message or note and sign your name.  This is the perfect opportunity to stamp a little something in the corners or edges of the white layer. And it is always a good idea to do a little stamping on the envelope if you think of it!

If you don’t like coloring, you could stamp the marquee on a piece of colored card stock or several different colors and cut out various parts.  This is called paper piecing. Lots of opportunities for creativity with this stamp set!

Shop Stampin’ Up! and get your Bonus Days coupons with every $50 you spend in July to use in August!

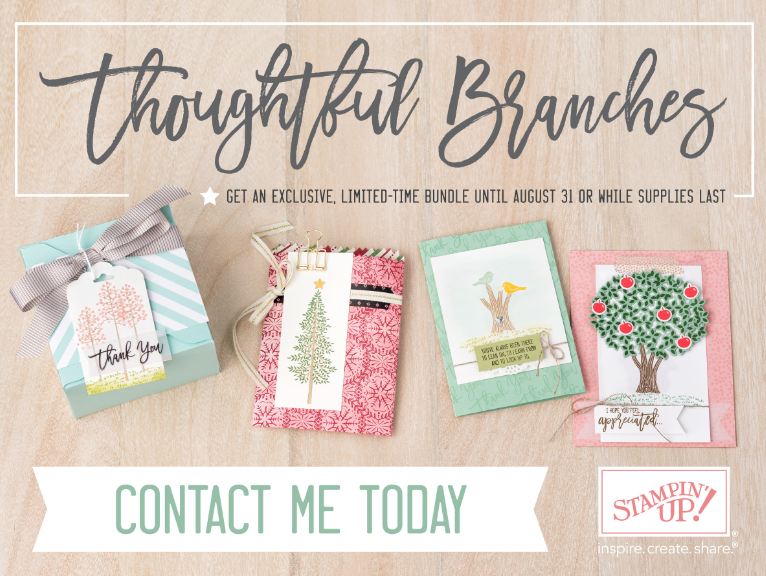
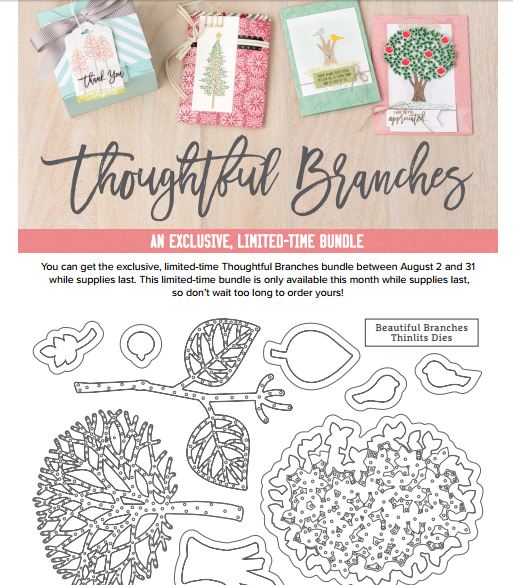
Thoughtful Branches Coming in August!

Thoughtful Branches Samples

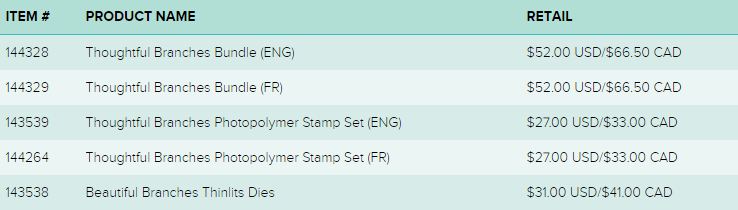
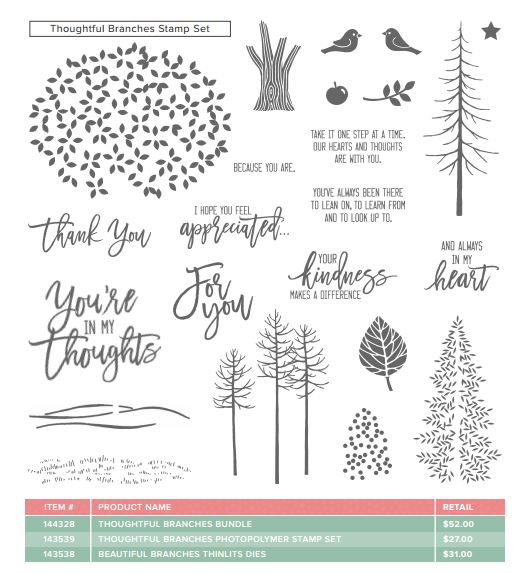
Here is a sneak peek of a new stamp set called Thoughtful Branches that will be available during the month of August only, while supplies last!  There is also a coordinating set of thinlits to die cut the images, called Beautiful Branches. And you can buy the stamps and thinlits in a Bundle and save 10%!  If you receive coupons from your July orders of $50 or more, you can use those to help purchase the Thoughtful Branches products in August!

This promotion runs August 2-31. Here is the ordering information:

Thoughtful Branches Ordering Info

Here is what you get!

Thoughtful Branches Flyer Images1

Thoughtful Branches Flyer Images2

Remember, these products are not available YET, but they will be beginning August 2, 2016 from Stampin’ Up! Stay tuned!!

Order $50 or more (kind of like Sale-A-Bration) during July and get a $5 coupon  with every $50 multiple of your order to spend during August!  Stampin’ Up! Bonus Days are here!

Make a Card For National Ice Cream Day

Make a Card For National Ice Cream Day

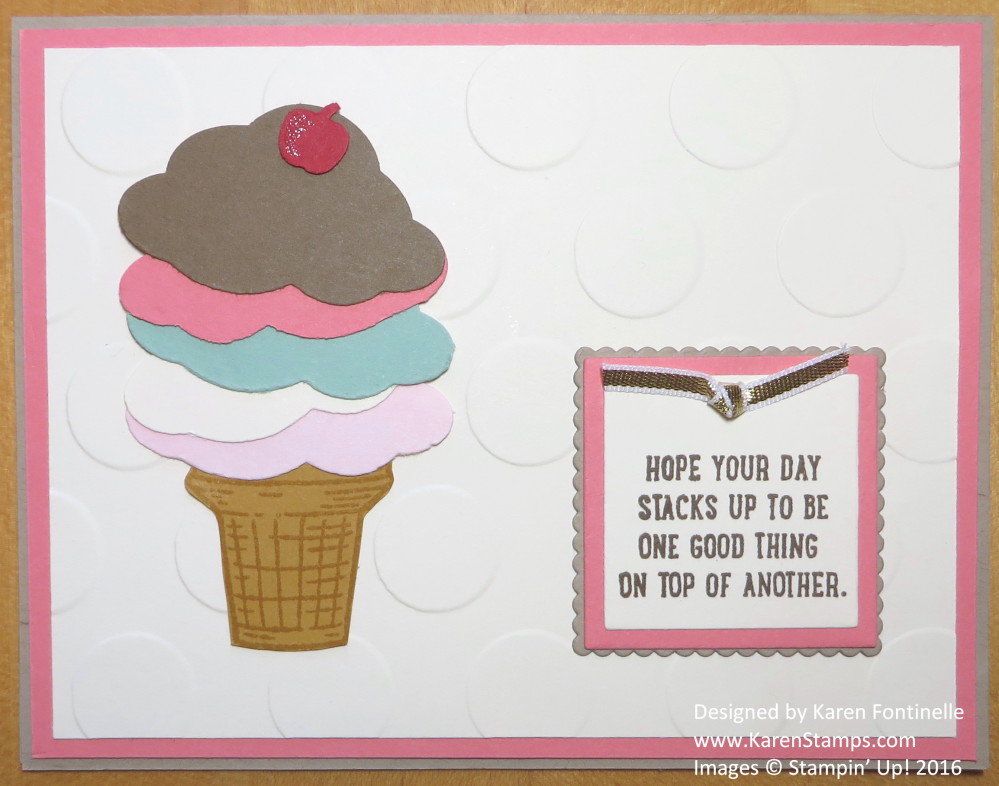
Today is National Ice Cream Day so why not celebrate by making a card about ice cream! Last year’s Ronald McDonald House Charities stamp set by Stampin’ Up! was carried over to the new catalog this year (which I think is a first, that I can remember) and is perfect to use to celebrate National Ice Cream Day! The Sprinkles of Life Stamp Set, with which you can make ice cream cones, also comes with a coordinating punch, the Tree Builder Punch by Stampin’ Up!,

I made the card with a card base of Crumb Cake card stock and a layer of the new In Color Flirty FlamingoThe background layer of the card is Very Vanilla embossed with the Polka Dot Embossing Folder.  The ice cream cone is stamped with Delightful Dijon Ink on Delightful Dijon Card Stock and just cut out with Paper Snips.  The ice cream scoops are punched with the Tree Builder Punch.  I made the flavors out of Pink Pirouette, Very Vanilla, Mint Macaron, Flirty Flamingo and Soft Suede.  The punch even has a little cherry (or in some cases it could be an apple!) to put on top of the ice cream! I added a little glimmer with the Clear Wink of Stella Glitter Brush to the cherry.  So fun to play with the Wink of Stella Glitter Brush!

The greeting comes in the stamp set and I layered it on the new Layering Squares Framelits Dies. Since I had a little space at the top, I added a little knot tied with the Gold 1/8″ Ribbon. This ribbon has been around for awhile and it is so useful.  It also comes in silver so be sure you have both!

What is your favorite ice cream flavor?  Be sure to celebrate National Ice Cream Day by eating a big bowl of ice cream with all your favorite toppings!  And if you must save calories, then make an ice cream card instead!

Shop Stampin’ Up! Online HERE!

Anniversary Card with Floral Thinlits and Floral Phrases Stamp Set

Anniversary Card with Floral Framelits and Floral Phrases

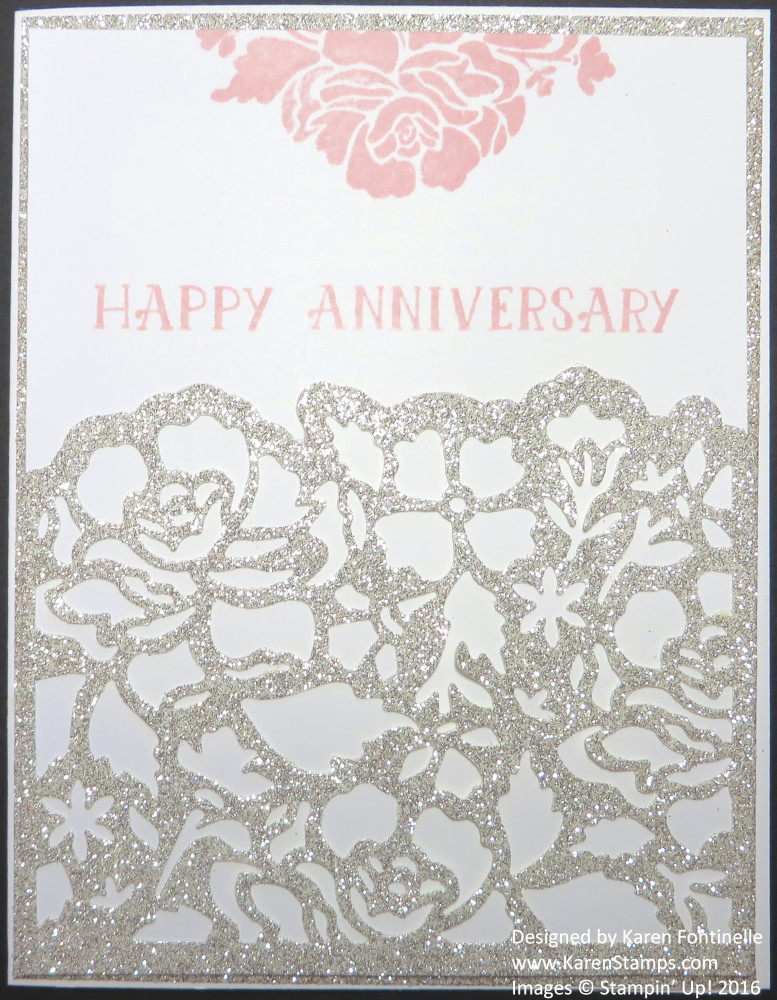
Sometimes an occasions calls for an extra-special card and the new detailed thinlits in the new Stampin’ Up! Catalog sure make it easy as with this Anniversary Card with Floral Thinlits and Floral Phrases. This was basically an easy card to make, just use your Big Shot and one of the new pretty framelits.

The card base is just Whisper White with a layer of Silver Glimmer PaperYou can cheat and cut out the center of the layer of glimmer paper to save and no one will be the wiser! Then another layer of Whisper White on top of that, although I recommend doing your stamping and gluing before adhering to the actual card. I used the beautiful new Detailed Floral Thinlits Dies, just the larger piece, cut off with the little curvy piece that goes across the top. I’m not sure it is necessary, but I did peel off the backing of the glimmer paper before die-cutting just in case it made it easier.  Be sure to roll through at least twice, forward and back, with the Big Shot. Then use the Big Shot Die Brush to get the die cut to release from the framelit and then to get the itty bitty pieces out of the glimmer paper.  Love that tool! If you don’t have that but you have a clean vegetable brush, someone told me that works too. But then you wouldn’t have the foam pad, too. I also used the new Big Shot Platform by Stampin’ Up! that comes with an adapter to use with the thin dies.

I found the “Happy Anniversary” greeting in the Number of Years Photopolymer Stamp SetAnd I couldn’t resist stamping part of the flower that comes in the Floral Phrases Stamp Set in Blushing Bride ink to match the flower.

Today is our 39th wedding anniversary so I will give this card to my husband, who will look at it, put it down, and later I will rescue it for my collection of samples! He never gets to keep his cards! Honestly, it is hard to believe we are even 39 years old, much less married for 39 years and if you add on the extra few years we dated beforehand, wow! Where does the time go??!

If you need a special anniversary card, wedding card, any kind of special card, you need these Floral Thinlits in your collection! You don’t have to die cut glimmer paper, any color paper will be beautiful and with embellishments you can dress it up even more or probably even dress it down. It is an impressive set to own, along with the Floral Phrases Stamp Set. Get them all in a Floral Phrases Bundle and save 10%! That will be just under $50, though, so add something else to your order so you can take advantage of Stampin’ Up! Bonus Days and receive a $5 coupon to use in August on another order!

Shop Bonus Days at Stampin’ Up! During July!

Marquee Messages All Occasion Card

Marquee Messages All Occasion Card

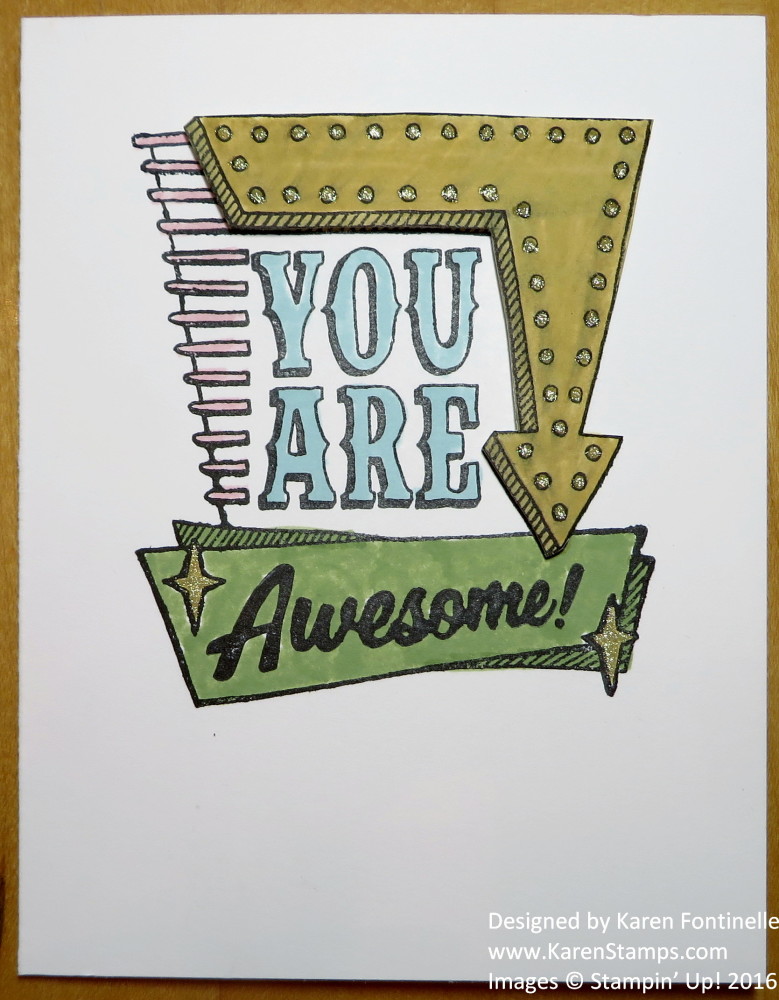
Here is an easy all-occasion card you can make with the Marquee Messages Photopolymer Stamp Set. Use the greetings that I did to send to an “awesome” person for just a friendly note to them or other occasions like a birthday or graduation. If you have other occasions, check out all the greetings that come in the stamp set.  You are sure to find something appropriate!

This card is made very simply by stamping on Whisper White Thick CardstockIf you like, stamp it twice so you can cut out the “arrow” part of the marquee so you can pop it up with Stampin’ Dimensionals. You can do that intentionally, or you can mess up the ink on the original card and then cut out THAT marquee arrow! See, there are no mistakes in stamping! There’s always a way to fix it!  I colored the design with various Stampin’ Write Markers, like So Saffron, Pink PIrouette, Pear Pizzazz and Soft Sky.

For a little pizzazz, even on this simple card, I colored in the little stars with the Gold Wink of Stella Glitter Brush. And why not also color in the light bulbs on the marquee also with the same brush! Honestly, these Glitter Brushes are so fun you can barely make yourself stop coloring! Be sure to put one or both on your next order!

I could have done more with this card, but for an easy, simple card I think this is just fine. Sometimes you have to know when to stop! You could also make this same card with layers behind the marquee image. Lots of fun in store with this stamp set!

Don’t forget Bonus Days at Stampin’ Up!  Spend $50 in July and get a $5 coupon to spend in August from Stampin’ Up!

Shop Stampin’ Up! Online!

Foxy Friends and Fox Builder Punch by Stampin’ Up!

If you are looking for a fun stamp set and punch to play with, you should consider the Foxy Friends Stamp Set and the Fox Builder Punch by Stampin’ Up! You can make more than just foxes with this set! Watch the video and see what other critters Andrea from the Home Office can make! If you want to save money, purchase the Foxy Friends Photopolymer Bundle which includes the stamp set and punch and save 10%.

Watch this video and find out what you can do with this stamp set and punch plus some tips on using the punch!

If you want to purchase this Bundle, just go to the Stampin’ Up! Online Store!  Remember, it is Bonus Days at Stampin’ Up! so with every $50 purchase you will receive a $5 coupon to use on an order in August!  You must have an email address to receive the coupon.  If that is a problem for you, let me know.

Shop Stampin’ Up! Online HERE!

Try Project Life by Stampin’ Up! for Memory-Keeping

Project Life Banner 2016

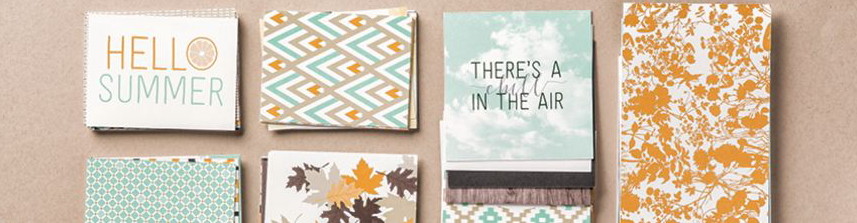
One of the really fun and cute products, I think, in the Stampin’ Up! Product Line is Project Life by Stampin’ Up! You can choose from cards like you see in the photo above that decorate your pocket pages or give you a place to do some journaling.  I think it is SO important to do some journaling IN YOUR OWN HANDWRITING, I don’t care how bad you think your handwriting is!! (Getting on my soap box here!) When I see someone’s personal handwriting, I see the person. This is all the more relevant when looking at old letters, scrapbooks, memorabilia, etc. But back to Project Life! Besides the cards that come in a cute box, you can use the coordinating stamps and the oh so fun Accessory Pack of the cutest little embellishments to use, if you want, on your pocket cards. You can even buy just the Accessory Pack if you want some extra embellishments for your regular card-making or projects!  Lots of choose from!  And be sure to get the Journaling Pens!

Try Project Life for your Memory Keeping today!

Tuxedo Pop Up Card

Tuxedo Pop Up Card

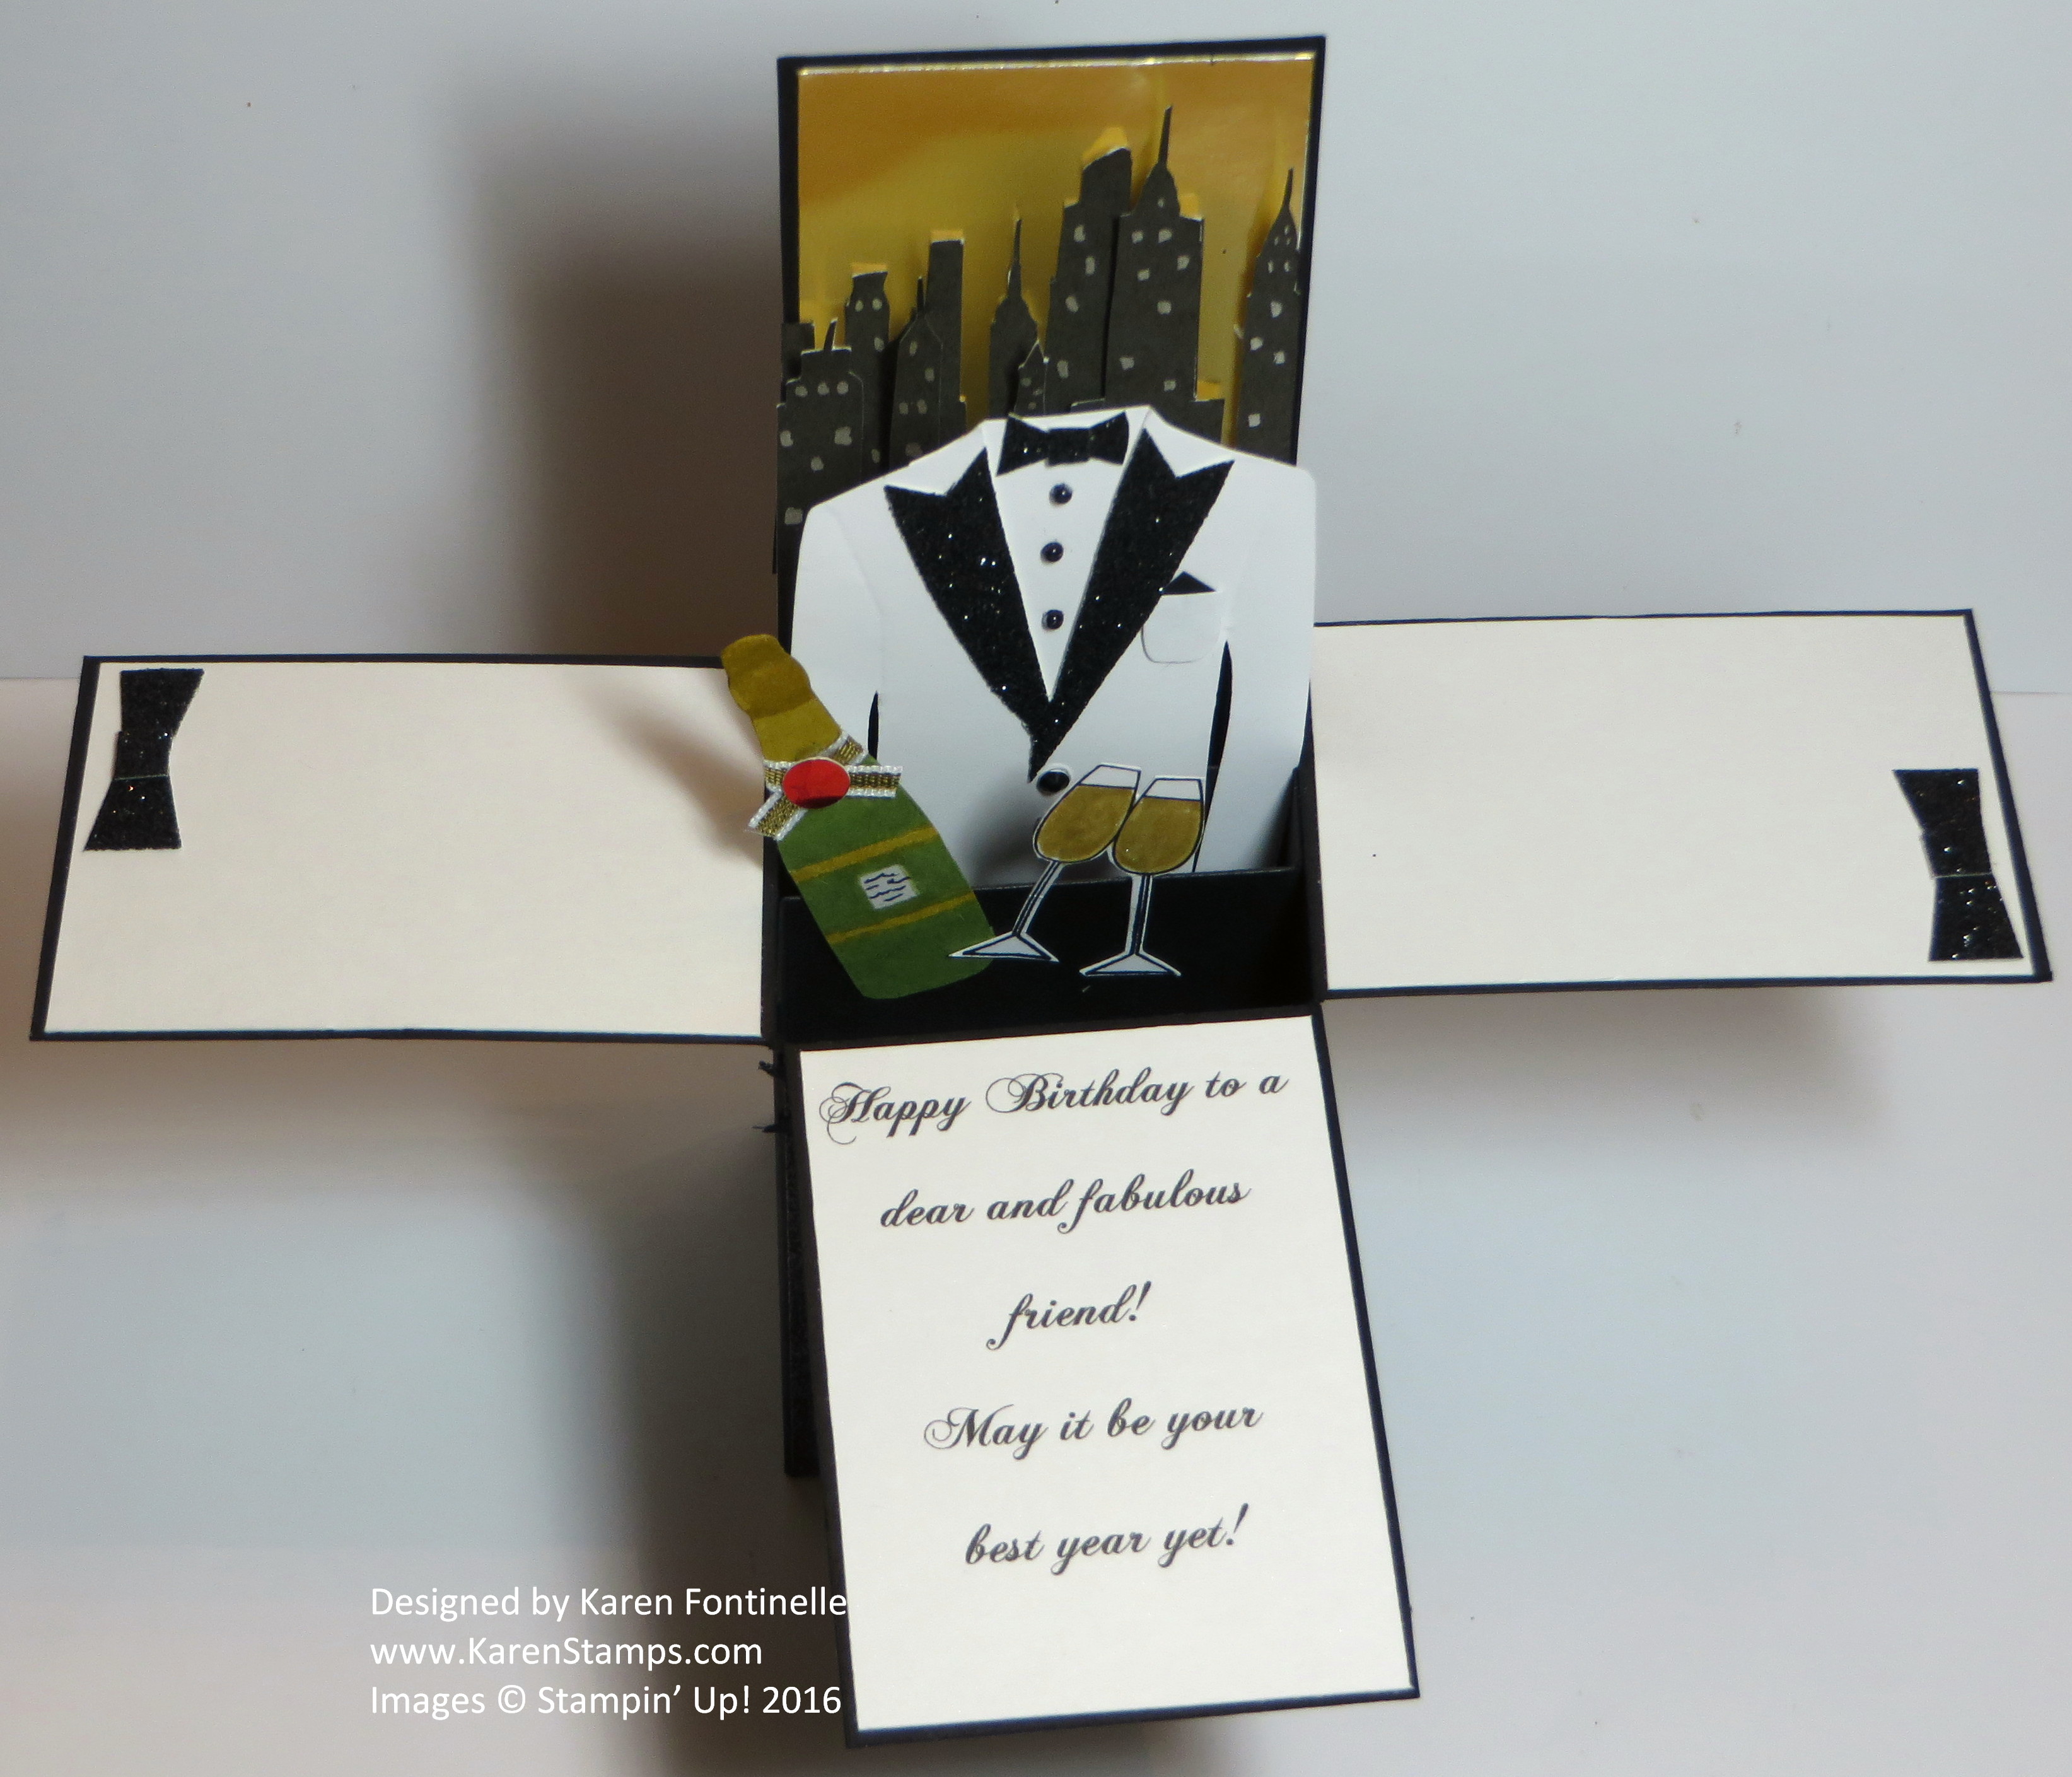
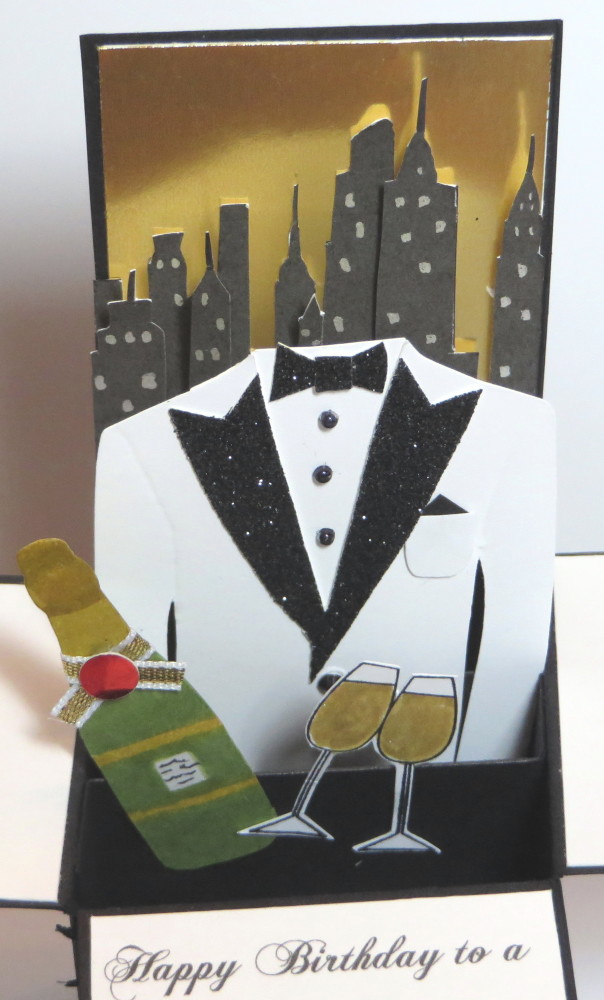
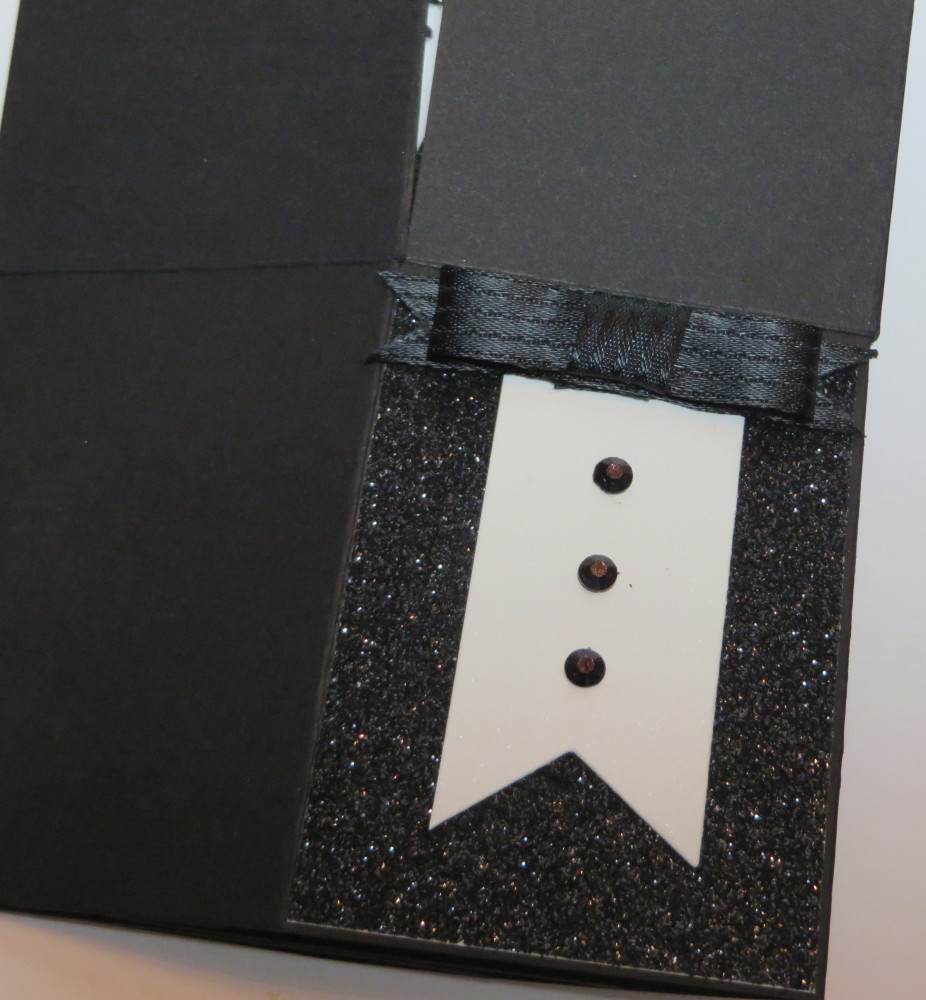
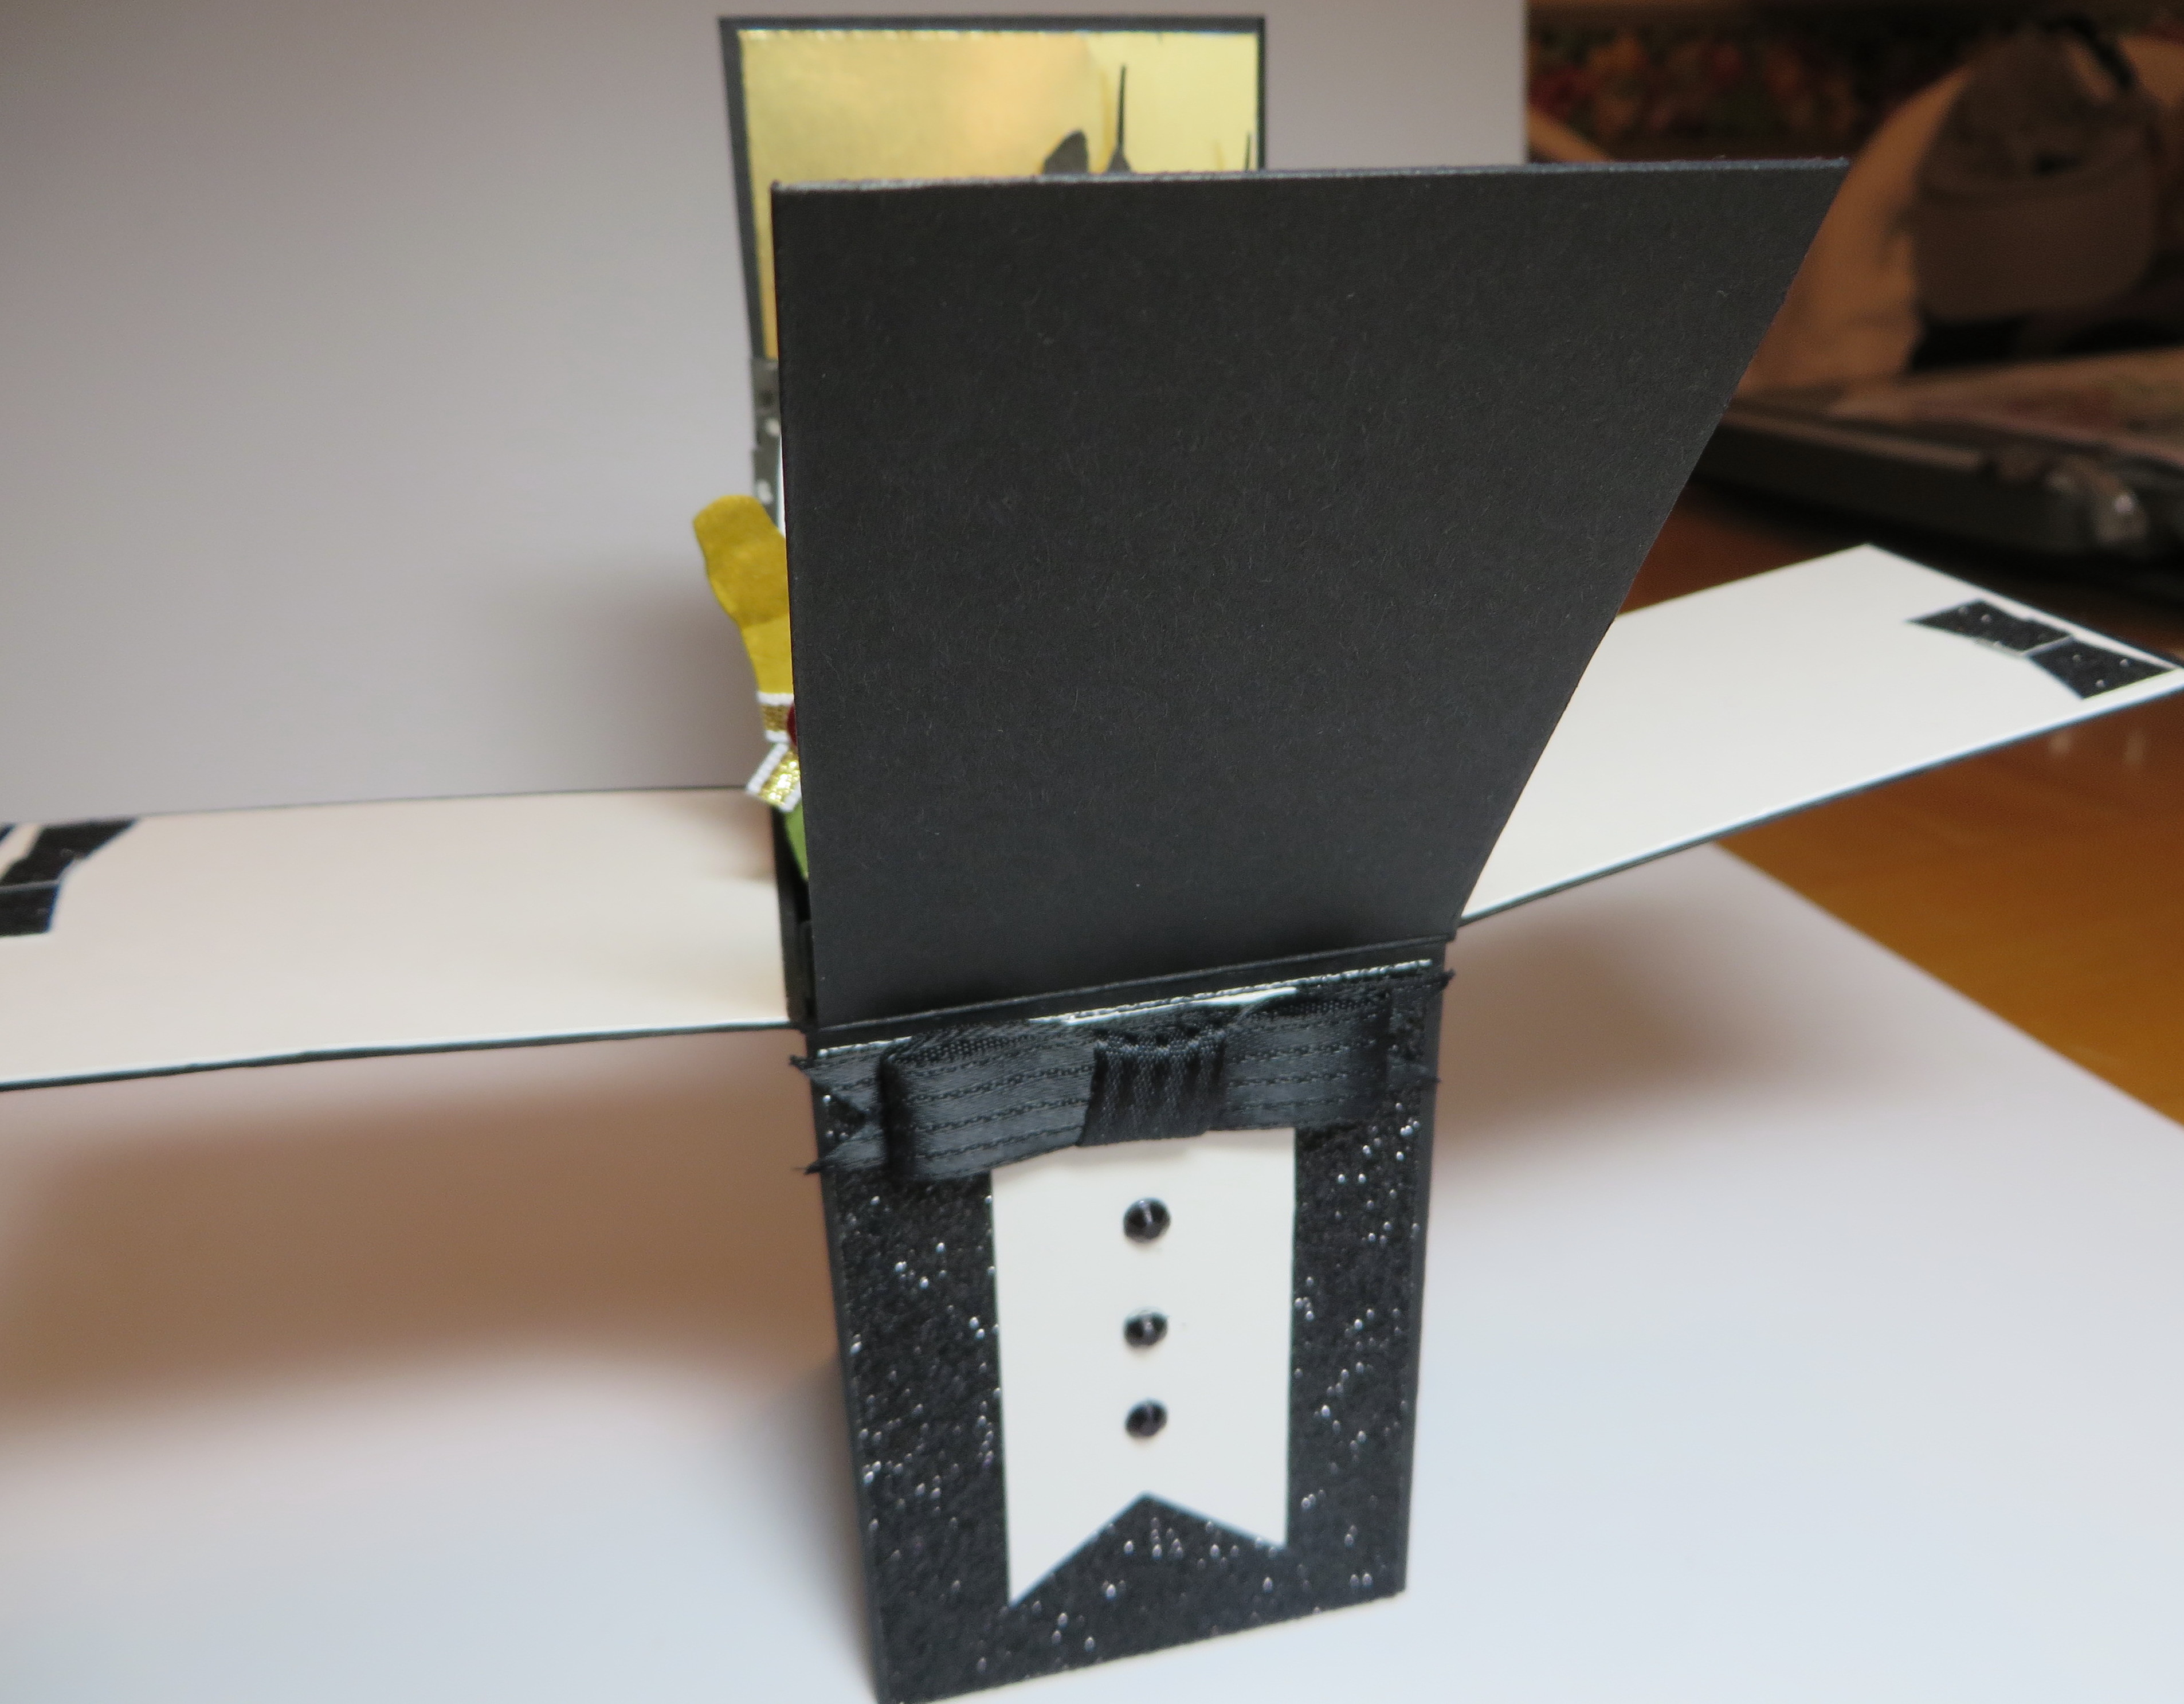
These pop up cards that fold flat and fit in an envelope for mailing are relatively easy to create and can then be customized for any occasion, such as this tuxedo card for a special gentleman’s birthday. This was a custom order for someone who knew exactly what she wanted and really designed the card, I just had to make it come to life.

I found a template for a tuxedo jacket online, probably resized it a little bit with Whisper White Cardstock and Black Glimmer Paper (retired) for the lapels and bowtie. The buttons are tiny Pearl Jewels colored with a black Sharpie marker. Just color them on the sheet before attaching to your project.  The champagne glasses are actually from a Stampin’ Up set Cheers To You (retired). The champagne bottle is clip art that I printed on cardstock and colored in myself with Stampin’ Write Markers.

The background is a piece of Gold Foil with the New York City skyline printed on cardstock and cut out. The greeting is printed out on the computer and the little bowties in the corners are Black Glimmer Paper.

tuxedo closeup

Tuxedo Card Front

Tuxedo Card Front

Just google directions for making a pop up card and you will probably find directions.  They are pretty easy and you can add any stamped images or whatever you like to pop up from the divider(s) inside the box.  Just keep checking as you make it that they all stay within the boundaries of the box so that it will fit in the envelope, unless you are not mailing it!

Shop Stampin’ Up! Online 24/7

Remember, Bonus Days in July gets you coupons to shop with in August!


You’ve Got This 12×12 Scrapbook Page

You've Got This 12x12 Scrapbook Page

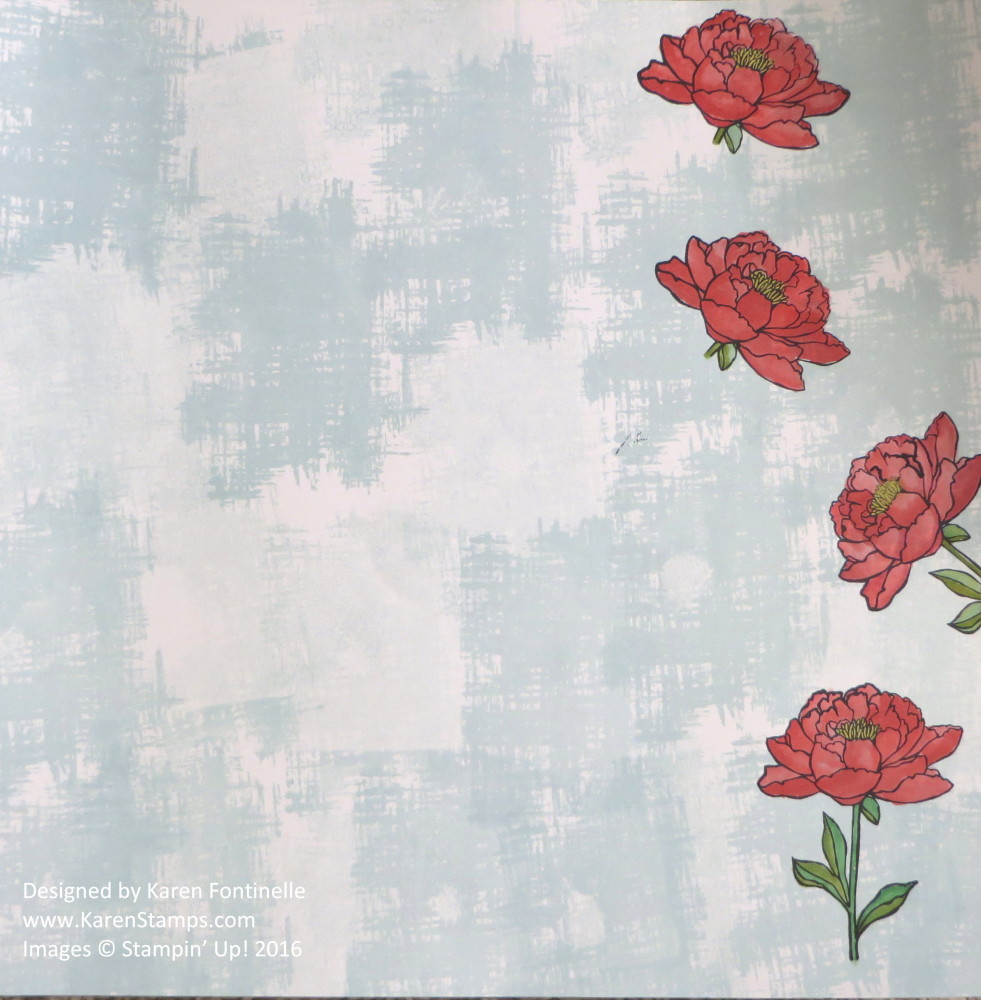
This stamp set, You’ve Got This Stamp Set, can be used to make a beautiful 12″ x 12″ scrapbook page. You don’t even need designer paper, just make your own background. Start with a piece of Whisper White card stock and stamp with the cross-hatch stamp in the set.  You can stamp and then stamp again without reinking to give it that varied shading. Just stamp around randomly.

After the background is finished, stamp the flower in the set with Stazon Ink so that you can color in without smearing the ink. Just use Stampin’ Write Markers if they are not too dark or use ink refills and the Aqua Painter. Lots of options for watercoloring!

Since this will be a scrapbook page, you will be adding photos and their layers so you don’t necessarily need to add all the stems to the flowers, but it just depends on your layout.

When you don’t know what to make, use the Stampin’ Up! Catalog for ideas! I got the idea for this scrapbook page when I loved the Popcorn Box on page 51.  Check it out!

Don’t forget to page through the catalog for inspiration. You can choose any element of any project that you like and apply that to what you are making!

Bonus Days Banner July 2016

July 7th begins Bonus Days!! Spend $50 and get a $5 coupon to spend in August! You must have an email address and keep track of the coupon codes they send you.  Don’t lose them! You can’t have them resent!  Click the banner above to shop!

Stampin’ Up! Bonus Days Promotion! Something New!

Stampin' Up! Bonus Days

Stampin’ Up! has a fun, new promotion this month! It’s called “Bonus Days” and runs beginning from July 7 – July 31. With every $50 you spend on Stampin’ Up! products in July, you will receive a coupon for $5 to spend in August!

You must have an email to receive the special coupon codes. Once you receive it, be sure to save the email and write down the codes so they don’t get lost.  Stampin’ Up! will not resend coupon codes. Redeem the coupon codes in August!

Nice to get a bonus on what you spend, isn’t it??!

Be sure your email is correct in your account so you will receive your coupon code!

Just wait one day and then have fun shopping!!

Shop Stampin’ Up! Online 24/7!