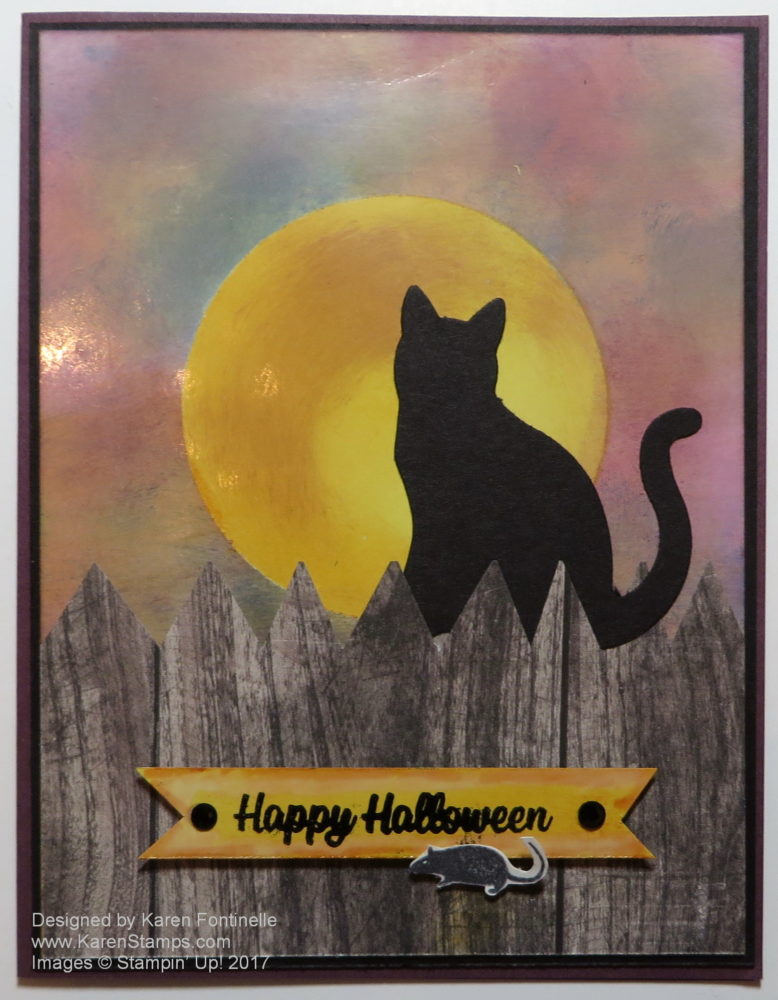
How about making a spooky cat on Halloween night looking up at the moon sitting on a fence? Halloween cards are so much fun! All the varieties of Halloween stamps in the new Stampin’ Up! Holiday Catalog give you so many design options for different scenes and Halloween themes for cards, party invitations, decorations, and more! And this card uses a fun (but a little messy!) technique for the spooky sky!
The card base is Fresh Fig Cardstock, one of the new In Colors this year. I also have a narrow layer of Basic Black, but you could try another color. Then the card front layer is the fun part. It is Glossy White Cardstock, something we used to have and now it has been brought back. I always loved Glossy Cardstock since I first began stamping. I still remember the lollipop cover I made with it!
The moon and background on this card is just made by sponging various colors of ink onto the Glossy White Cardstock. First I die cut a circle from a sticky note so that I could use both the circle and the negative piece that was left to make this card. You could also use a punch. First I stuck down the negative piece on the layer where I wanted the moon to be and sponged on some yellow like Crushed Curry, then some Pumpkin Pie orange, and then a little of the Fresh Fig purple. I love the Stamping Sponges we sell and usually cut them into smaller pieces for sponging. I just sponged inside the cut out circle making sure the paper didn’t move which is the reason to use a sticky note so the adhesive will hold it in place.
Here is another card I made for the Eclipse with the sponging technique.
When I was happy with the moon, I removed the negative piece of sticky note and then adhered the cut out circle over the moon to cover it while I sponged on the sky colors. You can use whatever you like! I used a bunch of colors, probably some Night of Navy, some Daffodil Delight, some Rich Razzleberry, Pumpkin Pie, whatever you like to make a spooky sky!
For the fence, I took a piece of the Wood Textures Designer Series Paper Stack and just cut the triangles at the top to look like the top of a fence. You can draw a line on the back to keep them straight but mostly I just eyeballed it!
The cat is super simple, at least if you have the Cat Punch! This is a new punch in the Holiday Catalog and if you like cats or Halloween it should be on your list right away! You will also be able to use the cat on lots of other projects, like Christmas cards! My punched cat is just stuck behind the pickets of the fence, easy peasy!
The greeting is stamped on a sponged scrap piece of the Glossy White. I managed to smear it a little as I was adhering it to the card, but since “there are no mistakes in stamping” I fixed it! Can you tell?! I looked in the Spooky Cat Stamp Set, where the greeting came from, and found a rat stamp! I stamped the rat in Basic Gray and cut him out with my Paper Snips. Yes, a little tedious since he is so small but I did it and adhered him with a tiny piece of a dimensional so he would cover my smear! I also added a couple of the new Black Rhinestone Jewels in the Holiday Catalog. They are all ready to go, already colored black for you to use at Halloween and beyond!
If you want both the Cat Punch and the Spooky Cat Stamp Set, the be sure to purchase the Spooky Cat Photopolymer Bundle and save 10%!
Yes, it is time to start thinking about Halloween and start making those cards and craft projects! Maybe that will make fall get here sooner!

