Tag Archives: Ladybug Builder Punch

Hello Ladybug Thank You Card

Hello Ladybug Thank You Card

This Hello Ladybug Thank You Card is a little of the old mixed with the new! For some reason, this Hello, Ladybug Stamp Set caught my eye! Sometimes when you think you have no ideas or no inspiration, something will jump out at you. I hadn’t used this set in so long that I forgot that it coordinates with the Ladybug Punch! I was looking for the dies!

The card base is Granny Apple Green to match the Brights 6″ x 6″ Designer Series Paper I chose to use. At this time, that designer paper is unavailable until the week of September 25! Sorry!

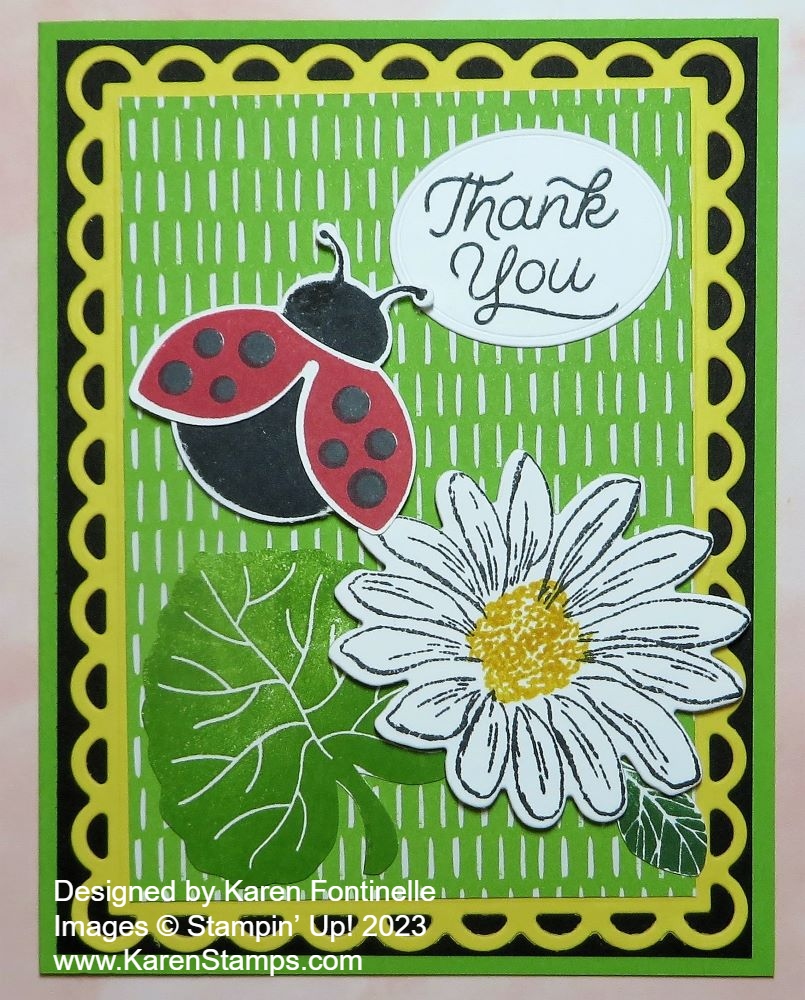
Since there was black on the ladybug, I thought maybe a layer of Basic Black cardstock would look good. The black is cut at the usual layer size of 4″ x 5 1/4″. Then I thought maybe some Daffodil Delight would look good so I used the largest scalloped rectangle in the Scalloped Contours Dies. To fit the designer paper inside, I just measured the inside area and used the Paper Trimmer to cut a rectangle of designer paper.

The ladybug in the Hello, Ladybug Stamp Set is stamped with a black body and Real Red for the wings. You can either stamp the dots or simply color them in with a marker. Then use the Ladybug Builder Punch to punch out those pieces. The big leaf is also in the stamp set. It is stamped in Granny Apple Green ink and I just cut it out by hand with Paper Snips. No dies!

When this set came out last year, we often paired it with the Daisy Punch (retired). So for something new, I used the Cheerful Daisies Bundle. The daisy is stamped and then die cut, plus there are some little green leaves. The daisy and the ladybug are both popped up on Stampin’ Dimensionals, but the large leaf is glued down flat.

I wasn’t sure what greeting I wanted to use. I found this “Thank You” in the Circle Sayings Stamp Set and cut it out with the oval die in the All That Dies.

Sometimes it’s good to look through ALL your current stamp sets and find one you haven’t used in a while before it retires! This Hello Ladybug Bundle is a great one to use for summertime cards and to make this Hello Ladybug Thank You Card.

Today is the LAST DAY to earn a Bonus Coupon with every $50 purchase at Stampin’ Up! (before tax and shipping, of course!). You will get an email with your coupon code and you can spend your $5 coupon (and hopefully more coupons!) in August!

SHOP STAMPIN’ UP! AND DON’T MISS OUT!

Hello Ladybug Floral Card

Hello Ladybug Floral Card

This Hello Ladybug Floral Card was so much fun to make! I hadn’t really used the Hello Ladybug Stamp Set very much, but it was enjoyable to work with and make this card! I think it was fun to work with a punch instead of dies for a change. The Ladybug Builder Punch is surprisingly versatile. You can make more things with the punch than just ladybugs!

The card base is Real Red cardstock with a layer of Basic White. One leaf is stamped right on the card layer and the other leaf is stamped on a separate piece of cardstock and then cut out by hand with Paper Snips. It’s easy to cut out. The edge of the leaf is just wiggly, not fussy! The leaves are stamped in Granny Apple Green. The cutout leaf is popped up on Stampin’ Dimensionals.

The ladybugs are both stamped and punched out. The bodies are stamped in Memento Black ink. The wings are stamped in Real Red ink and then the spots are stamped in Memento Black. If you look at the underside of the punch before you stamp, you can perhaps stamp the images in the right position for the punch! You still may have to trim off a bit of paper for the punch to reach the image properly, but at least you will have the image positioned somewhat close to where it needs to be for the punch.

The ladybug on the top leaf is popped up on Stampin’ Dimensionals. The ladybug on the lower leaf has Stampin’ Seal on just the head portion that is going to overlap the leaf and the rest of the body is popped up with Stampin’ Dimensionals to match the leaf.

The little flowers are one stamp in the Hello Ladybug Stamp Set. I chose to color them individually with different colors of Stampin’ Write Markers and then stamped them directly on the card front. The greeting is also in the stamp set and is stamped in Real Red ink. I didn’t want the greeting to be very big since I already had a lot of things going on with the card!

If you wanted to, you could add some jewels or a few sequins or something to add some sparkle to the card. I decided to leave it as it was. I think the greeting makes it a fun card and certainly ladybugs are probably the only fun bugs out there in the world for most people!

This Bundle is in the January-June 2022 Mini Catalog which just has one month left! While the stamp set and punch are not retiring (they are in the new Stampin’ Up! Annual Catalog!) but if you want to purchase both products, be sure to buy them during June so you can get the Bundle price of 10% off. In the new catalog, they are sold separately.

If you want a fun stamp set and punch, especially for summertime with ladybugs and other things you can make with the punch, now is the time to get it!

SHOP STAMPIN’ UP! ONLINE!

Hello Ladybug Flower Card

I just had to try out my new Hello Ladybug Stamp Set and the coordinating Ladybug Builder Punch. To get started, I used one of the samples in the Spring Mini Catalog (p. 20) for my inspiration. The background is pretty much copied from the sample but I made the rest of the elements of the card a little different. Actually, seeing the leaf on one of the other samples inspired me to use the leaf on my card!

The card base is Flirty Flamingo, a color I seem to be drawn to pretty often lately. The card layer is Basic White cardstock which is stamped with the daisy in the Hello Ladybug Stamp Set. I stamped it once with full-strength Flirty Flamingo ink, then stamped it again which makes for a light shade. The flower center is stamped with Bumblebee ink. The leaf is stamped in Granny Apple Green ink and cut out by hand with my Paper Snips.

You can make two different kinds of ladybugs with this stamp set and punch. One ladybug stamped and punched out is the top view of the ladybug. If you like the side view of the ladybug, just stamp it! If you only want the Ladybug Builder Punch, you can just punch out its body in Basic Black cardstock and the wings in Real Red. Then add your own black spots on the wings with a marker or the new Classic Matte Dots or the Matte Black Dots. I adhered the wings right on the black body but then I popped up the whole ladybug with Stampin’ Dimensionals® on the leaf which is adhered direct to the card front.

The greeting is in the Hello Ladybug Stamp Set and I think is kind of cute! I punched it out with the Banners Pick a Punch. I think I forgot I owned this punch! Then I adhered it to a strip of Flirty Flamingo that was 1″ wide (since the greeting is 3/4″ wide in order to fit in the slot for the punch). I just trimmed the pointy end to match after it was adhered.

I thought the greeting still needed a little something, so I stamped the small flowers in the stamp set, some in Bumblebee Ink stamped off and some in Flirty Flamingo ink stamped off. I just cut the flowers out by hand and adhered them to the greeting. You can pull up the petals a little bit if you want them to look a little 3D. Then I added various gems to the flower centers. I think two were the In Color Jewels and one was one of the Elegant Faceted Gems.

And as the card was finished up, I decided to stamp the three little dots in the stamp set (probably for the flower centers) with Granny Apple Green ink. I really think this one little thing was just the finishing touch this card needed. I think the green color just made the background “pop” a little bit!

Use the Stampin’ Up! catalogs to get your creativity going if you need to, then often you will find that you will come up with something slightly different as you stamp along! I’m happy with my Hello Ladybug Flower Card!